Published by Nick Heppleston on Wednesday, 17th June 2009 in VirtualBox and Virtualisation. 7 Comments
As a virtual machine environment user, I regularly create ‘base’ images of machines that I can reuse – a base Windows Server 2003 environment, or SQL Server 2005 environment for example. That way, when I need a new machine, I can simply create a copy of the virtual disk and add any additional software I need, saving myself valuable time creating new virtual environments.
With VMWare’s various offerings, copying a virtual disk is easy: copy the disk in Windows Explorer and add it to a newly created VM; VMWare will detect that the disk was a copy and create a new unique identifier (UUID) for the disk before adding it to the VM. Easy and painless. Not so with VirtualBox.
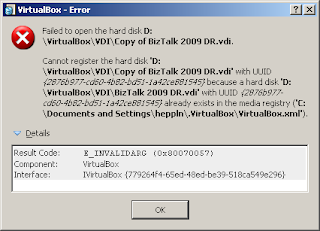
With VirtualBox, copying a virtual disk is a bit of a pain. If you copy the disk in Windows Explorer and try and use it in a new VM, VirtualBox will have a hissy fit and display the error shown below. A bit of a ‘wordy’ way to say that it already knows about this disk, don’t you think?
The publicised way around this is to use the command-line VBoxManage CloneHd tool, however there is another – secret and undocumented – way to clone a disk: the setvdiuuid tool. Lets look at these two methods in detail.
Cloning a Virtual Disk – The ‘Supported’ Method
Cloning a disk is (IMHO) a clunky and Unix-y type way of creating a duplicate disk. We need to invoke the CloneHd command of the VBoxManage tool, supplying the disk to clone and the name of the new ‘cloned’ disk. In its simplest form, you would do something like this at the command-line:
cd C:\Program Files\Sun\VirtualBox
VBoxManage clonehd "DiskToClone.vdi" "ClonedDisk.vdi"
The cloned disk can now be used on a new VM without incurring the ‘I already know about this disk’ error.
Copying a Disk – The ‘Unsupported’ Method
The unsupported method is to copy the disk like you copy a normal file and then set a diferent uuid
using setvdiuuid.
Setvdiuuid is an undocumented option available in VBoxManage – the setvdiuuid command. As the command help states: ‘This is a development tool and shall only be used to analyse problems. It is completely unsupported and will change in incompatible ways without warning’. Because of this, let me add a little disclaimer: I don’t accept any responsibility if you completely destroy your VM using this procedure. Having said that, it appears to work without issue, so I’m more than happy to use it myself – just make sure that you take a backup of you virtual disk before using it if necessary.
To use the tool, simply create a copy of the virtual disk’s VDI file in Windows Explorer; open the Windows command-line and issue the setvdiuuid command for the newly copied disk:
To use the tool, simply create a copy of the virtual disk’s VDI file in Windows Explorer; open the Windows command-line and issue the setvdiuuid command for the newly copied disk:
cd C:\Program Files\Sun\VirtualBox
VBoxManage internalcommands setvdiuuid "CopiedDisk.vdi"
The tool will create a new UUID and assign it to the disk:
The new copied disk can now be used on a new VM without incurring the ‘I already know about this disk’ error.
This was shown for windows but also works on linux, you just need to change cd C:\Program Files\Sun\VirtualBox to the correct location on linux.