Here I'm going to show you howto activate XDMCP (remote desktop protocol), on Gnome (bash an gui) and KDE. I have tested it only on Gnome so far. Note that this remote desktop protocol does not forwand sound.
Here some notes on the roles of the XDMCP server and client
Server - The remote machine were we want to login.
Client - The local machine were we will login on the Server
Before trying anything on XDMCP, you should make
sure that on the server your firewall is either disabled
or allows Udp port 177.
Here I'm going to show how to open a UDP 177 (rule),
on Iptables (firewall) using the bash, but you use a
very simple and usefull, Gui for Iptables nown as
"
Firestarter" (to install on ubuntu just do
sudo apt-get install iptables).
$ sudo iptables -A INBOUND -p udp --destination-port 177 -j ACCEPT
Here are a couple off other usefull comands on Iptables
## Checking Iptables Rules #####$ sudo iptables -nvL
if you have already executed the rule to open UDP port 177,
by executing this comand, you should see it there.
## Clearing All the Rules #####$ sudo iptables -F
be aware that this comand clears all off the rules, and this
does not mean that all is allowed, on the contrary,
IPtables default beaviour, when it has no rules is to
deny all, so be very carefull.
XDMCP GNOME - via Bash=====================================
XDMCP Server Configuration----------------------------------
## Allowing the remote login on the Server #####
$ sudo gedit /etc/gdm/gdm.conf-custom
...
[xdmcp]
Enable=true
...
You should have the above on the file.
If you want the remote login screen to be the same as
the graphical greeter that is the default in the Ubuntu
install make sure that the following is present.
...
[daemon]
RemoteGreeter=/usr/lib/gdm/gdmgreeter
...
For these changes to take efect you can either,
reboot:
$ sudo reboot
or restart the service, for that go to text terminal (Ctlr+Alt+F2)
and type:
$ sudo /etc/init.d/gdm restart
to go back to you Gnome environment try Ctlr+Alt+F7, or some
Ctlr+Alt+Fx, close to F7.
XDMCP Client Login------------------------
$ sudo X :1 -query server_ip
After this if all went well you should see
Ubuntu's graphical login screen, as if you
were on the remote computer fisicaly.
If don't want to see it fullscreen, you can
show the remote desktop on a window by
using the following command instead:
$ sudo Xnest :1 -query server_ip
XDMCP GNOME - via Gui=====================================
This is equivelent to the shown above, the diference
is that, the server here is configured via Gui.
XDMCP Server Configuration-----------------------------------
Allowing the remote login on the Server
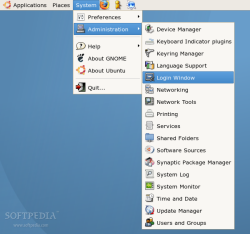
As shown above System > Administration > Login Window
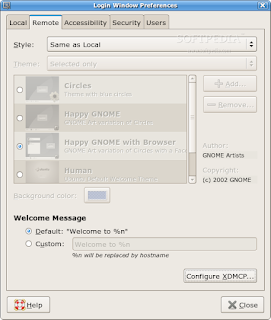
And then change the Style to "Same as Local", and that's it.
Aditional confuguration can be done on "Configure XDMCP"
For these changes to take efect you can either,
reboot:
$ sudo reboot
or restart the service, for that go to text terminal (Ctlr+Alt+F2)
and type
$ sudo /etc/init.d/gdm restart
to go back to you Gnome environment try Ctlr+Alt+F7, or some
Ctlr+Alt+Fx, close to F7.
XDMCP Client Login------------------------
$ sudo X :1 -query server_ip
After this if all went well you should see
Ubuntu's graphical login screen, as if you
were on the remote computer fisicaly.
If don't want to see it fullscreen, you can
show the remote desktop on a window
by using the following command instead:
$ sudo Xnest :1 -query server_ip
XDMCP KDE - via Bash(didn't test it, give me feedback if you do)
=====================================
XDMCP Server Configuration----------------------------------
Still working on it...
XDMCP Client Login------------------------
$ sudo X :1 -query server_ip
After this if all went well you should see
Ubuntu's graphical login screen, as if you
were on the remote computer fisicaly.
If don't want to see it fullscreen, you can
show the remote desktop on a window
by using the following command instead:
$ sudo Xnest :1 -query server_ip
Based On:GNOME
http://megaf.wordpress.com/2009/04/15/xdmcp-internet-seu-linux-onde-voce-estiver/http://stochasticflux.com/blog/?p=4KDE
http://www.guiadohardware.net/tutoriais/configurando-servidor-xdmcp/pagina3.htmlhttp://megaf.wordpress.com/2009/04/15/xdmcp-internet-seu-linux-onde-voce-estiver/Iptables
http://www.cyberciti.biz/tips/linux-iptables-open-bittorrent-tcp-ports-6881-to-6889.html


