If a tree falls in the woods and no one is there to hear it, does it make a sound? This the classic query designed to place your mind into the Zen-like state known as the silent mind. Whether or not you want to hear a tree fall, if you run a network, you probably want to hear a server when it goes down. Many organizations utilize the long-established Simple Network Management Protocol (SNMP) as a way to monitor their networks proactively and listen for things going down.
At a rudimentary level, SNMP requires only two items to work: a management server and a managed device (or devices). The management server pulls status and health information at regular intervals from the managed devices and stores the information in a table. Managed devices use local SNMP agents to notify the management server when defined behavior occurs (such as errors or “traps”), which are stored in the same table on the server. The result is an accurate, real-time reporting mechanism for outages. However, SNMP as a protocol does not stipulate how the data in these tables is to be presented and managed for the end user. That's where a promising new open-source network-monitoring software called Zenoss (pronounced Zeen-ohss) comes in.
Available for most Linux distributions, Zenoss builds on the basic operation of SNMP and uses a comprehensive interface to manage even the largest and most diverse environment. The Core version of Zenoss used in this article is freely available under the GPLv2. An Enterprise version also is available with additional features and support. In this article, we install Zenoss on a CentOS 5.1 system to observe its usefulness in a network-monitoring role. From there, we create a simulated multisystem server network using the following systems: a Fedora-based Postfix e-mail server, an Ubuntu server running Apache and a Windows server running File and Print services. To conserve space, only the CentOS installation is discussed in detail here. For the managed systems, only SNMP installation and configuration are covered.
Building the Zenoss Server Begin by selecting your hardware. Zenoss lacks specific hardware requirements, but it relies heavily MySQL, so you can use MySQL requirements as a rough guideline. I recommend using the fastest processor available, 1GB of memory, fast enough hard disks to provide acceptable MySQL performance and Gigabit Ethernet for the network. I ran several test configurations, and this configuration seemed adequate enough for a medium-size network (100+ nodes/devices). To keep configuration simple, all firewalls and SELinux instances were disabled in the test environment. If you use firewalls in your environment, open ports 161 (SNMP), 8080 (Zenoss Management Page) and 514 (if you integrate syslog with Zenoss).
Install CentOS 5.1 on the server using your own preferences. I used a bare install with no X Window System or desktop manager. Assign a static IP address and any other pertinent network information (DNS servers and so forth). After the OS install is complete, install the following packages using the yum command below:
yum install mysql mysql-server net-snmp net-snmp-utils gmp httpd
If the mysqld or the httpd service has not started after yum installs it, start it and set it to run for your configured runlevel. Next, download the latest Zenoss Core .rpm from Sourceforge.net (2.1.3 at the time of this writing), and install it using rpm from the command line. To start all the Zenoss-related dæmons after the .rpm has been installed, type the following at a command prompt:
service zenoss start
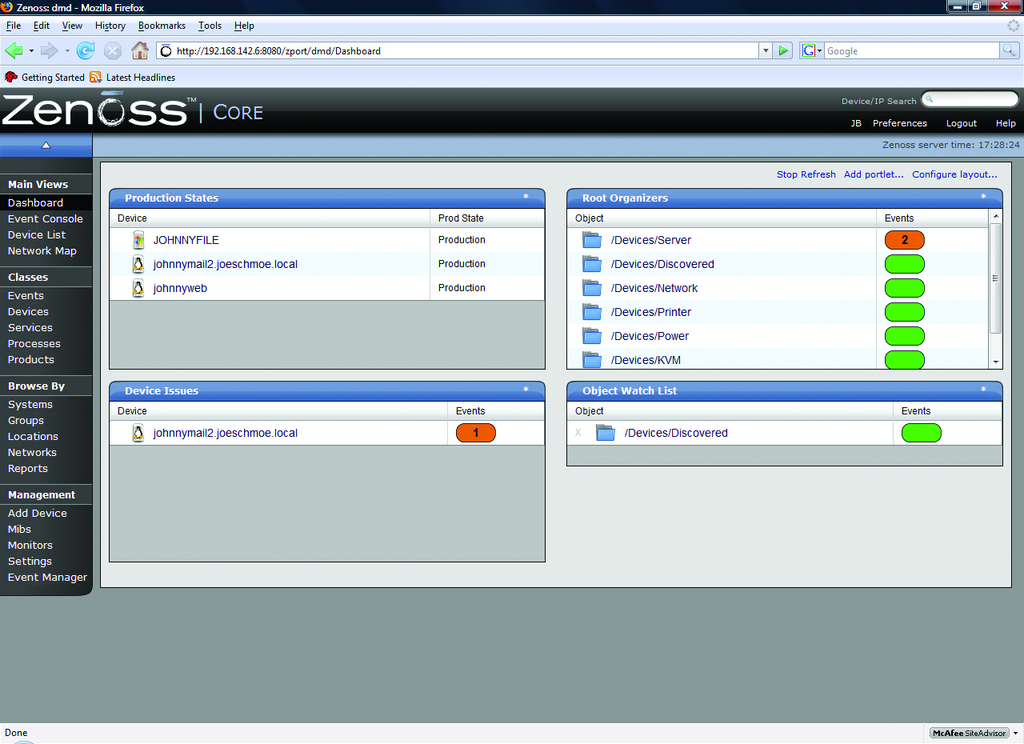
Launch a Web browser from any machine, and type the IP address of the Zenoss server using port 8080 (for example, http://192.168.142.6:8080). Log in to the site using the default account admin with a password of zenoss. This brings up the main dashboard. The dashboard is a compartmentalized view of the state of your managed devices. If you don't like the default display, you can arrange your dashboard any way you want using the various drop-down lists on the portlets (windows). I recommend setting the Production States portlet to display Production, so we can see our test systems after they are added.
Almost everything related to managed devices in Zenoss revolves around classes. With classes, you can create an infinite number of systems, processes or service classifications to monitor. To begin adding devices, we need to set our SNMP community strings at the top-level /Devices class. SNMP community strings are like passphrases used to authenticate traffic between devices. If one device wants to communicate with another, they must have matching community names/strings. In many deployments, administrators use the default community name of public (and/or private), which creates a security risk. I recommend changing these strings and making them into a short phrase. You can add numbers and characters to make the community name more complex to guess/crack, but I find phrases easier to remember.
Click on the Devices link on the navigation menu on the left, so that /Devices is listed near the top of the page. Click on the zProperties tab and scroll down. Enter an SNMP community string in the zSNMPCommunitiy field. For our test environment, I used the string whatsourclearanceclarence. You can use different strings with different subclasses of systems or individual systems, but by setting it at the /Devices class, it will be used for any subclasses unless it is overridden. You also could list multiple strings in the zSNMPCommunities under the /Devices class, which allows you to define multiple strings for the discovery process discussed later. Make sure your community string (zSNMPCommunity) is in this list.
Installing Net-SNMP on Linux Clients Now, let's set up our Linux systems so they can talk to the Zenoss server. After installing and configuring the operating systems on our other Linux servers, install the Net-SNMP package on each using the following command on the Ubuntu server:
sudo apt-get install snmpd
And, on the Fedora server use:
yum install net-snmp
Once the Net-SNMP packages are installed, edit out any other lines in the Access Control sections at the beginning of the /etc/snmp/snmpd.conf, and add the following lines:
##      sec.name  source      community
com2sec local     localhost   whatsourclearanceclarence
com2sec mynetwork 192.168.142.0/24   whatsourclearanceclarence

##  group.name  sec.model  sec.name
group MyROGroup v1         local
group MyROGroup v1         mynetwork
group MyROGroup v2c        local
group MyROGroup v2c        mynetwork

##         incl/excl subtree  mask
view all   included  .1        80

##             context sec.model sec.level prefix  read   write  notif
access MyROGroup ""      any       noauth  exact    all    none   none
Do not edit out any lines beneath the last Access Control Sections. Please note that the above is only a mildly restrictive configuration. Consult the snmpd.conf file or the Net-SNMP documentation if you want to tighten access. On the Ubuntu server, you also may have to change the following line in the /etc/default/snmp file to allow SNMP to bind to anything other than the local loopback address:
SNMPDOPTS='-Lsd -Lf /dev/null -u snmp -I -smux -p /var/run/snmpd.pid'
Installing SNMP on Windows On the Windows server, access the Add/Remove Programs utility from the Control Panel. Click on the Add/Remove Windows Components button on the left. Scroll down the list of Components, check off Management and Monitoring Tools, and click on the Details button. Check Simple Network Management Protocol in the list, and click OK to install. Close the Add/Remove window, and go into the Services console from Administrative Tools in the Control Panel. Find the SNMP service in the list, right-click on it, and click on Properties to bring up the service properties tabs. Click on the Traps tab, and type in the community name. In the list of Trap Destinations, add the IP address of the Zenoss server. Now, click on the Security tab, and check off the Send authentication trap box, enter the community name, and give it READ-ONLY rights. Click OK, and restart the service.
Return to the Zenoss management Web page. Click the Devices link to go into the subclass of /Devices/Servers/Windows, and on the zProperties tab, enter the name of a domain admin account and password in the zWinUser and zWinPassword fields. This account gives Zenoss access to the Windows Management Instrumentation (WMI) on your Windows systems. Make sure to click Save at the bottom of the page before navigating away.
Adding Devices into Zenoss Now that our systems have SNMP, we can add them into Zenoss. Devices can be added individually or by scanning the network. Let's do both. To add our Ubuntu server into Zenoss, click on the Add Device link under the Management navigation section. Enter the IP address of the server and the community name. Under Device Class Path, set the selection to /Server/Linux. You could add a variety of other hardware, software and Zenoss information on this page before adding a system, but at a minimum, an IP address name and community name is required (Figure 1). Click the Add Device button, and the discovery process runs. When the results are displayed, click on the link to the new device to access it.
To scan the network for devices, click the Networks link under Browse By section of the navigation menu. If your network is not in the list, add it using CIDR notation. Once added, check the box next to your network and use the drop-down arrow to click on the Select Discover Devices option. You will see a similar results page as the one from before. When complete, click on the links at the bottom of the results page to access the new devices. Any device found will be placed in the /Discovered class. Because we should have discovered the Fedora server and the Windows server, they should be moved to the /Devices/Servers/Linux and /Devices/Servers/Windows classes, respectively. This can be done from each server's Status tab by using the main drop-down list and selecting Manage→Change Class.
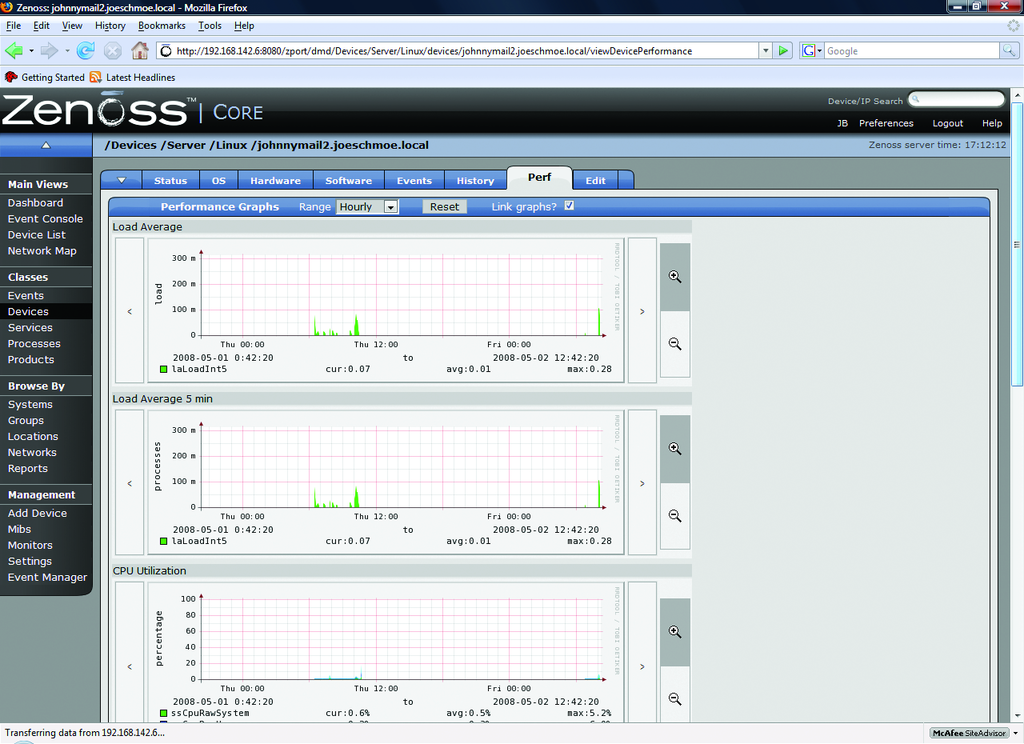
If all has gone well, so far we have a functional SNMP monitoring system that is able to monitor heartbeat/availability (Figure 2) and performance information (Figure 3) on our systems. You can customize other various Status and Performance Monitors to meet your needs, but here we will use the default localhost monitors.
Creating Users and Setting E-Mail Alerts
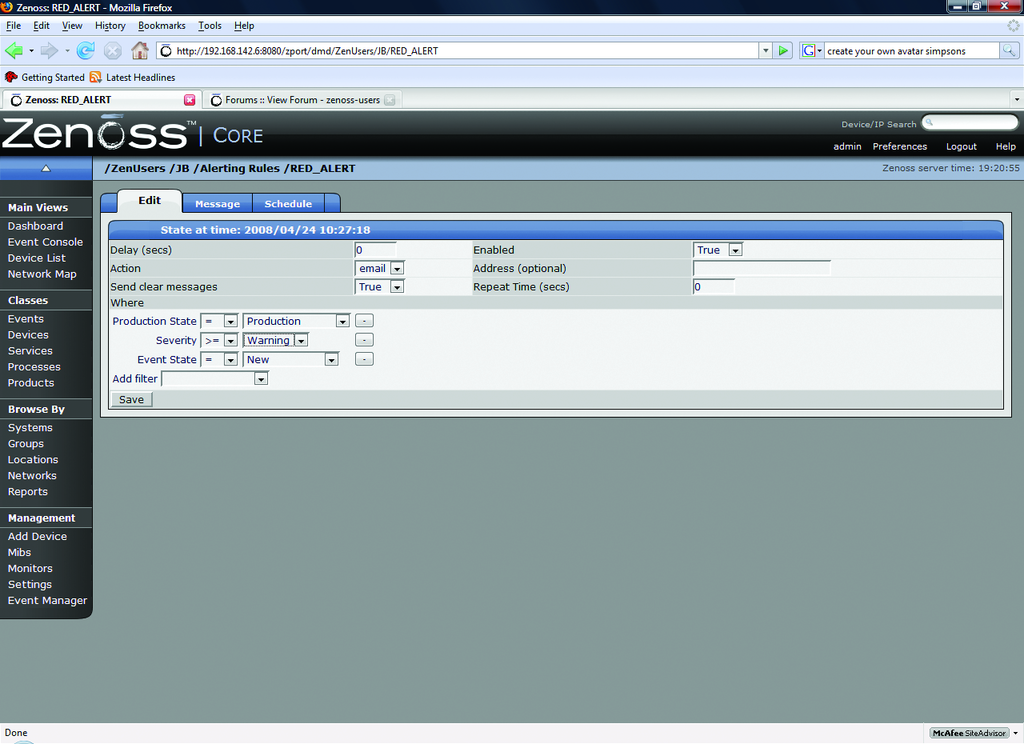
At this point, we can use the dashboard to monitor the managed devices, but we will be notified only if we visit the site. It would be much more helpful if we could receive alerts via e-mail. To set up e-mail alerting, we need to create a separate user account, as alerts do not work under the admin account. Click on the Setting link under the Management navigation section. Using the drop-down arrow on the menu, select Add User. Enter a user name and e-mail address when prompted. Click on the new user in the list to edit its properties. Enter a password for the new account, and assign a role of Manager. Click Save at the bottom of the page. Log out of Zenoss, and log back in with the new account. Bring the settings page back up, and enter your SMTP server information. After setting up SMTP, we need to create an Alerting Rule for our new user. Click on the Users tab, and click on the account just created in the list. From the resulting page, click on the Edit tab and enter the e-mail address to which you want alerts sent. Now, go to the Alerting Rules tab and create a new rule using the drop-down arrow. On the edit tab of the new Alerting Rule, change the Action to email, Enabled to True, and change the Severity formula to >= Warning (Figure 4). Click Save.
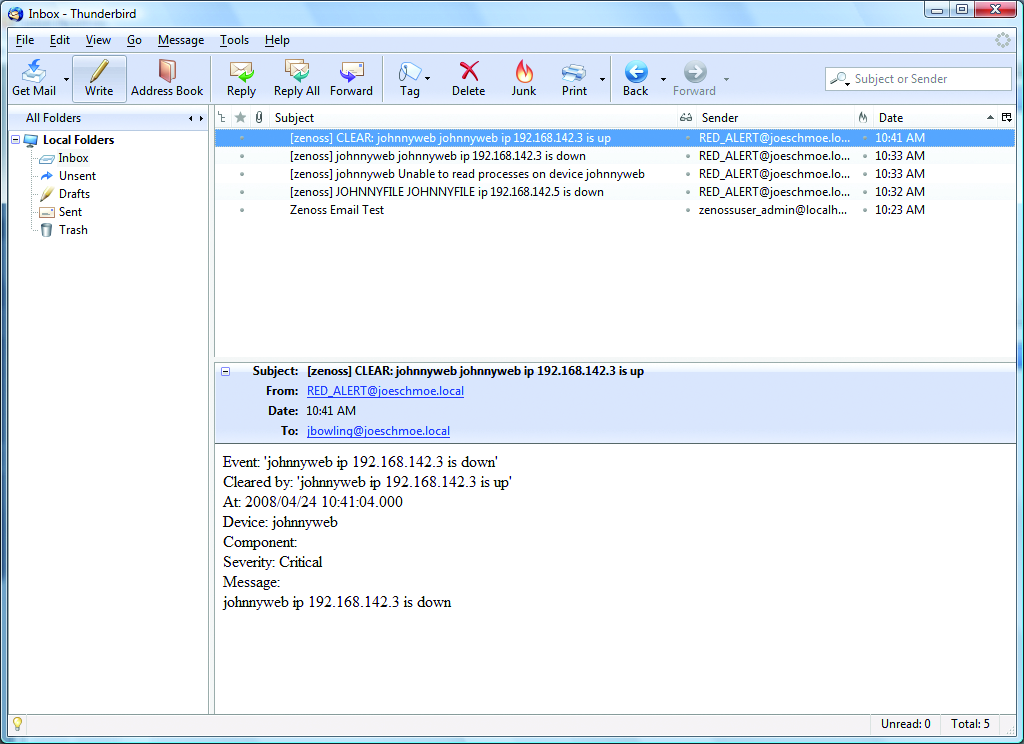
The above rule sends alerts when any Production server experiences an event rated Warning or higher (Figure 5). Using a filter, you can create any number of rules and have them apply only to specific devices or groups of devices. If you want to limit your alerts by time to working hours, for example, use the Schedule tab on the Alerting Rule to define a window. If no schedule is specified (the default), the rule runs all the time. In our rule, only one user will be notified. You also can create groups of users from the Settings page, so that multiple people are alerted, or you could use a group e-mail address in your user properties.
We can expand our view of the test systems by adding a process and a service for Zenoss to monitor. When we refer to a process in Zenoss, we mean an active program, usually a dæmon, running on a managed device. Zenoss uses regular expressions to monitor processes.
To monitor Postfix on the mail server, first, let's define it as a process. Navigate to the Processes page under the Classes section of the navigation menu. Use the drop-down arrow next to OS Processes, and click Add Process. Enter Postfix as the process ID. When you return to the previous page, click on the link to the new process. On the edit tab of the process, enter master in the Regex field. Click Save before navigating away. Go to the zProperties tab of the process, and make sure the zMonitor field is set to True. Click Save again. Navigate back to the mail server from the dashboard, and on the OS tab, use the topmost menu's drop-down arrow to select Add→Add OSProcess. After the process has been added, we will be alerted if the Postfix process degrades or fails. While still on the OS tab of the server, place a check mark next to the new Postifx process, and from the OS Processes drop-down menu, select Lock OSProcess. On the next set of options, select Lock from deletion. This protects the process from being overwritten if Zenoss remodels the server.
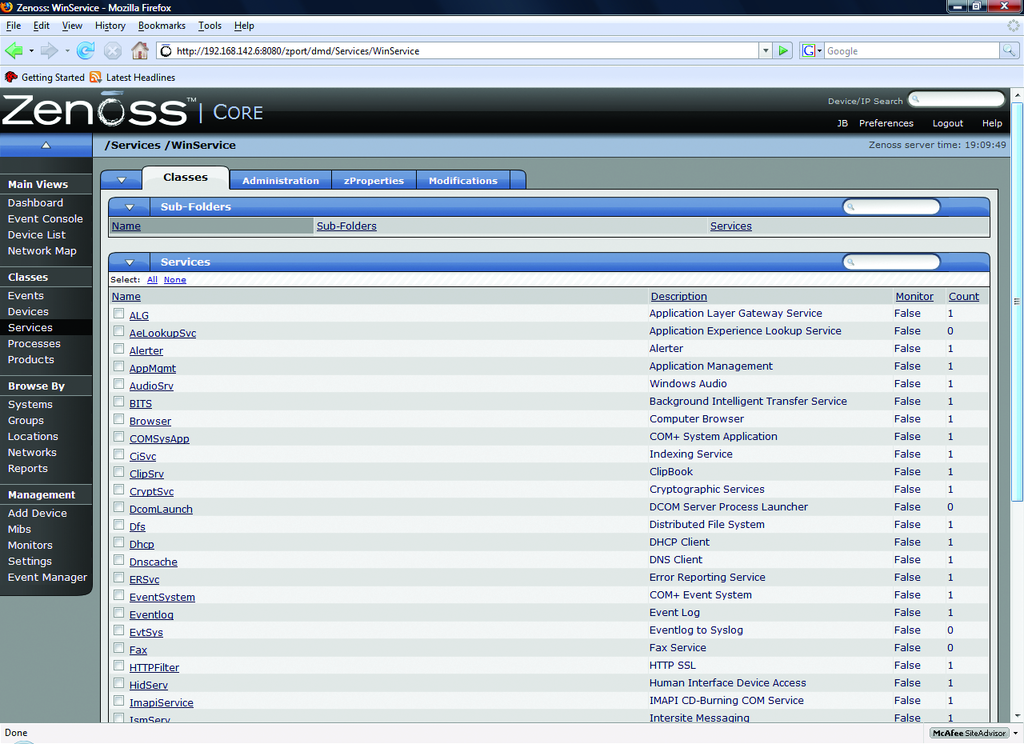
Services in Zenoss are defined by active network ports instead of running dæmons. There are a plethora of services built in to the software, and you can define your own if you want to. The built-in services are broken down into two categories: IPServices and WinServices. IPservices use any port from 1-65535 and include common network apps/protocols, such as SMTP (Port 25), DNS (53) and HTTP (80). WinServices are intended for specific use with Windows servers (Figure 6).
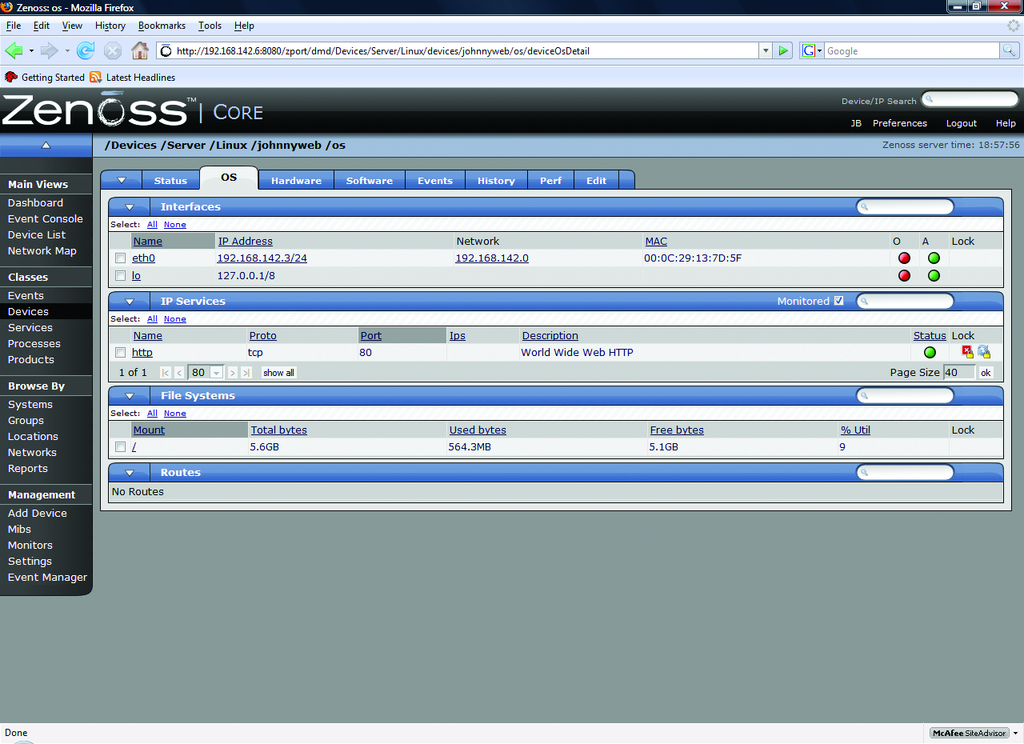
Adding a service is much simpler than adding a process, because there are so many predefined in Zenoss. To monitor the HTTP service on our Web server, navigate to the server from the dashboard. Use the main menu's drop-down arrow on the server's OS tab arrow, and select Add→Add IPService. Type HTTP in the Service Class Field. Notice that the field begins to prefill with matches as you type the letters. Select TCP as the protocol, and click OK. Click Save on the resulting page. As with the OSProcess procedure, return to the OS tab of the server and lock the new IPService. Zenoss is now monitoring HTTP availability on the server (Figure 7).
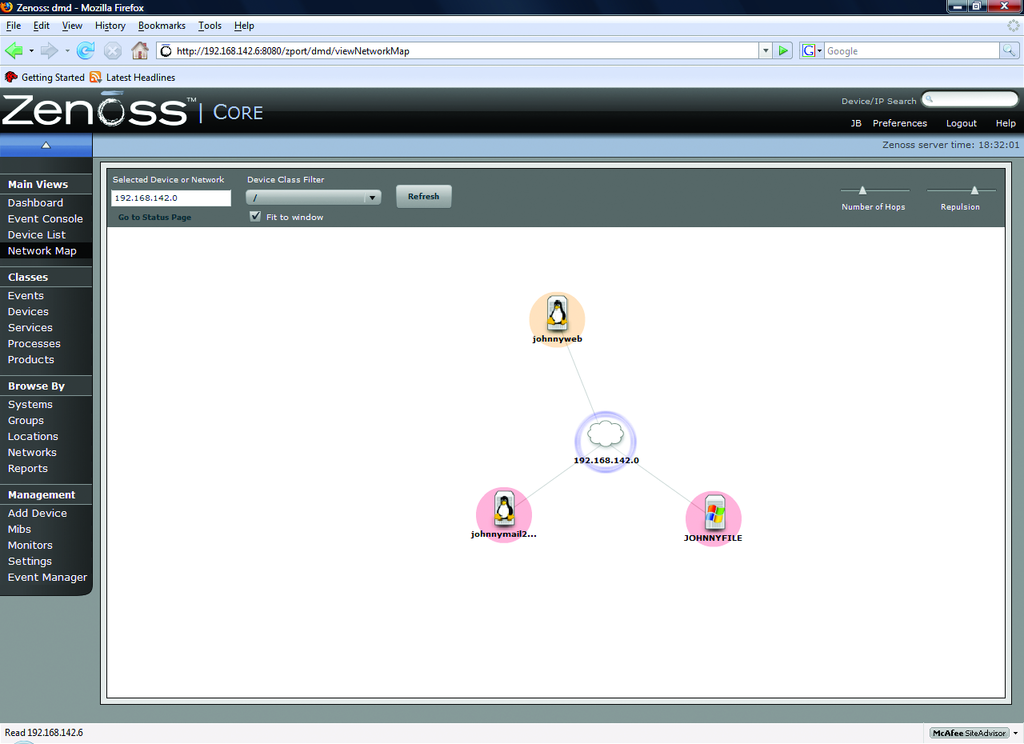
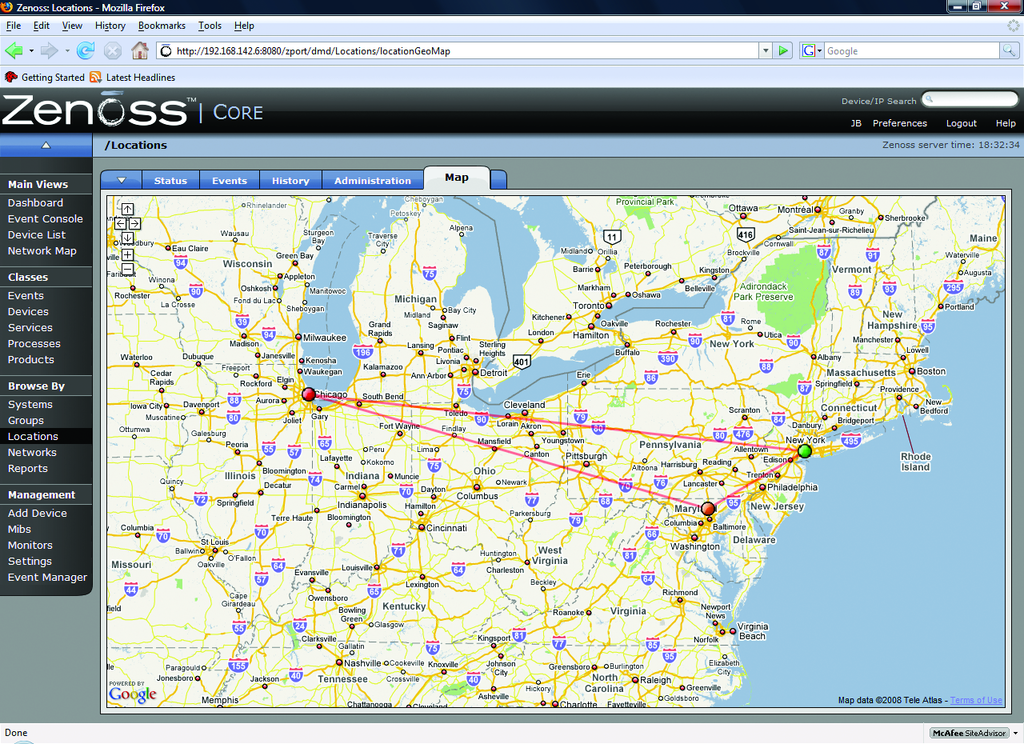
There are a multitude of other features in Zenoss that space here prevents covering, including Network Maps (Figure 8), a Google Maps API for multilocation monitoring (Figure 9) and Zenpacks that provide additional monitoring and performance-capturing capabilities for common applications.
In the span of this article, we have deployed an enterprise-grade monitoring solution with relative ease. Although it's surprisingly easy to deploy, Zenoss also possesses a deep feature set. It easily rivals, if not surpasses, commercial competitors in the same product space. It is easy to manage, highly customizable and supported by a vibrant community.
Although you may not achieve the silent mind as long as you work with networks, with Zenoss, at least you will be able to sleep at night knowing you will hear things when they go down. Hopefully, they won't be trees.