Today I’m going to show you how to install and configure OpenMediaVault which is a very cool platform that allow you to make a NAS out of a Raspberry Pi or a PC and add a lot of services on top of that, these are either already builtin ou added via the many plugins that you can install with just a click.
Index
- Install - PC / VM
- Install - Raspberry Pi
- Log In
- System Basic SetUp
- Storage SetUp
- Users SetUp
- Service SetUp – SMB/CIFS
- Service SetUp – Other Services (Compact)
NOTE
On the Web Interface every change needs to be:
SAVED and APPLIED
or else the changes don't take efect
Install – PC / VM
Installing OMV
Go to:
https://sourceforge.net/projects/openmediavault/files/3.0beta/
and get the iso, in my case i got this:
openmediavault_3.0.36-amd64.iso
for a real PC you must burn it to a CD and put it in the CD Drive and for a VM you just select
the ISO image.
Now start you PC/VM and boot the CD/ISO, then series of BLUE SCREENS will show and you should configure it to your specific location, bellow you have the default values OMV gives you.
Use Tab and Arrow Keys to move arround in
each screen
## BLUE SCREENS ##
- Select Language | English
- Select your location | United States
- Keymap to use | American English
- Configure the Network | Hostname: openmediavault
- Configure the Network | Domain name: local
- Set up users and passwords | Root password:********
- Set up users and passwords | Re-enter password to verify:********
- Configure the clock | Select your time zone: Eastern
Wait...
- Configure the package manager | Debian archive mirror country: United States
- Configure the package manager | Debian archive mirror: ftp.us.debian.org
- Configure the package manager | HTTP proxy information: <blank>
Wait...
- Install the GRUB boot loader on a hard disk | Device for boot loader installation: /dev/sda
Wait...
- Configuring resolvconf | Installation complete: <Continue>
Now it boot up and starts OpenMediaVault showing you the CLI
Installing OMV Extras
The OMV Extras plugins adds multiple plugins repositories that make installing additional plugins very easy.
Download the plugin OMV Extras plugin here:
http://omv-extras.org/joomla/index.php/guides
download the .deb for you version:
For OMV 2.x (stoneburner) - openmediavault-omvextrasorg_latest_all.deb
For OMV 3.x (erasmus) (STILL BETA) - openmediavault-omvextrasorg_latest_all3.deb
First find the IP your OpenMediaVault obtained via DHCP on the CLI
openmediavault login: root
Password: ********
ifconfig
eth0
...
inet addr: 192.168.1.99 !--> OMV_IP
...
Now do the following steps:
- On a Browser: http://<OMV_IP>
- Go to the plugin tab in OMV's web interface
- Upload the file.
- Select the newly uploaded plugin openmediavault-omvextrasorg
- Click on Install. Refresh page.
- Go to the plugin tab and click Check.
from here on the PC version is indistinguishable from the Raspberry Pi version.
If you had any trouble check the following video, it has the procedure above and more:
Install - Raspberry Pi
Go to:
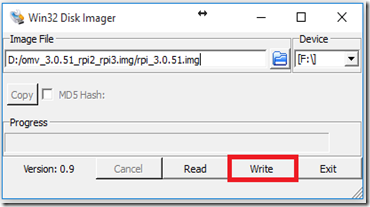
and download an image, then you install it with Win32 Disk Imager on your Raspberry Pi SD Card, like every other raspberry Pi Image.
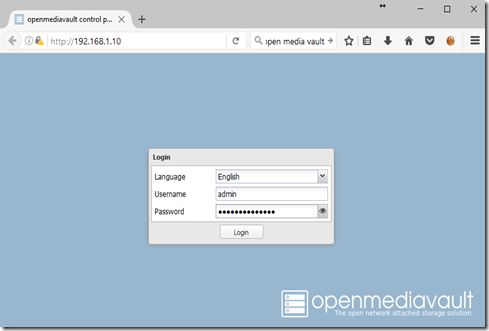
Log In
The IP was assigned via DHCP, I found the IP on my internet router on the DHCP section (the name associated with the IP was “raspberry” / “OMV3”)
WEB INTERFACE:
- username = admin
- password = openmediavaultCONSOLE/SSH:
- username = root
- password = openmediavault
System Basic Setup
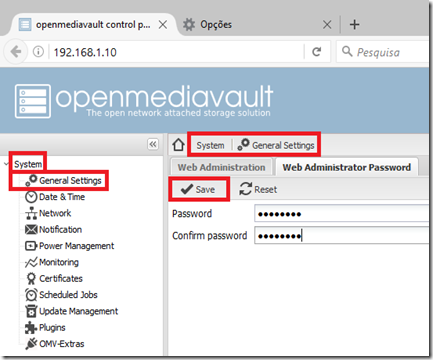
First lets change the Web Interface password:
This does not change the SSH password, if want to change it you need to access it via SSH with a client like Putty
root@raspberrypi:~# passwd root
Enter new UNIX password:
Retype new UNIX password:
passwd: password updated successfully
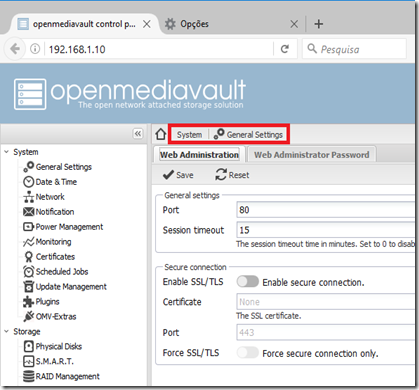
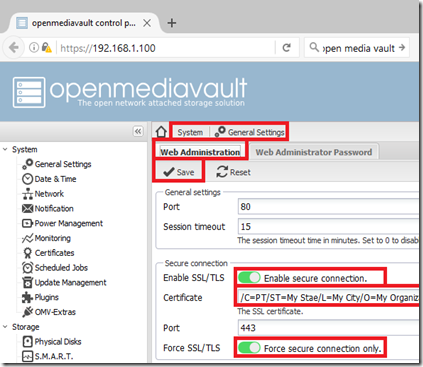
Bellow I activate the HTTPS option, and force it to be the only available web access, to garante a secure access (this step is optional).
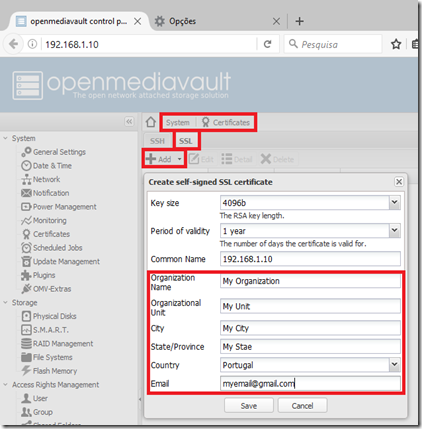
Enabling HTTPs requires a certificate, so first we will have to create it:
Creating a certificate:
Enable HTTPS and force HTTPS to be the only option (“Force secure connection only”) :
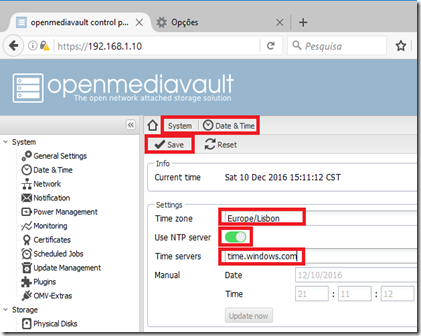
Set time with via NTP server (this step is optional):
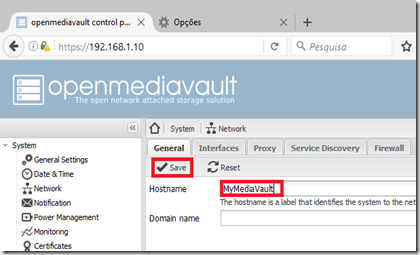
Change Hostname (this step is optional):
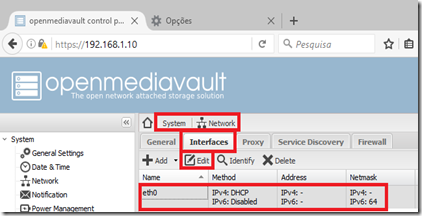
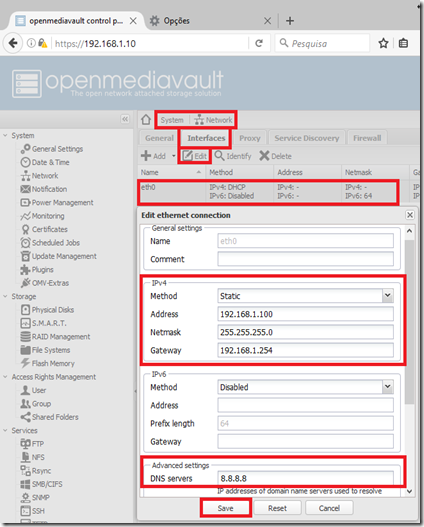
SetUp a private IP Adress (this step is optional):
Storage Setup
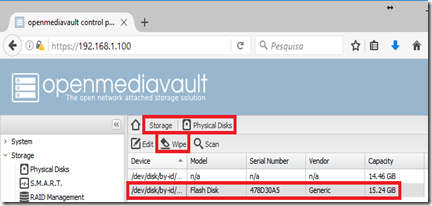
First lets wipe the Disk clean if it already has a filesystem (mine is a USB Flash Disk) :
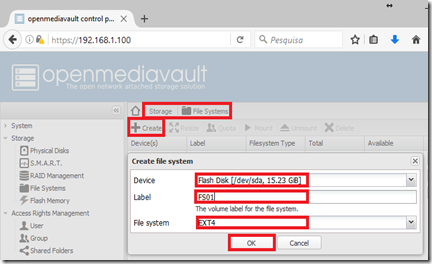
Now let’s create a filesystem (disk with an EXT4 partition):
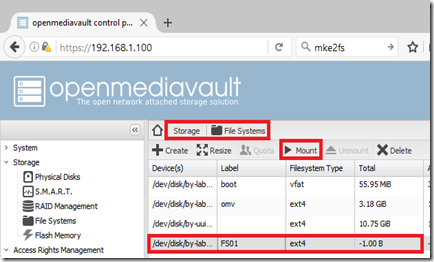
Now we mount the filesystem we created above:
Users Setup
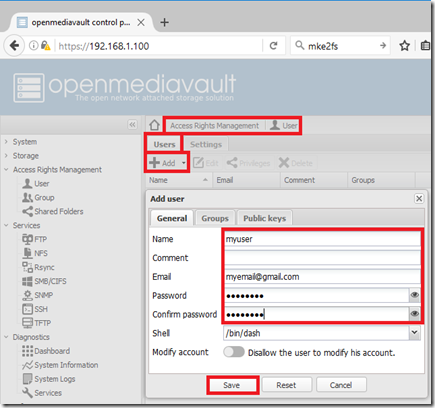
Now we setup a user to use with the services we are going to configure later:
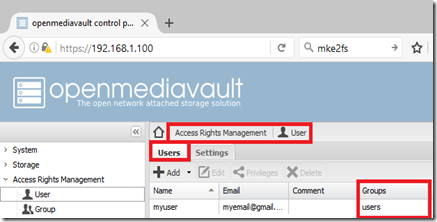
This user is automatically put in the users Group:
Service Setup – SMB/CIFS
Here we are going to setup the SMB/CISFS service (aka Windows Shared Folders).
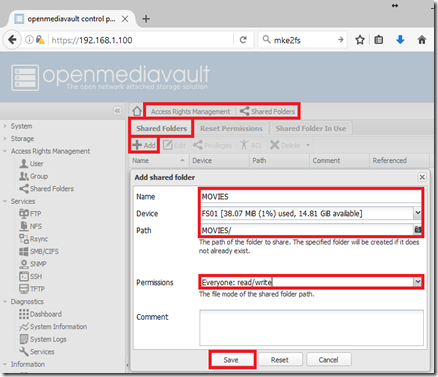
First we add a folder to the filesystem:
Next we make this folder available via SMB/CIFS.
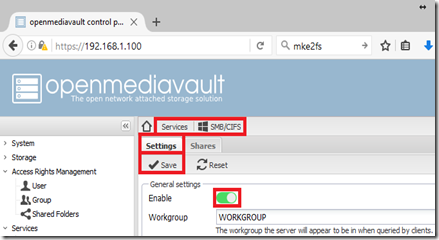
First we enable the service:
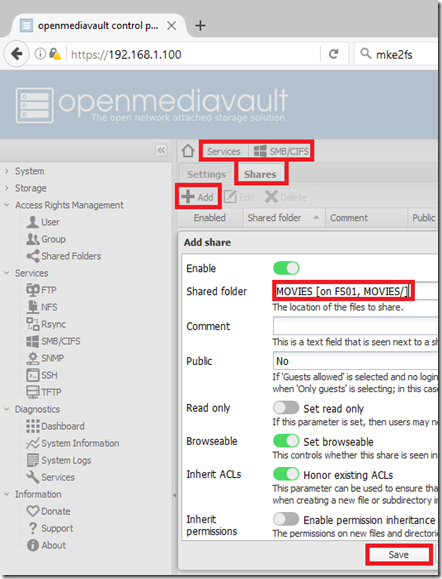
and next we add the previously created folder to SMB/CIFS:
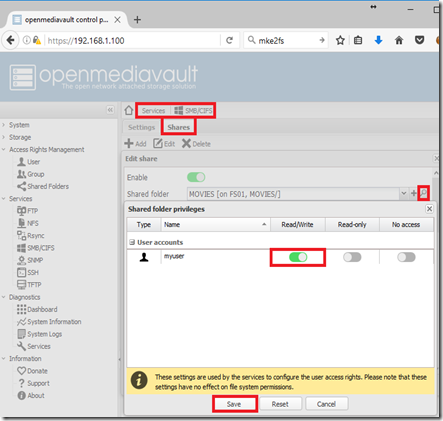
the final step is to setup the access permissions to the folder:
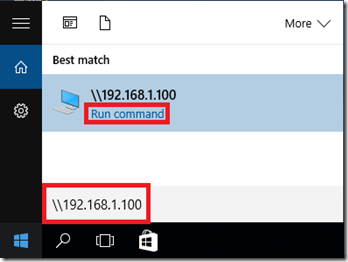
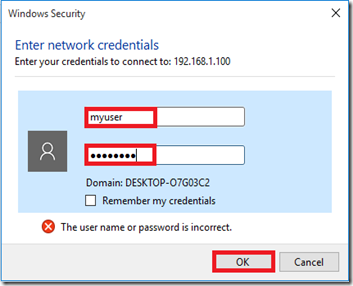
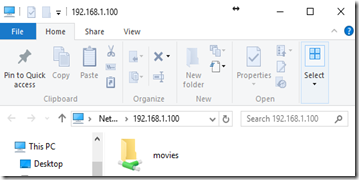
Now let’s test the access via SMB/CIFS to the created folder.
Service SetUp – Other Services (Compact)
The setup of other the services is very similar to the setup of SMB/CIFS above, so lets take a more compact aproach
### FTP Service (Built In) ###
Services >> FTP >> Settings | Enable !--> Activate Service
Services >> FTP >> Shares | (v) !--> Add Folder to Service
Services >> FTP >> Shares | (Magnifying Glass) !--> Define permissions
### TFTP Service (Built In) ###
Services >> TFTP >> Settings | Enable !--> Activate Service
Services >> TFTP >> Shares | (v) !--> Add Folder to Service
Services >> TFTP >> Shares | (Magnifying Glass) !--> Define permissions
Services >> TFTP >> Allow new files !--> Allow new files creation
### RSync Server (Built In) ###
Rsync >> Server | Enable !--> Activate Service
Rsync >> Server >> Modules >> Shared Folder | (v) !--> Add Folder (Source)
Rsync >> Server >> Modules >> Shared Folder | (Magnifying Glass) !--> Define user permitions
!-- Syncing with the OMV Rsync Server – Remote to Local Folder --
rsync -avz -e ssh remoteuser@remotehost:/remote/ /local
!-- Syncing with the OMV Rsync Server – Local to Remote Folder --
rsync -avz /local/ -e ssh remoteuser@remotehost:/remote
### BitTorrent Client (PlugIn) ###
Download your torrents directly to you OpenMediaVault and access them via the
other services (ex: SMB/CIFS | MiniDlna | Plex | etc).
System >> Network >> Plugins !--> Install Plugin
- Section: Downloaders
- Plugin : openmediavault-transmissionbt 3.0.9
- Select Plugin + Install
Services >> BitTorrent >> Settings | Enable !--> Activate Service
Services >> BitTorrent >> Files and Locations | Download !--> Add+Enable Done Folder
Services >> BitTorrent >> RPC | Enable !--> Enable Web Client
Services >> BitTorrent >> RPC | Port: 9091 !--> Web Client TCP Port
Services >> BitTorrent >> RPC | Username !--> Web Client Username
Services >> BitTorrent >> RPC | Password !--> Web Client Password
To use the BitTorrent WebClient just go to:
### MINI DLNA (PlugIn) ###
This allows you to access/stream you
media files to you TV or Mobile device
System >> Network >> Plugins !--> Install Plugin
- Section: Multimedia
- Plugin : openmediavault-minidlna 3.3.4
- Select Plugin + Install
Services >> DLNA >> Settings | Enable !--> Activate Service
Services >> DLNA >> Shares | (v) !--> Add Folder to Service
Services >> DLNA >> Shares | (Magnifying Glass) !--> Define permitions
### Plex Media Server (PlugIn) ###
!-- Install and Configure --
System >> OMV-Extras | Plexmediaserver: Edit+Enable !--> Activate Repository
System >> Network >> Plugins !--> Install Plugin
- Section: Multimedia
- Plugin : openmediavault-plexmediaserver 3.7
- Select Plugin + Install
Services >> Plex Media Server >> Settings | Enable !--> Activate Plex Server
Services >> Plex Media Server >> Settings | Database Volume !--> Pick Filesystem
Services >> Plex Media Server >> Plex Web Client !--> Local Plex Client
The Local Plex Client allow you to play you
media on you browser locally on you LAN, but
if you want to make it available on the internet
just create an account at:
Clic on the message at the top of the
Local Plex Client:
"An unclaimed media server has been found on your network. Claim it now"
and click on "Claim Server"
If this message dos not show, just go to:
Settings >> Server >> Claim Server
and add the user and password of the account
you created online
Now you can play the media on you disk from
anywer in the internet
!-- Play Media - On The internet --
https://www.plex.tv/ + LAUNCH
!-- Play Media - On The LAN --
Services >> Plex Media Server >> Plex Web Client
### Remote Desktop - RDP (PlugIn) ###
Remote desktop plugin for OpenMediaVault. Installs xfce4 minimal desktop environment
and rdp server.
System >> Network >> Plugins !--> Install Plugin
- Section: Network
- Plugin : openmediavault-remotedesktop 3.6
- Select Plugin + Install
Services >> Remote Desktop >> Port: 3389 !--> Default Port
Services >> Remote Desktop >> Encription Level: Low !--> Default Encription
### USB Backup (PlugIn) ###
The new plugin ‘USB Backup’ can be used to automatically synchronise a shared
folder to an external USB storage device when the USB stick is plugged in.
System >> Network >> Plugins !--> Install Plugin
- Section: Multimedia
- Plugin : openmediavault-usbbackup 3.2.12
- Select Plugin + Install
Services >> USB Backup >> Settings | +Add !--> Add Job
Services >> USB Backup >> Settings | Enable !--> Activate Service
Services >> USB Backup >> Shared Folder | (v) !--> Add Folder (Source)
Services >> USB Backup >> Shared Folder | (Magnifying Glass) !--> Define user permitions
Services >> USB Backup >> Device !--> Select USB Flash (Destination)
### OpenVPN (PlugIn) - UNTESTED ###
This is AWSOME OpenMediaVault can even have
a VPN Server in it's services for remote/secure
access to you files
This is AWSOME OpenMediaVault can even
have a VPN Server in it's services for
remote/secure access to you files
System >> Network >> Plugins !--> Install Plugin
- Section: Remote
- Plugin : openmediavault-openvpn 3.0.4
- Select Plugin + Install
Services >> OpenVPN >> Settings | Enable !--> Activate OpenVPN
Services >> OpenVPN >> Settings | Public address: <Pub IP> !--> Your Public IP
Services >> OpenVPN >> Settings | DNS servers(s): <IP1>;<IP2> !—> DNS Server
### Shell In a Box (SSH via Web UI) ###
Web based SSH client to the local Open Media Vault
System >> Network >> Plugins
- Section: Administration
- Plugin : openmediavault-shellinabox 3.4
- Select Plugin + Install
Services >> Shellinabox >> Enable
To use the Web SSH Shell:
Services >> Shellinabox >> Web Client
or
http://<Your_OpenMediaVault_IP>:4200
### Wake On Lan (WOL) ###
Plugin to send WAKE-ON-LAN magic
to wake a system at using rtcwake
and wakeonlan.
System >> Network >> Plugins
- Section: Administration
- Plugin : openmediavault-wol 3.1
- Select Plugin + Install
Services >> WOL >> System | +Add !--> Add Machine
- Name : <Machine Name>
- MAC Address : <Machine MAC>
- IP Address : <Machine IP - Optional>
To use the Web SSH Shell:
Services >> WOL >> System | Select Machine +Send
Enjoy ![]()
Related links:
- OpenMediaVault on VMWARE: https://www.youtube.com/watch?v=ox69xQaOfXM
![thin-provisioning[6] thin-provisioning[6]](https://lh3.googleusercontent.com/-otRBo97KKqQ/V_1h-gIj4mI/AAAAAAAAhlI/gOILAAS3dMI/thin-provisioning%25255B6%25255D_thumb%25255B1%25255D.jpg?imgmax=800)

