So you’ve got your Raspberry Pi setup, but what if you don’t have a dedicated monitor to use with it (for example, mine’s connected to my TV). How can you use it without disrupting your setup? VNC (Virtual Network Computing) allows you to see your Pi’s desktop and control it remotely using another computer running Mac OS X, Windows or Linux (and other devices too).
The VNC server software runs on your RPi, access it by running VNC client software on your other device.
The VNC Server
There are various guides for this online, most suggest using the TightVNC server software, here’s my summarised need to know version, run all commands from the command line:
- Install tight VNC: “sudo apt-get install tightvncserver”
- Run the program: “tightvncserver”, and it will start a new session with 1024x728 and 24 bit colour:
pi@raspberrypi ~ $ sudo tightvncserver
New 'X' desktop is raspberrypi:1
Starting applications specified in /root/.vnc/xstartup
Log file is /root/.vnc/raspberrypi:1.logthe :1 (aka session number) means port 5901
- If you run the program: “tightvncserver” again, and it will start a another session with 1024x728 and 24 bit colour:
pi@raspberrypi ~ $ sudo tightvncserver
New 'X' desktop is raspberrypi:2
Starting applications specified in /root/.vnc/xstartup
Log file is /root/.vnc/raspberrypi:2.logthe :2 (aka session number) means port 5902
- If you want to start a custom VNC session: “vncserver :3 -geometry 640x480 -depth 24”
vncserver :3 -geometry 640x480 -depth 24
New 'X' desktop is raspberrypi:3
Starting applications specified in /home/pi/.vnc/xstartup
Log file is /home/pi/.vnc/raspberrypi:3.logthe :3 (aka session number) means port 5903
Notes:
- Configure the session’s resolution after the -geometry argument. In the above 1024x768 is used. The RPi is capable of full HD so you could try 1920x1080.
- Colour depth is specified by the -depth argument. In the above exampe, 24-bit colour depth is used. You could use 16-bit instead to reduce network traffic.
- You can start more than one VNC session by running subsequent vncserver commands, just increment the first digit: e.g “vncserver :2 …” for a second, ”vncserver :3 …” for a third (I don’t know how many the RPi could handle).
- You can set this to run at start up, see the eLinux wiki tutorial, or look for a later post on this blog on automatic login which can start the VNC session with less effort.
The VNC Server (Connect To Your Raspberry PI)
There are lots of VNC clients you can use, depending on your platform. I’m using Apple’s Remote Desktop software which is incredibly powerful (especially when administering Macs) but is overkill if you are just using it with your RPi. TightVNC has a free client application, there’s a native Windows version and a surprisingly good (but limited) Java version, which should run on any desktop/laptop system. A Google search should find you a suitable app for your own system.
To connect to your RPi:
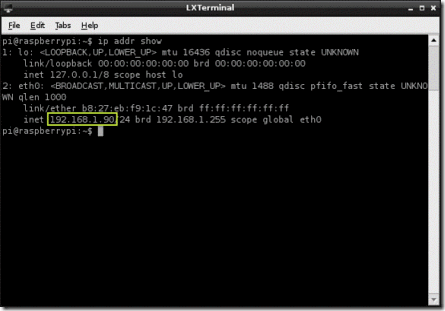
- Get your RPi’s IP address by running “ip addr show” or “ifconfig”. The IP address with be shown as highlighted in the image below.
- Connect your client to the IP address obtained from 1.
- Use port “590x”, where “x” is the session number seen in the previous section. If this doesn’t work, enter the IP address followed by “:x”, e.g. “192.168.1.50:1” (works on TigthVNC).
Based On: http://gettingstartedwithraspberrypi.tumblr.com/post/24142374137/setting-up-a-vnc-server

No comments:
Post a Comment