Setting up Wifi with the Command Line
Created by Simon Monk
This tutorial works best if your router is broadcasting the SSID. Make sure you have "Broadcast SSID" set up on your router! This may not work with "private" SSID setups
Setting up WiFi in Occidentalis, is also pretty straight forward. You just need to add the name of your wireless network (its SSID) and your password to a configuration file.
Step 1.
Boot the Raspberry Pi without the WiFi adapter plugged in.
Step 2.
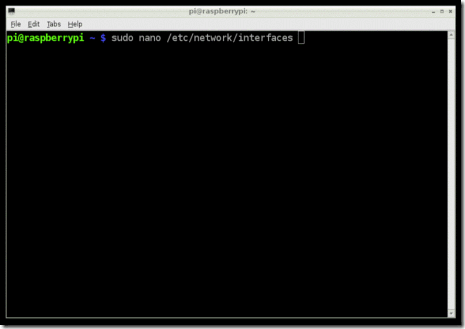
Open a Terminal session by clicking on the LXTerminal icon, and enter the following command into it:
Copy Code
1. sudo nano /etc/network/interfaces
auto lo
iface lo inet loopback
iface eth0 inet dhcp
allow-hotplug wlan0
auto wlan0
iface wlan0 inet dhcp
wpa-ssid "ssid"
wpa-psk "password"
If you are using a 'hidden' SSID, try the following (hat-tip to http://www.dafinga.net/2013/01/how-to-setup-raspberry-pi-with-hidden.html)
auto lo
iface lo inet loopback
iface eth0 inet dhcp
auto wlan0
allow-hotplug wlan0
iface wlan0 inet dhcp
wpa-scan-ssid 1
wpa-ap-scan 1
wpa-key-mgmt WPA-PSK
wpa-proto RSN WPA
wpa-pairwise CCMP TKIP
wpa-group CCMP TKIP
wpa-ssid "My Secret SSID"
wpa-psk "My SSID PSK"
iface default inet dhcp
Step 3.
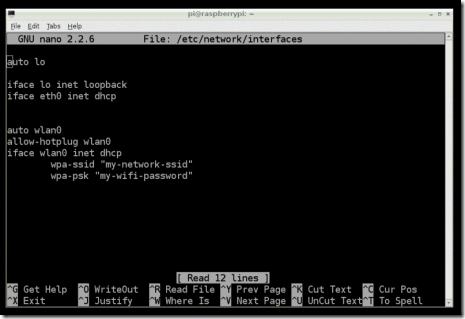
This opens an editor screen of the wifi configuration file you need to change.
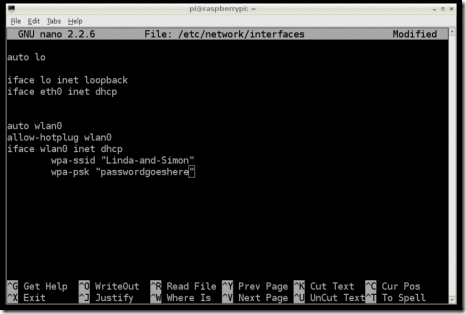
The two places where you need to make a change are on the last two lines. Change the file so that it looks like this:
Of course, you should put in your network and password! Note that you need to keep the double-quote characters around your wireless network name and password.
This kind of editor does not let you use the mouse. Instead, use the cursor keys to move around the file.
Step 4.
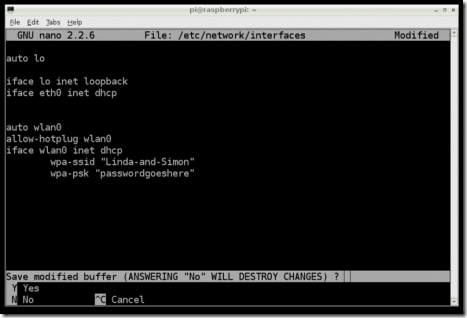
When you have finished press [ctrl]x. This will ask if you want to save the modified files.
Press 'Y' and then Return to save the file with the same name.
Step 5.
Shut down your Raspberry Pi, plug the WiFi adapter in and start it up again. You should find that the Raspberry Pi connects using the WiFi adapter as it boots up.
Taken From: http://learn.adafruit.com/adafruits-raspberry-pi-lesson-3-network-setup/setting-up-wifi-with-occidentalis


7 comments:
Still having problems with occidentils and WI-FI. Works fine on my RPi build. The interfaces files are the same. On start-up Occidentilis broadcast for an address but receives no offers. Any ideas?
Have you sniffed the traffic to see that the request is really getting out ?
Do you have a DHCP server ?
Thanks Jose', No I didn't sniff for the request. I see it reporting the request at boot, failing with no DHCPOFFERs. It does get a IP address with a Raspian boot just not with Occidentilis. I will try to see if I can see the request over the network. Thanks again
DCHP requests are easy to sniff because they are broadcast, like so, they are sent to evey port on the switch, so you just have to conect a PC on the same switch (same VLAN).
Use wireshark, it's very straight forward: http://www.wireshark.org/
Strange sniffer data. I see a DHCP request broadcast the src is 10.0.0.3 and 10.0.0.4. Thought this was to be 0.0.0.0. Anyway the gateway sends a offer to both 10.0.0.3 and 10.0.0.4. Pi see no Offer.
good blog...
structured cabling companies
structured cabling solutions
Firstly it ensures that the WiFi signal will reach all areas in your house, and secondly it will minimize the amount of signal leakage beyond your property. 192.168.10.1
Post a Comment