Game-streaming services like Twitch TV are becoming bigger and bigger. Whether you want to let your friends watch you play a game or try to build up a larger audience, streaming is easy.
The PlayStation 4 and Xbox One have built-in support for streaming to Twitch. Some PC games even have built-in Twitch TV support — but, for most games, you’ll need a third-party streaming program to stream.
Important Notes
Note that Twitch only supports public streams at this time. If you want to broadcast a private stream, you may want to try Justin.tv, a competing service. The process should be similar.
Twitch recommends fairly powerful hardware for streaming. Twitch itself recommends you use an Intel Core i5-2500K 3.3GHz or AMD equivalent CPU, at least 8GB of DDR3 SDRAM, and Windows 7 — Windows Vista or XP are not ideal. If your stream doesn’t perform smoothly, you probably need a faster CPU and perhaps more RAM.
Get a Twitch TV Stream Key
We’re broadcasting using Twitch TV because it’s the most popular option. Sure, you could host your own stream and stream directly to your viewers, but it takes much less upload bandwidth to stream a game to a website like Twitch and allow that website to rebroadcast it to your viewers. This also frees you up from having to forward ports and deal with other nasty networking issues.
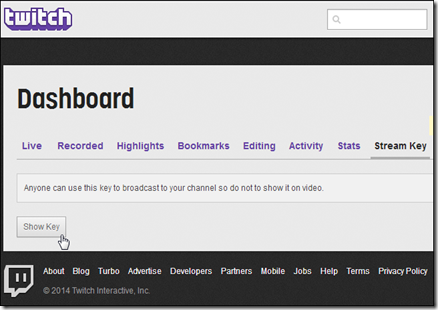
First, you’ll need to make a free Twitch account you’ll stream the game with. Just visit Twitch TV and create an account. After creating an account, click your account name at the top-right corner of the Twitch homepage, select Dashboard, and click the Stream Key heading. Click the Show Key button.
You’ll need this key to stream to your channel. Anyone who has the key can stream to your channel, so don’t share it.
Set Up OBS Game Capture Mode
Open Broadcaster Software is a free, open-source video recording and streaming application that’s ideal for streaming on Twitch. We recently covered using Open Broadcaster Software to record a screencast, but you can also use Open Broadcaster Software to stream live to a channel like Twitch. OBS also allows you to add additional elements to your stream, so you can add live video from your webcam, image overlays, and other things.
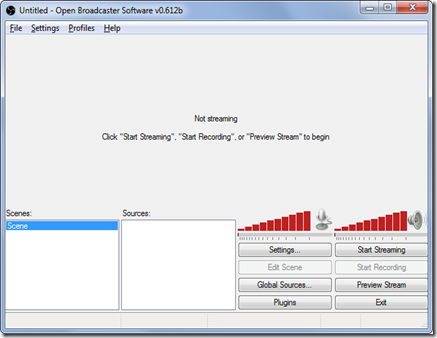
Download Open Broadcaster Software, install it, and fire it up. OBS uses “scenes” and “sources.” It comes with one scene by default, and that will work fine. A scene can have one or more sources — so you could have a scene that displays the contents of a game window, or the contents of a game window and a webcam. You could have a separate scene for each game you want to stream and switch between them on the fly.
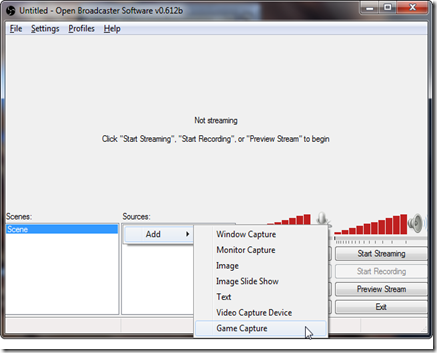
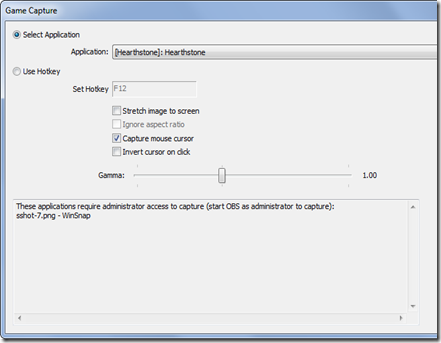
The first thing we’ll need to do is add the game’s window as a source to our scene. First, you’ll need to open the game and have it running in the background. With the game running, right-click in the Sources box, point to Add, and select Game Capture.
Select the application window you want to capture and click OK. You can change these options later, too — just right-click the game capture source in your Sources list and select Properties.
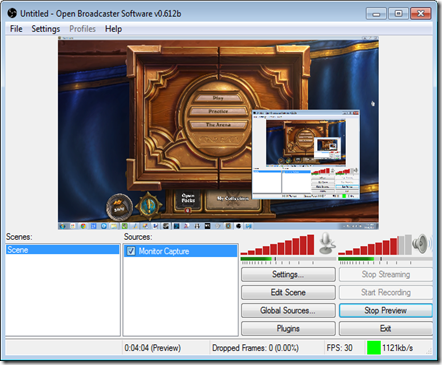
The Preview Stream button will now allow you to preview your stream. A black stream is normal if you’re Alt+Tabbed out of a full-screen game.
Using Monitor Capture Mode
Game Capture mode just doesn’t work with every game. If you see a black screen while you’re playing the game, things aren’t working properly.
OBS’s FAQ notes that OpenGL games — including Minecraft — have issues with Game Capture mode. If your game doesn’t seem to stream properly, you’ll need to use Monitor Capture mode. This captures your entire desktop, including the game on it. You’ll want to disable Aero in Windows’ settingsbefore doing this — the Aero graphics require more resources and will slow down your stream.
To use Monitor Capture mode, first right-click your Game Capture source and click Remove to remove it rom the list. Right-click inside the Sources box and add the Monitor Capture source. The default settings should work fine.
Set up Twitch Streaming
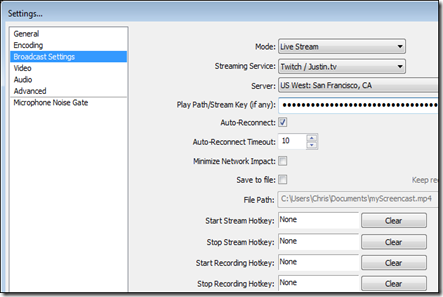
You’ll now need to connect OBS to your Twitch channel. Click the Settings button in OBS and select Settings. Click the Broadcast Settings category, set the Mode to Live Streaming, and set the Streaming Service to Twitch / Justin.tv.
Select the closest server to you and enter your Twitch stream key. These are the only essential settings here.
You’ll also need to change some encoding settings to ensure you’re streaming in an optimized format.
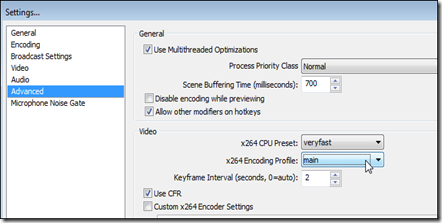
The Broadcast Settings pane will tell you exactly what you need to change. By default, you’ll just need to visit the Advanced settings pane and tweak a few video encoding settings.
You can now stream to Twitch, but it won’t necessarily be smooth. You’ll probably want to visit the Encoding pane in OBS’s settings and change your quality settings. The ideal setting depends on your hardware and connection speed. Higher quality settings require more hardware resources and a upload bandwidth. OBS provides a Stream Settings Estimator toolthat will help you decide on the optimal settings.
Start Streaming
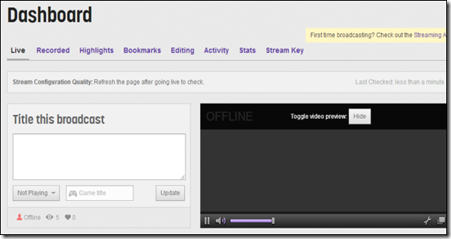
After setting everything up, all you need to do is click Start Streaming in OBS. You can then see a preview of your stream, provide a title, and set your “Now Playing” status on the Dashboard page — click your username at the top-right corner of the Twitch page and select Dashboard.
To share your stream with other people, just direct them to your channel page — it’s twitch.tv/user , where “user” is your username.
To add webcam videos and other elements, just add them to your scene as additional sources and reposition them. You’ll find more information on configuring multiple sources for a single scene in our guide to screencasting with OBS.
Taken From: http://www.howtogeek.com/183900/how-to-stream-a-pc-game-online-with-twitch-tv/

1 comment:
Post a Comment