Spanning Tree Protocol: Bridge ID, Priority, System ID Extension & Root Bridge Election Process
Written by Arani Mukherjee. Posted in Spanning Tree Protocol (STP)
In this article we will examine the Spanning Tree Bridge ID structure, explain why it has increments of 4096, how VLAN information is embedded (for Per-VLAN Spanning Tree & multiple STP instances) via the System ID Extension and finally explain how the Spanning Tree Protocol Root Bridge Election occurs.
Understanding Bridge ID, Bridge Priority & System ID Extension
In our earlier article we discussed about the Spanning Tree Protocol, Rapid STP port costs and port states. Before STP decides which path is the best to the Root Bridge, it needs to first decide which switch has to be elected as the Root Bridge, which is where the Bridge ID comes into play. Readers interested can also read our STP Principles, Redundant Network Links & Broadcast Storms article.
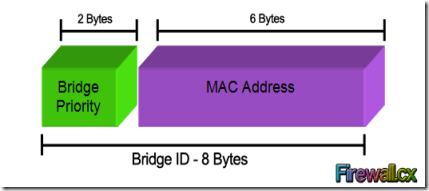
Every switch has an identity when they are part of a network. This identity is called the Bridge ID or BID. It is an 8 byte field which is divided into two parts. The first part is a 2-byte Bridge Priority field (which can be configured) while the second part is the 6-byte MAC address of the switch. While the Bridge Priority is configurable, the MAC address is unique amongst all switches and the sum of these two ensures a unique Bridge ID.
The above Bridge ID assumes there is one Spanning Tree instance for the entire network. This is also called Common Spanning-Tree (CST).
As networks begun to grow and become more complex, VLANs were introduced, allowing the creation of multiple logical and physical networks. It was then necessary to run multiple instances of STP in order to accommodate each network - VLAN. These multiple instances are called Multiple Spanning Tree (MST), Per-VLAN Spanning Tree (PVST) and Per-VLAN Spanning Tree Plus (PVST+).
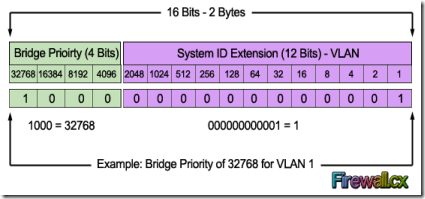
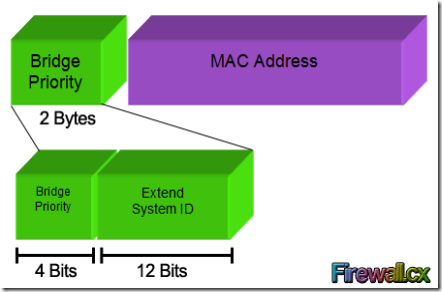
In order to accommodate the additional VLAN information, the Extended System ID field was introduced, borrowing 12 bits from the original Bridge Priority:
The Bridge Priority value and the Extended System ID extension together make up a 16 bit (2-byte) value. The Bridge Priority making up the left most bits, is a value of 0 to 61440. The Extended System ID is a value of 1 to 4095 corresponding to the respective VLAN participating in STP. The Bridge Priority increments in blocks of 4096 to allow the System ID Extension to squeeze in between each increment. This is clearly shown in the below analysis: We should note that the Bridge Priority Field can only be set in increments of 4096. This means that possible values are: 4096, 8192, 12288, 16384, 20480, 24576, 28672, 32768 etc. By default, Cisco’s Per-VLAN Spanning-Tree Plus (PVST+) adds this System ID Extension (sys-id-ext) to the Bridge Priority.
The two values (Bridge Priority + System ID Extension) together make up the Bridge ID used to elect the Root Bridge.
The Root Bridge Election Process
The election process uses several STP messages sent between switches which help each switch to decide, who is the Root Bridge. These messages are called Hello BPDU where BPDU stands for Bridge Protocol Data Unit. It is important to understand the information these BPDUs carry as it will help understand the election process itself.
Each BPDU carries several fields in it. The following table defines each field:
| Field | Description |
| Root Bridge ID or Root BID | BID of the switch that the sender of this BPDU believes to be the root switch |
| Sender’s Bridge ID | BID of the switch sending this Hello BPDU |
| Cost to the Root Bridge | The STP cost between this switch and the current root |
| Timer values on Root Bridge | Hello Timer, Max Age Timer, Forward Delay Timer |
For the purpose of this exercise, we will only concentrate on the first three fields.
Now, the election process itself is very simple. The switch with the lowest BID becomes the Root Bridge. Since the BID starts with the Bridge Priority field, essentially, the switch with the lowest Bridge Priority field becomes the Root Bridge. If there is a tie between two switches having the same priority value, then the switch with the lowest MAC address becomes the Root Bridge.
The STP Root Bridge election process starts with each switch advertising themselves as the Root Bridge and constructing the Hello BPDU accordingly. So each switch lists its own BID as the Root BID. The Sender Bridge ID is ofcourse the same as the Root BID, as it is again its own BID. With in BPDU, the Cost field is listed with a value of 0, because there is no cost between itself. The switches send out the Hello BPDU constructed as above, onto the network. They will keep on maintaining their status as Root Bridge by default, until they receive a Hello BPDU which carries a lower BID. This Hello BPDU then becomes a superior BPDU. Now the switch receiving this superior BPDU makes changes to the Hello BPDU it has been sending out. It changes the value of the Root BID to reflect the Root BID from the superior Hello BPDU. This process continues till every switch agrees on which switch has the lower BID, and hence deserves to be the Root Bridge.
Root Bridge Election Example
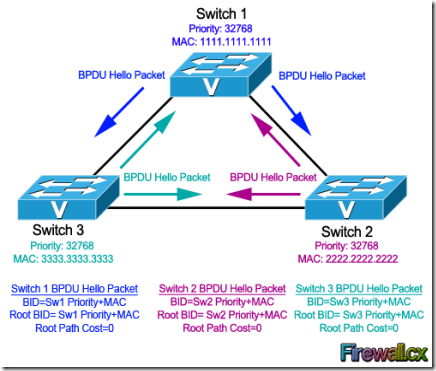
Let's look at this process using a three switch combination within a network. For the sake of simplicity, the MAC address of each switch has been changed to a simple value:
· Switch 1 (SW1). Has a priority of 32768 and MAC address of 1111.1111.1111. So its BID becomes 32768.1111.1111.1111. When SW1 creates its own BPDU, it sets both BID and Root BID to 32768.1111.1111.1111.
· Switch 2 (SW2). Has a priority of 32768 and MAC address of 2222.2222.2222. So its BID becomes 32768.2222.2222.2222. When SW2 creates its own BPDU, it sets both BID and Root BID to 32768.2222.2222.2222.
· Switch 3 (SW3). Has a priority of 32768 and MAC address of 3333.3333.3333. So its BID becomes 32768.3333.3333.3333. When SW3 creates its own BPDU, it sets both BID and Root BID to 32768.3333.3333.3333.
Now, the election process commences with the advertisement of the individual Hello BPDU's from each switch, as indicated by the arrows in our diagram. These BPDUs originate from each switch and end up at the other switches. Let's take up one switch at a time to see how it reacts to the BPDUs it receives from the other switches.
Switch 1 (SW1): It had sent out its own Hello BPDU with both BID and Root BID set to 32768.1111.1111.1111. When it receives the Hello BPDU from SW2, it checks for the Root BID value which is 32768.2222.2222.2222. SW1 discards the BPDU sent by SW2, as it still is the switch with the lowest BID. Same situation happens when it receives the Hello BPDU from SW3. SW1 is still the switch with the lowest BID. So it discards the Hello BPDU received from SW3 and keeps on advertising itself as the Root Bridge.
Switch 2 (SW2): Just like SW1, SW2 generates and sends its own Hello BPDU with both BID and Root BID set to 32768.2222.2222.2222. When it receives the Hello BPDU from SW1, it checks for the Root BID value which SW1 has set to 32768.1111.1111.1111. This being lower than SW2's own BID, makes the Hello BPDU received from SW1, a superior BPDU. So in its own BPDU, SW2 changes the value of the Root BID from 32768.2222.2222.2222, to 32768.1111.1111.1111, and starts advertising this revised Hello BPDU. SW2 now considers SW1 as the Root Bridge. Now, when it receives the Hello BPDU from SW3, it will obviously discard the BPDU as it is not superior in Root BID value. So for SW2, SW1 remains as Root Bridge, even after receiving the Hello BPDU from SW3.
Switch 3 (SW3): SW3 will send out its own Hello BPDU with both BID and Root BID set to 32768.3333.3333.3333. Depending on which Hello BPDU it receives first i.e. from SW1 or SW2, it will end up changing the Root BID value in its Hello BPDU because both SW1 & SW2 have lower MAC addresses. So if it received the Hello BPDU from SW2 first, then it will change the Root BID from 32768.3333.3333.3333 to 32768.2222.2222.2222 and consider SW2 as new Root Bridge. Once it receives the Hello BPDU from SW1, this BPDU supersedes the BPDU sent by SW2. So SW3 changes the Root BID from 32768.2222.2222.2222 to 32768.1111.1111.1111 and now considers SW1 as new Root Bridge.
At this point, all switches have received each other's BPDU and have agreed that SW1 has the lowerst BID address and is therefore the rightful Root Bridge of the network. Both SW2, and SW3 now agree that SW1 is Root Bridge, and start organizing their respective links into Root Ports and Designated Ports.
What if we wanted Switch 3 to be the Root Bridge?
In most real-life cases, we need to configure the Root Bridge to ensure that no matter the switch that joins the network, our initial Root Bridge will remain. To achieve this, we simply configure the Bridge Priority so that it is always smaller than the default value of 32768.
In our example, if we wanted Switch 3 to become the new Root Bridge, we would set its Bridge Priority to 4096. By doing so, we change its BID to 4096.3333.3333.3333 making it the lowest amongst our network switches.
Configuring a new BID in a production network is not recommended unless every caution has been taken to ensure network downtime is eliminated. When the BID of a switch changes to make it a Root Bridge, the whole network (switches) will react upon this and begin recomputing the new information. Depending on where the new Root Bridge is located, switch uplinks and redundant links might be blocked.
This article analysed the Spanning Tree Protocol Bridge ID structure and its importance. We saw how the Bridge Priority and System ID Extension fields play a primary role in the Root Bridge election within a network.


1 comment:
Very good explanation.
Post a Comment