Monday, August 18, 2008

Cfengine - Configuration Management for Multiple Machine

Cfengine for Enterprise Configuration Management

April 1st, 2008 by Scott Lackey

Cfengine makes it easier to manage configuration files across large numbers of machines.

Cfengine is known by many system administrators to be an excellent tool to automate manual tasks on UNIX and Linux-based machines. It also is the most comprehensive framework to execute administrative shell scripts across many servers running disparate operating systems. Although cfengine is certainly good for these purposes, it also is widely considered the best open-source tool available for configuration management. Using cfengine, sysadmins with a large installation of, say, 800 machines, can have information about their environment quickly that otherwise would take months to gather, as well as the ability to change the environment in an instant. For an initial example, if you have a set of Linux machines that need to have a different /etc/nsswitch.conf, and then have some processes restarted, there's no need to connect to each machine and perform these steps or even to write a script and run it on the machines once they are identified. You simply can tell cfengine that all the Linux machines running Fedora/Debian/CentOS with XGB of RAM or more need to use a particular /etc/nsswitch.conf until a newer one is designated. Cfengine can do all that in a one-line statement.

Cfengine's configuration management capabilities can work in several different ways. In this article, I focus on a make-it-so-and-keep-it-so approach. Let's consider a small hosting company configuration, with three administrators and two data centers (Figure 1).

Figure 1. How the Few Control the Many

Each administrator can use a Subversion/CVS sandbox to hold repositories for each data center. The cfengine client will run on each client machine, either through a cron job or a cfengine execution dæmon, and pull the cfengine configuration files appropriate for each machine from the server. If there is work to be done for that particular machine, it will be carried out and reported to the server. If there are configuration files to copy, the ones active on the client host will be replaced by the copies on the cfengine server. (Cfengine will not replace a file if the copy process is partial or incomplete.)

A cfengine implementation has three major components:

  • Version control: this usually consists of a versioning system, such as CVS or Subversion.

  • Cfengine internal components: cfservd, cfagent, cfexecd, cfenvd, cfagent.conf and update.conf.

  • Cfengine commands: processes, files, shellcommands, groups, editfiles, copy and so forth.

The cfservd is the master dæmon, configured with /etc/cfservd.conf, and it listens on port 5803 for connections to the cfengine server. This dæmon controls security and directory access for all client machines connecting to it. cfagent is the client program for running cfengine on hosts. It will run either from cron, manually or from the execution dæmon for cfengine, cfexecd. A common method for running the cfagent is to execute it from cron using the cfexecd in non-dæmon mode. The primary reason for using both is to engage cfengine's logging system. This is accomplished using the following:

*/10 * * * * /var/cfengine/sbin/cfexecd -F

as a cron entry on Linux (unless Solaris starts to understand */10). Note that this is fairly frequent and good only for a low number of servers. We don't want 800 servers updating within the same ten minutes.

The cfenvd is the “environment dæmon” that runs on the client side of the cfengine implementation. It gathers information about the host machine, such as hostname, OS and IP address. The cfenvd detects these factors about a host and uses them to determine to which groups the machine belongs. This, in effect, creates a profile for each machine that cfengine uses to determine what work to perform on each host.

The master configuration file for each host is cfagent.conf. This file can contain all the configuration information and cfengine code for the host, a subset of hosts or all hosts in the cfengine network. This file is often just a starting point where all configurations are stored in other files and “imported” into cfagent.conf, in a very similar fashion to Nagios configuration files. The update.conf file is the fundamental configuration file for the client. It primarily just identifies the cfengine server and gets a copy of the cfagent.conf.

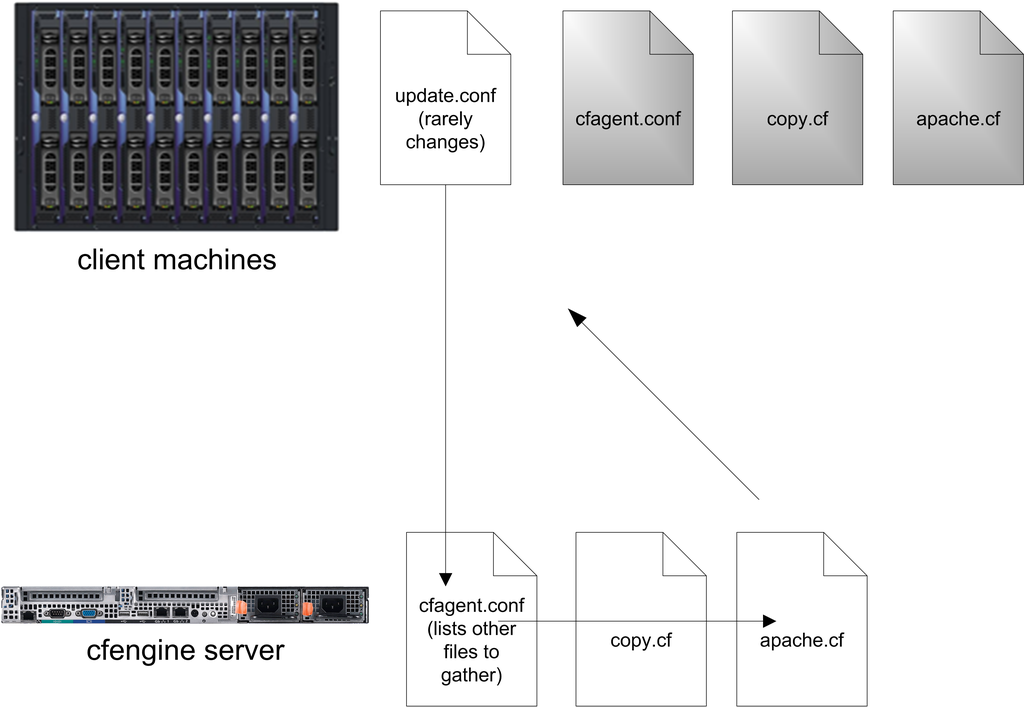
Figure 2. Automated Distribution of Cfengine Files

The update.conf file tells the cfengine server to deploy a new cfagent.conf file (and perhaps other files as well) if the current copy on the host machine is different. This adds some protection for a scenario where a corrupt cfagent.conf is sent out or in case there never was one. Although you could use cfengine to distribute update.conf, it should be copied manually to each host.

Cfengine “commands” are not entered on the command line. They make up the syntax of the cfengine configuration language. Because cfengine is a framework, the system administrator must write the necessary commands in cfengine configuration files in order to move and manipulate data. As an example, let's take a look at the files command as it would appear in the cfagent.conf file:

files:

/etc/passwd mode=644
owner=root action=fixall
/etc/shadow mode=600
owner=root action=fixall

This would set all machines' /etc/passwd and /etc/shadow files to the permissions listed in the file (644 and 600). It also would change the owner of the file to root and fix all of these settings if they are found to be different, each time cfengine runs. It's important to keep in mind that there are no group limitations to this particular files command. If cfengine does not have a group listed for the command, it assumes you mean any host. This also could be written as:

files:
any::
/etc/passwd mode=644
owner=root action=fixall
/etc/shadow mode=600
owner=root action=fixall

This brings us to an important topic in building a cfengine implementation: groups. There is a groups command that can be used to assign hosts to groups based on various criteria. Custom groups that are created in this way are called soft groups. The groups that are filled by the cfenvd dæmon automatically are referred to as hard groups. To use the groups feature of cfengine and assign some soft groups, simply create a groups.cf file, and tell the cfagent.conf to import it somewhere in the beginning of the file:

import:
any::
groups.cf

Cfengine will look in the default directory for the groups.cf file in /var/cfengine/inputs. Now you can create arbitrary groups based on any criteria. It is important to remember that the terms groups and classes are completely interchangeable in cfengine:

groups:
development = ( nfs01 nfs02 10.0.0.17 )
production = ( app01 app02 !development )

You also can combine hard groups that have been discovered by cfenvd with soft groups:

groups:
legacy = ( irix compiled_on_cygwin sco )

Let's get our testing setup in order. First, install cfengine on a server and a client or workstation. Cfengine has been compiled on almost everything, so there should be a package for your OS/distribution. Because the source is usually the latest version, and many versions are bug fixes, I recommend compiling it yourself. Installing cfengine gives you both the server and client binaries and utilities on every machine, so be careful not to run the server dæmon (cfservd) on a client machine unless you specifically intend to do that. After the install, you should have a /var/cfengine/ directory and the binaries mentioned previously.

Before any host can actually communicate with the cfengine server, keys must be exchanged between the two. Cfengine keys are similar to SSH keys, except they are one-way. That is to say, both the server and the client must have each other's public key in order to communicate. Years of sysadmin paranoia cause me to recommend manually copying all keys and trusting nothing. Copy /var/cfengine/ppkeys/localhost.pub from the server to all the clients and from the clients to the server in the same directory, renaming them /var/cfengine/ppkeys/root-10.11.0.1.pub, where the IP is 10.11.0.1.

On the server side, cfservd.conf must be configured to allow clients to access particular directories. To do this, create an AllowConnectionsFrom and an admit section:

#cfservd.conf

control:
AllowConnectionsFrom = ( 192.168.0.0/24 )
admit:
/configs/datacenter1 *.example1.com
/configs/datacenter2 *.example2.com

To test your example client to see whether it is connecting to the cfengine server, make sure port 5803 is clear between them, and run the server with:

cfservd -v -d2

And, on the client run:

cfagent -v --no-splay

This will give you a lot of debugging information on the server side to see what's working and what isn't.

Now, let's take a look at distributing a configuration file. Although cfengine has a full-featured file editor in the editfiles command, using this method for distributing configurations is not advised. The copy command will move a file from the server to the client machine with .cfnew appended to the filename. Then, once the file has been copied completely, it renames the file and saves the old copy as .cfsaved in the specified directory. Here's the copy command syntax:

copy:
class::
<>

dest=target-file
server=server
mode=mode
owner=owner
group=group
backup=true/false
repository=backup dir
recurse=number/inf/0
define=classlist

Only the dest= is required, along with the filename to save at the destination. These can be different. Here's another example:

copy:
linux::
${copydir}/linux/resolv.conf

dest=/etc/resolv.conf
server=cfengine.example1.com
mode=644
owner=root
group=root
backup=true
repository=/var/cfengine/cfbackup
recurse=0
define=copiedresolvdotconf

The last line in this copy statement assigns this host to a group called copiedresolvdotconf. Although we don't have to do anything after copying this particular file, we may want to do some action on all hosts that just had this file successfully sent to them, such as sending an e-mail or restarting a process. As another example, if you update a configuration file that is attached to a dæmon, you may want to send a SIGHUP to the process to cause it to reread the configuration file. This is common with Apache's httpd.conf or inetd.conf. If the copy is not successful, this server won't be added to the copiedresolvdotconf class. You can query all servers in the network to see whether they are members and, if not, find out what went wrong.

A great way to version control your config files is to use a cfengine variable for the filename being copied to control which version gets distributed. Such a line may look something like this:

copy:
linux::
${copydir}/linux/${resolv_conf}

Or, better yet, you can use cfengine's class-specific variables, whose scope is limited to the class with which they are associated. This makes copy statements much more elegant and can simplify changes as your cfengine files scale:

control:

# ${resolve_conf} value depends on context,
# is this a linux machine or hpux?
linux:: resolve_conf = ( "${copydir}"/linux/resolv.conf )
hpux:: resolve_conf = ( "${copydir}"/hpux/resolv.conf )
copy:
linux::

${resolve_conf}

Here is a full cfagent.conf file that makes use of everything I've covered thus far. It also adds some practical examples of how to do sysadmin work with cfengine:

# cfagent.conf

control:
actionsequence = ( files editfiles processes )
AddInstallable = ( cron_restart )
solaris:: crontab = ( /var/spool/cron/crontabs/root )
linux:: crontab = ( /var/spool/cron/root )

files:
solaris::
${crontab}
action=touch
linux::
${crontab}
action=touch

editfiles:
solaris::
{ ${crontab}
AppendIfNoSuchLine "0,10,20,30,40,50 * * * *
↪/var/cfengine/sbin/cfexecd -F"
DefineClasses "cron_restart"
}
linux::
{ ${crontab}
AppendIfNoSuchLine "0,10,20,30,40,50 * * * *
↪/var/cfengine/sbin/cfexecd -F"
#linux doesn't need a cron restart.
}

shellcommands:
solaris.cron_restart::
"/etc/init.d/cron stop"
"/etc/init.d/cron start"

import:
any::
groups.cf
copy.cf

The above is a full cfagent configuration that adds cfengine execution from cron to each client (if it's Linux or Solaris). So effectively, once you run cfengine manually for the first time with this cfagent.conf file, cfengine will continue to run every five minutes from that host, but you won't need to edit or restart cron. The control section of the cfagent.conf is where you can define some variables that will control how cfengine handles the configuration file. actionsequence tells cfengine what order to execute each command, and AddInstallable is a variable that holds soft groups that get defined later in the file in a “define” statement, such as after the editfiles command where the line is DefineClasses "cron_restart". The reason for using AddInstallable is sometimes cfengine skips over groups that are defined after command execution, and defining that group in the control section ensures that the command will be recognized throughout the configuration.

Being able to check configuration files out from a versioning system and distribute them to a set of servers is a powerful system administration tool. A number of independent tools will do a subset of cfengine's work (such as rsync, ssh and make), but nothing else allows a small group of system administrators to manage such a large group of servers. Centralizing configuration management has the dual benefit of information and control, and cfengine provides these benefits in a free, open-source tool for your infrastructure and application environments.

Scott Lackey is an independent technology consultant who has developed and deployed configuration management solutions across industry from NASA to Wall Street. Contact him at slackey@violetconsulting.net, www.violetconsulting.net.

Zenoss Enterprise Network Monitoring

Zenoss and the Art of Network Monitoring

August 1st, 2008 by Jeramiah Bowling in

If a server goes down, do you want to hear it?

If a tree falls in the woods and no one is there to hear it, does it make a sound? This the classic query designed to place your mind into the Zen-like state known as the silent mind. Whether or not you want to hear a tree fall, if you run a network, you probably want to hear a server when it goes down. Many organizations utilize the long-established Simple Network Management Protocol (SNMP) as a way to monitor their networks proactively and listen for things going down.

At a rudimentary level, SNMP requires only two items to work: a management server and a managed device (or devices). The management server pulls status and health information at regular intervals from the managed devices and stores the information in a table. Managed devices use local SNMP agents to notify the management server when defined behavior occurs (such as errors or “traps”), which are stored in the same table on the server. The result is an accurate, real-time reporting mechanism for outages. However, SNMP as a protocol does not stipulate how the data in these tables is to be presented and managed for the end user. That's where a promising new open-source network-monitoring software called Zenoss (pronounced Zeen-ohss) comes in.

Available for most Linux distributions, Zenoss builds on the basic operation of SNMP and uses a comprehensive interface to manage even the largest and most diverse environment. The Core version of Zenoss used in this article is freely available under the GPLv2. An Enterprise version also is available with additional features and support. In this article, we install Zenoss on a CentOS 5.1 system to observe its usefulness in a network-monitoring role. From there, we create a simulated multisystem server network using the following systems: a Fedora-based Postfix e-mail server, an Ubuntu server running Apache and a Windows server running File and Print services. To conserve space, only the CentOS installation is discussed in detail here. For the managed systems, only SNMP installation and configuration are covered.


Building the Zenoss Server

Begin by selecting your hardware. Zenoss lacks specific hardware requirements, but it relies heavily MySQL, so you can use MySQL requirements as a rough guideline. I recommend using the fastest processor available, 1GB of memory, fast enough hard disks to provide acceptable MySQL performance and Gigabit Ethernet for the network. I ran several test configurations, and this configuration seemed adequate enough for a medium-size network (100+ nodes/devices). To keep configuration simple, all firewalls and SELinux instances were disabled in the test environment. If you use firewalls in your environment, open ports 161 (SNMP), 8080 (Zenoss Management Page) and 514 (if you integrate syslog with Zenoss).

Install CentOS 5.1 on the server using your own preferences. I used a bare install with no X Window System or desktop manager. Assign a static IP address and any other pertinent network information (DNS servers and so forth). After the OS install is complete, install the following packages using the yum command below:

yum install mysql mysql-server net-snmp net-snmp-utils gmp httpd

If the mysqld or the httpd service has not started after yum installs it, start it and set it to run for your configured runlevel. Next, download the latest Zenoss Core .rpm from Sourceforge.net (2.1.3 at the time of this writing), and install it using rpm from the command line. To start all the Zenoss-related dæmons after the .rpm has been installed, type the following at a command prompt:

service zenoss start

Launch a Web browser from any machine, and type the IP address of the Zenoss server using port 8080 (for example, http://192.168.142.6:8080). Log in to the site using the default account admin with a password of zenoss. This brings up the main dashboard. The dashboard is a compartmentalized view of the state of your managed devices. If you don't like the default display, you can arrange your dashboard any way you want using the various drop-down lists on the portlets (windows). I recommend setting the Production States portlet to display Production, so we can see our test systems after they are added.

Almost everything related to managed devices in Zenoss revolves around classes. With classes, you can create an infinite number of systems, processes or service classifications to monitor. To begin adding devices, we need to set our SNMP community strings at the top-level /Devices class. SNMP community strings are like passphrases used to authenticate traffic between devices. If one device wants to communicate with another, they must have matching community names/strings. In many deployments, administrators use the default community name of public (and/or private), which creates a security risk. I recommend changing these strings and making them into a short phrase. You can add numbers and characters to make the community name more complex to guess/crack, but I find phrases easier to remember.

Click on the Devices link on the navigation menu on the left, so that /Devices is listed near the top of the page. Click on the zProperties tab and scroll down. Enter an SNMP community string in the zSNMPCommunitiy field. For our test environment, I used the string whatsourclearanceclarence. You can use different strings with different subclasses of systems or individual systems, but by setting it at the /Devices class, it will be used for any subclasses unless it is overridden. You also could list multiple strings in the zSNMPCommunities under the /Devices class, which allows you to define multiple strings for the discovery process discussed later. Make sure your community string (zSNMPCommunity) is in this list.

Installing Net-SNMP on Linux Clients

Now, let's set up our Linux systems so they can talk to the Zenoss server. After installing and configuring the operating systems on our other Linux servers, install the Net-SNMP package on each using the following command on the Ubuntu server:

sudo apt-get install snmpd

And, on the Fedora server use:

yum install net-snmp

Once the Net-SNMP packages are installed, edit out any other lines in the Access Control sections at the beginning of the /etc/snmp/snmpd.conf, and add the following lines:

##      sec.name  source      community
com2sec local localhost whatsourclearanceclarence
com2sec mynetwork 192.168.142.0/24 whatsourclearanceclarence

## group.name sec.model sec.name
group MyROGroup v1 local
group MyROGroup v1 mynetwork
group MyROGroup v2c local
group MyROGroup v2c mynetwork

## incl/excl subtree mask
view all included .1 80

## context sec.model sec.level prefix read write notif
access MyROGroup "" any noauth exact all none none

Do not edit out any lines beneath the last Access Control Sections. Please note that the above is only a mildly restrictive configuration. Consult the snmpd.conf file or the Net-SNMP documentation if you want to tighten access. On the Ubuntu server, you also may have to change the following line in the /etc/default/snmp file to allow SNMP to bind to anything other than the local loopback address:


SNMPDOPTS='-Lsd -Lf /dev/null -u snmp -I -smux -p /var/run/snmpd.pid'

Installing SNMP on Windows

On the Windows server, access the Add/Remove Programs utility from the Control Panel. Click on the Add/Remove Windows Components button on the left. Scroll down the list of Components, check off Management and Monitoring Tools, and click on the Details button. Check Simple Network Management Protocol in the list, and click OK to install. Close the Add/Remove window, and go into the Services console from Administrative Tools in the Control Panel. Find the SNMP service in the list, right-click on it, and click on Properties to bring up the service properties tabs. Click on the Traps tab, and type in the community name. In the list of Trap Destinations, add the IP address of the Zenoss server. Now, click on the Security tab, and check off the Send authentication trap box, enter the community name, and give it READ-ONLY rights. Click OK, and restart the service.

Return to the Zenoss management Web page. Click the Devices link to go into the subclass of /Devices/Servers/Windows, and on the zProperties tab, enter the name of a domain admin account and password in the zWinUser and zWinPassword fields. This account gives Zenoss access to the Windows Management Instrumentation (WMI) on your Windows systems. Make sure to click Save at the bottom of the page before navigating away.


Adding Devices into Zenoss

Now that our systems have SNMP, we can add them into Zenoss. Devices can be added individually or by scanning the network. Let's do both. To add our Ubuntu server into Zenoss, click on the Add Device link under the Management navigation section. Enter the IP address of the server and the community name. Under Device Class Path, set the selection to /Server/Linux. You could add a variety of other hardware, software and Zenoss information on this page before adding a system, but at a minimum, an IP address name and community name is required (Figure 1). Click the Add Device button, and the discovery process runs. When the results are displayed, click on the link to the new device to access it.

Figure 1. Adding a Device into Zenoss

To scan the network for devices, click the Networks link under Browse By section of the navigation menu. If your network is not in the list, add it using CIDR notation. Once added, check the box next to your network and use the drop-down arrow to click on the Select Discover Devices option. You will see a similar results page as the one from before. When complete, click on the links at the bottom of the results page to access the new devices. Any device found will be placed in the /Discovered class. Because we should have discovered the Fedora server and the Windows server, they should be moved to the /Devices/Servers/Linux and /Devices/Servers/Windows classes, respectively. This can be done from each server's Status tab by using the main drop-down list and selecting Manage→Change Class.

If all has gone well, so far we have a functional SNMP monitoring system that is able to monitor heartbeat/availability (Figure 2) and performance information (Figure 3) on our systems. You can customize other various Status and Performance Monitors to meet your needs, but here we will use the default localhost monitors.

Figure 2. The Zenoss Dashboard

Figure 3. Performance data is collected almost immediately after discovery.

Creating Users and Setting E-Mail Alerts

At this point, we can use the dashboard to monitor the managed devices, but we will be notified only if we visit the site. It would be much more helpful if we could receive alerts via e-mail. To set up e-mail alerting, we need to create a separate user account, as alerts do not work under the admin account. Click on the Setting link under the Management navigation section. Using the drop-down arrow on the menu, select Add User. Enter a user name and e-mail address when prompted. Click on the new user in the list to edit its properties. Enter a password for the new account, and assign a role of Manager. Click Save at the bottom of the page. Log out of Zenoss, and log back in with the new account. Bring the settings page back up, and enter your SMTP server information. After setting up SMTP, we need to create an Alerting Rule for our new user. Click on the Users tab, and click on the account just created in the list. From the resulting page, click on the Edit tab and enter the e-mail address to which you want alerts sent. Now, go to the Alerting Rules tab and create a new rule using the drop-down arrow. On the edit tab of the new Alerting Rule, change the Action to email, Enabled to True, and change the Severity formula to >= Warning (Figure 4). Click Save.

Figure 4. Creating an Alert Rule

The above rule sends alerts when any Production server experiences an event rated Warning or higher (Figure 5). Using a filter, you can create any number of rules and have them apply only to specific devices or groups of devices. If you want to limit your alerts by time to working hours, for example, use the Schedule tab on the Alerting Rule to define a window. If no schedule is specified (the default), the rule runs all the time. In our rule, only one user will be notified. You also can create groups of users from the Settings page, so that multiple people are alerted, or you could use a group e-mail address in your user properties.

Figure 5. Zenoss alerts are sent fresh to your mailbox.


Services and Processes

We can expand our view of the test systems by adding a process and a service for Zenoss to monitor. When we refer to a process in Zenoss, we mean an active program, usually a dæmon, running on a managed device. Zenoss uses regular expressions to monitor processes.

To monitor Postfix on the mail server, first, let's define it as a process. Navigate to the Processes page under the Classes section of the navigation menu. Use the drop-down arrow next to OS Processes, and click Add Process. Enter Postfix as the process ID. When you return to the previous page, click on the link to the new process. On the edit tab of the process, enter master in the Regex field. Click Save before navigating away. Go to the zProperties tab of the process, and make sure the zMonitor field is set to True. Click Save again. Navigate back to the mail server from the dashboard, and on the OS tab, use the topmost menu's drop-down arrow to select Add→Add OSProcess. After the process has been added, we will be alerted if the Postfix process degrades or fails. While still on the OS tab of the server, place a check mark next to the new Postifx process, and from the OS Processes drop-down menu, select Lock OSProcess. On the next set of options, select Lock from deletion. This protects the process from being overwritten if Zenoss remodels the server.

Services in Zenoss are defined by active network ports instead of running dæmons. There are a plethora of services built in to the software, and you can define your own if you want to. The built-in services are broken down into two categories: IPServices and WinServices. IPservices use any port from 1-65535 and include common network apps/protocols, such as SMTP (Port 25), DNS (53) and HTTP (80). WinServices are intended for specific use with Windows servers (Figure 6).

Figure 6. Zenoss comes with a plethora of predefined Windows services to monitor.

Adding a service is much simpler than adding a process, because there are so many predefined in Zenoss. To monitor the HTTP service on our Web server, navigate to the server from the dashboard. Use the main menu's drop-down arrow on the server's OS tab arrow, and select Add→Add IPService. Type HTTP in the Service Class Field. Notice that the field begins to prefill with matches as you type the letters. Select TCP as the protocol, and click OK. Click Save on the resulting page. As with the OSProcess procedure, return to the OS tab of the server and lock the new IPService. Zenoss is now monitoring HTTP availability on the server (Figure 7).

Figure 7. Monitoring HTTP as an IPService


Only the Beginning

There are a multitude of other features in Zenoss that space here prevents covering, including Network Maps (Figure 8), a Google Maps API for multilocation monitoring (Figure 9) and Zenpacks that provide additional monitoring and performance-capturing capabilities for common applications.

Figure 8. Zenoss automatically maps your network for you.

Figure 9. Multiple sites can be monitored geographically with the Google Maps API.

In the span of this article, we have deployed an enterprise-grade monitoring solution with relative ease. Although it's surprisingly easy to deploy, Zenoss also possesses a deep feature set. It easily rivals, if not surpasses, commercial competitors in the same product space. It is easy to manage, highly customizable and supported by a vibrant community.

Although you may not achieve the silent mind as long as you work with networks, with Zenoss, at least you will be able to sleep at night knowing you will hear things when they go down. Hopefully, they won't be trees.

Jeramiah Bowling has been a systems administrator and network engineer for more than ten years. He works for a regional accounting and auditing firm in Hunt Valley, Maryland, and holds numerous industry certifications, including the CISSP. Your comments are welcome at jb50c@yahoo.com.


Taken From: Linux Journal Issue #172/August 2008 - Zenoss and the Art of Enterprise Monitoring by Jeramiah Bowling


WiiMote on Linux - Install and Config

Hack and / - Wiimote Control

August 1st, 2008 by Kyle Rankin in

Why let your Wii have all the fun? Find out how to connect your Wiimote to your computer and use it as a mouse or an input device for any number of popular gaming emulators.

If you think about it, there are almost as many ways to interface with your computer as there are Debian-based distributions—and that's a lot. Besides the trusty keyboard and optical mouse, there are trackpoint mice, touchpads, touchscreens, twiddlers, joysticks, presentation remotes and even devices that measure your brain waves. Although I mostly stick with my tried-and-true keyboard and trackpoint mouse (fingers on home row, thank you), when I started hearing about all the interesting things people were doing with the Wiimote (the main controller from the Nintendo Wii), I knew I had to give it a try.

Now traditionally, connecting a brand-new device to a Linux machine was an investment in Internet research, kernel module hacking, prayer and obscure programming skills I haven't used since college. I figured the mere fact that this was a Bluetooth device meant I was going to have to spend some quality time with hcidump. To my surprise, all the hard work already had been done for me, and I could connect and use a Wiimote on my laptop with only a few basic steps.

Configure udev

First, your kernel needs the uinput module available and loaded. This module is available in modern kernels, and my Ubuntu Gutsy install already had it. If you want to be able to connect to the Wiimote as a regular user, however, you need to add a new udev rule to extend permissions to the uinput device. I created a file called /etc/udev/rules.d/95-uinput.rules that contained the following:

KERNEL=="uinput", GROUP="plugdev"

Then, I made sure my user was a member of the plugdev group. If your system doesn't have a plugdev group, you could choose or create another group to use for this device. Next, run /etc/init.d/udev reload to make sure your changes are seen. Finally, I ran modprobe uinput to make sure the module was loaded, and I also added uinput to /etc/modules to make sure it was loaded at boot.

Install wminput

The next step is to install the wminput software. For me, this was simple, as wminput is packaged for my distribution; otherwise, you can download the source from the official site (www.cwiid.org). Then, make sure the Bluetooth device in your computer is enabled. For my laptop, I had to flip a switch on the side, but if you have an external USB Bluetooth adapter, for instance, now is a good time to plug it in. Finally, run wminput in a console and follow the directions:

greenfly@minimus:~$ wminput
Put Wiimote in discoverable mode now (press 1+2)...
Ready.

When you press buttons 1 and 2 on your Wiimote, it goes into discoverable mode, and the blue LEDs along the bottom start blinking. Sometimes you might not start discoverable mode fast enough, or wminput won't detect it, but as long as the LEDs on the Wiimote are blinking, it is still in that mode. So if wminput times out, just run the program again.

If you continually can't connect, you probably should double-check that your Bluetooth device is working. To do this, press buttons 1 and 2 on the Wiimote and then use hcitool to scan for the Wiimote. A successful scan will look like the following:

greenfly@minimus:~$ hcitool scan
Scanning ...
00:1B:7A:3E:8C:54 Nintendo RVL-CNT-01

After wminput connects, you also can look in /var/log/dmesg for confirmation that the Wiimote is connected:

[ 1226.247203] usb 3-2: new full speed USB device using
↪uhci_hcd and address 13
[ 1226.288768] usb 3-2: configuration #1 chosen
↪from 1 choice
[ 1227.922403] input: Nintendo Wiimote as
↪/devices/virtual/input/input21
Use the Wiimote as a Mouse

Once the Wiimote is connected, the default bindings use it as a mouse. The accelerometers in the Wiimote are used to move the mouse pointer, so if you point the Wiimote down or up, the mouse will move down or up, respectively, and if you roll the Wiimote to the left or right, the mouse will move left or right, respectively. If you look at /etc/cwiid/wminput/buttons, you can see the default mappings:

Wiimote.A               = BTN_LEFT
Wiimote.B = BTN_RIGHT
Wiimote.Up = KEY_UP
Wiimote.Down = KEY_DOWN
Wiimote.Left = KEY_LEFT
Wiimote.Right = KEY_RIGHT
Wiimote.Minus = KEY_BACK
Wiimote.Plus = KEY_FORWARD
Wiimote.Home = KEY_HOME
Wiimote.1 = KEY_PROG1
Wiimote.2 = KEY_PROG2
...

By default, wminput reads the configuration listed in /etc/cwiid/wminput/default to get its mappings. In this file you will see:

#acc_ptr

include buttons

Plugin.acc.X = REL_X
Plugin.acc.Y = REL_Y

Essentially, this file includes the buttons file for keybindings, and it also enables the use of the accelerometers for X and Y movements. The great thing about wminput is that all these mappings are completely configurable. If you look in /etc/cwiid/wminput, you should see a number of other example mappings you can use as inspiration. You also can store custom mappings in your home directory under ~/.cwiid/wminput. The button mappings use standard names for keys and mouse buttons that can be found in /usr/include/linux/input.h, but most of the names are pretty straightforward.

Wiimotes for NES Emulation

One of the first things I wanted to do with my Wiimote after it was connected was to use it as a controller for my various game system emulators. But, before I go any further, if you do use a game system emulator like nestra, fceu, snes9x or MAME, be sure you have full rights to use any ROMs you might have. Make an appointment with your lawyer for details, but essentially, to play a commercial ROM, you should own the corresponding game.

With the legal disclaimers aside, the Wiimote makes a great wireless NES (Nintendo Entertainment System) controller. All the basic buttons are there, and all that's left to do is rearrange the button mappings to work with either nestra or fceu NES emulators. Both programs use slightly different mappings, so I created files called buttons-fceu and buttons-nestra and placed them in ~/.cwiid/wminput. First, buttons-nestra:

Wiimote.A               = KEY_0
Wiimote.B = KEY_1
Wiimote.Up = KEY_LEFT
Wiimote.Down = KEY_RIGHT
Wiimote.Left = KEY_DOWN
Wiimote.Right = KEY_UP
Wiimote.Minus = KEY_TAB
Wiimote.Plus = KEY_ENTER
Wiimote.Home = KEY_PAUSE
Wiimote.1 = KEY_Z
Wiimote.2 = KEY_SPACE

After I set the regular NES buttons, I had a few extra to bind, so I bound the A button to pause the emulator, the B button to set nestra to normal speed and the home button to reset the game.

The fceu emulator had completely different keybindings, so here is my buttons-fceu file:

Wiimote.A               = KEY_F7
Wiimote.B = KEY_F5
Wiimote.Up = KEY_A
Wiimote.Down = KEY_S
Wiimote.Left = KEY_Z
Wiimote.Right = KEY_W
Wiimote.Minus = KEY_TAB
Wiimote.Plus = KEY_ENTER
Wiimote.Home = KEY_F10
Wiimote.1 = KEY_KP2
Wiimote.2 = KEY_KP3

In addition to the standard buttons, I bound the B button to save a game state, A to restore and home to reset the game.

Now, to use either of these configuration files, all I need to do is tell wminput to load these files instead:

greenfly@minimus:~/$ wminput -c ~/.cwiid/wminput/buttons-nestra
Put Wiimote in discoverable mode now (press 1+2)...
Ready.

Because wminput sends regular keyboard events, I don't have to do anything special to nestra or fceu.

Wiimotes for SNES Emulation

The Wiimote worked great for NES games, but how about SNES (Super Nintendo) emulation? I actually purchased a few different SNES games for the Wii virtual console, and I also bought a Classic Controller so I would have all the standard SNES buttons. It turns out that wminput also can bind keys to the Nunchuck and Classic Controller attachments, so all I had to do for it to work with snes9x was create a new configuration file that mapped all the keys. Here is my buttons-snes9x file:

Wiimote.A               = KEY_X
Wiimote.B = KEY_S
Wiimote.Up = KEY_LEFT
Wiimote.Down = KEY_RIGHT
Wiimote.Left = KEY_DOWN
Wiimote.Right = KEY_UP
Wiimote.Minus = KEY_TAB
Wiimote.Plus = KEY_ENTER
Wiimote.Home = KEY_ESC
Wiimote.1 = KEY_C
Wiimote.2 = KEY_D

Nunchuk.C = BTN_LEFT
Nunchuk.Z = BTN_RIGHT

Classic.Up = KEY_UP
Classic.Down = KEY_DOWN
Classic.Left = KEY_LEFT
Classic.Right = KEY_RIGHT
Classic.Minus = KEY_SPACE
Classic.Plus = KEY_ENTER
Classic.Home = KEY_ESC
Classic.A = KEY_D
Classic.B = KEY_C
Classic.X = KEY_S
Classic.Y = KEY_X
#Classic.ZL =
#Classic.ZR =
Classic.L = KEY_A
Classic.R = KEY_Z

Even though I planned to use the Classic Controller, I tried to map as many of the regular Wiimote keys to buttons that made sense, so you could potentially play at least some games with the regular Wiimote as well. If you notice, I also left bindings for the special ZL and ZR keys blank, so you could bind them to extra keys.

Wiimote Control for MAME

One of the best game system emulators out there is MAME. MAME emulates classic arcade games, and there are many guides out there (including in Linux Journal itself) on how to use MAME to create your own arcade cabinet. Well, I haven't cleared away the time for that project yet, but I did want to use my Wiimote and Classic Controller attachment for MAME games. MAME has a large number of bindings (press Tab in MAME to see a list), so it was difficult to choose which to bind to the extra keys. Here is a sample buttons-xmame file I created:

Wiimote.A               = KEY_P
Wiimote.B = KEY_5
Wiimote.Up = KEY_LEFT
Wiimote.Down = KEY_RIGHT
Wiimote.Left = KEY_DOWN
Wiimote.Right = KEY_UP
Wiimote.Minus = KEY_2
Wiimote.Plus = KEY_1
Wiimote.Home = KEY_F3
Wiimote.1 = KEY_LEFTCTRL
Wiimote.2 = KEY_LEFTALT

Nunchuk.C = BTN_LEFT
Nunchuk.Z = BTN_RIGHT

Classic.Up = KEY_UP
Classic.Down = KEY_DOWN
Classic.Left = KEY_LEFT
Classic.Right = KEY_RIGHT
Classic.Minus = KEY_2
Classic.Plus = KEY_1
Classic.Home = KEY_F3
Classic.A = KEY_LEFTCTRL
Classic.B = KEY_LEFTALT
Classic.X = KEY_SPACE
Classic.Y = KEY_LEFTSHIFT
Classic.ZL = KEY_5
Classic.ZR = KEY_P
Classic.L = KEY_Z
Classic.R = KEY_X

In addition to the standard bindings you might expect, the home key resets MAME; the plus key selects single player; minus selects two players; ZL on the Classic Controller and B on the Wiimote insert a coin; and ZR on the Classic Controller and A on the Wiimote pause. These are by no means perfect bindings, so I recommend you experiment with different keys that work better for you.

The possibilities with wminput go much further than what I've presented here. There also are configuration files that use the analog joystick inputs on the Classic Controller, the IR sensors on the Wiimote and the accelerometers on the Nunchuck. Wminput isn't just a handy way to play video games on your laptop or desktop. The fact that the connection to the computer is wireless makes the Wiimote a great gaming input for a MythTV client or other computer connected to your PC. As for me, I think I'll be spending a few more days trying to beat this impossible Super Mario Brothers hack that has been floating around the Internet.

Kyle Rankin is a Senior Systems Administrator in the San Francisco Bay Area and the author of a number of books, including Knoppix Hacks and Ubuntu Hacks for O'Reilly Media. He is currently the president of the North Bay Linux Users' Group.


Taken From: Linux Journal Issue #172/August 2008 - Wiimote Control by Kyle Rankin

Render HTML in Your Applications (C/C++) - WebKit - QT

Using WebKit in Your Desktop Application

July 1st, 2008 by Benjamin Meyer in

Include Web content in your desktop application with WebKit.

Qt always has included the ability to render basic HTML and download files with HTTP. With the release of version 4.4.0, this has been taken to a whole new level with the inclusion of WebKit. Developers who use Qt now can utilize WebKit for everything—from simple HTML document viewers to full-blown Web browsers. Trolltech always has been known for creating high-quality APIs that are easy and intuitive to use, and this is just as true with QtWebKit, the integration of WebKit with Qt.

The WebKit rendering engine is used by Safari and has its roots in the KDE Project's KHTML engine, which drives the Konqueror Web browser. Licensed under the LGPL, this open-source engine has been praised for its performance and low memory usage. It was the ideal choice for small devices, such as the Nokia S60 and the iPhone. Beyond Web browsers, WebKit is used by many applications, including Adium, Colloquy, MSN Messenger and Mac OS X's Dashboard. With the addition of the Qt port to WebKit, there no doubt will be many more cross-platform applications in the near future that take advantage of this engine.

Figure 1. Designer lets you easily create forms with widgets, including WebKit.

QtWebKit provides developers with a handful of useful classes. At the very top level, there is QWebView, which is a QWidget with a number of convenience functions, such as setUrl(), loadProgress() and reload(). Inside Qt Designer, the GUI builder for Qt applications, you even can drag a QWebView into a form and set the URL. QWebView is built on top of QWebPage, which contains the Web content, history and settings. QWebPage is not a widget, but was built to be used on many surfaces, including QGraphicsView, Qt's canvas widget. Supporting QWebView and QWebPage are classes that let you build plugins, access the page history and walk the frames.

A lot of the fun of having WebKit in your application is having it pull content from the Internet. Qt 4.4.0 introduces new networking classes, including an all new HTTP implementation. QNetworkAccessManager handles all network requests and replies with support for HTTP 1.0, 1.1 and SSL. A custom cookie jar and proxy configuration also can be set. Qt's source code includes a demo browser and example applications that show off how to use many of the features of these classes.

Qt always has provided fantastic cross-platform support with integration into the desktop. With the introduction of QtWebKit, developers now can make a cross-platform desktop application for a Web site. Linux Journal provides a digital subscription that lets you download older issues. The Web site is very simple and a perfect candidate for building a small application around. Although the Web site does have the table of contents, it does not provide a way to search all the available issues for articles. So the application I am going to make provides an easy way to search through the issues and let you download them.

The GUI for the application was made with Qt Designer and has a matching main window class that contains the functionality. To compile the project, Qt includes a cross-platform build tool called qmake. Beyond the normal qmake template when using QtWebKit, the Qt variable also needs WebKit to be specified for the library to be linked in. Our application's project file (lj.pro) consists of the following:

TEMPLATE = app
QT += WebKit
FORMS += lj.ui
SOURCES += main.cpp mainwindow.cpp
HEADERS += mainwindow.h

Like most Qt applications, main.cpp contains only a small amount of code. It constructs a QApplication and the main window, and then starts the event loop. By setting the application name, we tell QtWebKit to include it in the user agent string automatically. That way, if Qt's networking in your application starts behaving badly, Web site developers know whom to contact. The user agent string is, of course, fully customizable by subclassing QWebPage if you need to. Here's the main.cpp file:

#include 
#include "mainwindow.h"

int main(int argc, char **argv)
{
QApplication app(argc, argv);
app.setApplicationName("LinuxJournalDigital");
MainWindow mainwindow;
mainwindow.show();
return app.exec();
}

The interface was built in just a few minutes using Qt Designer. On the left-hand side are two QListViews. The one on the top will contain the list of available issues, and the bottom one will contain the table of contents of the currently selected issue. On the right-hand side is a QWebView.

Figure 2. Designer shows off the form for our application.

The interface file is turned into a header file (ui_lj.h) by uic during the compilation process. ui_lj.h contains the generated Ui_Form class along with all the objects in the interface. The main window class definition is a subclass of QMainWindow and Ui_Form. The only new objects in the MainWindow classes are the models that are used to contain the list of issues and the proxy, which is used for searching. The mainwindow.h file is as follows:

#include 
#include
#include "ui_lj.h"

class MainWindow :
public QMainWindow, public Ui_Form
{
Q_OBJECT
public:
MainWindow();

private slots:
void downloadFinished();
void clicked(const QModelIndex &);
void activated(const QModelIndex &);
void downloadRequested(const QNetworkRequest &);
void downloadingIssueFinished();
void downloadProgress(qint64, qint64);

private:
QStandardItemModel *issues;
QSortFilterProxyModel *proxy;
QStringListModel *tocModel;
};

mainwindow.cpp contains all the application's plumbing. The MainWindow constructor sets up the interface, creates the toolbar and begins to fetch the available issues. setupUi() is declared in the generated interface header and populates the central widget with the widgets that were specified in the interface file. The toolbar is populated with actions for the Web page and a line edit for searching. Rather than create and set up each QAction manually, QWebPage has built-in actions that can be used. Here's mainwindow.cpp:

#include "mainwindow.h"

#define SERVER "https://secure.linuxjournal.com/" \
"allsubs/"

MainWindow::MainWindow() : QMainWindow()
{
QWidget *w = new QWidget;
setCentralWidget(w);
setupUi(centralWidget());

connect(issuesView, SIGNAL(activated(QModelIndex))
,this, SLOT(activated(QModelIndex)));
connect(issuesView, SIGNAL(clicked(QModelIndex)),
this, SLOT(clicked(QModelIndex)));
issues = new QStandardItemModel(issuesView);
proxy = new QSortFilterProxyModel(issues);
proxy->setSourceModel(issues);
proxy->setFilterCaseSensitivity(Qt::CaseInsensitive);
proxy->setFilterRole(Qt::UserRole + 1);
issuesView->setModel(proxy);
connect(
webView, SIGNAL(statusBarMessage(QString)),
statusBar(), SLOT(showMessage(QString)));
connect(webView->page(),
SIGNAL(downloadRequested(QNetworkRequest)),
this, SLOT(downloadRequested(QNetworkRequest)));
tocModel = new QStringListModel(this);
toc->setModel(tocModel);

QToolBar *bar = addToolBar(tr("Navigation"));
bar->addAction(
webView->pageAction(QWebPage::Back));
bar->addAction(
webView->pageAction(QWebPage::Forward));
bar->addAction(
webView->pageAction(QWebPage::Stop));
bar->addAction(
webView->pageAction(QWebPage::Reload));
bar->addSeparator();

QLabel *label = new QLabel("Search:", bar);
bar->addWidget(label);
QLineEdit *search = new QLineEdit(bar);
QSizePolicy policy = search->sizePolicy();
search->setSizePolicy(QSizePolicy::Preferred,
policy.verticalPolicy());
bar->addWidget(search);
connect(search, SIGNAL(textChanged(QString)),
proxy, SLOT(setFilterFixedString(QString)));
QUrl home(SERVER "dlj.php?action=show-account");
webView->load(home);

setWindowTitle("Linux Journal Digital Archive");

QNetworkAccessManager *networkManager =
webView->page()->networkAccessManager();

QUrl url(SERVER "dlj.php?action=show-downloads");
QNetworkRequest request(url);
QNetworkReply *r = networkManager->get(request);
connect(r, SIGNAL(finished()),
this, SLOT(downloadFinished()));
}

Figure 3. The application with all the found issues and the table of contents of the currently selected issue.

When the application launches, the user will see the main login page, and in the background, the “show-downloads” page is downloaded from Linux Journal. In an ideal world, Linux Journal would provide a simple XML file with all the available issues, table of contents and download location, but because this is just a demo, this information is acquired the hard way. It does this by using a regular expression to find any available issues, which is listed at the top of every Web page:

void MainWindow::downloadFinished()
{
QNetworkReply *reply =
((QNetworkReply *)sender());
QByteArray data = reply->readAll();
QTextStream out(&data);
QString file = out.readAll();

// The first page, find all of the pages that
// we can download issues from and fetch them.
if (issues->rowCount() == 0) {
QRegExp rx("show-downloads&row_offset=[0-9]*");
QStringList pages;
int pos = 0;
while (pos != -1) {
pos = rx.indexIn(file, pos + 1);
QString page = rx.capturedTexts().first();
if (!page.isEmpty() && !pages.contains(page))
pages.append(page);
}
QNetworkAccessManager *networkManager =
webView->page()->networkAccessManager();
foreach (QString page, pages) {
QUrl url(SERVER "dlj.php?action=" + page);
QNetworkReply *reply =
networkManager->get(QNetworkRequest(url));
connect(reply, SIGNAL(finished()),
this, SLOT(downloadFinished()));
}
}

Each Web page also contains several issues, usually three. Another regular expression is used to find each issue and the table of contents for that issue. After they are extracted, the data is put into the model where it is displayed:

  QRegExp issue("class=\"data-data\">([a-zA-Z]* " \
"20[0-9][0-9])");
int pos = 0;
while (pos != -1) {
pos = issue.indexIn(file, pos + 1);
QString page = issue.capturedTexts().value(1);
QStandardItem *item = new QStandardItem(page);
if (!page.isEmpty()) {
item->setData(reply->url(), Qt::UserRole);
item->setFlags(Qt::ItemIsSelectable
| Qt::ItemIsEnabled);
issues->insertRow(issues->rowCount(), item);
}

// Now that we have an issue, find the
// table of contents
QRegExp toc("
");
toc.setMinimal(true);
toc.indexIn(file, pos);
QStringList list =
toc.capturedTexts().first().split("
  • ");
    for (int j = list.count() - 1; j >= 0; --j) {
    QString s = list[j].simplified();
    if (!s.endsWith("
  • "))
    list.removeAt(j);
    else {
    s = s.mid(0, s.length() - 5);
    list[j] = s;
    }
    }

    // The table of contents is joined
    // together in one string and is used
    // by the proxy for searching
    item->setData(list.join(" "),
    Qt::UserRole + 1);

    // Save TOC which will be used to populate the
    // TOC list view if this issue is clicked on
    item->setData(list, Qt::UserRole + 2);
    }
    }

    The proxy is set to filter on Qt::UserRole + 1, which contains the full table of contents for each issue. When you type in the search box, any issue that doesn't contain the string will be filtered out.

    Figure 4. On-the-fly searching filters the issues only to those that contain the search string.

    When an issue is clicked, the table of contents is fetched out of the issuesView model and inserted into the tocModel where it is displayed in the lower list view:

    void MainWindow::clicked(const QModelIndex &index)
    {
    QVariant v = index.data(Qt::UserRole + 2);
    tocModel->setStringList(v.toStringList());
    }

    When an issue is activated (depending on the platform, this could be a double-click or single-click), the URL is fetched out of the issue model and set on the QWebView:

    void MainWindow::activated(const QModelIndex &index)
    {
    webView->load(index.data(Qt::UserRole).toUrl());
    }

    Once the user clicks on the download issue button, the Web site confirms authentication and then forwards to a Web page to download the actual file. Once there, downloadRequested() is called. From here on out, the example deals mostly with the new networking code. QWebPage has a built-in QNetworkAccessManager that is used to fetch the PDF:

    void MainWindow::downloadRequested(
    const QNetworkRequest &request)
    {
    // First prompted with a file dialog to make sure
    // they want the file and to select a download
    // location and name.
    QString defaultFileName =
    QFileInfo(request.url().toString()).fileName();
    QString fileName =
    QFileDialog::getSaveFileName(this,
    tr("Save File"),
    defaultFileName);
    if (fileName.isEmpty())
    return;

    // Construct a new request that stores the
    // file name that should be used when the
    // download is complete
    QNetworkRequest newRequest = request;
    newRequest.setAttribute(QNetworkRequest::User,
    fileName);

    // Ask the network manager to download
    // the file and connect to the progress
    // and finished signals.
    QNetworkAccessManager *networkManager =
    webView->page()->networkAccessManager();
    QNetworkReply *reply =
    networkManager->get(newRequest);
    connect(
    reply, SIGNAL(downloadProgress(qint64, qint64)),
    this, SLOT(downloadProgress(qint64, qint64)));
    connect(reply, SIGNAL(finished()),
    this, SLOT(downloadIssueFinished()));
    }

    Because Linux Journal PDFs are large files, it is important to give notification on the download progress. The simplest method is to update the status bar with the progress:

    void MainWindow::downloadProgress(qint64
    bytesReceived, qint64 bytesTotal)
    {
    statusBar()->showMessage(QString("%1/%2")
    .arg(bytesReceived)
    .arg(bytesTotal), 1000);
    }

    When the PDF has finished downloading successfully, the filename and location that were chosen by the user before are retrieved, and the full file is saved to disk:

    void MainWindow::downloadingIssueFinished()
    {
    QNetworkReply *reply = ((QNetworkReply*)sender());
    QNetworkRequest request = reply->request();
    QVariant v =
    request.attribute(QNetworkRequest::User);
    QString fileName = v.toString();
    QFile file(fileName);
    if (file.open(QFile::ReadWrite))
    file.write(reply->readAll());
    }

    Conclusion

    The inclusion of WebKit into Qt provides the opportunity for a number of very interesting applications to be developed. It will no doubt be utilized in many different types of applications, from desktop Web applications to applications that use it to display and manipulate HTML. QtWebKit has come a long way since the port was initially started two years ago. It will be exciting to see how QtWebKit improves and what people create with it.

    Benjamin Meyer is a happily married hacker. He has been developing with Qt for 11 years, and he has worked on many tools and applications, such as KDE's audiocd ioslave, System Settings, KAutoConfig, KAudiocreator, QAutotestGenerator, Valgrind Tools, NetflixRecommenderFramework, Zaurus applications and much more. He collects Transformers and runs the site

    Taken From: Linux Journal Issue #171/July 2008 - Using WebKit in Your Desktop Application by Benjamin Meyer

    Sunday, August 10, 2008

    Setting Up CPU Affinity (select cpus for a process)

    To set CPU HARD affinity (as opposed to the soft affinity already done by the kernel automatically) install schedtool. Then read the manual to understand how it works.

    The short version:

    To set a process’ affinity to only eg the first CPU (CPU0) and third CPU (CPU2) :

    #> schedtool -a 0,2


    Here is also a very good link to explain when and why HARD affinity could provide benefits vs SOFT affinity. I found way too many posts about "it's not needed" in my search instead of actual information, so clearing up the misconceptions might be a good thing in general.


    http://www-128.ibm.com/developerwork...-affinity.html

    Taken From: http://ubuntuforums.org/showthread.php?t=636521

    Friday, August 8, 2008

    PSP Video Converter (PSPVC) on Ubuntu 8.04

    I'm new to Linux and sure appreciate step by step instructions when I get stuck. Since I haven't been able to find any while trying to install pspvc, I figured I'd roll my own. I managed to successfully install it by piecing together bits from a bunch of posts. Let's see if we can put it all together in one place.

    This worked for me in Ubuntu Edgy. Hopefully, it'll work for you.

    1. Download pspvc from here: http://pspvc.sourceforge.net/, saving it to your desktop.

    2. Double click the pspvc tar.gz file on your desktop.

    3. Press "Extract", ensure "Desktop" is listed as the location to extract the files, and then press the "Extract" button (again).

    4. You should now have a pspvc-install-0.3 folder on your desktop.

    5. Open Terminal or Konsole (whichever you have installed).

    6. Install dependencies using this command:
    Code:

    $ sudo apt-get install libgtk2.0-dev libfaac-dev libxvidcore4-dev nasm build-essential


    7. Several development libraries that pspvc requires will install. You'll see a bunch of output and it'll take a few seconds to complete.

    8. Next, enter the following command, replacing user with your user name. This will change the prompt to the pspvc installation directory.
    Code:

    $ cd /home/user/Desktop/pspvc-install-0.3

    9. To begin the pspvc install, enter this command:
    Code:

    sudo ./install.sh

    10. When the install completes, you should see a message that says "PSPVC installation completed". You're done!

    11. Enter pspvc at the prompt to start the application.


    Taken From: http://ubuntuforums.org/showpost.php?p=2258647&postcount=5