Tuesday, December 27, 2011

Install Android Applications on SD Cards (from Android1.6 and above)

The biggest advantage that Link2SD offers, in my opinion, is the possibility to be used in android versions as low as 1.6 to the higher versions above like 2.1 an so on, where the popular App2SD, can only be used starting at android 2.2.
Link2SD Guide and Usage Tutorial
Hello all,
As you know most of the android phone owner are getting hard time to manage internal phone space and so everyone are looking for some kind of apps that able to move apps and their data to SD card storage. Link2SD is one of that app and used by most of us atleast once. But some folks out there still having trouble to setup Link2SD and related partitioning procedure for SD Card. Hope this guide and usage tutorial helpful to everyone. Feel free to leave questions or any comments on comment section(very bottom).
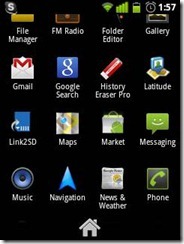
1. Install “Link2SD” from market. Here is link: http://alturl.com/43oki. Once you install you see the icon as below image. Tap on that. It will load all apps in there and eventually will show the error message as shown in 2nd image. But don’t worry, that’s part of setup too. This error comes because your SD card is still not formatted (that’s i’m assuming clip_image001 )
clip_image003
clip_image005
2. Now download EASEUS Partition Masters. It’s Free. (Everyone has different selection for partitioning purpose, but in this tutorial i’ll go thru this tool.)
Here is link: http://alturl.com/7kueu
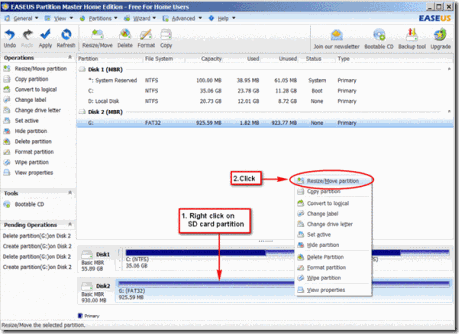
- Before starting plug your phone using USB to PC and “Turn on USB Mode” from your phone to get SD card access in PC.
- After that , run EASEUS from PC. You will see your SD Card partitions.
- Follow next step as shown in screenshot (below).
clip_image007
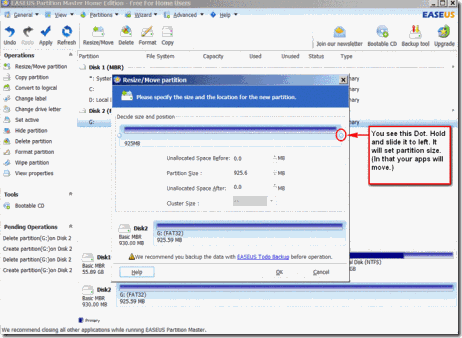
3. Follow next step as shown in screenshot (below).
clip_image009
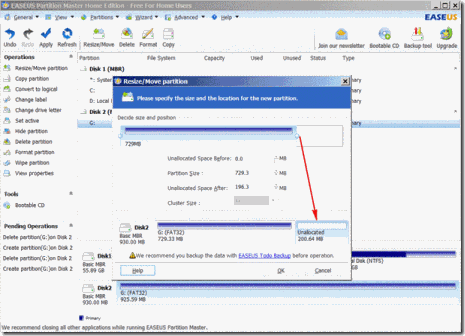
4. As shown below, move the dot to left side according to your require partition size. Once you do that, this partition will be called “Unallocated” because we haven’t formatted yet. We’ll do in next step. (Note: this is the partition in which your apps will move or linked).
clip_image011
5. After performing above step, it will show warning message as shown below. Just click YES. clip_image001[1]
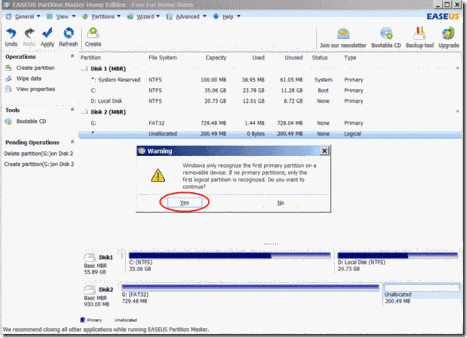
clip_image013
6. Now we will define format method for unallocated partition. As shown screenshot follow the options and then click OK.
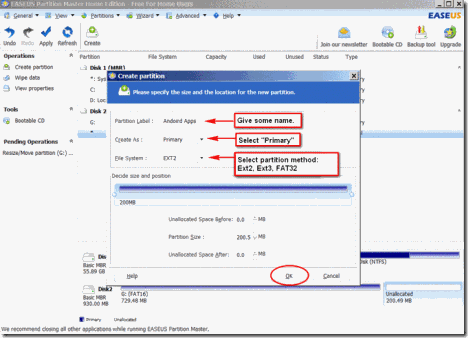
clip_image015
7. Now we are going to apply our settings for SD card. Click on “Apply” and proceed ahead. It will create partition on SD card (i.e. 200MB- Ext2. )
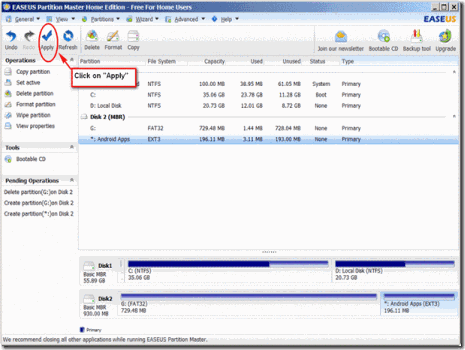
clip_image017
8. Unplug your phone from PC. PLEASE RESTART YOUR PHONE NOW.
After reboot, Go to Link2SD app. As it will start, you will see the message as shown in screenshot. Basically it mount script on SD card and it will run on next reboot and mount the partition that we have created.  Go ahead press OK, it will restart your phone.
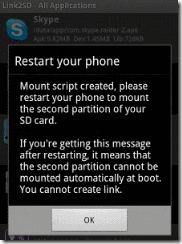
clip_image019
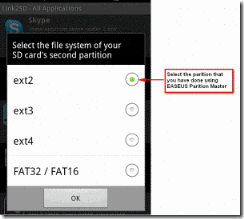
9. After reboot, open Link2SD. It will pop up 4 options for you. Select ONLY that partition that you have created using EASEUS. (i.e select ext2, as we have cerated ext2 partition using EASEUS)clip_image021
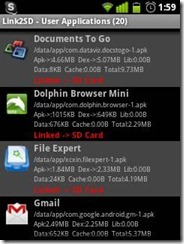
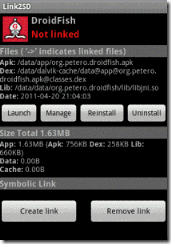
10. After that you ready to go. Click on any apps that you want to link to SD –> Click on “Create Link” option –>Check mark all the boxes (it’ll pop up menu to ask which data files you want to move. Select all) and press OK.
It will move that app to SD and as shown below ,it’ll show red text at the bottom of app if its linked successfully.
clip_image023
clip_image025
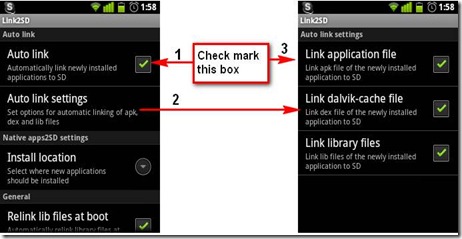
11. Let’s have a look to the some features. In last step we have move app and data manually. What about auto move?
Follow screenshot, you  will get it. It will move apps directly to SD card automatically after enabling “Auto Link” option. (Note: Already installed apps won’t move automatically from internal to SD card, you have to do manually for those. This option only effective for next installation of any apps.)
clip_image027
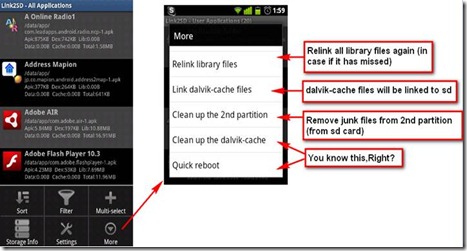
12. Another useful features are shown below.
clip_image029
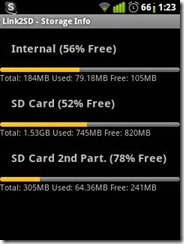
13. Last but not least, it will give info of Internal storage and SD card partition storage.
clip_image031
14. Hope you have setup Link2SD app successfully. Still if you have any problem, questions or comments, feel free to post it below in comment section. clip_image032
Thanks
Taken From: http://www.madteam.co/2011/09/30/link2sd-guide-and-usage-tutorial/

Install Gnome in Ubuntu 11.10 (Unity Desktop)

Here we go again. A new version of Ubuntu is out and if you still don't want to switch from it because of Unity, you are welcome to try and install Gnome. (I didn't try removing or disabling Unity this time, but you are welcome to).
Keep in mind that the new gnome leaves a lot to be desired (like that clock in the middle of the screen) and will take some time to get used to (not as much as Unity though).
Steps:

1. Open shell and run:

     sudo apt-get install gnome-shell

2. Once installed, you have to reboot.

3. After the reboot, on the login window select Gnome classic


clip_image002

An alternative is XFCE, you can either get XUbuntu or do the following:

     sudo apt-get install xubuntu-desktop

I have done this and it works but Gnome looks like crap, I’m seriously considering switching to another distro like MintLinux. CANONICAL please support GNOME again, Unity is good for tablets, but not for the Desktop, you can put Unity in the netbook version off Ubuntu.

Based on: http://www.virtualhelp.me/linux/470-install-gnome-in-ubuntu-1110-oneiric-ocelot

Saturday, December 24, 2011

Backup a Cisco Config Automatically – Time (Kron Method)

In order to get a router to copy the running-config to startup-config, for example every Sunday at 23:00, complete these steps:

1 - Create a kron policy list—This is the script that lists what commands the router should run at the scheduled time.

Router#enable
Router#configure terminal
Router(config)#kron policy-list Backup
Router(config-kron-policy)#cli show startup-config | redirect tftp://192.168.1.252/test.cfg
Router(config-kron-policy)#exit

cli—Specifies EXEC CLI commands within a Command Scheduler policy list.
policy-list—Specifies the policy list associated with a Command Scheduler occurrence.

Note: The reason why write was used rather than copy running-config startup-config is because kron does not support interactive prompts and the copy running-config startup-config command requires interaction. It is important to remember this when you create commands. Also, note that kron does not support configuration commands.


2 - Create a kron occurrence—This informs the router when and how often the policy should run.

Router(config)#kron occurrence SaveConfigSchedule at 23:00 Sun recurring
Router(config-kron-occurrence)#policy-list Backup

SaveConfigSchedule—This is the name of occurrence. Length of occurrence-name is from 1 to 31 characters. If the occurrence-name is new, an occurrence structure will be created. If the occurrence-name is not new, the existing occurrence will be edited.

at—Identifies that the occurrence is to run at a specified calendar date and time.
recurring—Identifies that the occurrence is to run on a recurring basis.


3 - Verify the kron configuration by using the show command.

Router#show kron schedule
Kron Occurrence Schedule
SaveConfigSchedule inactive, will run again in 1 days 12:37:47 at 23:00 on Sun

inactive—Means that kron is not running the command(s) at present.
active—Means that kron is running the current command(s).


Router#show running-configuration
...
kron occurrence SaveConfigSchedule at 23:00 Sun recurring
policy-list Backup
!
kron policy-list Backup
cli show startup-config | redirect tftp://192.168.1.252/test.cfg
...


Note: You can use this to schedule other things, just change the the policy-list, to what you want.

Based Onhttp://www.cisco.com/en/US/products/sw/iosswrel/ps1835/products_tech_note09186a008020260d.shtml

Friday, December 23, 2011

Backup a Cisco Config Automatically – Changes ( Archive Method )

Cisco IOS has the ability to save it’s configuration when you run the write memory command.
Here is how:

R1#enable
R1#configure terminal
R1(config)#archive
R1(config-archive)#path tftp://172.16.10.61/sw3725/sw3725.cfg
R1(config-archive)#write-memory
R1(config-archive)#exit
R1(config)#exit

The “write-memory” option means that when the running-config is saved to the startup-config a copy will also be saved on the tftp server, thus backing up the startup-config every time it’s changed.

In this example, we’ve configured the switch to save to the configuration file to the sw3725 sub-directory of a ttp server.
To test the setup, run the “write memory” command.

R1#enable
R1#write memory

or
R1#copy running-config startup-config

Looking on the sw3725 on the tftp server, we see a configuration file was uploaded:

sw3725.cfg-1

if you save the running-config a couple more times you wil get something like this:

sw3725.cfg-1
sw3725.cfg-2
sw3725.cfg-3

like you see the number at the end of the file name is incremented, every time you save the running-config

Based On: http://www.rainingpackets.com/configuring-cisco-ios-automatically-save-running-configuration-tftp-server-save

More Info at:

Boot From USB Disk in VMWare Workstation (increase boot screen also)

Increase the VMWare Boot Screen Delay

If you’ve wanted to try out a bootable CD or USB flash drive in a virtual machine environment, you’ve probably noticed that VMWare’s offerings make it difficult to change the boot device. We’ll show you how to change these options.

You can do this either for one boot, or permanently for a particular virtual machine.

clip_image002

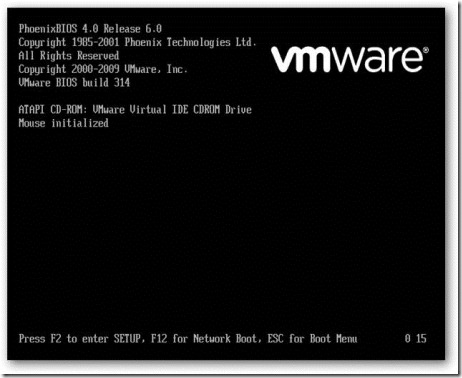
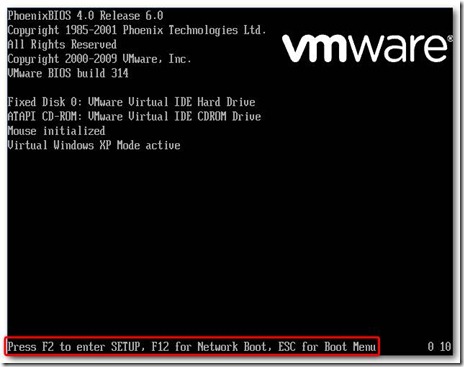
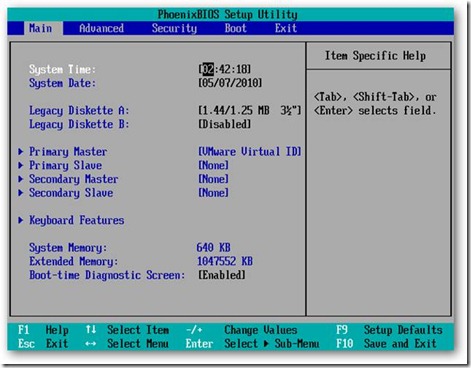
Even experienced users of VMWare Player or Workstation may not recognize the screen above – it’s the virtual machine’s BIOS, which in most cases flashes by in the blink of an eye.

If you want to boot up the virtual machine with a CD or USB key instead of the hard drive, then you’ll need more than an eye’s-blink to press Escape and bring up the Boot Menu. Fortunately, there is a way to introduce a boot delay that isn’t exposed in VMWare’s graphical interface – you have to edit the virtual machine’s settings file (a .vmx file) manually.

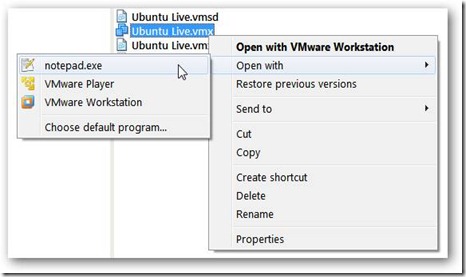
Editing the Virtual Machine’s .vmx

Find the .vmx file that contains the settings for your virtual machine. You chose a location for this when you created the virtual machine – in Windows, the default location is a folder called My Virtual Machines in your My Documents folder.

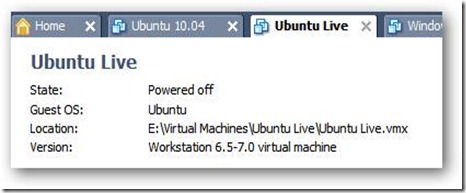
In VMWare Workstation, the location of the .vmx file is listed on the virtual machine’s tab.

clip_image004

If in doubt, search your hard drive for .vmx files. If you don’t want to use Windows default search, an awesome utility that locates files instantly is Everything.

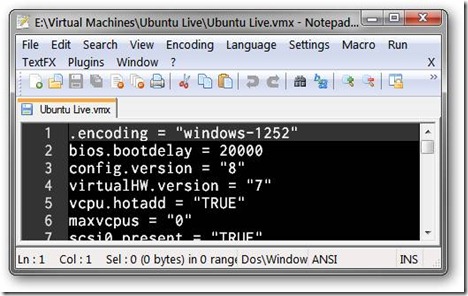
Open the .vmx file with any text editor.

clip_image006

Somewhere in this file, enter in the following line… save the file, then close out of the text editor:

bios.bootdelay = 20000

clip_image008

This will introduce a 20 second delay when the virtual machine loads up, giving you plenty of time to press the Escape button and access the boot menu. The number in this line is just a value in milliseconds, so for a five second boot delay, enter 5000, and so on.

Change Boot Options Temporarily

Now, when you boot up your virtual machine, you’ll have plenty of time to enter one of the keystrokes listed at the bottom of the BIOS screen on boot-up.

clip_image010

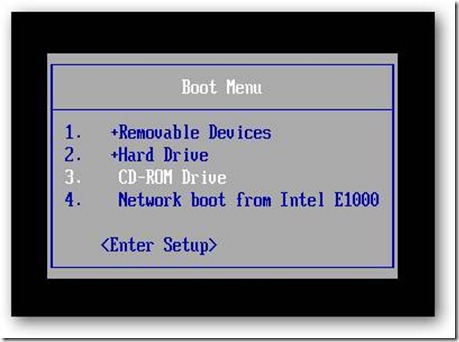
Press Escape to bring up the Boot Menu. This allows you to select a different device to boot from – like a CD drive.

clip_image012

Your selection will be forgotten the next time you boot up this virtual machine.

Change Boot Options Permanently

When the BIOS screen comes up, press F2 to enter the BIOS Setup menu.

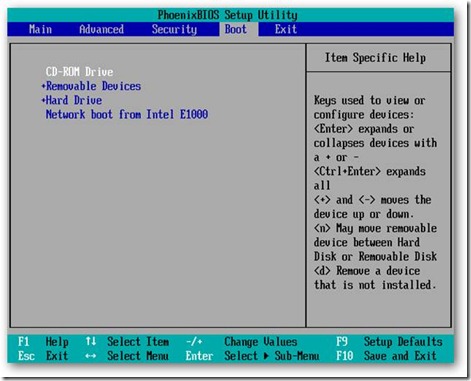
clip_image014

Switch to the Boot tab, and change the ordering of the items by pressing the “+” key to move items up on the list, and the “-” key to move items down the list. We’ve switched the order so that the CD-ROM Drive boots first.

clip_image016

Once you make this change permanent, you may want to re-edit the .vmx file to remove the boot delay.

Boot from a USB Flash Drive

One thing that is noticeably missing from the list of boot options is a USB device. VMWare’s BIOS just does not allow this, but we can get around that limitation using the PLoP Boot Manager that we’ve previously written about. And as a bonus, since everything is virtual anyway, there’s no need to actually burn PLoP to a CD.

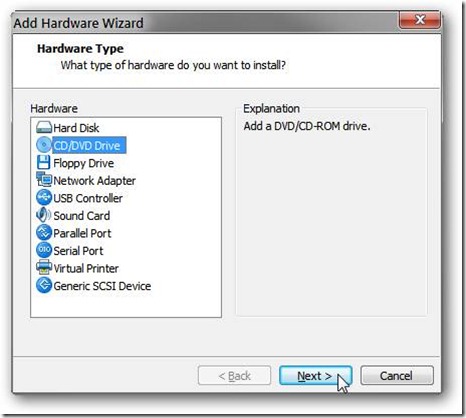
Open the settings for the virtual machine you want to boot with a USB drive. Click on Add… at the bottom of the settings screen, and select CD/DVD Drive. Click Next.

clip_image018

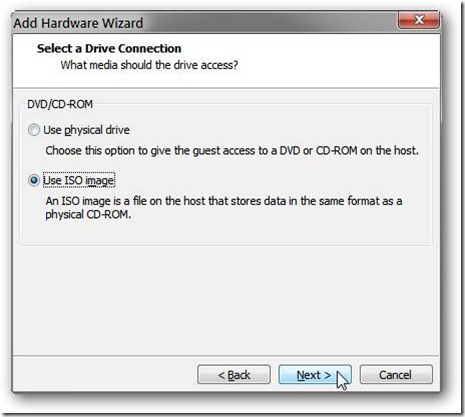
Click the Use ISO Image radio button, and click Next.

clip_image020

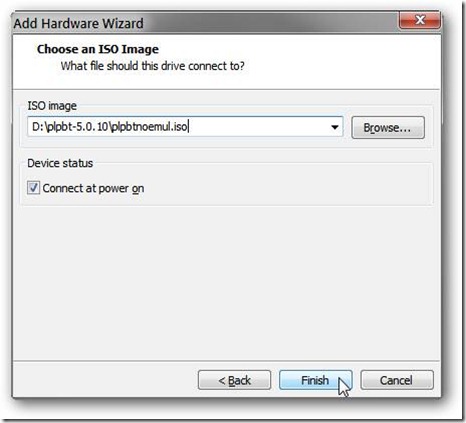
Browse to find plpbt.iso or plpbtnoemul.iso from the PLoP zip file. Ensure that Connect at power on is checked, and then click Finish.

clip_image022

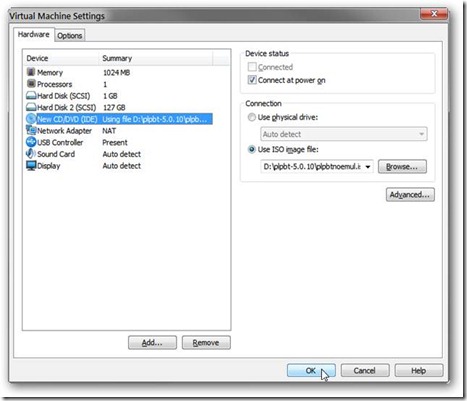
Click OK on the main Virtual Machine Settings page.

clip_image024

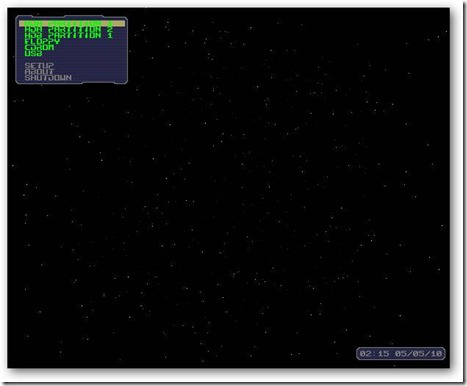
Now, if you use the steps above to boot using that CD/DVD drive, PLoP will load, allowing you to boot from a USB drive!

clip_image026

Conclusion

We’re big fans of VMWare Player and Workstation, as they let us try out a ton of geeky things without worrying about harming our systems. By introducing a boot delay, we can add bootable CDs and USB drives to the list of geeky things we can try out.

Download PLoP Boot Manager

The Plop Boot Manager is a small program with unbelievable many features.

Here is a list of features, but you can do more...

  • USB boot without BIOS support (UHCI, OHCI and EHCI)
  • CD/DVD boot without BIOS support (IDE)
  • PCMCIA CardBus support to enable boot from USB PC-Cards
  • Floppy boot
  • Different profiles for operating systems
  • Define up to 16 partitions
  • No extra partition for the boot manager
  • Hidden boot, maybe you have a rescue system installed and the user should not see that there is another system installed
  • Boot countdown
  • Hide partitions
  • Password protection for the computer and the boot manager setup
  • Backup of partition table data
  • Textmode user interface 80x50
  • Graphical user interface 640x480, 800x600, 1024x786, 1280x1024
  • MBR partition table edit
  • Start of the boot manager from harddisk, floppy, USB, CD, DVD
  • Starting from Windows boot menu
  • Starting from LILO, GRUB, Syslinux, Isolinux, Pxelinux (network)
  • It can be used as PCI option ROM in your BIOS
  • Access the whole USB hard disk (up to 2TB) even when the bios has a 128 GiB limit
  • You can run the boot manager over the network
  • Start the networkcard bootrom from the boot manager to boot from the network

Based On: http://www.howtogeek.com/howto/16876/how-to-increase-the-vmware-boot-screen-delay/

Sunday, December 11, 2011

HTC Hero Modes - Key Combination

Recovery mode: Home + HangUp.
Fastboot mode: HangUp + Back.
Soft reset: Call + Menu + HangUp - has the same efect has removing the battery
Start in Safety Mode: Keep the Menu key pressed while phone is booting

These modes migth only work with rooted rom or a cyanogen mod.

HTC Hero Root/Recovery and ADB (Debug Mode)

Not sure if this has been put anywhere yet but a noobs guide to Rooting and using ADB. If your new to Android lots of ADB commands in forums can look scary but its really not. This guide will hopefully help you understand it all.
Information from the Unlockr Video guide., I Recommend watching this first to help with understanding.
http://www.youtube.com/watch?v=7w_R4...layer_embedded
1. Download these 4 files:

Android SDK
http://developer.android.com/sdk/dow...ows-1.5_r3.zip
Fastboot (scroll to Fastboot tool and download the appropriate one for you computer’s OS)
http://www.htc.com/www/support/android/adp.html#s2
Fastboot is a command line tool used to directly flash the filesystem in Android devices from a host via USB. It allows flashing of unsigned partition images


CM-Hero-Recovery.img
http://rapidshare.com/files/26262114...covery.img.zip


Superuser.zip
http://forum.xda-developers.com/atta...9&d=1249225060

2. Once you download the SDK, extract the SDK files to “C:\AndroidSDK”. Then extract the fastboot program to the C:\AndroidSDK\tools\ folder.

 
3. Extract the CM-Hero-Recovery.img.zip contents into the Tools folder in the AndroidSDK folder on your computer.


4. Extract the Superuser.zip contents into the Tools folder in the AndroidSDK folder on your computer.


5. Turn off the phone, then turn it back on by holding down the Power and Back button (to enter bootloader mode).


6. Plug the phone into the computer via USB. Make sure that it says FASTBOOT USB instead of FASTBOOT now.


7. Your computer should say installing drivers right now (if this is the first time you have connected the phone in fastboot mode).

8. Goto the Start menu type cmd into the run section of the start menu and hit enter to bring up the Command Prompt.

9. Type the following into the command dos prompt on the computer (the black screen with white letters that just opened) while the phone is connected through USB, hitting enter at the end of the line:
   cd\
   cd androidsdk\tools\
   fastboot devices


10.
You should see a serial number pop up and the word fastboot to the right of it. This means that your USB drviers are all set up correctly and you can continue. If you do NOT see this, then you need to start over or Google for how to set up the USB drivers correctly.


11. If the serial number and the word fastboot next to it popped up, then go back to the command prompt on the computer and type
   fastboot boot cm-hero-recovery.img


12. Once the phone boots up into the recovery screen type the following in the command prompt on the computer: 
  adb shell mount /system
   adb push su /system/bin/
   adb shell chmod 4755 /system/bin/su
   adb push Superuser.apk /system/app/
   adb shell reboot

13. Once the phone reboots, click the Menu button and click Settings.

14. Goto Applications > Development and check the USB debugging on.

15. While the phone is still plugged in, goto the Command Prompt still up on your computer and type:
adb devices
You should see a serial number, which means the computer is seeing the device.

16. Then type:
  adb shell
  su

The phone should pop up an su request. Click Always Allow on the phone.

17. Type:
   adb reboot

18. Phone should reboot and you now have Root Access! Try downloading a program that needs root access and see if it works to test it out.
notes, I have a custom rom after step 16 I did not get the request rebooted and opened up shootMe and it asked for permission at that stage I clicked Always Allow

ADB (Android Debug Bridge) – Install App (ShootMe) From PC
If you are not a developer and just want custom roms and apps. You don’t need the full SKD, if you have ever looked at guides for that and been scared away. You only need the SKD from google,(which you downloaded to get root) and not the eclipse parts.
download ShootMe http://www.mediafire.com/?igmztlyzzwj (as this is a good test if root access worked)


Make a folder called apps in your tools folder
Make a folder called apps in your tools folder.

  C:\AndroidSDK\tools\apps

In the apps folder put all the APK files you want to install. 

Open CMD 
Change directory to tools

   cd \
   cd AndroidSDK\tools\

Now type:
   adb remount
   (this is to make sure phone is mounted safety first)

Now type:
  adb push apps\ com.bw.picme.local.apk /system/app/
   (Replace com.bw.picme.local.apk with the title of your apk for other installs. )

Now type:
   adb reboot
   (after you have pushed your apps do a restart. And everything should be installed fine)


Open the application and have fun.
Please note that the slashes are different from each directory.  The first uses “\” this is from your computer
Second uses “/” this is on your phone.


Taken From: http://htcpedia.com/forum/htc-hero/1523-noob-guide-htc-hero-root-adb.html

Saturday, December 10, 2011

Cyanogen Mod on HTC Hero

HTC Hero (GSM): Full Update Guide

This guide will walk you through the process of taking the HTC Hero (GSM) from stock to having the ability to flash the latest version of CyanogenMod.

Contents

Before you do anything — Make a backup

Don't forget to back up your data. If you have synced the device with a Google account, then the contacts, calendar, Gmail, & select other Google-related data will not be lost and will come back after the next sync. However, you should backup anything you want to keep that is not stored on the SD card:
It would also be a good idea to backup everything stored on the SD card in the rare case the SD card must be formatted to resolve any major problems.
MyBackup Root, SMS Backup & Restore, and Call Backup & Restore are all free applications that can assist with backing up your data.

Installing a Custom Recovery Image

For the HTC Hero (GSM), there are two custom recovery images available, Amon_Ra's Recovery & the ClockworkMod Recovery. Choose one and follow the instructions below on how to install each custom recovery image. If the HTC Hero (GSM) already has a custom recovery image, skip this section.
WARNING: INSTALLING A CUSTOM RECOVERY IMAGE ON THE HTC HERO (GSM) WILL VOID THE WARRANTY.
Amon_Ra's Recovery
  1. You will need ADB on the computer to install Amon_Ra's Recovery on the HTC Hero (GSM). Follow the Android SDK guide, to get the ADB shell on the computer.
  2. Download flash_image & the latest version of Amon_Ra's Recovery:
    • flash_image: Download
      md5: bd475f29e0665c702f8eaf57a0423b58
    • Amon_Ra's Recovery 1.7.0.1: Download
      md5: 2c399ba2d780742c1eb8bb2710a31684

  3. Unzip the flash_image &and copy its contents with Amon_Ra's Recovery to the same folder as adb (the /platform-tools folder within the Android SDK folder).

  4. Connect the HTC Hero (GSM) to the computer via USB.

  5. On the computer, open terminal and run the following commands:
    adb push recovery-RA-hero-v1.7.0.1.img /data/local/
    adb push flash_image /data/local/
    adb shell chmod 777 /data/local/recovery-RA-hero-v1.7.0.1.img
    adb shell chmod 777 /data/local/flash_image
    adb shell rm /data/local/rights/mid.txt
    adb shell ln -s /dev/mtd/mtd1 /data/local/rights/mid.txt
    adb reboot

  6. The HTC Hero (GSM) will reboot. Once it's booted back all the way, run the following command:
    adb shell /data/local/flash_image recovery /data/local/recovery-RA-hero-v1.7.0.1.img

  7. Amon_Ra's Recovery should now be installed on the HTC Hero (GSM).
ClockworkMod Recovery
  1. You will need ADB on the computer to install the ClockworkMod Recovery on the HTC Hero (GSM). Follow the Android SDK guide, to get the ADB shell on the computer.
  2. Download flash_image & the latest version of the ClockworkMod Recovery:
    • flash_image: Download
      md5: bd475f29e0665c702f8eaf57a0423b58
    • ClockworkMod Recovery 2.5.0.7: Download
      md5: 4e576c048d8d4d8890e755992577a5b
  3. Unzip the flash_image &and copy its contents with the ClockworkMod Recovery to the same folder as adb (the /platform-tools folder within the Android SDK folder).

  4. Connect the HTC Hero (GSM) to the computer via USB.

  5. On the computer, open terminal and run the following commands:
    adb push recovery-clockwork-2.5.0.7-hero.img /data/local/
    adb push flash_image /data/local/
    adb shell chmod 777 /data/local/recovery-clockwork-2.5.0.7-hero.img
    adb shell chmod 777 /data/local/flash_image
    adb shell rm /data/local/rights/mid.txt
    adb shell ln -s /dev/mtd/mtd1 /data/local/rights/mid.txt
    adb reboot

  6. The HTC Hero (GSM) will reboot. Once it's booted back all the way, run the following command:
    adb shell /data/local/flash_image recovery /data/local/recovery-clockwork-2.5.0.7-hero.img

  7. The ClockworkMod Recovery should now be installed on the HTC Hero (GSM).


Flashing CyanogenMod

Amon_Ra's Recovery process
  1. Download the latest version of CyanogenMod.
    Optional: Download the Google Apps for the device.

  2. Place the CyanogenMod update.zip file on the root of the SD card.
    Optional: Place the Google Apps .zip on the root of the SD card also.

  3. Boot into Amon_Ra's Recovery.

  4. Once you enter Amon_Ra's Recovery, scroll up & down with the trackball, and the trackball button to select.

  5. Select Wipe, then Wipe data/factory reset

  6. Select Flash zip from sdcard.

  7. Select the CyanogenMod update.zip.
    • Optional: Install the Google Apps by performing steps 6 & 7 again and choosing the Google Apps update.zip.

  8. Once the installation has finished, select Reboot system. The HTC Hero (GSM) now should boot into CyanogenMod.
ClockworkMod Recovery process
Method via Recovery
  1. Download the latest version of CyanogenMod.
    Optional: Download the Google Apps for the device.

  2. Place the CyanogenMod update.zip file on the root of the SD card.
    Optional: Place the Google Apps .zip on the root of the SD card also.

  3. Boot into the ClockworkMod Recovery.

  4. Once the device boots into the ClockworkMod Recovery, use the side volume buttons to move around, and either the power button or the trackball to select.
    Optional: Select backup and restore to create a backup of current installation on the HTC Hero (GSM).

  5. Select the option to Wipe data/factory reset.

  6. Then select the option to Wipe cache partition.

  7. Select Install zip from sdcard.

  8. Select Choose zip from sdcard.

  9. Select the CyanogenMod update.zip.
    Optional: Install the Google Apps by performing steps 7 - 9 again and choosing the Google Apps update.zip.

  10. Once the installation has finished, select +++++Go Back+++++ to get back to the main menu, and select the Reboot system now option. The HTC Hero (GSM) should now boot into CyanogenMod.
Method via ROM Manager
  1. Launch RomManager.
    Optional: Choose the first option in the app, Flash ClockworkMod Recovery to update to the latest version.

  2. Select the Download ROM option from the main menu in the ROM Manager.

  3. Select the CyanogenMod option, and then choose the latest version of CyanogenMod from the menu.
    Optional: When you select the latest version of CyanogenMod, check the Google Apps* option.

  4. Once the ROM is finished downloading, it asks if you would like to Backup Existing ROM and Wipe Data and Cache.

  5. If Superuser prompts for root permissions check to Remember and then Allow.

  6. The HTC Hero (GSM) will now reboot into the recovery, wipe data and cache, and then install CyanogenMod. When it's finished installing it will reboot into CyanogenMod.

Taken From: http://wiki.cyanogenmod.com/wiki/HTC_Hero_(GSM):_Full_Update_Guide

Thursday, December 8, 2011

Windows Server 2008 Domain Controller and DNS Server Setup

This tutorial will explain how to setup Windows Server 2008 Domain Controller and DNS
Server.

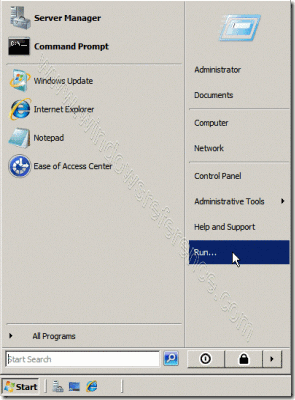
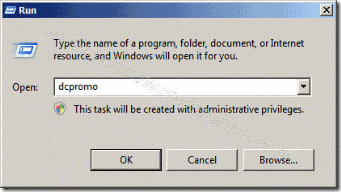
Click on Start > Run

clip_image002
Now type dcpromo > Click OK

clip_image004

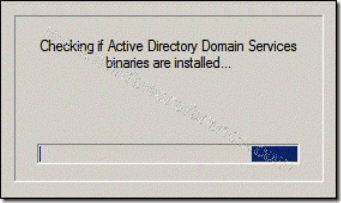
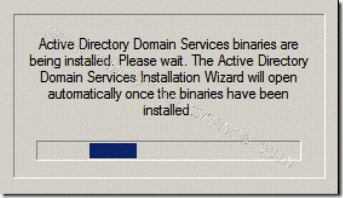
The system will start checking if Active Directory Domain Services ( AD DS) binaries are installed, then will start installing them. The binaries could be installed if you had run the dcpromo command previously and then canceled the operation after the binaries were installed.

clip_image006

clip_image008

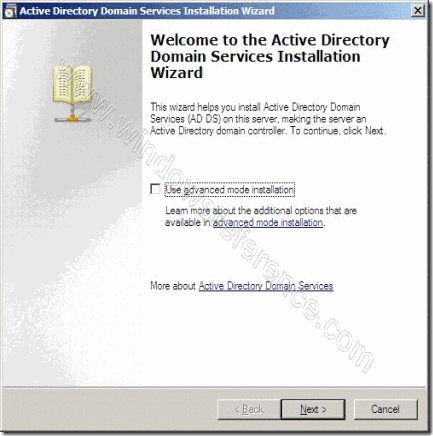
The Active Directory Domain Services Installation Wizard will start, either enable the checkbox beside Use Advanced mode installation and Click Next , or keep it unselected and click on Next

clip_image010

The Operating System Compatibility page will be displayed, take a moment to read it and click Next

clip_image012

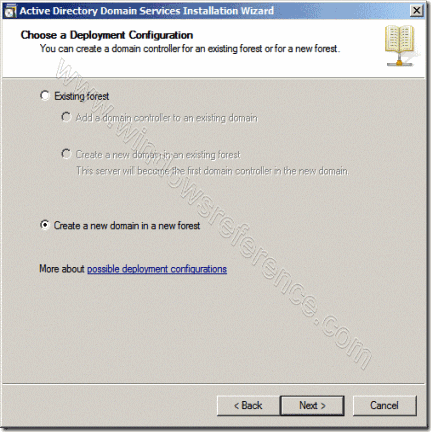
Choose Create a new domain in a new forest, Click Next

clip_image014

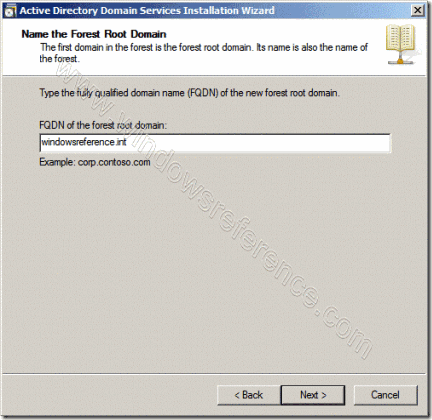
Enter the Fully Qualified Domain Name of the forest root domain inside the textbox, click Next

clip_image016

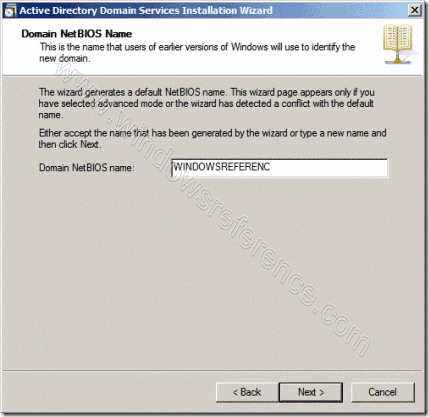
If you selected Use advanced mode installation on the Welcome page, the Domain NetBIOS Name page appears. On this page, type the NetBIOS name of the domain if necessary or accept the default name and then click Next.

clip_image018

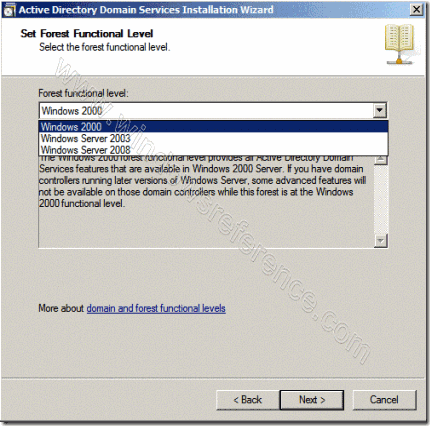
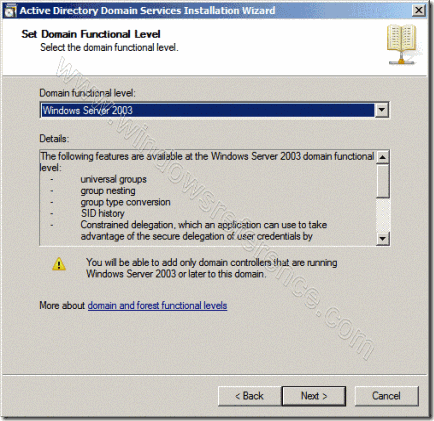
Select the Forest Functional Level, choose the level you desire and click on Next.

clip_image020

Make sure to read the description of each functional level to understand the difference between each one.

In the previous step, If you have selected any Forest Functional Level other than windows Server 2008 and clicked on Next , you would then get a page to select the domain Functional Level. Select it and then click on Next

clip_image022

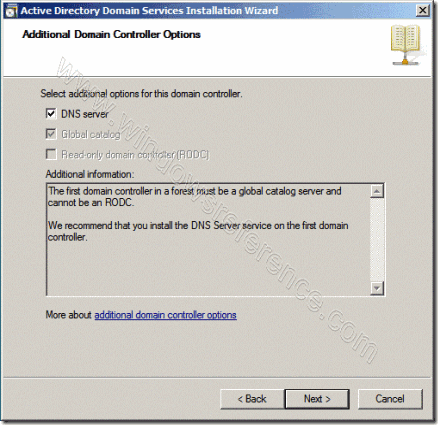
In the Additional Domain Controller Options page, you can select to install the domain Name Service to your server. Note that the First domain controller in a forest must be a Global Catalog that’s why the checkbox beside Global Catalog is selected and it cannot be cleared. The checkbox is also selected by default when you install an additional domain controller in an existing domain, however you can clear this checkbox if you do not want the additional domain controller to be a global catalog server. The first domain controller in a new forest or in a new domain can not be a Read Only Domain Controller (RODC), you can later add a RODC but you must have at least one Windows Server 2008 Domain Controller.

I want to set my DC as a DNS Server as well, so I will keep the checkbox beside DNS server selected and click on Next

clip_image024

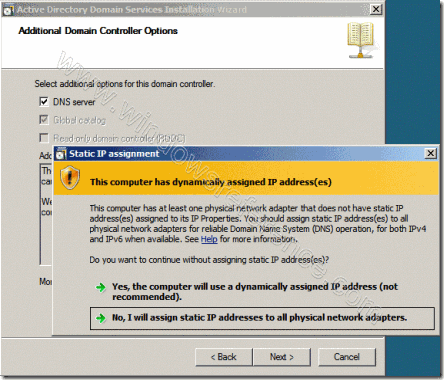
If you don’t have static ip assigned to your server you will see similar to the following screen now you need to assign static ip and start the above process.

clip_image026

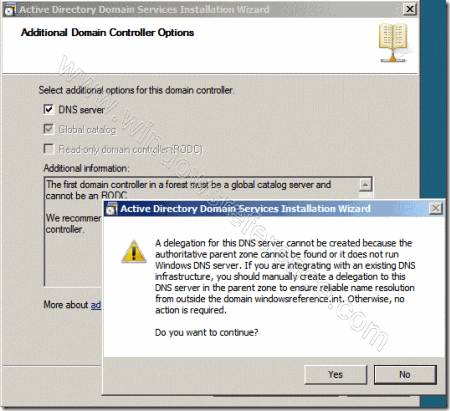
If the wizard cannot create a delegation for the DNS server, it displays a message to indicate that you can create the delegation manually. To continue, click Yes

clip_image028

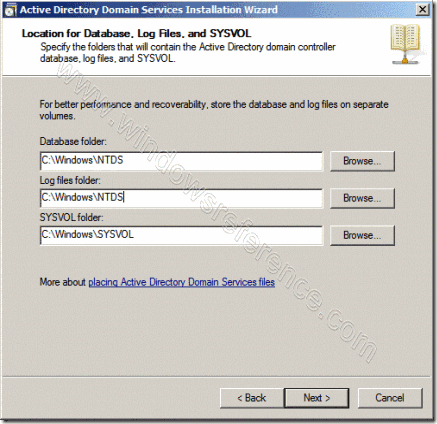
Now you will have the location where the domain controller database, log files and SYSVOL are stored on the server.

The database stores information about the users, computers and other objects on thenetwork. the log files record activities that are related to AD DS, such information about an object being updated. SYSVOL stores Group Policy objects and scripts. By default, SYSVOL is part of the operating system files in the Windows directory either type or browse to the volume and folder where you want to store each, or accept the defaults and click on Next

clip_image030

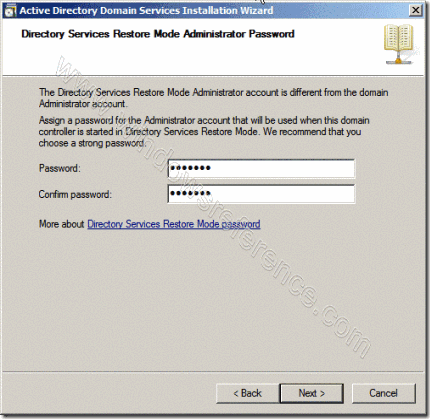
In the Directory Services Restore Mode Administrator Password (DSRM) page, write a password and confirm it. This password is used when the domain controller is started in Directory Services Restore Mode, which might be because Active Directory Domain services is not running, or for tasks that must be performed offline.Make sure that you memorize this password when you need it.

clip_image032

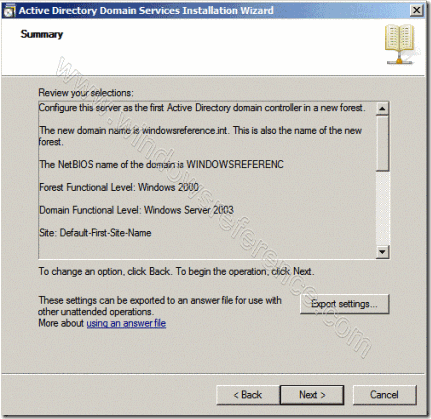
Summary page will be displayed showing you all the setting that you have set . It gives you the option to export the setting you have setup into an answer file for use with other unattended operations, if you wish to have such file, click on the Export settings button and save the file.

clip_image034

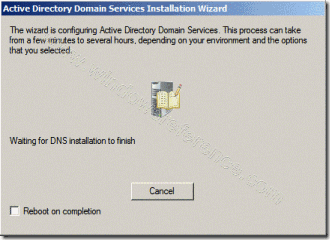
DNS Installation will start

clip_image036

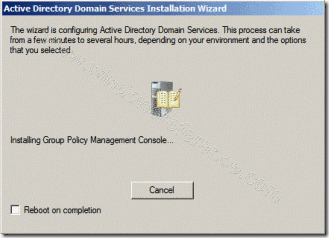
Followed by installing Group Policy Management Console, the system will check first if it is installed or not.

clip_image038

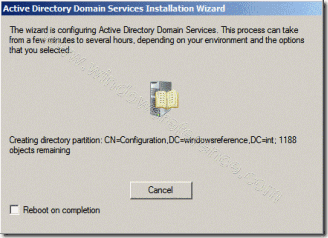
clip_image040

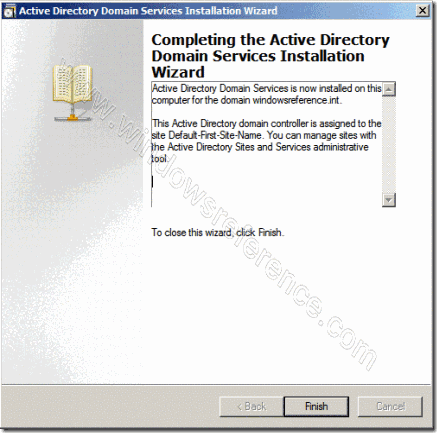
Configuring the local computer to host active directory Domain Services and other operations will take place setting up this server as a Domain Controller active Directory Domain Services installation will be completed, click Finish.

clip_image042

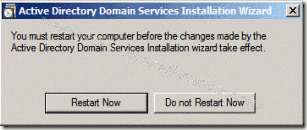
Click on Restart Now to restart your server for the changes to take effect.

clip_image044

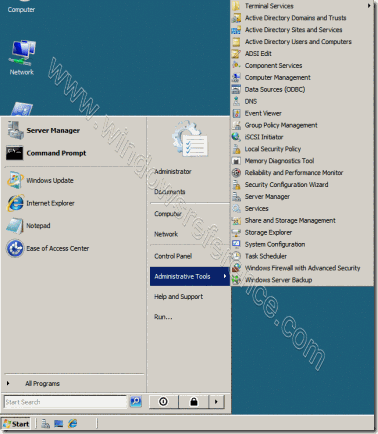
Once the server is booted and you logon to it, click on Start > Administrative Tools
you will notice that following have been installed :
Active Directory Domains and Trusts
Active Directory Sites and Services
Active Directory Users and Computers
ADSI Edit
DNS
Group Policy Management

clip_image046

That’s it now your new win server 2008 domain controller with dns server setup was completed.

Taken From: http://www.windowsreference.com/windows-server-2008/step-by-step-guide-for-windows-server-2008-domain-controller-and-dns-server-setup/