# Install Apache With It's Documentation #####
$ sudo apt-get install apache2 apache2-doc
# Start Apache (it should already be started) #####
$ sudo /etc/init.d/apache2 start
# Test Apache #####
Type on Mozilla Firefox: http://127.0.0.1/
It souhld read: It works!
Note: The message "It works!" can be found at the /var/www
directorie, which is apaches's root directory, wich is were
we will install SMF.
# Instaling MySQL and PHP necessary Dependencies #####
$ sudo apt-get install mysql-server mysql-client
Type in mySQL's root password in the upcoming textbox.
$ sudo apt-get install libapache2-mod-php5 libapache2-mod-perl2
$ sudo apt-get install php5 php5-cli php5-common php5-curl php5-dev php5-gd php5-imap php5-ldap
$ sudo apt-get install php5-mhash php5-mysql php5-odbc curl libwww-perl imagemagick
# Extract SMF #####
$ unzip smf_1-1-7_install.zip
# Installing SMF in Apache #####
# Copy SMF to /var/www (apache root dir)
$ sudo cp -vr smf_1-1-7_install /var/www
# Give Apache Ownership Over SMF Files (apache-user: www-data) #####
$ sudo chown www-data -vR /var/www/smf_1-1-7_install/*
# Restart Apache #####
$ sudo /etc/init.d/apache2 restart
# Delete Apache's Test Page #####
$ sudo rm -rf /var/www/index.html
# Configuring SMF #####
Type on Mozilla Firefox:
http://127.0.0.1/smf_1-1-7_install/install.php
and configure SMF acording to the presented instructions.
Now your forum is on:
http://127.0.0.1/smf_1-1-7_install/index.php
or
http://127.0.0.1/smf_1-1-7_install/
Tuesday, January 27, 2009
Thursday, January 8, 2009
Installing a Web Application (SugarCRM) on a WebHost
The web application in this example is SugarCRM (SugarCE-5.0.0f) which I already shown how to install on you own host here. Now I'm going to show you how to install it on a WebHost (like BlueHost or others). Installing a web application on a web host is a bit trickier because what you can do on the webhost is very limited.
Im going to assume that you have SugarCRM working on you computer using the howto about installing SugarCRM on your own webhost you can find here. We are going to use this as a basis of comparison between the configs you have localy and the ones on the webhost. You may not need this.
Lets Start...
Create on the webhost the folder SugarCRM, using an FTP client like gftp.
Upload a file php.info (below) on to the folder SugarCRM on the webhost in order to obtain information about the instaled modules and php.ini (/etc/php5/apache2/php.ini) configuration, since you can't access them directly.
Copy the phpinfo.php to your local SugarCRM folder at the apache root (/var/www), not because you are limited but to make it easyer to compare with the webhost config
$ cp /path_to_phpinfo/phpinfo.php /var/www/SugarCRM
Check if the webhost as the apache modules you need
On the browser execute:
http//www.your_domain_on_the_webhost.com/SugarCRM/phpinfo.php
and check the "Loaded Modules" for the needed modules, if you dont now the modules you need execute also:
http://127.0.0.1/SugarCRM/phpinfo.php
and compare the modules you have localy to the the ones on the webhost, the modules you have locally migth not all be needed but if your webhost has them it will work for sure. If there are missing modules contact you webhost and ask them to install them.
Extracting SugarCRM
$ unzip SugarCE-5.0.0f.zip
From now on we are going to prepare on our local machine SugarCRM, in order to upload to the webhost all thats necessary, to minimize the problems.
Defining the read and write permissions on some of SugarCRM's files
$ cd /path_to_extracted_sugar/SugarCE-Full-5.0.0f
$ sudo chmod 766 config.php
$ sudo chmod 766 custom
$ sudo chmod -R 766 data
$ sudo chmod -R 766 cache
$ sudo chmod -R 766 modules
Creating the the SugarCRM sessions directory, seen that by default SugarCRM sessions directory woul be /var/lib/php/session to wich on the webhost we won't have access.
$ cd /path_to_extracted_sugar/SugarCE-Full-5.0.0f
$ mkdir session_save
$ sudo chmod 770 session_save
Configuring php.ini via .htaccess
Seen that we dont have access to php.ini on the webhost (/etc/php5/apache2/php.ini), we are going have to put the configurations we need on the file .htaccess, notice that the configurations on .htaccess only affects the directory where it is and those bellow it.
In order to now what to put on .htaccess, what I did was, execute the phpinfo.php on my local SugarCRM folder and the Webhost, like this:
http:/www.your_domain_on_the_webhost.com/SugarCRM/phpinfo.php (Webhost SugarCRM)
http://127.0.0.1/phpinfo.php (Local SugarCRM)
And saw the differences between the different variables in "Configuration - PHP Core" (php.ini config), and changed the ones in the webhost that were different to the value the local ones had. They not all be needed but if it work locally on the web host should work to. The result was the following .htaccess:
.htaccess - put in /path_to_extracted_sugar/SugarCE-Full-5.0.0f
--------------------------------------------------------------------
php_value memory_limit 50M
php_value upload_max_filesize 10M
php_value allow_call_time_pass_reference On
php_value allow_url_fopen On
php_value display_errors On
php_value enable_dl On
php_value magic_quotes_gpc On
php_value register_long_arrays On
php_value safe_mode Off
php_value session.save_path /home/my_ftp_user_name/SugarCRM/session_save
The last value php_value session.save_path you have to ask to you webhost, where on in their machine is the top folder you access via FTP, which in my case is /home/my_user_name/, the rest is same (SugarCRM/session_save). Or you can always try to gess it /home/your_ftp_user_name.
Nowing that after the upload of SugarCRM to the webhost in order for SugarCRM to work, like any other webapp, the must be owned by the apache user. Now the problem is, that if apache owns the the files you wont be able to access the if there's some kind of problem, or even delete them.
My solution for this problem is giving the same read,write, execute permitions that the owner has, to the group and being a part of this group, like this you will have the same permitions you had before apache became the owner of the files.
In order to do that we are going to use the following script:
usertogroup
---------------------
#!/bin/ksh
echo "Enter Base Directory: "
read source_dir
for file in `find $source_dir`
do
#full=`ls -ld $file |awk '{print $1}'`
owner=`ls -ld $file | cut -c2-4`
#echo "$full $file ----------------> chmod g+$owner $file"
chmod g+$owner $file
done
$ sudo chmod 777 usertogroup
$ sh usertogroup
Enter Base Directory:
/path_to_extracted_sugar/SugarCE-Full-5.0.0f
Now that we have SugarCRM prepared in our computer, lets upload the contents off /path_to_extracted_sugar/SugarCE-Full-5.0.0f to the SugarCRM
folder that we created before, using an FTP client like gFTP.
The folowing steps you have to ask the webhost to do the following:
- Change the owner of all of the SugarCRM files to the apache user
- Add our username to the group that the file belongs to.
Now you should be able to configure SugarCRM, by executing the following in the browser:
http://www.your_domain_on_the_webhost.com/SugarCRM/install.php
and configure SugarCRM, once configure you can access SugarCRM's main page by executing the following in the web browser:
http://www.your_domain_on_the_webhost.com/SugarCRM/index.php
OR
http://www.your_domain_on_the_webhost.com/SugarCRM
And thats it, now you sould have SugarCRM up and running.
Im going to assume that you have SugarCRM working on you computer using the howto about installing SugarCRM on your own webhost you can find here. We are going to use this as a basis of comparison between the configs you have localy and the ones on the webhost. You may not need this.
Lets Start...
Create on the webhost the folder SugarCRM, using an FTP client like gftp.
Upload a file php.info (below) on to the folder SugarCRM on the webhost in order to obtain information about the instaled modules and php.ini (/etc/php5/apache2/php.ini) configuration, since you can't access them directly.

Copy the phpinfo.php to your local SugarCRM folder at the apache root (/var/www), not because you are limited but to make it easyer to compare with the webhost config
$ cp /path_to_phpinfo/phpinfo.php /var/www/SugarCRM
Check if the webhost as the apache modules you need
On the browser execute:
http//www.your_domain_on_the_webhost.com/SugarCRM/phpinfo.php
and check the "Loaded Modules" for the needed modules, if you dont now the modules you need execute also:
http://127.0.0.1/SugarCRM/phpinfo.php
and compare the modules you have localy to the the ones on the webhost, the modules you have locally migth not all be needed but if your webhost has them it will work for sure. If there are missing modules contact you webhost and ask them to install them.
Extracting SugarCRM
$ unzip SugarCE-5.0.0f.zip
From now on we are going to prepare on our local machine SugarCRM, in order to upload to the webhost all thats necessary, to minimize the problems.
Defining the read and write permissions on some of SugarCRM's files
$ cd /path_to_extracted_sugar/SugarCE-Full-5.0.0f
$ sudo chmod 766 config.php
$ sudo chmod 766 custom
$ sudo chmod -R 766 data
$ sudo chmod -R 766 cache
$ sudo chmod -R 766 modules
Creating the the SugarCRM sessions directory, seen that by default SugarCRM sessions directory woul be /var/lib/php/session to wich on the webhost we won't have access.
$ cd /path_to_extracted_sugar/SugarCE-Full-5.0.0f
$ mkdir session_save
$ sudo chmod 770 session_save
Configuring php.ini via .htaccess
Seen that we dont have access to php.ini on the webhost (/etc/php5/apache2/php.ini), we are going have to put the configurations we need on the file .htaccess, notice that the configurations on .htaccess only affects the directory where it is and those bellow it.
In order to now what to put on .htaccess, what I did was, execute the phpinfo.php on my local SugarCRM folder and the Webhost, like this:
http:/www.your_domain_on_the_webhost.com/SugarCRM/phpinfo.php (Webhost SugarCRM)
http://127.0.0.1/phpinfo.php (Local SugarCRM)
And saw the differences between the different variables in "Configuration - PHP Core" (php.ini config), and changed the ones in the webhost that were different to the value the local ones had. They not all be needed but if it work locally on the web host should work to. The result was the following .htaccess:
.htaccess - put in /path_to_extracted_sugar/SugarCE-Full-5.0.0f
--------------------------------------------------------------------
php_value memory_limit 50M
php_value upload_max_filesize 10M
php_value allow_call_time_pass_reference On
php_value allow_url_fopen On
php_value display_errors On
php_value enable_dl On
php_value magic_quotes_gpc On
php_value register_long_arrays On
php_value safe_mode Off
php_value session.save_path /home/my_ftp_user_name/SugarCRM/session_save
The last value php_value session.save_path you have to ask to you webhost, where on in their machine is the top folder you access via FTP, which in my case is /home/my_user_name/, the rest is same (SugarCRM/session_save). Or you can always try to gess it /home/your_ftp_user_name.
Nowing that after the upload of SugarCRM to the webhost in order for SugarCRM to work, like any other webapp, the must be owned by the apache user. Now the problem is, that if apache owns the the files you wont be able to access the if there's some kind of problem, or even delete them.
My solution for this problem is giving the same read,write, execute permitions that the owner has, to the group and being a part of this group, like this you will have the same permitions you had before apache became the owner of the files.
In order to do that we are going to use the following script:
usertogroup
---------------------
#!/bin/ksh
echo "Enter Base Directory: "
read source_dir
for file in `find $source_dir`
do
#full=`ls -ld $file |awk '{print $1}'`
owner=`ls -ld $file | cut -c2-4`
#echo "$full $file ----------------> chmod g+$owner $file"
chmod g+$owner $file
done
$ sudo chmod 777 usertogroup
$ sh usertogroup
Enter Base Directory:
/path_to_extracted_sugar/SugarCE-Full-5.0.0f
Now that we have SugarCRM prepared in our computer, lets upload the contents off /path_to_extracted_sugar/SugarCE-Full-5.0.0f to the SugarCRM
folder that we created before, using an FTP client like gFTP.
The folowing steps you have to ask the webhost to do the following:
- Change the owner of all of the SugarCRM files to the apache user
- Add our username to the group that the file belongs to.
Now you should be able to configure SugarCRM, by executing the following in the browser:
http://www.your_domain_on_the_webhost.com/SugarCRM/install.php
and configure SugarCRM, once configure you can access SugarCRM's main page by executing the following in the web browser:
http://www.your_domain_on_the_webhost.com/SugarCRM/index.php
OR
http://www.your_domain_on_the_webhost.com/SugarCRM
And thats it, now you sould have SugarCRM up and running.
Sharing Internet on Linux
Hello there, in this post I'm going to show you how to share an Internet connection regardless off you having a public ip or not, you just need to have Internet on the computer that`s going to make the share.
I don't now if this is the most correct way to do it, but I can tell you that it worked on my machine which was running Ubuntu 8.10.
The picture below shows my test scenario, to make it easier for you to map it to your own.
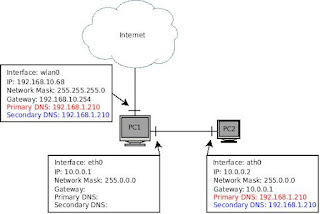
As you can see on the picture above I shared PC1's Internet with PC2, my PC2 was also running Linux but it could also be running Windows, MacOS, etc.
The IP configuration for the link between PC1 and PC2 was done manualy, but you can have an DHCP Server on PC1 dictating the IPs, DNS Servers, Gateway for both PCs.
What we are configuring is an IP Forwanding using the iptables, NAT MASQUERING.
As you can see on the picture you can see the DNS Servers (red an blue) I used on PC2 was the same servers that the wlan0 interface (the one with internet) on PC1, because if PC1 can reach the servers so will PC2.
First configure the interfaces that make the link between PC1 and PC2, you can configure any private network you want, i used the 10.0.0.0/8 network (see picture), gave the IP 10.0.0.1 to PC1, and 10.0.0.2 to PC2 and defined its Gateway as 10.0.0.1 (PC1) in order for it to send it's packets for the internet to PC1. On PC2 don't forget the DNS Servers that are the same that you have on PC1 in the interface with internet (wlan0), in Ubuntu you can find the DNS Servers, by tipping the following on the bash, so type this on PC1:
$ cat /etc/resolv.conf
# Generated by NetworkManager
domain hello.there
search hello.there
nameserver 192.168.1.210
nameserver 192.168.1.216
nameserver 192.168.1.215
Now that you have the link between both PCs configured (2 PCs on the same private network, and DNS Servers on PC2), just type the following on the bash in order to do the share.
$ su
# echo 1 > /proc/sys/net/ipv4/ip_forward
# exit
$ sudo iptables -t nat -A POSTROUTING -s 10.0.0.0/8 -o wlan0 -j MASQUERADE
On the last command you if you configured a different private ip range, between the two PCs, you should change the 10.0.0.0/8 onto the one you chose and change the wlan0 to the interface that has the Internet on PC1.
And now you should have Internet both on PC1 and PC2.
Note: If instead of PC2 you have a switch/hub conected to PC1, you can use PC1 to serve multiple PCs (PC2, PC3, PC4, ...), you just need to make the same IP configuration that you did for PC2, only chanaging the the IP (PC2: 10.0.0.2, PC3: 10.0.0.3, PC4: 10.0.0.4) and connect these to the switch.
OR
Another solution to share with more than one PC is PC1 having multiple interfaces onto which PC2, PC3, PC4, ..., connected directly, as above make the same IP configuration that you did for PC2, only changing the the IP (PC2: 10.0.0.2, PC3: 10.0.0.3, PC4: 10.0.0.4) and connect these to PC1.
I don't now if this is the most correct way to do it, but I can tell you that it worked on my machine which was running Ubuntu 8.10.
The picture below shows my test scenario, to make it easier for you to map it to your own.

click on the picture for a better viewing!!!
As you can see on the picture above I shared PC1's Internet with PC2, my PC2 was also running Linux but it could also be running Windows, MacOS, etc.
The IP configuration for the link between PC1 and PC2 was done manualy, but you can have an DHCP Server on PC1 dictating the IPs, DNS Servers, Gateway for both PCs.
What we are configuring is an IP Forwanding using the iptables, NAT MASQUERING.
As you can see on the picture you can see the DNS Servers (red an blue) I used on PC2 was the same servers that the wlan0 interface (the one with internet) on PC1, because if PC1 can reach the servers so will PC2.
First configure the interfaces that make the link between PC1 and PC2, you can configure any private network you want, i used the 10.0.0.0/8 network (see picture), gave the IP 10.0.0.1 to PC1, and 10.0.0.2 to PC2 and defined its Gateway as 10.0.0.1 (PC1) in order for it to send it's packets for the internet to PC1. On PC2 don't forget the DNS Servers that are the same that you have on PC1 in the interface with internet (wlan0), in Ubuntu you can find the DNS Servers, by tipping the following on the bash, so type this on PC1:
$ cat /etc/resolv.conf
# Generated by NetworkManager
domain hello.there
search hello.there
nameserver 192.168.1.210
nameserver 192.168.1.216
nameserver 192.168.1.215
Now that you have the link between both PCs configured (2 PCs on the same private network, and DNS Servers on PC2), just type the following on the bash in order to do the share.
$ su
# echo 1 > /proc/sys/net/ipv4/ip_forward
# exit
$ sudo iptables -t nat -A POSTROUTING -s 10.0.0.0/8 -o wlan0 -j MASQUERADE
On the last command you if you configured a different private ip range, between the two PCs, you should change the 10.0.0.0/8 onto the one you chose and change the wlan0 to the interface that has the Internet on PC1.
And now you should have Internet both on PC1 and PC2.
Note: If instead of PC2 you have a switch/hub conected to PC1, you can use PC1 to serve multiple PCs (PC2, PC3, PC4, ...), you just need to make the same IP configuration that you did for PC2, only chanaging the the IP (PC2: 10.0.0.2, PC3: 10.0.0.3, PC4: 10.0.0.4) and connect these to the switch.
OR
Another solution to share with more than one PC is PC1 having multiple interfaces onto which PC2, PC3, PC4, ..., connected directly, as above make the same IP configuration that you did for PC2, only changing the the IP (PC2: 10.0.0.2, PC3: 10.0.0.3, PC4: 10.0.0.4) and connect these to PC1.
Subscribe to:
Comments (Atom)