Sunday, March 29, 2015

Cisco – Router as a DNS Server

As many didn’t know (me included) you can configure cisco router as DNS server.

A cisco router can:

  • Reply to requests for locally defined DNS entries.
  • Forward the request the public DNS servers (max 6)

In the cenario bellow we are going setup and test this.

Topology2


Configs

-- R1 --

interface FastEthernet0/0
description *** LAN ***
ip address 192.168.1.254 255.255.255.0
no shutdown

interface FastEthernet0/1
description *** WAN ***
ip address 200.0.0.2 255.255.255.252
no shutdown
 
ip route 0.0.0.0 0.0.0.0 200.0.0.1 name DefaultRoute
 
!!!!!!!!!!!!!!!!!!!!!!!!!!!!!!!!!!!!!!!!!!!!!!!!!!!!!!!!!!!!!!!!!!!!
! Enable the router as a DNS server
! and domain lookup on the router
!!!!!!!!!!!!!!!!!!!!!!!!!!!!!!!!!!!!!!!!!!!!!!!!!!!!!!!!!!!!!!!!!!!!
ip dns server
ip domain-lookup

!!!!!!!!!!!!!!!!!!!!!!!!!!!!!!!!!!!!!!!!!!!!!!!!!!!!!!!!!!!!!!!!!!!!
! Public name-servers, for the router to query
! the names it doesn't know
! Maximum 6x DNS servers
!!!!!!!!!!!!!!!!!!!!!!!!!!!!!!!!!!!!!!!!!!!!!!!!!!!!!!!!!!!!!!!!!!!!
ip name-server 4.2.2.5
ip name-server 4.2.2.6

!!!!!!!!!!!!!!!!!!!!!!!!!!!!!!!!!!!!!!!!!!!!!!!!!!!!!!!!!!!!!!!!!!!!
! Local DNS Entries
!!!!!!!!!!!!!!!!!!!!!!!!!!!!!!!!!!!!!!!!!!!!!!!!!!!!!!!!!!!!!!!!!!!!
ip host PC1 192.168.1.1
ip host PC2 192.168.1.2
ip host PC3 192.168.1.3

The big secret here is the “ip dns server”, because the rest of the config you could have it to solve name locally on the router.

With the “ip dns server” you extend the router’s local name resolution, to the hosts on the network.


-- PC1 --

PCx

The PCs on my topology are actually routers so here is my config:

-- PC1 (Router) --
interface FastEthernet0/0
ip address 192.168.1.1 255.255.255.0
no shutdown

ip route 0.0.0.0 0.0.0.0 192.168.1.254 name GW

ip domain-lookup
ip name-server 192.168.1.254


-- PC2 (Router) --
interface FastEthernet0/0
ip address 192.168.1.2 255.255.255.0
no shutdown
 
ip route 0.0.0.0 0.0.0.0 192.168.1.254 name GW

ip domain-lookup
ip name-server 192.168.1.254


-- PC3 (Router) --
interface FastEthernet0/0
ip address 192.168.1.3 255.255.255.0
no shutdown

ip route 0.0.0.0 0.0.0.0 192.168.1.254 name GW

ip domain-lookup
ip name-server 192.168.1.254


Tests

-- Test the Local Entries for The PCs on the LAN --

PC1#ping PC2
Translating "PC2"...domain server (192.168.1.254) [OK]

Type escape sequence to abort.
Sending 5, 100-byte ICMP Echos to 192.168.1.2, timeout is 2 seconds:
.!!!!
Success rate is 80 percent (4/5), round-trip min/avg/max = 1/1/1 ms

PC1#ping PC3
Translating "PC3"...domain server (192.168.1.254) [OK]

Type escape sequence to abort.
Sending 5, 100-byte ICMP Echos to 192.168.1.3, timeout is 2 seconds:
!!!!!
Success rate is 100 percent (5/5), round-trip min/avg/max = 1/1/5 ms
PC1#

-- Test Forwarding Request to Public DNS Servers--

PC1#ping www.google.com

Translating "www.google.com"...domain server (192.168.1.254) [OK]

Type escape sequence to abort.
Sending 5, 100-byte ICMP Echos to 216.58.208.4, timeout is 2 seconds:
!!!!!
Success rate is 100 percent (5/5), round-trip min/avg/max = 52/69/84 ms

 

Related Links:

Monday, March 2, 2015

Cisco IOS on UNIX (IOU) – On GNS3 v1.x

Today I’m going to discuss How to install and configure Cisco IOU in GNS3-1.2.1. In this way you can emulate Cisco Switch in GNS3. This article explains to get a working layer 2 switch in GNS3-1.1. Cisco IOS on UNIX (IOU) is a fully working version of IOS that runs UNIX/LINUX platform. Cisco IOS on UNIX is intended for Cisco employees for research and experiments. Distribution of IOU images to customers or external persons is strictly prohibited.

Table of Contents

  1. Tools required
  2. Import GNS3 IOU VM.ova
  3. Uploading IOU image to UNIX
  4. GNS3 Local and Remote Server
  5. IOS on UNIX Configuration for GNS3

Tools required

  1. GNS3-1.2.1
  2. Oracle VirtualBox
  3. GNS3 IOU VM.ova:- Is the Virtual UNIX platform to run IOU image. It is a virtual box OVA file.
  4. IOU image: IOU image is intended to use only for Cisco employees, distribution of IOU is strictly prohibited. Please don’t ask me! Google is your friend always.
  5. iourc.txt file: Is the license of Cisco IOU image. I have no privilege to provide it publically, but I found a discussion related to it here. It may help you.


Step 1: Import GNS3 IOU VM.ova

Import GNS3 IOU VM.ova to VirtualBox.

1.png

Go to Settings → Network → Adapter 1. Make sure it is attached to Host-only Adapter with name VirtualBox Host-Only Ethernet Adapter. Then click OK.

Start the GNS3 IOU VM, and login with following credentials.

  • User name : root
  • Password  : cisco


Step 2: Configuring the GNS3 IOU VM Ethernet Adapter

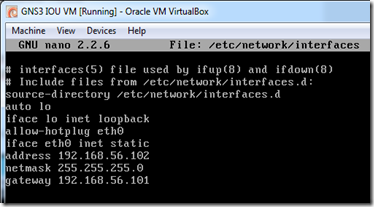
First define the IP of the eth0 interface on GNS3 IOU VM:

nano /etc/network/interfaces

image

save the interface configuration: Ctlr+X – Yes

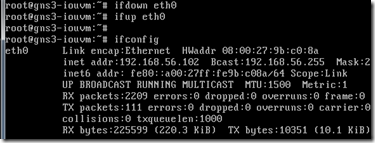
Next restart the eth0 (down/up) interface, so that it loads the configuration from the /etc/network/interfaces file

image

If you restart the VM, the initial banner will shows the configured IP, along with the Web interface URL that we will use latter to load IOU images.

image

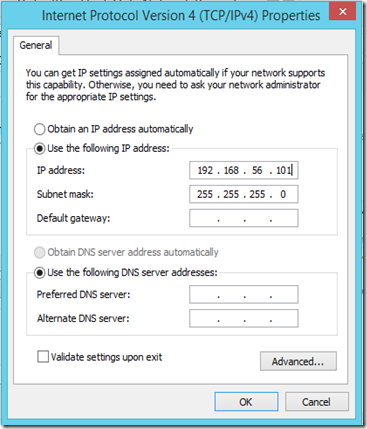
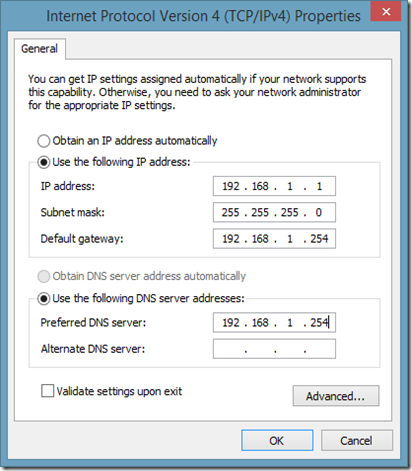
On your computer set the VirtualBox Host-Only Ethernet Adapter with an IP in the same network.

Go to Control Panel → Network and Internet → Network Connections

image

image

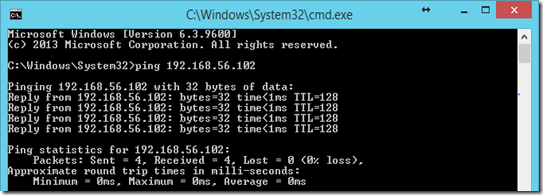
to test that you have a connection between you computer and the VM, ping the VM from your computer:

image


Step 3: Uploading IOU image to UNIX

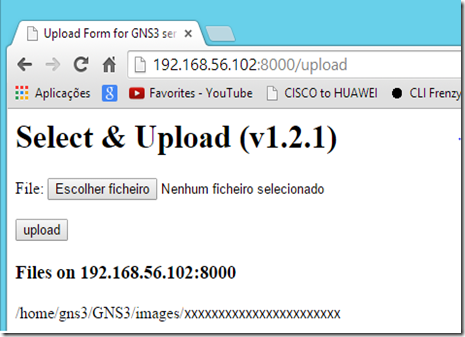
Check the IP address of the GNS3 IOU VM by issuing ifconfig (or as seen on step 2) command and note down the IP (mine 192.168.56.102). Now open any web browser in host machine and enter the following link in the address bar:

http://192.168.56.102:8000/upload

image

Choose your IOU image and click Upload button.

 image

Note the location of IOU image being copied:

/home/gns3/GNS3/images/XXXXXXXXXXXXXXXXXXX


Step 4: GNS3 Local and Remote Server

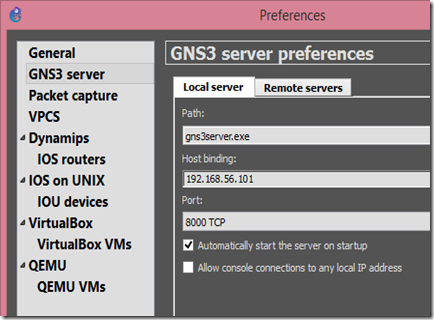
Go GNS3, Edit → Preferences → GNS3 Server → Local Server

Drop down the Host Binding section and choose 192.168.56.XX, VirtualBox Host-Only Adapter IP (mine 192.168.56.101) and click Apply.

This binds the local server to:

image

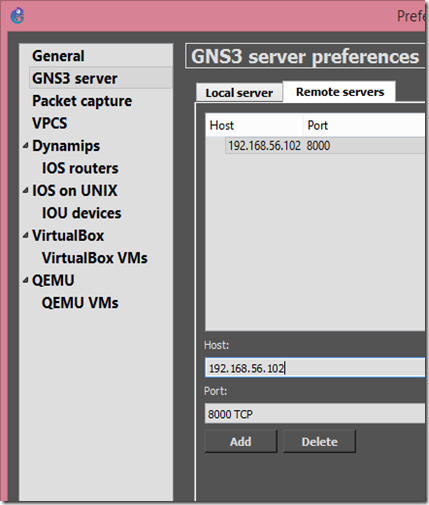
Again Edit → Preferences → GNS3 Server → Remote Server

Enter GNS3 IOU VM address (mine 192.168.56.102) and 8000 as port.

image


Step 5: IOS on UNIX Configuration for GNS3

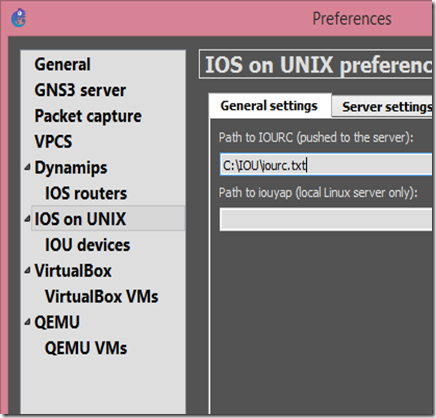
Go to Edit → Preferences → IOS on UNIX → General Settings

Browse iourc.txt (iourc.txt can be stored on any directory of your local PC, eg: Desktop).

image

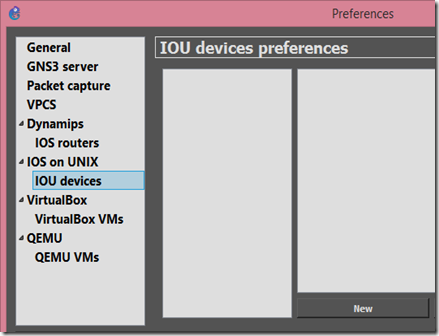
Go to IOU Devices → New button and select server type as Remote. Your remote server will be listed there. → Next

image

image

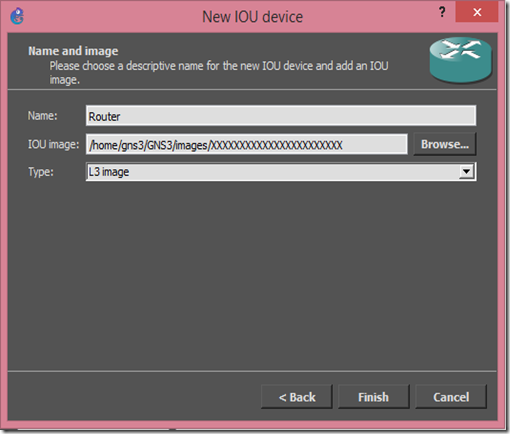
Put a Name for the IOU image and set IOU image path that you noted already in Step 2. (/home/gns3/GNS3/images/XXXXXXXXXXXXXXXXXXX)

Type the image must be L2 if switch IOU.

image

Click Finish button. and you are done:

image

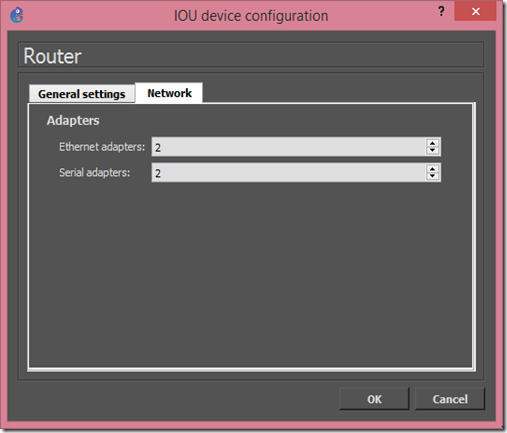
If you want more Interfaces click on Edit to add more:

image

note that on IOU you add the interfaces in cards of four interfaces, so the above means:

  • 8 Ethernet Interfaces (2x4)
  • 8 Serial Interfaces (2x4)

Now you have one more router to select:

image

Based On: