Note: To see the pictures at full quality just click on them.
This article was graciously contributed by mwdmeyer which was originally posted on his site here.
I've been getting lots of hits to the post about a site to site VPN setup with a netscreen. So I've decided to do one for a dial-up VPN user connecting to a netscreen.
A dial-up user is anyone who needs access into the network and has a dynamic ip address. We don't wish to be able to access them (the dial-up user) from within the network. This is how we setup most connections at work. This allows people to access file shares and outlook (without the need to setup RPC over HTTP).
Background
- Netscreen 5GT running ScreenOS 5.4.0r1 (Should be the same process for any netscreen running ScreenOS 5.x)
- Netscreen Remote 8.7 (The Windows VPN client)
- Local Network (the one in which the vpn users want to access) of 10.0.0.0/22 (10.0.0.0 - 10.0.3.255)
- External Address of 59.167.253.89
Setting up the Netscreen
1) First we need to create a user. This can be found in Objects -> Users -> Local (Note: Follow the screen shot below, you don't need a password here, you do need the IKE User info though)
So we have our user, Test.User
2) Create Phase 1 of the VPN tunnel. This can be found in VPNs -> AutoKey Advanced -> Gateway (Note: Security level is set to custom, password for VPN is entered here, Outgoing interface is your untrust interface).

3) Now we'll modify the advanced settings. Click Advanced (Note: We're using DES and MD5 here. Mode is set to Aggressive)

Now click return and okay to save your settings.
4) Now we'll create the Phase 2 information. This can be found in VPNs -> AutoKey IKE (Note: Security level is set to custom, Remote Gateway is set to "Test.UserP1")

5) Now we'll modify the advanced settings. Click Advanced (Note: We're using DES and MD5 here. Replay Protection is on)

Now click return and okay to save your settings.
6) Now we'll need to create a policy. This will go from untrust to trust. This can be found in Policies.

Click new (Note: Source Address is Any-IPv4 or just Any if IPv6 is disabled, Destination Address is your local subnet, tunnel the connection though the VPN user "Test.UserP2")

Now the Netscreen has been setup.
Setting up Netscreen Remote
1) Open the policy editor in Netscreen Remote
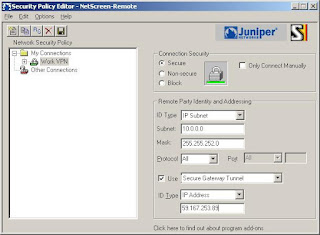
NetScreen Remote 12) Create a new connection (Note: Type in the remote subnet details and set the secure gateway to your netscreens external address)
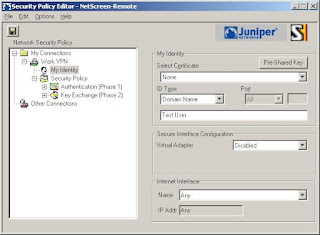
3) Now we'll setup the login details (Note: The Certificate is None, The ID Type is Domain Name and the value is "Test.User")
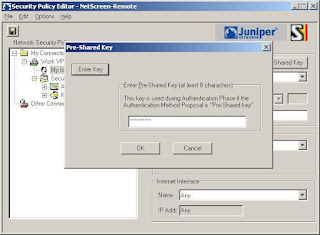
4) Now click Pre-Shared Key (Note: Type in the password you used when setting up the connection in the netscreen)
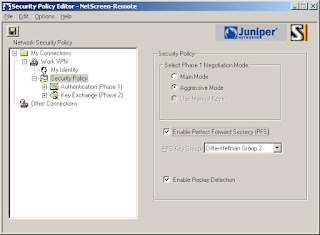
5) Now we'll set the connection to aggressive (Note: Enable PFS, DH is Group 2 and Enable Replay Dection)
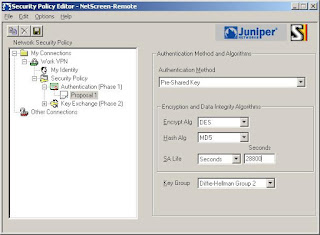
6) Now we'll setup the Phase 1 details (Note: We're using DES and MD5 here. SA Life is 28800 seconds)
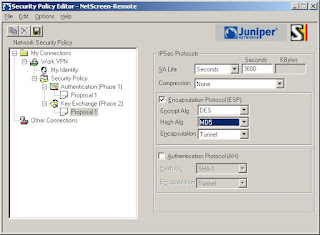
7) Now we'll setup the Phase 2 details (Note: The SA Life here is 3600 Seconds)
8) Save the settings and Test!
That should be all you need to do.
Notes
- The VPN may not work behind some NAT routers. You can try turning on NAT-T within the netscreen, although I find it doesn't normally work.
- Make sure the details in the Netscreen and Netscreen Remote Match (i.e Phase 1 policies etc)
- You can check the logs from both Netscreen and Netscreen Remote
- You cannot connect to the VPN while within the local subnet
- Netscreen Remote should be disabled when you're directly connected to the network
- Only traffic for the subnet is passed over the VPN.
Taken From: http://www.juniperforum.com/index.php?page=20
Added minor correction in te policy source that has to be "Dial Up"