This blog is about: Open Source, Operating Systems (mainly linux), Networking and Electronics The information here is presented in the form of howtos. Sometimes the information migth be in portuguese! As vezes a informação pode estar em portugues!
Wednesday, September 23, 2009
PPPoE and DSL Connections - Public IP
Remote Desktop (XDMCP) on Ubuntu
Here some notes on the roles of the XDMCP server and client
Server - The remote machine were we want to login.
Client - The local machine were we will login on the Server
Before trying anything on XDMCP, you should make
sure that on the server your firewall is either disabled
or allows Udp port 177.
Here I'm going to show how to open a UDP 177 (rule),
on Iptables (firewall) using the bash, but you use a
very simple and usefull, Gui for Iptables nown as
"Firestarter" (to install on ubuntu just do
sudo apt-get install iptables).
$ sudo iptables -A INBOUND -p udp --destination-port 177 -j ACCEPT
Here are a couple off other usefull comands on Iptables
## Checking Iptables Rules #####
$ sudo iptables -nvL
if you have already executed the rule to open UDP port 177,
by executing this comand, you should see it there.
## Clearing All the Rules #####
$ sudo iptables -F
be aware that this comand clears all off the rules, and this
does not mean that all is allowed, on the contrary,
IPtables default beaviour, when it has no rules is to
deny all, so be very carefull.
XDMCP GNOME - via Bash
=====================================
XDMCP Server Configuration
----------------------------------
## Allowing the remote login on the Server #####
$ sudo gedit /etc/gdm/gdm.conf-custom
...
[xdmcp]
Enable=true
...
You should have the above on the file.
If you want the remote login screen to be the same as
the graphical greeter that is the default in the Ubuntu
install make sure that the following is present.
...
[daemon]
RemoteGreeter=/usr/lib/gdm/gdmgreeter
...
For these changes to take efect you can either,
reboot:
$ sudo reboot
or restart the service, for that go to text terminal (Ctlr+Alt+F2)
and type:
$ sudo /etc/init.d/gdm restart
to go back to you Gnome environment try Ctlr+Alt+F7, or some
Ctlr+Alt+Fx, close to F7.
XDMCP Client Login
------------------------
$ sudo X :1 -query server_ip
After this if all went well you should see
Ubuntu's graphical login screen, as if you
were on the remote computer fisicaly.
If don't want to see it fullscreen, you can
show the remote desktop on a window by
using the following command instead:
$ sudo Xnest :1 -query server_ip
XDMCP GNOME - via Gui
=====================================
This is equivelent to the shown above, the diference
is that, the server here is configured via Gui.
XDMCP Server Configuration
-----------------------------------
Allowing the remote login on the Server

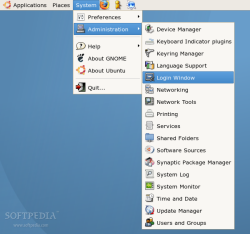
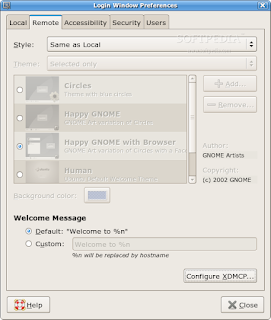
As shown above System > Administration > Login Window

And then change the Style to "Same as Local", and that's it.
Aditional confuguration can be done on "Configure XDMCP"
For these changes to take efect you can either,
reboot:
$ sudo reboot
or restart the service, for that go to text terminal (Ctlr+Alt+F2)
and type
$ sudo /etc/init.d/gdm restart
to go back to you Gnome environment try Ctlr+Alt+F7, or some
Ctlr+Alt+Fx, close to F7.
XDMCP Client Login
------------------------
$ sudo X :1 -query server_ip
After this if all went well you should see
Ubuntu's graphical login screen, as if you
were on the remote computer fisicaly.
If don't want to see it fullscreen, you can
show the remote desktop on a window
by using the following command instead:
$ sudo Xnest :1 -query server_ip
XDMCP KDE - via Bash
(didn't test it, give me feedback if you do)
=====================================
XDMCP Server Configuration
----------------------------------
Still working on it...
XDMCP Client Login
------------------------
$ sudo X :1 -query server_ip
After this if all went well you should see
Ubuntu's graphical login screen, as if you
were on the remote computer fisicaly.
If don't want to see it fullscreen, you can
show the remote desktop on a window
by using the following command instead:
$ sudo Xnest :1 -query server_ip
Based On:
GNOME
http://megaf.wordpress.com/2009/04/15/xdmcp-internet-seu-linux-onde-voce-estiver/
http://stochasticflux.com/blog/?p=4
KDE
http://www.guiadohardware.net/tutoriais/configurando-servidor-xdmcp/pagina3.html
http://megaf.wordpress.com/2009/04/15/xdmcp-internet-seu-linux-onde-voce-estiver/
Iptables
http://www.cyberciti.biz/tips/linux-iptables-open-bittorrent-tcp-ports-6881-to-6889.html
Saturday, September 19, 2009
Remote Applications via X11 - Easy Way (over ssh)
So whit this you can show and interact with the graphical applications on the Ubuntu Server, using your Desktop's, graphical environment. So in the X11 world you have the following:
Ubuntu Server - X11 Client --> Application is executed
Ubuntu Desktop - X11 Server --> Application is shown
It's a bit confusing at first, that your Ubuntu Server is your X11 Client, and you Desktop is the X11 Server.
Note: this was tested on Ubuntu 8.04 and 9.04.
X11 Server - Where the remote apps will be shown
===================================
my_user@my_desktop:~$ ssh -X root@remote_server
root@remote_server:~$
Now you have a what looks like a normal ssh remote terminal on the "remote_server". But when you execute an graphical apps on the remote server it will be displayed on your desktop, for example:
root@remote_server:~$ gedit
With this you can make a text file on your machine tha will be saved on the remote server.
If you want ssh to always act like this, have the following line in your /etc/ssh/ssh_config:
ForwardX11 yes
With this method all the data over the network will be encrypted, because of ssh, but if you want to kick it old school, whit no encryption an a lot more complicated using X11 directly, you can check the post "Run Applications Remotely via X11 - Hard Way"
Based on: http://wiki.linuxquestions.org/wiki/X11_forwarding_with_OpenSSH
Remote Applications via X11 - Hard Way
So whit this you can show and interact with the graphical applications on the Ubuntu Server, using your Desktop's, graphical environment. So in the X11 world you have the following:
Ubuntu Server - X11 Client --> Application is executed
Ubuntu Desktop - X11 Server --> Application is shown
It's a bit confusing at first, that your Ubuntu Server is you X11 Client, and you Desktop is the X11 Server.
Note: this was tested on Ubuntu 8.04 and 9.04.
X Server - 192.168.1.68 (Where the remote apps will be shown)
=======================================
## Allow that the remote applicatilõns to be show on the X11 Server #####
$ sudo gedit /etc/gdm/gdm.conf
DisallowTCP=true
change it to
DisallowTCP=false
## Reboot to load the new gdm.conf file #####
$ sudo reboot
## Check if the X Server TCP Connections ######
$ netstat -natp |grep :6000
(Not all processes could be identified, non-owned process info
will not be shown, you would have to be root to see it all.)
tcp 0 0 0.0.0.0:6000 0.0.0.0:* LISTEN -
tcp6 0 0 :::6000 :::* LISTEN -
## Add permission for the remote X Client applications #####
## to be shown locally this is temporary, when you #####
## reboot, you must do this again #####
$ sudo xhost 192.168.1.71
## Find the id of the display you are in currently, #####
## and were we see the remote apps, from the X Clinet #####
$ echo $DISPLAY
:0.0
X client - 192.168.1.71 (Where the remote apps will be executed)
========================================
In order to show an application remotely you should use one of the options bellow, where 192.168.1.68 is the IP of the remote computer were the applications will be shown and 0.0 is the id of the graphical terminal on that computer, found earlier, were the remote applications will be displayed.
In this example we execute the application "nautilus", you should change it to the application you want to see remotely.
$ sudo DISPLAY=192.168.1.68:0.0 nautilus
or
$ sudo export DISPLAY=192.168.1.68:0.0
$ nautilus
some applications will not work with the first option so try the second.
After executing one of the two options above, the applications
will be running locally on the X Client (192.168.1.71) but displayed remotely on X Server (192.168.1.68), the applications will not be able to see or use anything on the X Server, there you can only interact with it, and all the resources it may use are from the X Client (local machine).
For example if you replace "nautilus" with "gedit", write something on it and save it the file will be saved on the X Client and not on the X Server were you are interacting with it.
With this method all the data over the network will not be encrypted, if you want a method with encription and a lot easyer using X11 over ssh, you can check the post "Run Applications Remotely via X11 - Easy Way (over ssh)"
Inspired on:
http://ubuntuforums.org/showthread.php?t=162566
http://www.cisl.ucar.edu/docs/ssh/guide/node29.html
http://www.hackinglinuxexposed.com/articles/20040513.html
http://www.linuxquestions.org/questions/linux-newbie-8/how-do-i-restart-x-without-rebooting-418785/
http://www.linuxplanet.com/linuxplanet/tutorials/857/3/
http://www.codingdomain.com/linux/remote/x11/
Wednesday, September 2, 2009
NIC Auto-Negotiation and Duplex Settings - NIC satus
Q: How to disable auto-negotiation option of my network interface card and set up half/full duplex mode manually from Linux command line (CLI)? By the way, how to see current settings?
A: There are several Linux utilities coming with almost any distribution including Debian, Ubuntu, Fedora, RedHat, Mandriva, Centos whatever. See details below.
This is rather powerful utility can display and change settings of ethernet network interface card. You can easily disable/enable autonegotiation option for your NIC, also it’s possible to manually set up duplex mode, configure wake-on-lan options, set speed settings. Just look through full manual page for ethtool. Here are several ethtool usage examples:
ethtool eth0 - shows current NIC settings
Settings for eth0:
     Supported ports: [ TP MII ]
     Supported link modes:   10baseT/Half 10baseT/Full
                             100baseT/Half 100baseT/Full
     Supports auto-negotiation: Yes
     Advertised link modes:  10baseT/Half 10baseT/Full
                             100baseT/Half 100baseT/Full
     Advertised auto-negotiation: No
     Speed: 10Mb/s
     Duplex: Half
     Port: MII
     PHYAD: 32
     Transceiver: internal
     Auto-negotiation: off
     Supports Wake-on: pumbg
     Wake-on: d
     Current message level: 0x00000007 (7)
     Link detected: yes
ethtool -s eth0 duplex half autoneg off - disables auto-negotiation, enables Half Duplex.ethtool -s eth1 duplex full speed 1000 autoneg off - disables auto-negotiation, enables Falf Duplex and sets up Speed to 1000 Mb/s.
According to manual it allows to manipulate and see media-independent interface status. Let’s see examples:
bash-3.1# mii-tool eth0 - shows 100 Mbps speed, Full Duplex, Auto-negotiation is on.
eth0: negotiated 100baseTx-FD, link okbash-3.1# mii-tool eth0 -F 10baseT-HD - enables 10 Mb/s Half Duplex connection.
Taken From: http://www.linuxscrew.com/2008/11/20/faq-how-to-change-duplex-andor-auto-negotiation-nic-settings-in-linux/


 auto-nego