This page describes how to install the Android SDK and set up your development environment for the first time.
If you encounter any problems during installation, see the
Troubleshooting section at the bottom of this page.
Updating?
If you already have an Android SDK, use the
Android SDK and AVD Manager tool to install updated tools and new Android platforms into your existing environment. For information about how to do that, see
Adding SDK Components
Step 1. Preparing Your Development Computer
Before getting started with the Android SDK, take a moment to confirm that your development computer meets the
System Requirements. In particular, you might need to install the
JDK, if you don't have it already.
If you will be developing in Eclipse with the Android Development Tools (ADT) Plugin—the recommended path if you are new to Android—make sure that you have a suitable version of Eclipse installed on your computer as described in the
System Requirements document. If you need to install Eclipse, you can download it from this location:
http://www.eclipse.org/downloads/
The "Eclipse Classic" version is recommended. Otherwise, a Java or RCP version of Eclipse is recommended.
Step 2. Downloading the SDK Starter Package
The SDK starter package is not a full development environment—it includes only the core SDK Tools, which you can use to download the rest of the SDK components (such as the latest Android platform).
If you haven't already, get the latest version of the SDK starter package from the
SDK download page.
If you downloaded a
.zip or
.tgz package (instead of the SDK installer), unpack it to a safe location on your machine. By default, the SDK files are unpacked into a directory named
android-sdk-<machine-platform>.
If you downloaded the Windows installer (
.exe file), run it now and it will check whether the proper Java SE Development Kit (JDK) is installed (installing it, if necessary), then install the SDK Tools into a default location (which you can modify).
Make a note of the name and location of the SDK directory on your system—you will need to refer to the SDK directory later, when setting up the ADT plugin and when using the SDK tools from command line.
Step 3. Installing the ADT Plugin for Eclipse
Android offers a custom plugin for the Eclipse IDE, called Android Development Tools (ADT), that is designed to give you a powerful, integrated environment in which to build Android applications. It extends the capabilites of Eclipse to let you quickly set up new Android projects, create an application UI, debug your applications using the Android SDK tools, and even export signed (or unsigned) APKs in order to distribute your application. In general, developing in Eclipse with ADT is a highly recommended approach and is the fastest way to get started with Android.
If you'd like to use ADT for developing Android applications, install it now.
Downloading the ADT Plugin
Use the Update Manager feature of your Eclipse installation to install the latest revision of ADT on your development computer.
Assuming that you have a compatible version of the Eclipse IDE installed, as described in
Preparing for Installation, above, follow these steps to download the ADT plugin and install it in your Eclipse environment.
- Start Eclipse, then select Help > Install New Software....
- Click Add, in the top-right corner.
- In the Add Repository dialog that appears, enter "ADT Plugin" for the Name and the following URL for the Location:
https://dl-ssl.google.com/android/eclipse/
Note: If you have trouble acquiring the plugin, try using "http" in the Location URL, instead of "https" (https is preferred for security reasons).
- Click OK.
- In the Available Software dialog, select the checkbox next to Developer Tools and click Next.
- In the next window, you'll see a list of the tools to be downloaded. Click Next.
- Read and accept the license agreements, then click Finish.
- When the installation completes, restart Eclipse.
Configuring the ADT Plugin
Once you've successfully downloaded ADT as described above, the next step is to modify your ADT preferences in Eclipse to point to the Android SDK directory:
- Select Window > Preferences... to open the Preferences panel (Mac OS X: Eclipse > Preferences).
- Select Android from the left panel.
- For the SDK Location in the main panel, click Browse... and locate your downloaded SDK directory.
- Click Apply, then OK.
Done! If you haven't encountered any problems, then the installation is complete. If you're installing the Android SDK for the first time, return to
Installing the SDK to complete your setup.
If you prefer to work in a different IDE, you do not need to install Eclipse or ADT, instead, you can directly use the SDK tools to build and debug your application. The
Overview section of the developer guide outlines the major steps that you need to complete when developing in Eclipse or other IDEs.
Step 4. Adding Platforms and Other Components
The last step in setting up your SDK is using the
Android SDK and AVD Manager (a tool included in the SDK starter package) to download essential SDK components into your development environment.
The SDK uses a modular structure that separates the major parts of the SDK—Android platform versions, add-ons, tools, samples, and documentation—into a set of separately installable components. The SDK starter package, which you've already downloaded, includes only a single component: the latest version of the SDK Tools. To develop an Android application, you also need to download at least one Android platform and the SDK Platform-tools (tools that the latest platform depend upon). However, downloading additional components is highly recommended.
If you used the Windows installer, when you complete the installation wizard, it will launch the Android SDK and AVD Manager with a default set of platforms and other components selected for you to install. Simply click
Install to accept the recommended set of components and install them. You can then skip to
Step 5, but we recommend you first read the section about the
Available Components to better understand the components available from the Android SDK and AVD Manager.
You can launch the Android SDK and AVD Manager in one of the following ways:
- From within Eclipse, select Window > Android SDK and AVD Manager.
- On Windows, double-click the
SDK Manager.exe file at the root of the Android SDK directory.
- On Mac or Linux, open a terminal and navigate to the
tools/ directory in the Android SDK, then execute:
android
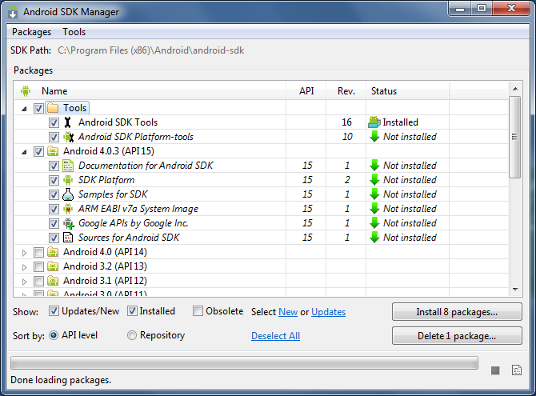
To download components, use the graphical UI of the Android SDK and AVD Manager, shown in Figure 1, to browse the SDK repository and select new or updated components. The Android SDK and AVD Manager will install the selected components in your SDK environment. For information about which components you should download, see the following section about
Recommended Components.
 Figure 1.
 The Android SDK and AVD Manager's
Available Packages panel, which shows the SDK components that are available for you to download into your environment.
Available Components
By default, there are two repositories of components for your SDK:
Android Repository and
Third party Add-ons.
The
Android Repository offers these types of components:
- SDK Tools (pre-installed in the Android SDK starter package) — Contains tools for debugging and testing your application and other utility tools. You can access these in the
<sdk>/tools/ directory of your SDK and read more about them in the Tools section of the developer guide.
- SDK Platform-tools — Contains tools that are required to develop and debug your application, but which are developed alongside the Android platform in order to support the latest features. These tools are typically updated only when a new platform becomes available. You can access these in the
<sdk>/platform-tools/ directory. Read more about them in the Tools section of the developer guide.
- Android platforms — An SDK platform is available for every production Android platform deployable to Android-powered devices. Each platform component includes a fully compliant Android library and system image, sample code, emulator skins, and any version specific tools. For detailed information about each platform, see the overview documents available under the section "Downloadable SDK Components," at left.
- USB Driver for Windows (Windows only) — Contains driver files that you can install on your Windows computer, so that you can run and debug your applications on an actual device. You do not need the USB driver unless you plan to debug your application on an actual Android-powered device. If you develop on Mac OS X or Linux, you do not need a special driver to debug your application on an Android-powered device. (See Developing on a Device for more information about developing on a real device.)
- Samples — Contains the sample code and apps available for each Android development platform. If you are just getting started with Android development, make sure to download the samples to your SDK.
- Documentation — Contains a local copy of the latest multiversion documentation for the Android framework API.
The
Third party Add-ons provide components that allow you to create a development environment using a specific Android external library (such as the Google Maps library) or a customized (but fully compliant) Android system image. You can add additional Add-on repositories, by clicking
Add Add-on Site.
Recommended Components
The SDK repository contains a range of components that you can download. Use the table below to determine which components you need, based on whether you want to set up a basic, recommended, or full development environment:


Once you've installed at least the basic configuration of SDK components, you're ready to start developing Android apps. The next section describes the contents of the Android SDK to familiarize you with the components you've just installed.
For more information about using the Android SDK and AVD Manager, see the
Adding SDK Components document.
Step 5. Exploring the SDK (Optional)
Once you've installed the SDK and downloaded the platforms, documentation, and add-ons that you need, we suggest that you open the SDK directory and take a look at what's inside.
The table below describes the full SDK directory contents, with components installed.
add-ons/
Contains add-ons to the Android SDK development environment, which let you develop against external libraries that are available on some devices.
docs/
A full set of documentation in HTML format, including the Developer's Guide, API Reference, and other information. To read the documentation, load the file
offline.html in a web browser.
platform-tools/
Contains development tools that may be updated with each platform release (from the
Android SDK Platform-tools component). Tools in here include
adb,
dexdump, and others others that you don't typically use directly. These tools are separate from the generic development tools in the
tools/ directory, because these tools may be updated in order to support new features in the latest Android platform, whereas the other tools have no dependencies on the platform version.
platforms/
Contains a set of Android platform versions that you can develop applications against, each in a separate directory.
<platform>/
Platform version directory, for example "android-1.6". All platform version directories contain a similar set of files and subdirectory structure.
data/
Storage area for default fonts and resource definitions.
images/
Storage area for default disk images, including the Android system image, the default userdata image, the default ramdisk image, and more. The images are used in emulator sessions.
skins/
A set of emulator skins available for the platform version. Each skin is designed for a specific screen resolution.
templates/
Storage area for file templates used by the SDK development tools.
tools/
This directory is used only by SDK Tools r7 and below for development tools that are specific to this platform version—it's not used by SDK Tools r8 and above.
android.jar
The Android library used when compiling applications against this platform version.
samples/
Sample code and apps that are specific to platform version.
tools/
Contains the set of development and profiling tools that are platform-independent, such as the emulator, the AVD and SDK Manager, ddms, hierarchyviewer and more. The tools in this directory may be updated at any time (from the
Android SDK Tools component), independent of platform releases, whereas the tools in
platform-tools/ may be updated based on the latest platform release.
SDK Readme.txt
A file that explains how to perform the initial setup of your SDK, including how to launch the Android SDK and AVD Manager tool on all platforms
SDK Manager.exe
Windows SDK only. A shortcut that launches the Android SDK and AVD Manager tool, which you use to add components to your SDK.
Optionally, you might want to add the location of the SDK's
tools/ and
platform-tools to your
PATH environment variable, to provide easy access to the tools.
 How to update your PATH
Next Steps
Once you have completed installation, you are ready to begin developing applications. Here are a few ways you can get started:
Set up the Hello World application
- If you have just installed the SDK for the first time, go to the Hello World tutorial. The tutorial takes you step-by-step through the process of setting up your first Android project, including setting up an Android Virtual Device (AVD) on which to run the application.
Following the Hello World tutorial is an essential first step in getting started with Android development.
Learn about Android
- Take a look at the Dev Guide and the types of information it provides
- Read an introduction to Android as a platform in What is Android?
- Learn about the Android framework and how applications run on it in Application Fundamentals
- Take a look at the Android framework API specification in the Reference tab
Explore the development tools
Follow the Notepad tutorial
- The Notepad Tutorial shows you how to build a full Android application and provides helpful commentary on the Android system and API. The Notepad tutorial helps you bring together the important design and architectural concepts in a moderately complex application.
Following the Notepad tutorial is an excellent second step in getting started with Android development.
Explore some code
- The Android SDK includes sample code and applications for each platform version. You can browse the samples in the Resources tab or download them into your SDK using the Android SDK and AVD Manager. Once you've downloaded the samples, you'll find them in
<sdk>/samples/<platform>/.
Visit the Android developer groups
- Take a look at the Community pages to see a list of Android developers groups. In particular, you might want to look at the Android Developers group to get a sense for what the Android developer community is like.
Troubleshooting
Ubuntu Linux Notes
- If you need help installing and configuring Java on your development machine, you might find these resources helpful:
- Here are the steps to install Java and Eclipse, prior to installing the Android SDK and ADT Plugin.
- If you are running a 64-bit distribution on your development machine, you need to install the
ia32-libs package using apt-get::
apt-get install ia32-libs
- Next, install Java:
apt-get install sun-java6-jdk
- The Ubuntu package manager does not currently offer an Eclipse 3.3 version for download, so we recommend that you download Eclipse from eclipse.org (http://www.eclipse.org/ downloads/). A Java or RCP version of Eclipse is recommended.
- Follow the steps given in previous sections to install the SDK and the ADT plugin.
Other Linux Notes
- If JDK is already installed on your development computer, please take a moment to make sure that it meets the version requirements listed in the System Requirements. In particular, note that some Linux distributions may include JDK 1.4 or Gnu Compiler for Java, both of which are not supported for Android development.
Based On: http://developer.android.com/sdk/installing.html


