Zenoss Core 4 Installation

[1/24/2014: Post has been updated to reflect configuration with CentOS 6.5 and Zenoss Core 4.2.4]
This is a sample installation guide for Zenoss Core 4. The single server installation closely aligns with the official Zenoss Core Installation Guide, but it also differs in some areas, and has a little more "glue".
The following components were used for this guide:
· CentOS
· Zenoss Core
· MariaDB
1. Hardware Requirements
You should meet these minimum hardware requirements for a single-server installation of Zenoss 4 Core (up to a 1000 devices):
| Deployment Size | Memory | CPU | Storage |
| 1 to 250 devices | 4GB | 2 cores | 1 x 300GB (10K RPM or SSD) |
| 250 to 500 devices | 8GB | 4 cores | 1 x 300GB (10K RPM or SSD) |
| 500 to 1000 devices | 16GB | 8 cores | 1 x 300GB (15K RPM or SSD) |
2. Operating System
My solution will be using the CentOS-6.5-x86_64-minimal.iso image. The aim of this image is to install a very basic CentOS 6.5 system, with the minimum number of packages needed to have a functional system. This post won't document the install process for CentOS 6 considering each environment (and associated requirements) is different. The main stages of the OS installation consist of language, storage, hostname, network, timezone, and the root password.
Note: All commands are run within the context of the root account unless otherwise specified.
Make sure to update the system after the initial boot post install.
# yum -y update
I also install the following packages that are not included by default.
# yum -y install file ntp vim-enhanced man man-pages wget traceroute yum-utils
# hosts file
It's recommended to add a hostname entry (FQDN and short), of the local computer, to the hosts file. You can update the entry manually (via text editor), or run the following set of commands:
# ipv4addr=$(ip -f inet addr show dev eth0 | sed -n 's/^ *inet *\([.0-9]*\).*/\1/p')
# printf "$ipv4addr\t$(hostname -f)\t$(hostname -s)\n" >> /etc/hosts
# unset -v ipv4addr
Verify the entry.
# cat /etc/hosts
127.0.0.1 localhost localhost.localdomain localhost4 localhost4.localdomain4
::1 localhost localhost.localdomain localhost6 localhost6.localdomain6
10.1.206.43 zenoss.corp.example.com zenoss
# SELinux
Zenoss documentation states the requirement that SELinux be disabled. We can accomplish this by changing the SELINUX value to disabled in the /etc/sysconfig/selinux file. Modify the file with your text editor.
# vim /etc/sysconfig/selinux
# This file controls the state of SELinux on the system.
# SELINUX= can take one of these three values:
# enforcing - SELinux security policy is enforced.
# permissive - SELinux prints warnings instead of enforcing.
# disabled - No SELinux policy is loaded.
SELINUX=disabled
# SELINUXTYPE= can take one of these two values:
# targeted - Targeted processes are protected,
# mls - Multi Level Security protection.
SELINUXTYPE=targeted
Reboot the computer for the change to take effect.
After logging in after the reboot, verify SELinux is disabled. Run the following command:
# sestatus
SELinux status: disabled
# Network Time Protocol (NTP)
Time synchronization is an often overlooked, but a very essential, configuration step for new server deployments. In my configuration, I will have my zenoss server sync with an Active Directory domain controller (which holds the PDC emulator FSMO role) on my private network. We will need to modify the ntp.conf file with a text editor and start the NTP daemon process, and also set it for autostart at boot time. Notice I "comment out" the default public pool.ntp.org virtual cluster servers. You may want to leave these enabled if you don't have a particular time source to sync with.
# vim /etc/ntp.conf
...
# Permit all access over the loopback interface. This could
# be tightened as well, but to do so would effect some of
# the administrative functions.
restrict 127.0.0.1
restrict -6 ::1
# Hosts on local network are less restricted.
#restrict 192.168.1.0 mask 255.255.255.0 nomodify notrap
# Use public servers from the pool.ntp.org project.
# Please consider joining the pool (http://www.pool.ntp.org/join.html).
#server 0.centos.pool.ntp.org
#server 1.centos.pool.ntp.org
#server 2.centos.pool.ntp.org
# Use internal NTP Server (AD/DC01)
server 10.1.206.11 iburst
#broadcast 192.168.1.255 autokey # broadcast server
#broadcastclient # broadcast client
#broadcast 224.0.1.1 autokey # multicast server
#multicastclient 224.0.1.1 # multicast client
#manycastserver 239.255.254.254 # manycast server
#manycastclient 239.255.254.254 autokey # manycast client
...
Start the NTP daemon.
# service ntpd start
Starting ntpd: [ OK ]
Set the NTP daemon for autostart at boot time and verify.
# chkconfig ntpd on; chkconfig --list ntpd
ntpd 0:off 1:off 2:on 3:on 4:on 5:on 6:off
We can verify the NTP status by running the following command:
# ntpq -pn
remote refid st t when poll reach delay offset jitter
=================================================
*10.1.206.11 199.180.253.191 3 u 42 64 377 0.429 -69.204 58.561
# Firewall
Zenoss requires the following ports be open on the host firewall:
| Port | Protocol | Direction | Description |
| 11211 | TCP/UDP | inbound | memcached |
| 8080 | TCP | inbound | Web interface |
| 514 | UDP | inbound | syslog |
| 162 | UDP | inbound | SNMP Traps |
| 25 | TCP | inbound | zenmail |
Add the rules. It is recommended to add each rule with the iptables command, but I prefer to modify the /etc/sysconfig/iptables file directly with a text editor.
# vim /etc/sysconfig/iptables
# Firewall configuration written by system-config-firewall
# Manual customization of this file is not recommended.
*filter
:INPUT ACCEPT [0:0]
:FORWARD ACCEPT [0:0]
:OUTPUT ACCEPT [0:0]
-A INPUT -m state --state ESTABLISHED,RELATED -j ACCEPT
-A INPUT -p icmp -j ACCEPT
-A INPUT -i lo -j ACCEPT
-A INPUT -m state --state NEW -m tcp -p tcp --dport 22 -j ACCEPT
-A INPUT -m state --state NEW -m tcp -p tcp --dport 11211 -j ACCEPT
-A INPUT -m state --state NEW -m udp -p udp --dport 11211 -j ACCEPT
-A INPUT -m state --state NEW -m tcp -p tcp --dport 8080 -j ACCEPT
-A INPUT -m state --state NEW -m udp -p udp --dport 514 -j ACCEPT
-A INPUT -m state --state NEW -m udp -p udp --dport 162 -j ACCEPT
-A INPUT -m state --state NEW -m tcp -p tcp --dport 25 -j ACCEPT
-A INPUT -j REJECT --reject-with icmp-host-prohibited
-A FORWARD -j REJECT --reject-with icmp-host-prohibited
COMMIT
Restart the firewall service for the changes to take effect.
# service iptables restart
iptables: Flushing firewall rules: [ OK ]
iptables: Setting chains to policy ACCEPT: filter [ OK ]
iptables: Unloading modules: [ OK ]
iptables: Applying firewall rules: [ OK ]
# Oracle Java 6
From a client computer, browse to Oracle's Java Downloads and grab the latest Java Version 6 Linux x64 RPM file.
Transfer the file to the Zenoss server. The command/utility will vary depending on what client OS you're using. I recommend WinSCP or PSCP if using a Windows client. From a Linux or Mac OS X client, we can use the scp command. The following command will copy the file to root's home directory on the destination Zenoss server:
$ scp jre-6u45-linux-x64-rpm.bin root@10.1.206.43:
Back in our terminal for the Zenoss server, we now need to make the binary file executable.
# cd ~
# chmod u+x ./jre-6u45-linux-x64-rpm.bin
Install the Oracle Java Runtime Environment (JRE).
# ./jre-6u45-linux-x64-rpm.bin
Unpacking...
Checksumming...
Extracting...
UnZipSFX 5.50 of 17 February 2002, by Info-ZIP (Zip-Bugs@lists.wku.edu).
inflating: jre-6u45-linux-amd64.rpm
Preparing... ########################################### [100%]
1:jre ########################################### [100%]
Unpacking JAR files...
rt.jar...
jsse.jar...
charsets.jar...
localedata.jar...
plugin.jar...
javaws.jar...
deploy.jar...
Done.
Add the JAVA_HOME variable statement to the end of the system BASH profile file.
# echo 'export JAVA_HOME=/usr/java/default' >> /etc/profile
"Dot" source the system BASH profile file to add the JAVA_HOME variable to the current shell environment.
# . /etc/profile
Verify the variable is set and that Java is installed correctly.
# echo $JAVA_HOME
/usr/java/default
# java -version
java version "1.6.0_45"
Java(TM) SE Runtime Environment (build 1.6.0_45-b06)
Java HotSpot(TM) 64-Bit Server VM (build 20.45-b01, mixed mode)
3. Database
My solution diverges from the official Zenoss documentation. I prefer to deploy MariaDB instead of the standard MySQL server. MariaDB is an enhanced, drop-in replacement for MySQL. Visit theMariaDB website for more information.
Let's first add the MariaDB repo to our local YUM configuration.
# cat >> /etc/yum.repos.d/MariaDB.repo << EOF
> [mariadb]
> name = MariaDB
> baseurl = http://yum.mariadb.org/5.5/centos6-amd64
> gpgkey=https://yum.mariadb.org/RPM-GPG-KEY-MariaDB
> gpgcheck=1
> EOF
Verify.
# cat /etc/yum.repos.d/MariaDB.repo
[mariadb]
name = MariaDB
baseurl = http://yum.mariadb.org/5.5/centos6-amd64
gpgkey=https://yum.mariadb.org/RPM-GPG-KEY-MariaDB
gpgcheck=1
Then also verify the repository is enabled.
# yum repolist
Loaded plugins: fastestmirror
Loading mirror speeds from cached hostfile
* base: mirror.nwresd.org
* extras: mirrordenver.fdcservers.net
* updates: yum.phx.singlehop.com
mariadb | 1.9 kB 00:00
mariadb/primary_db | 15 kB 00:00
repo id repo name status
base CentOS-6 - Base 6,367
extras CentOS-6 - Extras 14
mariadb MariaDB 9
updates CentOS-6 - Updates 373
repolist: 6,763
Let's now install the required packages.
# yum -y install MariaDB-server MariaDB-client
After MariaDB has been installed, modify the MariaDB server.cnf configuration file with some recommended settings from Zenoss.
# vim /etc/my.cnf.d/server.cnf
...
# this is read by the standalone daemon and embedded servers
[server]
# this is only for the mysqld standalone daemon
[mysqld]
max_allowed_packet=16M
innodb_buffer_pool_size=256M
innodb_additional_mem_pool_size=20M
# this is only for embedded server
[embedded]
...
Start the MariaDB server.
# service mysql start
Starting MySQL.. SUCCESS!
Verify MariaDB is set for autostart at boot.
# chkconfig --list mysql
mysql 0:off 1:off 2:on 3:on 4:on 5:on 6:off
4. Zenoss Core
From a client computer, browse to the Zenoss Core site and grab the latest Zenoss Core 4 RPM package for RHEL/CentOS 6 64-bit (v4.2.4 at the date of this post).
Transfer the file to the Zenoss server. The command/utility will vary depending on what client OS you're using. I recommend WinSCP or PSCP if using a Windows client. From a Linux or Mac OS X client, we can use the scp command. The following command will copy the file to root's home directory on the destination Zenoss server:
$ scp zenoss_core-4.2.4-1897.el6.x86_64.rpm root@10.1.206.43:
Back in our terminal for the Zenoss server, install the Zenoss dependencies repositories.
# rpm -Uvh http://deps.zenoss.com/yum/zenossdeps-4.2.x-1.el6.noarch.rpm
Retrieving http://deps.zenoss.com/yum/zenossdeps-4.2.x-1.el6.noarch.rpm
Preparing... ########################################### [100%]
1:zenossdeps ########################################### [100%]
Verify the repositories are enabled.
# yum repolist
Loaded plugins: fastestmirror
Loading mirror speeds from cached hostfile
* base: mirror.nwresd.org
* extras: mirrordenver.fdcservers.net
* updates: yum.phx.singlehop.com
repo id repo name status
base CentOS-6 - Base 6,367
extras CentOS-6 - Extras 14
mariadb MariaDB 9
updates CentOS-6 - Updates 373
zenossdeps-repo Zenoss Dependencies - Base 18
zenossdeps-update-repo Zenoss Dependencies - Updates 0
repolist: 6,781
It's now time to install the Zenoss Core 4 package (and dependency packages).
# cd ~
# yum -y --nogpgcheck localinstall zenoss_core-4.2.4-1897.el6.x86_64.rpm
# memcached, rabbitmq-server, snmpd
Set the services to start automatically at boot, and also interactively start them.
# for svc in memcached rabbitmq-server snmpd; do chkconfig $svc on; service $svc start; done
# Start Zenoss
Run the following command to start Zenoss:
# service zenoss start
At this stage, Zenoss should be ready from a functional perspective. We now need to focus on securing the Zenoss server.
5. Post-Install
The auto-deploy script offered by Zenoss runs a separate script that secures your Zenoss installation. Since we chose to do a normal install, we will have to manually fetch (and execute) the script.
Switch to a login shell for the zenoss user.
# su -l zenoss
Verify the zenoss user shell. As a side note, that's an "interesting" UID number for the zenoss user. :-)
$ id
uid=1337(zenoss) gid=500(zenoss) groups=500(zenoss)
Download the secure_zenoss.sh file from GitHub.
$ wget --no-check-certificate https://raw.github.com/osu-sig/zenoss-autodeploy-4.2.3/master/secure_zenoss.sh
Before we run the script, let's get the default passwords for the zenoss user in the global.conf file.
$ egrep 'user|password' $ZENHOME/etc/global.conf | grep -v admin
zodb-user zenoss
zodb-password zenoss
amqpuser zenoss
amqppassword zenoss
zep-user zenoss
zep-password zenoss
Give the secure_zenoss.sh script the execute permission.
$ chmod u+x secure_zenoss.sh
Run the secure_zenoss.sh script. I opted not to change the MySQL (MariaDB) root password at this time. We will be performing that task in the next section.
$ ./secure_zenoss.sh
Restricting permissions on /opt/zenoss/etc/*.conf*
Assigning secure password for global.conf:zodb-password
Assigning secure password for global.conf:amqppassword
Assigning secure password for global.conf:zep-password
Assigning secure password for global.conf:hubpassword
Assigning secure password for hubpassword:admin
MySQL is configured with a blank root password.
Configure a secure MySQL root password? [Yn]: n
Forcing zeneventserver to only listen on 127.0.0.1:8084
Let's verify the passwords have been modified for the zenoss user in the global.conf file.
$ egrep 'user|password' $ZENHOME/etc/global.conf | grep -v admin
zodb-user zenoss
zodb-password 18zmcTgYsA+AjczljwQd
amqpuser zenoss
amqppassword 18zmcTgYsA+AjczljwQd
zep-user zenoss
zep-password 18zmcTgYsA+AjczljwQd
hubpassword 18zmcTgYsA+AjczljwQd
We will also need to modify the password in the zodb_db_main.conf and zodb_db_session.conf files to match the value set for the zodb-password property in the global.conf file.
First, get the current configuration of these two files.
$ tail -n +1 $ZENHOME/etc/zodb_db_{main,session}.conf
==> /opt/zenoss/etc/zodb_db_main.conf <==
<mysql>
host localhost
port 3306
user zenoss
passwd zenoss
db zodb
</mysql>
==> /opt/zenoss/etc/zodb_db_session.conf <==
<mysql>
host localhost
port 3306
user zenoss
passwd zenoss
db zodb_session
</mysql>
Run the following commands to perform a substitution of the passwd property value for each of the files:
$ zodbpw=$(grep zodb-password $ZENHOME/etc/global.conf | awk '{print $2}')
$ sed -i.orig "5s/zenoss/$zodbpw/" $ZENHOME/etc/zodb_db_{main,session}.conf
$ unset -v zodbpw
Verify the modification was successful.
$ tail -n +1 $ZENHOME/etc/zodb_db_{main,session}.conf
==> /opt/zenoss/etc/zodb_db_main.conf <==
<mysql>
host localhost
port 3306
user zenoss
passwd 18zmcTgYsA+AjczljwQd
db zodb
</mysql>
==> /opt/zenoss/etc/zodb_db_session.conf <==
<mysql>
host localhost
port 3306
user zenoss
passwd 18zmcTgYsA+AjczljwQd
db zodb_session
</mysql>
Exit out of the shell for the zenoss user to return to the root user shell.
$ exit
logout
# MariaDB
The interactive mysql_secure_installation command improves the security of your MariaDB installation. It will allow you to set your MariaDB (MySQL) root password as well as other security related operations.
# mysql_secure_installation
The password for the MariaDB database zenoss user will also need to be set to "sync up" with the previous password modifications. We will use the value set for the passwd property in thezodb_db_* config files.
# mysql -u root -p
Enter password: <mysql_root_password>
Welcome to the MariaDB monitor. Commands end with ; or \g.
Your MariaDB connection id is 234
Server version: 5.5.34-MariaDB MariaDB Server
Copyright (c) 2000, 2013, Oracle, Monty Program Ab and others.
Type 'help;' or '\h' for help. Type '\c' to clear the current input statement.
MariaDB [(none)]> SET PASSWORD FOR 'zenoss'@'localhost' = PASSWORD('18zmcTgYsA+AjczljwQd');
Query OK, 0 rows affected (0.00 sec)
MariaDB [(none)]> \q
Bye
Restart the MariaDB server.
# service mysql restart
Shutting down MySQL. SUCCESS!
Starting MySQL.. SUCCESS!
# RabbitMQ
The following script will ensure the proper Zenoss credentials/permissions are set for the AMQP entities.
Create the set-rabbitmq-perms.sh script file.
# vim set-rabbitmq-perms.sh
Enter the following information (exclude the line numbers), then save the file:
| 001 002 003 004 005 006 007 008 009 010 011 012 013 014 015 016 017 018 019 020 021 022 023 024 025 | #!/usr/bin/env bash set -e VHOSTS="/zenoss" USER="zenoss" PASS="grep amqppassword \$ZENHOME/etc/global.conf | awk '{print \$2}'" if [ $(id -u) -eq 0 ] then RABBITMQCTL=$(which rabbitmqctl) $RABBITMQCTL stop_app $RABBITMQCTL reset $RABBITMQCTL start_app $RABBITMQCTL add_user "$USER" "$(su -l zenoss -c "$PASS")" for vhost in $VHOSTS; do $RABBITMQCTL add_vhost "$vhost" $RABBITMQCTL set_permissions -p "$vhost" "$USER" '.*' '.*' '.*' done exit 0 else echo "Error: Run this script as the root user." >&2 exit 1 fi |
Give the script file the execute permission.
# chmod u+x set-rabbitmq-perms.sh
Run the script.
# ./set-rabbitmq-perms.sh
Stopping node rabbit@zenoss ...
...done.
Resetting node rabbit@zenoss ...
...done.
Starting node rabbit@zenoss ...
...done.
Creating user "zenoss" ...
...done.
Creating vhost "/zenoss" ...
...done.
Setting permissions for user "zenoss" in vhost "/zenoss" ...
...done.
Restart the rabbitmq-server daemon.
# service rabbitmq-server restart
Restarting rabbitmq-server: SUCCESS
rabbitmq-server.
Restart Zenoss.
# service zenoss restart
# Verification
Verify all Zenoss daemons are running.
# su -l zenoss -c 'zenoss status'
Daemon: zeneventserver program running; pid=10564
Daemon: zopectl program running; pid=10662
Daemon: zenrrdcached program running; pid=10667
Daemon: zenhub program running; pid=10730
Daemon: zenjobs program running; pid=10777
Daemon: zeneventd program running; pid=10831
Daemon: zenping program running; pid=10907
Daemon: zensyslog program running; pid=11035
Daemon: zenstatus program running; pid=11026
Daemon: zenactiond program running; pid=11064
Daemon: zentrap program running; pid=11185
Daemon: zenmodeler program running; pid=11196
Daemon: zenperfsnmp program running; pid=11222
Daemon: zencommand program running; pid=11254
Daemon: zenprocess program running; pid=11282
Daemon: zredis program running; pid=11283
Daemon: zenjmx program running; pid=11410
Daemon: zenwin program running; pid=11600
Daemon: zenwinperf program running; pid=11758
Daemon: zeneventlog program running; pid=11910
If the proper permissions have been set for the RabbitMQ zenoss vhost(s), then the following queues should be listed:
# rabbitmqctl -p /zenoss list_queues
Listing queues ...
celery 0
zenoss.queues.zep.migrated.summary 0
zenoss.queues.zep.migrated.archive 0
zenoss.corp.example.com.celeryd.pidbox 0
zenoss.queues.zep.rawevents 0
zenoss.queues.zep.heartbeats 0
zenoss.queues.zep.zenevents 0
zenoss.queues.zep.signal 0
zenoss.queues.zep.modelchange 0
...done.
6. Web Interface Setup Wizard
After the preceding steps have been completed, you are ready to start the Setup Wizard for the initial configuration of customizing Zenoss for your environment. On your client computer, open a web browser and type http://zenoss.corp.example.com:8080 (or http://10.1.206.43:8080) in the address field.
Taken From: http://binarynature.blogspot.pt/2012/11/zenoss-core-4-installation.html
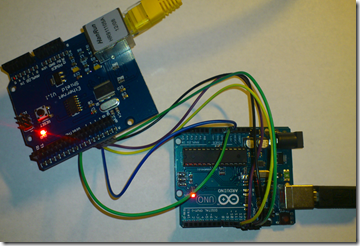
 But if you don’t want to put the shield on top of the arduino for some reason, you can connect it like this:
![]()


