Friday, July 31, 2015

Windows - How to Clean Install Windows 10

The Windows 10 upgrade process drags old files, settings, and programs from your previous Windows system to your new one. Microsoft allows you to get an entirely fresh system by performing a clean install, but the activation process can be a bit confusing.

This is also useful if you’ve purchased a new Windows 10 PC and it includes manufacturer-installed bloatware you don’t want. Or, you may need to perform a clean install on a computer without an existing Windows system after installing a new hard drive.

Note that you won’t be eligible for the free “Windows DVD Player” app offered to users of Windows Media Center if you perform a clean install. However, you can always install VLC to get DVD playback or use one of the more fully featured Windows Media Center alternatives.


The Easy Alternative: Perform a Reset and Remove Everything

There’s an alternative to clean-installing. You can use the Reset feature to reset your Windows 10 system back to its fresh state.

If you installed Windows 10 yourself, this should give you a fresh Windows system. If you purchased a computer that came with Windows 10, this will likely bring back the bloatware that came with your Windows 10 PC. (There should be a way to prevent Windows 10’s Reset function from reinstalling the bloatware, but we’ll need to get our hands on a PC that comes with Windows 10 before we can find out how.)

Note that this may not be the perfect solution — while it should give you a perfectly like-new Windows system, some people have reported that it won’t fix some system corruption issues, in which case you’d want to perform a real clean install.

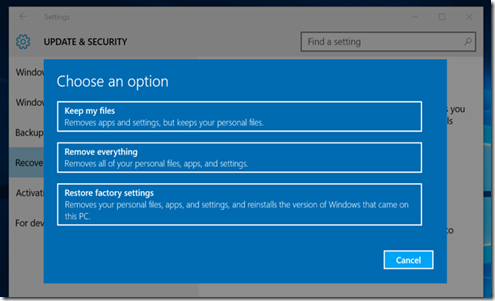
To reset your Windows 10 PC, open the Settings app, select Update & security, select Recovery, and click the “Get started” button under Reset this PC. Select “Remove everything.” This will wipe all your files, so be sure you have backups.

clip_image002


For the Free Upgrade: Have You Upgraded and Activated Your Windows 10 System?

If you want to perform a clean install of WIndows 10 and haven’t upgraded to Windows 10 yet on your Windows 7 or 8.1 PC, you have some extra work to do. You’ll need to take advantage of Microsoft’s upgrade offer before performing a clean install. (Obviously, if you have a PC that came with Windows 10 or you’ve purchased your own Windows 10 license, this isn’t necessary.)

When you upgrade a Windows 7 or 8.1 system to Windows 10, the installer confirms that you have a “genuine Windows” system installed and activates your computer for use with Windows 10. Note that you don’t actually get a Windows 10 product key — instead, your computer’s hardware is registered with Microsoft’s servers. When you install Windows 10 on that PC again in the future, it will check in with Microsoft’s servers, confirm it’s installed on a registered PC, and automatically activate itself.

If you don’t take advantage of the upgrade process first, this registration will never happen. There’s no way to enter a Windows 7 or 8.1 key into the Windows 10 installer, nor is there some sort of web form that will give you a Windows 10 key if you provide your Windows 7 or 8.1 key. Sorry — you’ll have to upgrade to Windows 10 before you can perform a clean install.

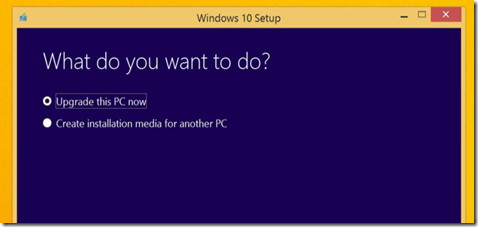
If you need to upgrade, you can download Microsoft’s Windows 10 media creation tool and tell it to “Upgrade this PC now.” It will automatically upgrade you to Windows 10 if your PC is running a genuine version of Windows 7 or Windows 8.1.

clip_image003

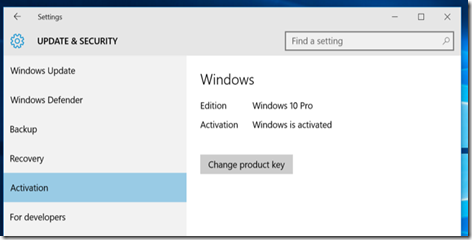
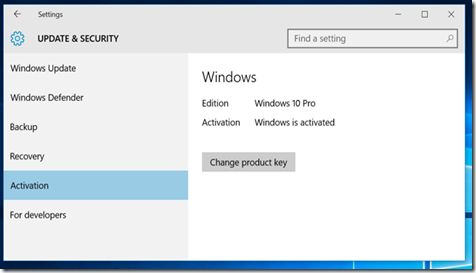
Once you’re done, confirm that Windows 10 is activated before performing a clean install. You can check this by opening Settings, selecting Update & Security, and selecting Activation.

Verify that you see “Windows is activated” here. Also, note the edition of Windows 10 you have installed — either Windows 10 Home or Windows 10 Pro. Most people will receive the Home edition as part of the free upgrade, but you’ll get Windows 10 Pro if you previously had a Professional edition of Windows 7 or 8.1 installed.

If Windows 10 isn’t activated, don’t try to perform a clean install until it is.

clip_image004


Download Windows 10 and Create Installation Media

Even if your Windows system has already been upgraded with the “Get Windows 10″ reservation process, you’ll need to download Windows installation media to install Windows 10 from scratch.

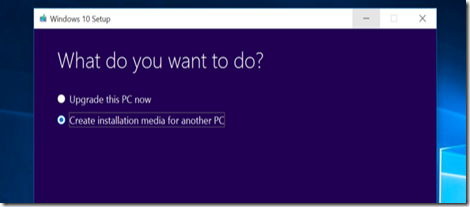
Download the Windows 10 media creation tool from Microsoft. This tool will download the correct Windows 10 installation files for your system, and it also has built-in functions to create USB installation media or burn an installer DVD. Select the “Create installation media for another PC” option to create installation media.

clip_image005

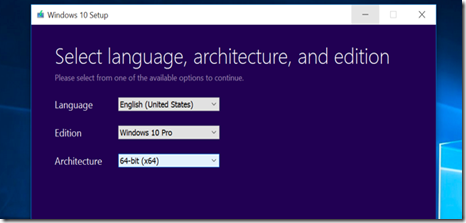
Be sure to select the correct type of installation media for the copy of Windows 10 that’s licensed for your PC — Windows 10 Home or Professional. You should also choose your language and select whether you want the 32-bit or 64-bit version of Windows here — most people will want the 64-bit version. However, you can create installation media that includes both the 32-bit and 64-bit version, and the installer will automatically select the most appropriate one when you use it to install Windows on a computer.

clip_image006

Install Windows 10 from the installation media like you would any other operating system. Restart your computer with the USB drive or DVD inserted and boot from that device. This may require you change a setting in the BIOS, access a boot menu, or use the “Use a device” option in the advanced startup options on a modern Windows 8 or 10 device that includes UEFI firmware instead of the traditional BIOS.

Select “Install Now” once the Windows installer starts. When you reach a screen asking for your WIndows 10 product key, click the Skip button. You won’t actually have a Windows 10 product key if you took advantage of the free upgrade offer.

If you do have a Windows 10 product key, enter it here.

image

Go through the setup process normally until you see the “Which type of installation do you want?” screen. Select the “Custom” option to ensure you’re performing a clean install and not an upgrade install.

Partition your system drive however you like. If you just have a single WIndows partition, you can tell the installer to overwrite it. If you have many partitions, you could delete them all and tell Windows 10 to install itself in the unallocated space.

image

You’ll be asked for the product key after the process is finished. Just click “Do this later” to skip this part and continue the setup process.

After you log into your new, clean-installed Windows 10 system, it should automaticallyactivate itself after you connect to the Internet. If you took advantage of the free upgrade offer, it does this by checking your computer’s hardware and then checking in with Microsoft, verifying that your hardware configuration is authorized to use Windows 10.

When we reinstalled Windows 10 Pro on our computer, it activated immediately. But, if Microsoft’s activation servers are overloaded, so it may take some time before your system activates. You can open the Settings app, select Update & security, and select Activation to check your activation status. If it’s not activated, you may see information here that can help you activate.

clip_image007

Some people report having to reboot several times, while others have just waited. The following command can force an activation to occur if it’s not happening automatically after going through the steps above. First, open an Administrator Command Prompt by right-clicking the Start button or pressing Windows Key + X and selecting Command Prompt (Admin). Type the following command and press Enter:

slmgr.vbs /ato

Many people report having to run this command several times. if you see an error message, try rebooting and running it again, wait and run it again, or just wait and let Windows activate automatically. Microsoft’s servers may be overloaded at the moment you’re trying to activate.

clip_image008

Microsoft’s free upgrade offer depends on your PC’s hardware so it may not activate properly if you’ve swapped out hardware inside your PC. You may need to call Microsoft and complete the phone activation process, explaining what happened, if you changed the PC’s hardware after taking advantage of the offer. The phone support line can give you an activation code that will allow you to activate Windows 10, even if it won’t activate automatically. However, you may have to provide additional information.

Note that the free Windows 10 upgrade (as well as OEM copies of Windows and pre-installed copies of Windows 10) can’t actually be transferred to a separate PC. They’re tied to a single PC’s hardware.

Taken From: http://www.howtogeek.com/224342/how-to-clean-install-windows-10/
Windows - Create an Image of Your PC

 How to Create an Image of Your PC Before Upgrading to Windows 10

Windows 10 is the biggest and most aggressive Windows rollout to date. Before you take the plunge you need to image your hard drive so, should you wish to return to the familiarity of Windows 7 or Windows 8 you can do so with the click of a button.

Note: This tutorial details how to create a bit-for-bit backup (a disk image) of your current Windows system disk so that you can later restore your computer using that image. If that’s not what you’re looking for and you’d like to actually copy your disk bit-for-bit over to a brand new hard disk (a disk clone) we’d encourage you to check out our detailed tutorial on the matter:How to Upgrade Your Existing Hard Drive in Under an Hour.

Why Do I Want To Do This?

There’s nothing worse than making a major change to your PC and then finding out that change breaks your workflow (like an old app you rely on doesn’t work anymore) or it outright breaks your PC because the leap to a new operating system leaves your hardware in need of new (and as-of-yet unreleased) drivers.

Over the years we’ve covered plenty of ways to use the tools built into Windows to perform snapshots, create backups, and otherwise help you to restore your computer to a prior state if your hardware upgrades or such go awry. When it comes to a change as big as jumping from Windows 7 or Windows 8 to the barely charted waters of Windows 10, however, you don’t want to rely on snapshots and rollback features to help you return to the safety of a prior version of Windows. You want the clear and precise ability to wipe the entire drive clean and restore it, bit for bit, to the exact state it was in before you even started the upgrade process.

In order to do that we need to image the drive. We want a perfect pre-upgrade copy we can call upon to restore the system. This drive image will remain clean and unchanged independently of anything we do to the computer during the upgrade process and thereafter so even if we format the drives, even if we use Windows 10 for six months and decide we really don’t like it, we can turn right back around and use the image we’ve created to turn back the clock and restore our computer to the exact state it was in before the upgrade.

We can’t emphasize enough how important this step is. We’ll complete it using free tools, it doesn’t cost anything (unless you need to purchase an extra drive to store the image on), and it hardly takes any time (especially when you compare it to the hassle of reinstalling your old version of Windows and reconfiguring everything).

What Do I Need?

As we highlighted in the introduction this procedure is free (unless you need an additional internal or external hard drive to house the drive image). To follow along with us today you’ll need the following things:

  • The PC you wish to backup.
  • A copy of Macrium Reflect Free (available for download here).
  • An internal or external hard drive with enough capacity to hold the contents of the drive you wish to image.
  • A USB drive to turn into a restoration drive (minimum size 1GB).

A few points of consideration before we proceed. We aren’t cloning your Windows drive onto a new bootable drive so we don’t need a fresh storage drive or a drive we can wipe. As long as you have the space you can use any drive you have on hand as long as it can hold the drive image. So, for example, if you have a 2TB external drive that you have a few hundred GB of photos backed up on, you can also use it (space permitting) to backup your Windows disk image with no risk to your photos or other data.

Although we advise you to have enough space for the whole drive, in reality the disk likely isn’t full and compression will buy you some wiggle room. On our test laptop, for example, we had a 100GB SSD, 75GB of that was filled up, and the compressed image in the end was only 50GB. Still, act as if you need a 1:1 space ratio and then be happy when you don’t.

Before proceeding gather together the required materials and take a moment to download and install Macrium Reflect Free.

Creating the Rescue Media

Because we are manipulating the system drive we need rescue media in order to properly restore the drive later (as we cannot simultaneously use the system drive and reload the system image). Further, good rescue media can be invaluable for troubleshooting problems down the road.

Thankfully Macrium makes it incredibly simple to create a Windows PE-based rescue media tool that includes Macrium preloaded and even boots right into the restoration tool. It couldn’t be easier and if you do things correctly on the setup and imaging side of things, the restoration side of things is a walk in the park.

clip_image002

Once you’re ready to create your restoration media, launch Macrium Reflect on select Other Tasks -> Create Rescue Media from the file bar, as seen above.

The Rescue Wizard is very helpful and will not only guide you through selecting the best rescue media but will automatically download and install the files from Microsoft on your behalf. The first step in the wizard process is confirming you have the right version of Windows PE. It automatically detects the version of Windows you’re creating the rescue media on. Ideally you want the rescue media to use the version of Windows PE that shares the same base kernel as the backup version.

If you’re backing up a Windows 7 machine before upgrading to Windows 10 that means you want Windows PE 3.1 (which uses the Windows 7 kernel). If you’re upgrading from Windows 8/8.1 to Windows 10 you want Windows PE 5.0 (PE 4.0 is an option but it’s not feature rich compared to PE 5.0 and the special use case for Windows PE 4.0 is very limited and definitely not within the requirements of anything we’re doing in this tutorial). If you need to change your PE version click on the button labeled “Change PE Version” at the bottom of the wizard screen.

Click Next and then confirm the drivers list (by default the media thoughtfully snags needed drivers from the host Windows installation, like USB 3.0 host drivers). Click Next.

clip_image003

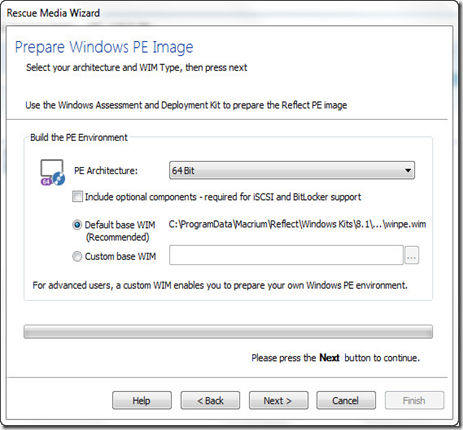
Confirm that the “PE Architecture” matches your machine (it should have defaulted to the correct setting). Newer machines (made recently or in the last few years) are almost universally 64 bit. If you’re unsure you can read up on the differences between 64 bit and 32 bit (and how to check what you have) in our article HTG Explains: What’s the Difference Between 32-bit and 64-bit Windows?

Click Next and you’ll be prompted to OK a download from Microsoft (typically around 500MB).

clip_image004

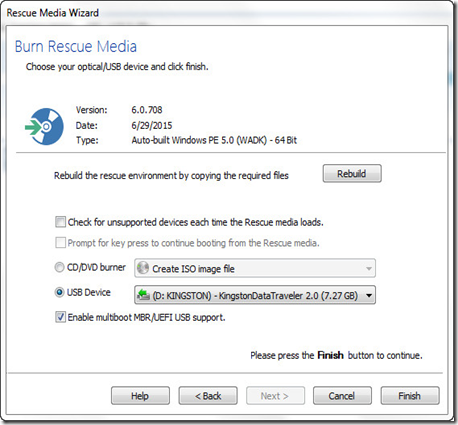
Once the files from Microsoft finish downloading you’ll find yourself in the final step of the Rescue Media Wizard. Select your USB drive carefully; while the recovering media creation process doesn’t format your USB drive it does dump a bunch of files onto the disk and make some minor modifications you’ll just have to turn around and undo.

When the process is complete it’s safe to eject the recovery disk (you won’t need it again until it is time to restore your system at a later date).

Cloning Your Windows Disk

This portion of the tutorial occurs on your PC before installing Windows 10. Again, for emphasis as many readers following this tutorial likely don’t routinely use disk imaging software, this step occurs on your machine before you begin the Windows 10 upgrade.

Now would be a great time to do some last minute housekeeping: delete things you don’t need, run CCleaner to purge old temporary files that don’t need to live on forever in your disk image, uninstall apps you no longer want or need, and so on.

When you’re ready to create a perfect copy of the disk in a tidy pre-Windows 10 state, launch Macrium Reflect. In the left-hand navigation panel of the main window select “Create an image of the partition(s) required to backup and restore Windows” as seen in the screenshot below.

clip_image005

That link will automatically pop up Disk Image dialogue box with only the critical Windows partitions selected, as seen in the screenshot below.

clip_image006

There are a few important things to note here. By default the tool only selects the partitions you need to actually run Windows. In the screenshot above you can see that it selected the system and OS partitions. It did not select the recovery partition or other partitions on the primary disk. If you wish to preserve the recovery partition or other partitions, you can check them and include them in the disk image. If you don’t (we really don’t care if the recovery partition is preserved) leave them unchecked. If you do, check them off.

clip_image007

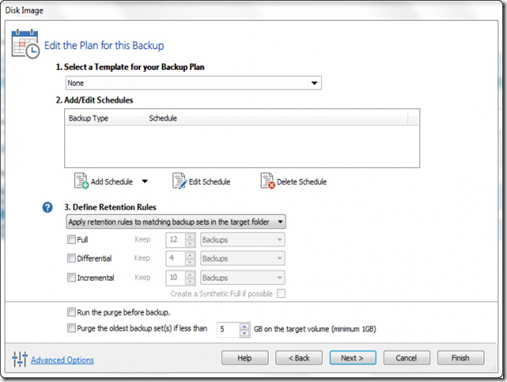
Next, select where you wish to store the image file. A local non-OS disk or a removable USB drive of suitable size is good. We stored ours on a removable USB 3.0 drive with plenty of space to spare. Click Next and you’ll be prompted to setup a backup plan for the disk. You can ignore all of these options. Macrium Reflect, even in the free version, has a very excellent automated backup system but that’s totally overkill for our needs as we’re making a one off backup. Leave the template “None”, don’t bother setting a schedule, and leave everything unchecked. Hit Next to continue on.

Confirm your settings on the last page (make sure the listed operations match what you selected earlier, like copying the system and Windows disks). Click Finish. In the final screen confirm “Run this backup now” is checked and click OK.

Sit back and relax as Macrium works to create the disk image. Expect to wait at least 30-60 minutes at minimum. When the process is complete you’ll have a perfect copy of your disk ready to pull out and restore the previous version of Windows. Put it in a safe place!

How Do I Restore To The Old Version?

Maybe you love Windows 10 and everything works wonderfully. We certainly never hope that someone is unhappy with an upgrade and despite all the complaints about Windows 8 we (albeit with a Windows 7 skin on things) were happy with the improvements. But not every upgrade is a match made in heaven and you might find that instabilities, non-existent drivers, or other problems hamper your enjoyment of Windows 10.

In such cases you’ll need to rollback with the help of Macrium Reflect and the disk image we just created. First things first, to avoid frustration, reboot your computer and enter the BIOS (it varies from manufacturer to manufacturer, but typically you access the BIOS via F2 or F11 on the keyboard when the computer is first booting).

It’s not enough to have a computer that can boot from USB, you need to check the boot order. More times than we can count we’ve had a boot disk fail because while the computer was more than capable of booting from a USB drive the USB drive option was third in the list after the physical hard disk and CDROM drive. Double check that the USB drive is at the top of the list! (Sometimes you actually need the physical USB drive inserted during the BIOS adjustment process or it won’t be detected or ordered properly). Save the changes and boot into your recovery media.

The recovery media we created in the early portion of the tutorial automatically boots right to the Macrium Reflect recovery software which is more than convenient. Once it boots up look for the Restore and Image Restore tabs as seen in the screenshot below.

If you’ve booted the computer with the hard drive that houses the disk image attached (either internally mounted or with the USB drive attached to the computer) it should automatically detect that the disk image is present and it matches the disk you’re about the restore via that image. If it doesn’t automatically detect don’t worry, you can browse for it.

clip_image008

Click on the entry “Browse for an image file”. Browse for the file and select the .MRIMG file you previously created. After you load the backup image you’ll see additional information about the image file.

clip_image009

Confirm that it is the correct image file (the name matches the one you want, the drive size and partitions match, and so on). Once you’ve confirmed it is the image you want, click the link “Restore Image” as seen in the screenshot above.

clip_image010

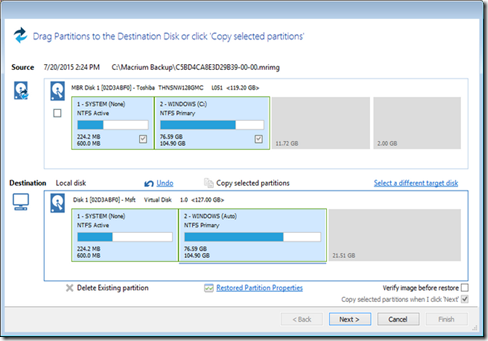
You’ll be prompted to select a disk to restore your image to. Click “Select a disk to restore to…”

Select carefully from the available disks. You don’t want to overwrite your secondary data hard drive when your real target is your primary system disk. Once you’ve selected the image, then click “Copy selected partitions” to copy the partitions from the image file back over to your disk.

clip_image011

Note: Sharp-eyed readers will likely have noticed that the disk size and partition distribution between our source disk and our destination disk do not match up in the above image. Because the computer with which we conducted the steps for this tutorial (as we personally test and confirm all steps in all articles we write here at How-To Geek) would not cooperate with our capture tool during the time it was booted into Windows PE we recreated the sequence in a virtual machine expressly to create the screenshots for your reference. Please note that in the particular application we’ve using here (overwriting your existing disk with an old image) the image and the actual hard drive configuration should match up.

With the disk selected (and double checked), click Next. Confirm the Restore Summary and Operation list match what you expect and then click Finish to start the process.

When the restoration process is complete and the conclusion summary is displayed, you’re all done! Click on the shutdown button located in the lower left corner of the restoration user interface, remove the USB restoration drive, and confirm you wish to restart. You’ll boot back into your Windows machine and everything will be good as new and exactly like it was the day you made the image.

When it comes to foolproof restoration you just can’t beat a good disk image. Before you make the leap to Windows 10 take an hour or so and make a clean disk image you can return to should you find the upgrade isn’t all it’s promised to be.

Taken From: http://www.howtogeek.com/223139/how-to-create-an-image-of-your-pc-before-upgrading-to-windows-10/

Wednesday, July 15, 2015

3G / 4G - Signal Quality Verification

Making Sense of Signal Strength/Signal Quality Readings for Cellular Modems

Posted by Stephen Mammen

The first step in any successful cellular modem installation is verifying that the modem has a good connection back to the carrier network.  This is especially helpful in that first "fingers crossed" moment when you are going live with a modem; good signal strength and signal quality makes modem deployment a smoother process.

While some graphical and qualitative ratings are provided by a cell modem's status page (e.g. green status/"Excellent"/"Good", red status/"Poor"/"Weak", etc.), more often one sees a numerical reading in dB or dBm.  What do all these acronyms and negative numbers mean?  This post aims to help with those questions.

Let's begin by defining our main acronyms of interest (along with the cellular technologies they are most useful for in parenthesis).  There are certainly more measurements used in the industry, but let's keep it simple... signal strength and signal quality.

Signal Strength

  • RSSI - Received Signal Strength Indicator (3G, CDMA/UMTS/EV-DO)
  • RSRP - Reference Signal Received Power (4G LTE)

Signal Quality

  • ECIO (Ec/Io) - Energy to Interference Ratio (3G, CDMA/UMTS/EV-DO)
  • RSRQ - Reference Signal Received Quality (4G LTE)
  • SINR - Signal to Interference-plus-Noise Ratio (4G LTE)

It is important to identify what cellular technology you are using when examining these metrics.
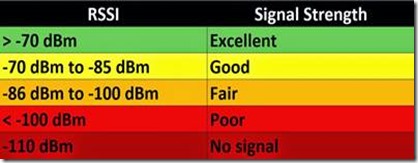
For 3G cellular connections, RSSI and EC/IO is what to look at.

clip_image002

clip_image004

For 4G LTE, RSRP, RSRQ, and SINR are the metrics to check.

clip_image006

clip_image008

clip_image010

Regardless of cellular technology, for a given installation to perform to expectations, both signal strength and quality should be optimized in the "Excellent" category.  If you are suffering from poor signal, consider moving the cellular device to a new location and survey the area for interfering RF components.  If simply relocating your device is not practical, it may be necessary to explore a new antenna configuration. As we've covered previously though, exercise caution or consult us on this topic as bigger isn't always better.
This information should be your first line of defense when troubleshooting cellular performance issues.  Give INS a call for all your cellular gateway needs!

Taken From: http://blog.industrialnetworking.com/2014/04/making-sense-of-signal-strengthsignal.html