Showing posts with label Desktop. Show all posts

Wednesday, September 5, 2012

Linux Desktop On Your Android Phone (Ubuntu)

Of all the various flavors of Linux available to those looking for an open-source platform from which to compute, Ubuntu is by far the simplest to install – allowing even the most hapless noob to download and enjoy.

Being that Google’s Android is also open source, developers have enjoyed a great deal of success porting Windows 95, 98, XP, as well as many other Linux iterations onto Android devices, but hitherto, not Ubuntu.

Those of you running a rooted Android may be pleased to learn of Ubuntu Installer, a Market app which - yes, you’ve guessed it - installs Ubuntu. Even for the unseasoned tinkerer, it’s pretty simple to install – providing you check for the compatibility of your device/ ROM in advance.

clip_image001

Here is a list of the key features:

  • Run Ubuntu within Android.
  • Access to both Android & Ubuntu at same time.
  • Highly optimized for ARM devices.
  • LXDE Desktop (very lightweight)
  • Ubuntu update manager, Software centre fully operational.
  • File system access: Ability to access files on your SD card and internal memory from Ubuntu.
  • Set resolution: Ability to set screen size on boot (you no longer have to download a certain image for different screen sizes!)
  • Choose Ubuntu Installation type: ‘large’ and ‘lightweight’

By default, we always recommend performing such installs on spare devices as opposed to your daily runner. We don’t expect anything to go wrong, but if it were to, we wouldn’t want the issue to intervene with your daily digital errands.

clip_image002

There’s a large version of the installer (1.5 GB downloaded, 3.5 GB installed), which comes with all the bells and whistles such as Firefox, Thunderbird, openoffice.org suite, GIMP Image Editor and so forth, as well as a lightweight version, which contains the basic features required for Ubuntu to function without a hitch.

clip_image003

clip_image004

Before you download, please check the compatibility of your device via the developer’s blog.

Download Ubuntu Installer for Android [Market Link]

Please let us know how you get on with Ubuntu Installer; feel free to share your sentiments via our Facebook and Google + pages linked below!

You can follow us on Twitter, add us to your circle on Google+ or like our Facebook page to keep yourself updated on all the latest from Microsoft, Google, Apple and the web.


MOBILE PC - Ubuntu On Android With External PC Screen, Mouse and Keyboard

Taken From: http://www.redmondpie.com/install-and-run-ubuntu-on-your-android-device-with-ubuntu-installer-download-now/

Tuesday, August 21, 2012

Forward Ports on Your Router From a Desktop (UPnP)

clip_image002

UPnP is a convenient way for programs to forward ports without you having to pull up your router’s web interface and forward ports manually. Unfortunately, some programs that require port forwarding don’t support UPnP – that’s where UPnP PortMapper comes in.

This application takes care of port forwarding for you, right from your desktop. If your IP address changes, you don’t need to log into your router and change your port forwarding rules – you can have the application update them for you.

If you visit a friend’s house and join their network, you don’t have to ask for their router’s password to forward ports – just fire up the application and activate your preset rules.

Installation

UPnP Port Mapper is written in Java, so you’ll need the free Java Runtime Environmentinstalled to run it. After installing Java, you can download UPnP Port Mapper from SourceForge. In addition to Windows, this application also works on Mac OS X and Linux.

UPnP Port Mapper communicates with your router with the UPnP protocol, so you’ll also need a router with UPnP enabled to use this application. If UPnP is disabled on your network’s router, this program can’t do anything.

After downloading UPnP Port Mapper, double-click the .jar file to launch it.

clip_image004

Forwarding Ports

To get started, click the Connect button in UPnP Port Mapper. If you see a Windows Firewall pop-up window, click the Unblock button. You may have to allow Java network access in the Windows firewall pop-up that appears.

If UPnP PortMapper informs you that it can’t find your router, click the Connect button again unblocking the application in the Windows firewall.

clip_image006

If it worked, you’ll see a list of UPnP port mappings in the top pane (this list will be empty by default), as well as your router’s external IP address on the Internet and its IP address on your local network.

To create a new port forwarding preset, click the Create button.

clip_image008

Enter a description for your port forwarding rule and provide a list of one or more ports to forward. You can specify port ranges or forward a list of ports using a single preset.

You can also specify a specific remote host. If you enter an IP address, only traffic from that IP address will be forwarded to your computer from your router. For example, you can use this feature to only allow connections from a friend’s IP address on the Internet.

The Use local host box is checked by default, making it easy to forward ports without having to double-check your computer’s local IP address. However, you could also use this application to forward ports to multiple different computers on your network.

clip_image010

Port forwarding presets you specify will appear  in the Port mapping presets box. Select a preset and click the Use button to activate it.

Clicking this button forwards the ports on your router – they’ll appear in the Port mappings box at the top of the window. You can remove port mappings by selecting them and clicking the Remove button.

clip_image012

The port mappings will be saved on your router until its UPnP data is cleared – depending on your router, this may happen when your router is restarted. If you open UPnP Port Mapper later and click the Connect button, you’ll see your active port mappings.

You will also need to reapply port mapping settings if your computer’s local IP address changes.

With your presets, you can quickly and easily apply these port mapping settings on any network with a router that supports UPnP – this can be convenient if you move around and need to forward ports for gaming, servers, or other purposes.

Taken From: http://www.howtogeek.com/122227/how-to-quickly-forward-ports-on-your-router-from-a-desktop-application/

Wednesday, August 4, 2010

KDE 4 on Windows

Have you ever found yourself working on Windows—for whatever reason—and reached for one of your favorite applications from the free software world only to remember that it is not available on Windows?

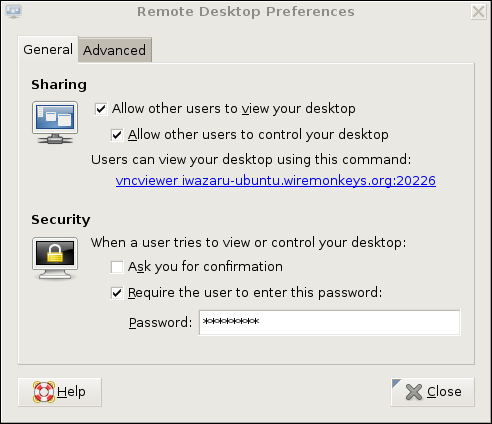
It is not a problem for some of the best-known free software applications, such as Firefox, Thunderbird, OpenOffice.org, GIMP or Pidgin. However, for some popular Linux applications, such as those from the KDE desktop software project, cross-platform support only recently became a possibility. KDE relies on the Qt toolkit from Nokia, which has long been available under the GPL for operating systems such as Linux that use the X Window System, but it was available under proprietary licenses for Windows only until the most recent series, Qt4. With the release of a GPL Qt for Windows, KDE developers started work on porting the libraries and applications to Windows, and the KDE on Windows Project was born. The project tracks the main KDE releases on Linux and normally has Windows versions of the applications available shortly after.

Installation

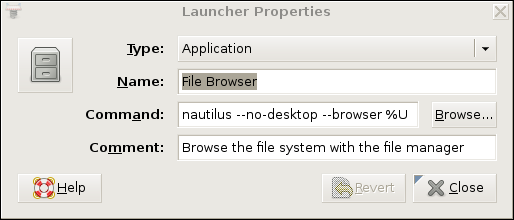
It is easy to try out KDE applications on Windows. Simply go to the project Web site (windows.kde.org), download and run the installer (Figure 1). You'll be presented with a few choices to make, such as the installation mode (a simple “End User” mode with a flat list of applications or the “Package Manager” mode that is categorized like many of the Linux package managers). You also are given the option of whether to install packages made with the Microsoft compiler or those made with a free software alternative—as many users are likely neither to care about nor understand this option, it may have been better to hide it in an advanced tab.

clip_image001

Figure 1. KDE on Windows Installer Welcome Screen

Next, you are presented with a choice of download mirrors, followed by the choice of which version of KDE software to install. It's hard to imagine why you wouldn't simply want the latest stable release, but the installer gives you a few options and, oddly, seems to preselect the oldest by default.

In the next step, you are presented with a list of applications and software groups available to install, or you can select everything (Figure 2). The installer then takes care of downloading and installing the software, and you don't need to make any further interventions. I did find that the speed of the various mirrors varied greatly; some were up to ten times faster than others. If you're short of time and things seem to be going slowly, it may be worth canceling the download and trying another mirror. The installer is intelligent enough to re-use what you already have downloaded, so you don't really lose anything in this way. When the installation is complete, your new KDE applications are available in a KDE Release subsection of the Windows application menu.

clip_image002

Figure 2. The installer provides a simple list of applications available for installation.

The main KDE 4 distribution for Linux is split into large modules—for example, Marble, a desktop globe application, is part of the KDE Education module with many other applications for subjects ranging from chemistry to astronomy. This works fine on Linux, where most of what you need is installed with your chosen distribution. But, if you're on Windows and want a desktop globe but have no interest in chemistry or physics, there are clear benefits in preserving your download bandwidth and hard-drive space by not downloading everything else. Patrick Spendrin, a member of both the KDE on Windows and Marble projects, says they recognize this issue: “as one can see, we are already working on splitting up packages into smaller parts, so that each application can be installed separately.” Many modules already have been split, so you can install the photo management application digiKam, individual games and key parts of the KDE software development kit separately from their companion applications. The productivity suite KOffice will be split up in a similar way in the near future, and Patrick hopes that the Education module will follow shortly afterward.

Overall, the installation process will feel familiar and easy if you've used Linux in the past. However, if you have used only Windows, the process of using a single installer to install whatever applications you want may seem a little strange. After all, most applications for Windows are installed by downloading a single self-contained executable file that installs the application and everything it needs to run in one go. The KDE on Windows installation process reflects the fact that KDE applications share a lot of code in common libraries.

Patrick explains that individual self-contained installers simply would not make sense at this stage: “the base libraries for a KDE application are around 200MB, so each single application installer would be probably this size.” A version of Marble, however, is available from its Web site as a self-contained installer—the map widget is pure Qt, so it is possible to maintain both a Qt and KDE user interface wrapping that widget. The pure Qt version is small enough to be packaged in this way.

As Torsten Rahn, Marble's original author and core developer puts it, having a standalone installer for the full KDE version of Marble “would increase the time a user needs to download and install Marble; installing the Qt version takes less than a minute.” It might be possible in the future to package a common runtime environment and provide applications as separate executables, similar to the approach taken by Java applications, but Patrick notes that this would take time, as “it would be a lot different from the current Linux-like layout.” In any case, the current approach has some advantages, because it makes you aware of other available applications and allows you to try them out simply by marking an extra check box.

First Impressions

The KDE 4 Windows install comes with a slimmed-down version of the System Settings configuration module (Figure 3), which will be familiar to you if you've used KDE 4 on Linux. Here, you can adjust KDE 4 notifications and default applications in addition to language and regional settings. However, these apply only to the KDE applications, so you can encounter slightly odd situations. For example, if you open an image from Windows Explorer, it will be shown by the Windows Picture and Fax Viewer, but if you open the same file from KDE 4's Dolphin file manager, it will be opened with the KDE image viewer, Gwenview. Of course, you can use the Windows control panel to make Windows prefer KDE applications for opening images and documents and change the file associations for Dolphin so that it will use other Windows programs that you have installed, but you will need to make adjustments in both places to get consistent behavior.

clip_image003

Figure 3. The KDE System Settings module lets you adapt the look and feel of KDE applications to match your system.

System Settings also allows you to choose a selection of themes for your KDE applications, including some that tie in well with the Classic and Luna themes in Windows XP. At present, KDE 4 doesn't include special themes for Windows Vista or Windows 7. However, Windows users are accustomed to using mismatching software from many different vendors, and the KDE applications fit in as well as anything else.

Most of the applications I tried seemed just fine, at least to start with. Konqueror, for example, correctly displayed the selection of major Web sites I visited (Figure 4). However, after using the applications for a while, I began to notice a less-than-perfect integration with the Windows environment. Okular, the KDE document viewer, used the default Windows dialog for open and save, with common Windows folders, such as Desktop and My Documents, available on the left-hand panel. However, other applications, such as KWord, used the KDE file dialog which, in common with the Dolphin file manager, has links on the left-hand panel to Home and Root. These labels probably will not mean a lot to a Windows user unfamiliar with a traditional Linux filesystem layout, and it would be nice to see Dolphin and KDE dialogs modified to show standard Windows folders, such as Desktop and My Documents instead.

clip_image004

Figure 4. KDE's Konqueror Web browser handled all the major sites I tried.

State of the Applications

digiKam, the photo management application, is one of the real highlights of the KDE world on Linux (Figure 5). On Windows, it started fine, found all my images and allowed me to view a full-screen slideshow. I was able to use its powerful editing tool to crop a photo and adjust the color levels of an image, but when saving the modifications, I received an error that the save location was invalid. digiKam was attempting to prepend a forward slash (as found in a Linux filesystem) to the save location, so that it read “/C:/Documents and Settings...”. A small error, but one that makes practical use of the application difficult.

clip_image005

Figure 5. digiKam, the KDE photo manager, worked quite well, finding and organizing my photos.

KOffice2, still experimental on Linux, seemed to run quite well on Windows. I was able to create a document, save it in OpenDocument format and then open it in Okular. Windows users who primarily use Microsoft Office and don't want to use another office suite might consider Okular as a lightweight OpenDocument viewer.

One of my favorite KDE applications on Linux is Kopete, the universal messaging application (Figure 6). I was able to log in to my Windows Live Messenger account and chat to my contacts, but the XMPP protocol (used by Google Talk) wasn't available. Integration with KDE's secure password storage system, KWallet, also seemed imperfect, as I had to go through two rounds of unlocking the wallet before Kopete appeared to have access to the account passwords.

clip_image006

Figure 6. Kopete works well with the Windows Live Messenger service but currently lacks XMPP support on Windows.

Dolphin, the file manager, seemed to work well (Figure 7), and its bread-crumb navigation structure made rapid switches between folders easy. It felt faster than Windows Explorer at loading thumbnails of images, and the preview pane provides excellent file overviews without having to open a dedicated application. If I spent a lot of time on Windows, I would be tempted to try Dolphin as an Explorer replacement. As mentioned previously, Konqueror also handled everything I threw at it.

clip_image007

Figure 7. The Dolphin file manager is an attractive and easy-to-use replacement for Explorer.

One notable application missing from the KDE installer is Amarok, the popular music player. The Amarok Web site explains that the Windows port is highly experimental and has been omitted from the KDE 4.3 release of the KDE on Windows installer, although it was available on Windows with KDE 4.2. In fact, no music or video player was available from the KDE installer for version 4.3, which is a shame, as the Phonon technology developed by KDE and integrated into Qt should make it easier than ever before to make such applications truly cross-platform.

KDE 4 comes with a great selection of simple games built in, including the likes ofHangman, Battleships and a few more exotic options, such as Mahjongg (Figures 8 and 9). Windows includes its own applications for playing many of these games, but the KDE alternatives were highly impressive with beautiful artwork. I encountered few problems that would give any indication that they hadn't been designed for Windows in the first place—only some problems saving partially completed games due to differences between the Linux and Windows filesystem structures.

clip_image008

Figure 8. KMahjongg is beautifully presented and very usable on Windows.

clip_image009

Figure 9. KHangMan comes with a selection of nice themes and worked flawlessly.

Going All the Way: Plasma on Your Desktop

The desktop shell in KDE 4 on Linux is provided by Plasma, a flexible, integrated replacement for the separate desktop, widget and taskbar applications of KDE 3. It is possible to run Plasma as the desktop shell on Windows, but some major features are missing—such as a taskbar—and you need to make some changes to the Windows Registry to try it out. In fact, trying Plasma on Windows really is not a good idea on any machine that you care about, because once you have made the switch, you cannot easily revert it from within your KDE Plasma desktop session. The safest way to try Plasma on Windows is to use a new (and disposable) user account in Windows running in a virtual machine. If you do try it (see the Replacing the Windows Desktop Shell with KDE's Plasma sidebar for instructions), you'll be presented with a pretty KDE desktop (Figure 10) to which you can add a few of your favorite widgets, such as a clock or the KDE menu, run a few KDE applications and, well, that's about it. Windows programs are entirely inaccessible. Although there is a certain wow factor to having an almost complete KDE 4 desktop on your Windows machine, using it is not really practical in any serious way at present.

clip_image010

Figure 10. The KDE Plasma desktop shell running on Windows—attractive, but not yet very functional.

Replacing the Windows Desktop Shell with KDE's Plasma

First, this is a really bad idea and may make your Windows system unusable. If you must follow these instructions, use at least a spare user account and preferably a disposable install in a virtual machine. You have been warned.

If that has not put you off and you still want to see how Plasma looks on Windows, you need to download and run Autoruns for Windows from Microsoft (technet.microsoft.com/en-us/sysinternals/bb963902.aspx).

Next, simply unzip the downloaded archive and run autoruns.exe (not autorunsc.exe).

In the main program window that appears, you then have to select the Logon tab and find the entry that references explorer.exe. Double-click on that to open the registry editor and change the key to replace explorer.exe with the full path to plasma-desktop.exe (if you accepted the default KDE install options, this is probably C:\Program Files\KDE\bin\plasma-desktop.exe).

Log out and back in again. You should be presented with a pretty but largely nonfunctional Plasma desktop.

You'll probably have to press the computer reset button to escape.

Can KDE Succeed on Windows?

Some of the KDE applications are competing for your attention against better-known alternatives that you easily can install from a single executable file. KDE's Konqueror Web browser, although a fine application, finds itself in a very crowded market for Windows browsers with Internet Explorer already installed and the likes of Firefox, Opera, Safari and Google Chrome all available as alternatives. The potential for some other applications to become popular on Windows is, however, much higher. Kopete faces only Pidgin and the proprietary Trillian messenger as serious competition in the market for multiprotocol messaging clients. Okular is a lightweight but well featured alternative to Adobe Reader. Marble is almost in a class of its own—the nearest competitor perhaps being Google Earth. Kontact, the Personal Information Management suite, also has potential as a compelling cross-platform alternative to existing solutions (Figure 11). Mozilla Thunderbird is a clear competitor, but it lacks comprehensive calendar functionality. Benjamin Dietrich, working in IT support at a German university, who currently has to support many different mail applications across the various computing platforms, believes Kontact could “provide one solution, once it is as mature as it is on Linux”. However, a way to distribute Kontact as a self-contained installer easily would add to its appeal: “a single binary installer would be perfect.”

clip_image011

Figure 11. KMail, part of the KDE Kontact Personal Information Management suite, was able to connect to my mail server and download my e-mail.

The spread of KDE applications to Windows also has had benefits for the wider KDE Project. Amarok's integration with the Last.fm music service was largely put together by a developer who used Windows rather than Linux. It is unlikely that he would have become involved if it had not been possible at the time to run Amarok on Windows. Getting exposure to users on Windows also gives KDE the potential to attract users to trying KDE 4 on Linux and should make the transition for such users easier if they already know some of the applications.

Conclusion

The KDE on Windows Project still is quite young, and there are plenty of rough edges in many of the applications and some notable gaps in the application line-up. However, the installation process works well and is straightforward for anyone who has used a package manager on Linux. Although the installation process is different from that of most Windows applications, the installer is sufficiently well designed that it should not cause problems for most Windows users. The recent and continuing work to split up applications so that users can install exactly what they want also lowers the barriers to trying out KDE applications in Windows. Some of the applications have great potential to fill gaps in the Windows application world, particularly as free software alternatives to proprietary applications. As the project Web site freely admits, many of the applications may not yet be ready for day-to-day use, but they are well worth checking out and will only get better.

Stuart Jarvis is a scientist and longtime KDE user. He divides his time between digging up some of the world's finest mud and regretting ill-judged experiments with pre-release software.

Taken From: http://www.linuxjournal.com/article/10639

Wednesday, October 15, 2008

Secured Remote Desktop/Application Sessions

Run graphical applications from afar, securely.

There are many different ways to control a Linux system over a network, and many reasons you might want to do so. When covering remote control in past columns, I've tended to focus on server-oriented usage scenarios and tools, which is to say, on administering servers via text-based applications, such as OpenSSH. But, what about GUI-based applications and remote desktops?

Remote desktop sessions can be very useful for technical support, surveillance and remote control of desktop applications. But, it isn't always necessary to access an entire desktop; you may need to run only one or two specific graphical applications.

In this month's column, I describe how to use VNC (Virtual Network Computing) for remote desktop sessions and OpenSSH with X forwarding for remote access to specific applications. Our focus here, of course, is on using these tools securely, and I include a healthy dose of opinion as to the relative merits of each.

Remote Desktops vs. Remote Applications

So, which approach should you use, remote desktops or remote applications? If you've come to Linux from the Microsoft world, you may be tempted to assume that because Terminal Services in Windows is so useful, you have to have some sort of remote desktop access in Linux too. But, that may not be the case.

Linux and most other UNIX-based operating systems use the X Window System as the basis for their various graphical environments. And, the X Window System was designed to be run over networks. In fact, it treats your local system as a self-contained network over which different parts of the X Window System communicate.

Accordingly, it's not only possible but easy to run individual X Window System applications over TCP/IP networks—that is, to display the output (window) of a remotely executed graphical application on your local system. Because the X Window System's use of networks isn't terribly secure (the X Window System has no native support whatsoever for any kind of encryption), nowadays we usually tunnel X Window System application windows over the Secure Shell (SSH), especially OpenSSH.

The advantage of tunneling individual application windows is that it's faster and generally more secure than running the entire desktop remotely. The disadvantages are that OpenSSH has a history of security vulnerabilities, and for many Linux newcomers, forwarding graphical applications via commands entered in a shell session is counterintuitive. And besides, as I mentioned earlier, remote desktop control (or even just viewing) can be very useful for technical support and for security surveillance.

Using OpenSSH with X Window System Forwarding

Having said all that, tunneling X Window System applications over OpenSSH may be a lot easier than you imagine. All you need is a client system running an X server (for example, a Linux desktop system or a Windows system running the Cygwin X server) and a destination system running the OpenSSH dæmon (sshd).

Note that I didn't say “a destination system running sshd and an X server”. This is because X servers, oddly enough, don't actually run or control X Window System applications; they merely display their output. Therefore, if you're running an X Window System application on a remote system, you need to run an X server on your local system, not on the remote system. The application will execute on the remote system and send its output to your local X server's display.

Suppose you've got two systems, mylaptop and remotebox, and you want to monitor system resources on remotebox with the GNOME System Monitor. Suppose further you're running the X Window System on mylaptop and sshd on remotebox.

First, from a terminal window or xterm on mylaptop, you'd open an SSH session like this:

mick@mylaptop:~$ ssh -X admin-slave@remotebox
admin-slave@remotebox's password: **********
Last login: Wed Jun 11 21:50:19 2008 from dtcla00b674986d
admin-slave@remotebox:~$

Note the -X flag in my ssh command. This enables X Window System forwarding for the SSH session. In order for that to work, sshd on the remote system must be configured with X11Forwarding set to yes in its /etc/ssh/sshd.conf file. On many distributions, yes is the default setting, but check yours to be sure.

Next, to run the GNOME System Monitor on remotebox, such that its output (window) is displayed on mylaptop, simply execute it from within the same SSH session:

admin-slave@remotebox:~$ gnome-system-monitor &

The trailing ampersand (&) causes this command to run in the background, so you can initiate other commands from the same shell session. Without this, the cursor won't reappear in your shell window until you kill the command you just started.

At this point, the GNOME System Monitor window should appear on mylaptop's screen, displaying system performance information for remotebox. And, that really is all there is to it.

This technique works for practically any X Window System application installed on the remote system. The only catch is that you need to know the name of anything you want to run in this way—that is, the actual name of the executable file.

If you're accustomed to starting your X Window System applications from a menu on your desktop, you may not know the names of their corresponding executables. One quick way to find out is to open your desktop manager's menu editor, and then view the properties screen for the application in question.

For example, on a GNOME desktop, you would right-click on the Applications menu button, select Edit Menus, scroll down to System/Administration, right-click on System Monitor and select Properties. This pops up a window whose Command field shows the name gnome-system-monitor.

Figure 1 shows the Launcher Properties, not for the GNOME System Monitor, but instead for the GNOME File Browser, which is a better example, because its launcher entry includes some command-line options. Obviously, all such options also can be used when starting X applications over SSH.

Figure 1. Launcher Properties for the GNOME File Browser (Nautilus)

If this sounds like too much trouble, or if you're worried about accidentally messing up your desktop menus, you simply can run the application in question, issue the command ps auxw in a terminal window, and find the entry that corresponds to your application. The last field in each row of the output from ps is the executable's name plus the command-line options with which it was invoked.

Once you've finished running your remote X Window System application, you can close it the usual way (selecting Exit from its File menu, clicking the x button in the upper right-hand corner of its window and so forth). Don't forget to close your SSH session too, by issuing the command exit in the terminal window where you're running SSH.

Virtual Network Computing (VNC)

Now that I've shown you the preferred way to run remote X Window System applications, let's discuss how to control an entire remote desktop. In the Linux/UNIX world, the most popular tool for this is Virtual Network Computing, or VNC.

Originally a project of the Olivetti Research Laboratory (which was subsequently acquired by Oracle and then AT&T before being shut down), VNC uses a protocol called Remote Frame Buffer (RFB). The original creators of VNC now maintain the application suite RealVNC, which is available in free and commercial versions, but TightVNC, UltraVNC and GNOME's vino VNC server and vinagre VNC client also are popular.

VNC's strengths are its simplicity, ubiquity and portability—it runs on many different operating systems. Because it runs over a single TCP port (usually TCP 5900), it's also firewall-friendly and easy to tunnel.

Its security, however, is somewhat problematic. VNC authentication uses a DES-based transaction that, if eavesdropped-on, is vulnerable to optimized brute-force (password-guessing) attacks. This vulnerability is exacerbated by the fact that many versions of VNC support only eight-character passwords.

Furthermore, VNC session data usually is transmitted unencrypted. Only a couple flavors of VNC support TLS encryption of RFB streams, and it isn't clear how securely TLS has been implemented even in those. Thus, an attacker using a trivially hacked VNC client may be able to reconstruct and view eavesdropped VNC streams.

Luckily, as it operates over a single TCP port, VNC is easy to tunnel through SSH, through Virtual Private Network (VPN) sessions and through TLS/SSL wrappers, such as stunnel. Let's look at a simple VNC-over-SSH example.

Tunneling VNC over SSH

To tunnel VNC over SSH, your remote system must be running an SSH dæmon (sshd) and a VNC server application. Your local system must have an SSH client (ssh) and a VNC client application.

Our example remote system, remotebox, already is running sshd. Suppose it also has vino, which is also known as the GNOME Remote Desktop Preferences applet (on Ubuntu systems, it's located in the System menu's Preferences section). First, presumably from remotebox's local console, you need to open that applet and enable remote desktop sharing. Figure 2 shows vino's General settings.

Figure 2. General Settings in GNOME Remote Desktop Preferences (vino)

If you want to view only this system's remote desktop without controlling it, uncheck Allow other users to control your desktop. If you don't want to have to confirm remote connections explicitly (for example, because you want to connect to this system when it's unattended), you can uncheck the Ask you for confirmation box. Any time you leave yourself logged in to an unattended system, be sure to use a password-protected screensaver!

vino is limited in this way. Because vino is loaded only after you log in, you can use it only to connect to a fully logged-in GNOME session in progress—not, for example, to a gdm (GNOME login) prompt. Unlike vino, other versions of VNC can be invoked as needed from xinetd or inetd. That technique is out of the scope of this article, but see Resources for a link to a how-to for doing so in Ubuntu, or simply Google the string “vnc xinetd”.

Continuing with our vino example, don't close that Remote Desktop Preferences applet yet. Be sure to check the Require the user to enter this password box and to select a difficult-to-guess password. Remember, vino runs in an already-logged-in desktop session, so unless you set a password here, you'll run the risk of allowing completely unauthenticated sessions (depending on whether a password-protected screensaver is running).

If your remote system will be run logged in but unattended, you probably will want to uncheck Ask you for confirmation. Again, don't forget that locked screensaver.

We're not done setting up vino on remotebox yet. Figure 3 shows the Advanced Settings tab.

Figure 3. Advanced Settings in GNOME Remote Desktop Preferences (vino)

Several advanced settings are particularly noteworthy. First, you should check Only allow local connections, after which remote connections still will be possible, but only via a port-forwarder like SSH or stunnel. Second, you may want to set a custom TCP port for vino to listen on via the Use an alternative port option. In this example, I've chosen 20226. This is an instance of useful security-through-obscurity; if our other (more meaningful) security controls fail, at least we won't be running VNC on the obvious default port.

Also, you should check the box next to Lock screen on disconnect, but you probably should not check Require encryption, as SSH will provide our session encryption, and adding redundant (and not-necessarily-known-good) encryption will only increase vino's already-significant latency. If you think there's only a moderate level of risk of eavesdropping in the environment in which you want to use vino—for example, on a small, private, local-area network inaccessible from the Internet—vino's TLS implementation may be good enough for you. In that case, you may opt to check the Require encryption box and skip the SSH tunneling.

(If any of you know more about TLS in vino than I was able to divine from the Internet, please write in. During my research for this article, I found no documentation or on-line discussions of vino's TLS design details whatsoever—beyond people commenting that the soundness of TLS in vino is unknown.)

This month, I seem to be offering you more “opt-out” opportunities in my examples than usual. Perhaps I'm becoming less dogmatic with age. Regardless, let's assume you've followed my advice to forego vino's encryption in favor of SSH.

At this point, you're done with the server-side settings. You won't have to change those again. If you restart your GNOME session on remotebox, vino will restart as well, with the options you just set. The following steps, however, are necessary each time you want to initiate a VNC/SSH session.

On mylaptop (the system from which you want to connect to remotebox), open a terminal window, and type this command:

mick@mylaptop:~$ ssh -L 20226:remotebox:20226 admin-slave@remotebox

OpenSSH's -L option sets up a local port-forwarder. In this example, connections to mylaptop's TCP port 20226 will be forwarded to the same port on remotebox. The syntax for this option is “-L [localport]:[remote IP or hostname]:[remoteport]”. You can use any available local TCP port you like (higher than 1024, unless you're running SSH as root), but the remote port must correspond to the alternative port you set vino to listen on (20226 in our example), or if you didn't set an alternative port, it should be VNC's default of 5900.

That's it for the SSH session. You'll be prompted for a password and then given a bash prompt on remotebox. But, you won't need it except to enter exit when your VNC session is finished. It's time to fire up your VNC client.

vino's companion client, vinagre (also known as the GNOME Remote Desktop Viewer) is good enough for our purposes here. On Ubuntu systems, it's located in the Applications menu in the Internet section. In Figure 4, I've opened the Remote Desktop Viewer and clicked the Connect button. As you can see, rather than remotebox, I've entered localhost as the hostname. I've also entered port number 20226.

Figure 4. Using vinagre to Connect to an SSH-Forwarded Local Port

When I click the Connect button, vinagre connects to mylaptop's local TCP port 20226, which actually is being listened on by my local SSH process. SSH forwards this connection attempt through its encrypted connection to TCP 20226 on remotebox, which is being listened on by remotebox's vino process.

At this point, I'm prompted for remotebox's vino password (shown in Figure 2). On successful authentication, I'll have full access to my active desktop session on remotebox.

To end the session, I close the Remote Desktop Viewer's session, and then enter exit in my SSH session to remotebox—that's all there is to it.

This technique is easy to adapt to other versions of VNC servers and clients, and probably also to other versions of SSH—there are commercial alternatives to OpenSSH, including Windows versions. I mentioned that VNC client applications are available for a wide variety of platforms; on any such platform, you can use this technique, so long as you also have an SSH client that supports port forwarding.

Conclusion

Thus ends my crash course on how to control graphical applications over networks. I hope my examples of both techniques, SSH with X forwarding and VNC over SSH, help you get started with whatever particular distribution and software packages you prefer. Be safe!

Mick Bauer (darth.elmo@wiremonkeys.org) is Network Security Architect for one of the US's largest banks. He is the author of the O'Reilly book Linux Server Security, 2nd edition (formerly called Building Secure Servers With Linux), an occasional presenter at information security conferences and composer of the “Network Engineering Polka”.

Taken From: Linux Journal Contents #173, September 2008

Wednesday, July 2, 2008

Graphicall Desktop for Ubuntu Server Edition

If you have installed an Ubuntu Server Edition, the first sing you notice is that you dont have X11, GDM, Gnome or KDE, only a text shell.

Here I'm going to show you howto install the Ubuntu Desktop for the Server Edition.

It's actually quite easy, just type on the bash shell:

$ sudo apt-get install ubuntu-desktop

Now sit down and wait, for apt-get to download and install about 900 packets / 472 MB.

And that it, next time you reboot you have the same Gnome Desktop that in the Ubuntu Desktop Edition.