IntroductionSection 1 - Installing Grub4DOSSection 2 - Setup Booting an ISO File (Acronis ISO)Additional Notes
IntroductionGrub4DOS is a boot manager that can be easily installed to a flashdrive or hard drive. It allows booting multiple operating systems directly as well as booting into bootable partitions.
For the purpose of this guide, Grub4DOS will be used to setup a flashdrive to boot the Acronis Resuce Media. This can be done by booting to the partition on the flashdrive (as setup by the Acronis Media Builder program) or by directly booting the Acronis ISO file. When you use the ISO method, you can put as many Acronis ISO images as required on the same flashdrive. This allows you to easily be able to boot into True Image Home 9, 10, 11, 2009, Echo Workstation, etc. by just selecting the desired menu entry.
Tip: It is highly recommended that you read through the entire instructions before you begin this procedure.
Note: Either of these methods work equally well on USB hard drives or internal drives too as long as another boot manager (such as BootIt NG) is not installed on the drive
While it is always recommended to have backups of any important data before making any changes to your drives, installing Grub4DOS is not a destructive procedure. Existing partitions and data on the flashdrive should not be erased or corrupted in any way.
Section 1 - Installing Grub4DOS
Before Grub4DOS can be installed, several files need to be downloaded and unzipped. One is the Grub4DOS program and the other is the Installer. Click on the links below to download the files. Save them to a known location (
My Downloads, for example) so they're easy to find.
Tip: For those interested, more information on Grub4Dos can be found at the following locations:
Grub4Dos Main Page Grub4Dos Tutorial Grub4Dos Guide (hosted by boot-land.net)
Grub4Dos GUI Installer DownloadsExtract the downloaded zip files into separate folders. For example, you may unzip Grub4DOS to
C:\Grub4DOS and the Installer to
C:\Grub4DOS-Installer. You may also choose to unzip them into a folder named after the zip file's name.
If your flashdrive is not already plugged into the computer, plug it in now.
The next step is to run the Grub4DOS Installer on the flashdrive. Browse to the Installer's unzipped folder using Windows Explorer.
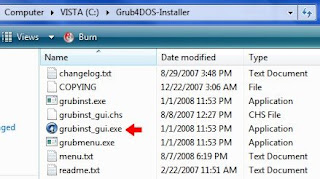
In Windows XP, just run the
grubinst_gui.exe program.
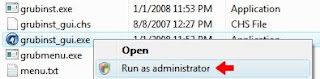
In Vista, you'll need to run grubinst_gui.exe in Administrator mode. Right-click on the program file and select Run as administrator from the pop-up menu.
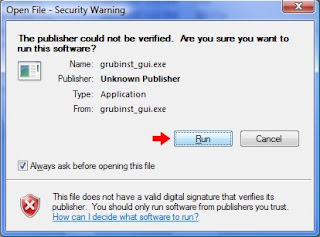
You may get a security pop-up window asking if you want to run the program. Select
Run to start the program.
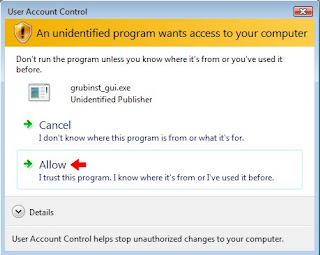
In Vista, if you have UAC turned on (the default setting), you'll get another warning. Select
Allow to let the program start.
Once the program is started, select the
Disk option, then click the Disk
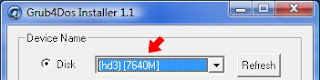
Refresh button and then select your flashdrive from the dropdown box.
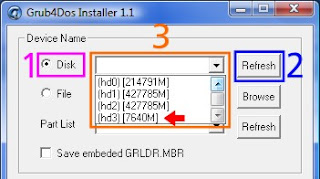
You should be able to tell which disk is your flashdrive by the size shown for each drive. In this example, my 8GB flashdrive is easy to pick out.
 IMPORTANT:
 Make sure you select your flashdrive from the dropdown list and not a different drive (if installing to a USB hard drive or an internal drive, make sure it's the correct one). If you accidentally select the wrong drive, you may not be able to boot your system without doing a boot repair.
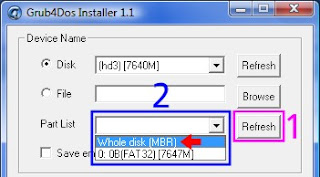
Now click the
Part List Refresh button, then the dropdown box and finally select the
Whole disk (MBR) option.
Check the
Don't search floppy option, leave all the other options unchecked and cleared and then click the
Install button to install Grub4DOS to the MBR of the flashdrive.
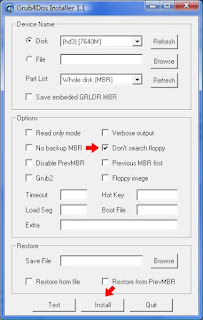
Hopefully, you'll get the message that the installation was successful.
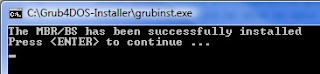
Press Enter to close the Command Prompt window. The Grub4DOS MBR and booting code is now installed on the flashdrive.
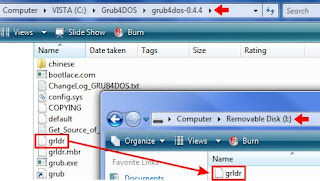
The next step is to copy the grldr file to the flashdrive's root folder. Using Windows Explorer, browse to the folder where you unzipped the Grub4DOS program and copy the file to the flashdrive.
Grub4DOS is now installed on the flashdrive. Next we will show howt to boot an ISO from Grub4DOS.
Section 2 - Setup Booting an ISO File (Acronis ISO)
The ability to boot ISO files directly is one of the newer features of Grub4DOS. It is still a work in progress and has problems with some types of ISO files. However, in my use and testing, it hasn't had any problems with the Acronis ISO files.
The flexibility allowed by being able to boot the ISO file directly makes keeping multiple versions and/or different builds on the same flashdrive an easy task. Adding them is as simple as putting the ISO file on the flashdrive and adding the menu entry to boot it.
As with the partition method, there are only two steps needed to use your Grub4DOS flashdrive in this fashion.
First, run the Acronis Media Builder. However, instead of specifying the flashdrive as the destination device, select to create an ISO file. You can save the ISO file directly to the flashdrive if you wish.
Second, create the Grub4DOS menu.lst file with the entry to start the Acronis Media. The menu.lst file is a plain text file created using the Windows Notepad program. This file must be located in the root folder of the flashdrive. Start the Notepad program and type (or copy and paste) in the following text:
timeout 10
default 0
title Acronis True Image Home 2009 (9,615)
map (hd0,0)/ti-12-9615.iso (hd32)
map --hook
chainloader (hd32)
boot
title CommandLine
commandline
title Reboot
reboot
title Halt
halt 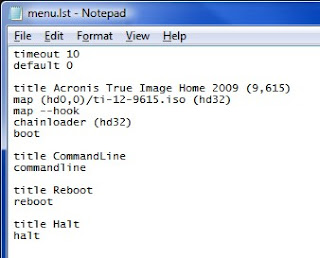 Note:
Note: In this example, I've used
Acronis True Image Home 2009 (9,615) as the menu entry's title for the Acronis Media. Feel free to use whatever name you want. Also note that I used
ti-12-9615.iso for the ISO filename. You can use whatever name is appropriate, however I would recommend you don't put spaces into the ISO's filename.
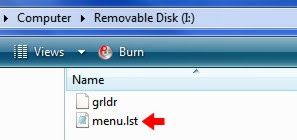
Save the file to the root folder of the flashdrive with the name:
menu.lst
Tip: If Notepad appends a ".txt" to the filename, just rename the file to
menu.lst using Windows Explorer
If you have the Windows Explorer option set to hide filename extensions for known file types, you may need to disable it. Otherwise, explorer may display
menu.lst when the actual filename is
menu.lst.txt.
Click here for instructions.
A sample menu.lst file can be downloaded below. If you use it, make sure to rename it to menu.lst once it's on the flashdrive. You will also need to edit it as necessary for your ISO's filename.
Download
Sample menu.lst fileTo update this flashdrive to a different version or build of the Acronis Media, just rerun the Media Builder program and save the new ISO file to the flashdrive. If you are replacing an existing ISO file, no other changes are needed. If you are adding an ISO file, edit the
menu.lst file and add the new menu entry. For example: If you want to add your True Image Home 10 build 4,942 ISO (ti-10-4942.iso) to the flashdrive, you would put the ISO file on the flashdrive and add the following menu entry:
title Acronis True Image Home 10 (4,942)
map (hd0,0)/ti-10-4942.iso (hd32)
map --hook
chainloader (hd32)
boot
Additional Notes
- In these instructions, the timout value for booting the default Grub4DOS menu entry is 10 seconds. If you want a shorter or longer time, change the value.
- If you setup to boot the ISO files, you can place the ISO files into folders instead of having them in the root folder. For example: If you want all of your Acronis ISO files to be in the \acronis folder, just modify the entry in the menu.lst file to include the folder in the path to the ISO file: map (hd0,0)/acronis/ti-12-9615.iso (hd32)
Taken From: http://themudcrab.com/acronis_grub4dos.php
An alternative method, to boot an ISO from a USB Flash Disk (PEN), can be found in this Blog here


