Saturday, July 16, 2016

Linux - Wifi Configuration (Detailed)

This guide was tested with Dapper Drake, Feisty Fawn, Gutsy Gibbon, and Hardy Heron.

Since it appears that very few people take wireless security seriously, I'd like to come up with my first HOWTO and explain how I was able to configure a secure home network using WPA2, the latest encryption & authentication standard. There are also other types of configuration (WPA1, mixed mode, LEAP, PEAP, DHCP, etc.) shown in the appendix. Feedback is much appreciated.

Common stumbling blocks - Make sure that:

  1. Ethernet cable is unplugged.
  2. No firewall & configuration tool is running (e.g. Firestarter).
  3. MAC filtering is disabled.
  4. NetworkManager, Wifi-Radar & similar wireless configuration tools are disabled/turned off and not in use.
  5. Some cards/drivers (e.g. Madwifi) do not support WPA2 (AES). Try WPA1 (TKIP) if WPA2 secured connections fail.
  6. RTxxx (Ralink) drivers do not support this approach. Either install "ndiswrapper" replacing Serialmonkey's driver or visit this site.
  7. Turn off "roaming" if you repeatedly fail to establish a connection.


My Requirements:
1. WPA2 / RSN
2. AES / CCMP
3. Hidden ESSID (no broadcast)
4. Static IP (because I use port forwarding & firewall, etc.)
5. Pre-shared key (no EAP)
If you want to know more about WPA / RSN & 802.11i security specification, I recommend this site.


Now let's get started:


0. Install "wpa-supplicant":

sudo apt-get install wpasupplicant

1. Verify that your network device ("wlan0"?) is working & your wireless network is detected:

iwconfig

iwlist scan

Your network device & wireless network should appear here.


2. Open "/etc/network/interfaces":

sudo gedit /etc/network/interfaces

The content should look similar to this:

auto lo
iface lo inet loopback
auto wlan0
iface wlan0 inet dhcp

3. Now replace the last 2 lines with the following using your own network settings (the sequence in which the lines appear is crucial):

auto wlan0
iface wlan0 inet static
address 192.168.168.40
gateway 192.168.168.230
dns-nameservers 192.168.168.230
netmask 255.255.255.0

wpa-driver wext
wpa-ssid
<your_essid>
wpa-ap-scan 2
wpa-proto RSN
wpa-pairwise CCMP
wpa-group CCMP
wpa-key-mgmt WPA-PSK
wpa-psk
<your_hex_key> [IMPORTANT: See "WPA-PSK key generation"]

  • auto wlan0:
    Your network interface (e.g. wlan0, eth1, rausb0, ra0, etc.).
  • iface wlan0 inet static:
    Self-explanatory... I am using a Static IP instead of DHCP. "iface wlan0" must correspond to your network interface (see above).
  • address, netmask, [..], dns-nameservers:
    Also self-explanatory... Be aware that "broadcast" needs to end with ".255" for negotiation with the router. These lines need to be according to your own (static) network settings. For DHCP see further below.
  • wpa-driver:
    That's the wpa-driver for your card ('wext' is a generic driver that is applicable when using "ndiswrapper"). Leave it as it is. Other drivers are:

hostap = Host AP driver (Intersil Prism2/2.5/3)
atmel = ATMEL AT76C5XXx (USB, PCMCIA)
wext = Linux wireless extensions (generic)
madwifi = Atheros
wired = wpa_supplicant wired Ethernet driver

  • wpa-ssid:
    Your network's ESSID (no quotes "").
  • wpa-ap-scan:
    "1" = Broadcast of ESSID.
    "2" = Hidden broadcast of ESSID.
  • wpa-proto:
    "RSN" = WPA(2)
    "WPA" = WPA(1)
  • wpa-pairwise & wpa-group:
    "CCMP" = AES cipher as part of WPA(2) standard.
    "TKIP" = TKIP cipher as part of WPA(1) standard.
  • wpa-key-mgmt:
    "WPA-PSK" = Authentication via pre-shared key (see 'key generation' further below).
    "WPA-EAP" = Authentication via enterprise authentication server.


VERY IMPORTANT ("WPA PSK Key Generation"):
Now convert your WPA ASCII password using the following command:

wpa_passphrase <your_essid> <your_ascii_key>

Resulting in an output like...

network={
ssid="test"
#psk="12345678"
psk=fe727aa8b64ac9b3f54c72432da14faed933ea511ecab1 5bbc6c52e7522f709a
}

Copy the "hex_key" (next to "psk=...") and replace <your_hex_key> in the "interfaces" files with it. Then save the file and restart your network:

sudo /etc/init.d/networking restart

You should be connecting to your router now... However, I figured that a restart is sometimes necessary so that's what I usually do (I know this sounds a bit clumsy - see post #2 for startup script).


*** Revoking read-permission from ‘others' ***

sudo chmod o=-r /etc/network/interfaces


*** Revoking read-permission from 'others' ***
*** Sample configuration WPA2 & DHCP, ESSID broadcast enabled ***

auto wlan0
iface wlan0 inet dhcp
wpa-driver wext
wpa-ssid
<your_essid>
wpa-ap-scan 1
wpa-proto RSN
wpa-pairwise CCMP
wpa-group CCMP
wpa-key-mgmt WPA-PSK
wpa-psk
<your_hex_key> [IMPORTANT: See "WPA-PSK key generation"]


*** Sample configuration WPA2 & DHCP, ESSID broadcast enabled ***
*** Sample configuration WPA1 & DHCP, ESSID broadcast enabled ***

auto wlan0
iface wlan0 inet dhcp
wpa-driver wext
wpa-ssid
<your_essid>
wpa-ap-scan 1
wpa-proto WPA
wpa-pairwise TKIP
wpa-group TKIP
wpa-key-mgmt WPA-PSK
wpa-psk
<your_hex_key> [IMPORTANT: See "WPA-PSK key generation"]


*** Sample configuration WPA1 & DHCP, ESSID broadcast enabled ***
*** Sample configuration mixed mode (WPA1, WPA2) & DHCP, ESSID broadcast ***

auto wlan0
iface wlan0 inet dhcp
wpa-driver wext
wpa-ssid
<your_essid>
wpa-ap-scan 1
wpa-proto WPA RSN
wpa-pairwise TKIP CCMP
wpa-group TKIP CCMP
wpa-key-mgmt WPA-PSK
wpa-psk
<your_hex_key> [IMPORTANT: See "WPA-PSK key generation"]


*** Sample configuration mixed mode (WPA1, WPA2) & DHCP, ESSID broadcast*****
*** Sample conf. LEAP, WEP, DHCP, ESSID broadcast ***

auto wlan0
iface wlan0 inet dhcp
wpa-driver wext
wpa-ssid
<your_essid>
wpa-ap-scan 1
wpa-eap LEAP
wpa-key-mgmt IEEE8021X
wpa-identity
<your_user_name>
wpa-password
<your_password>


*** Sample conf. LEAP, WEP, DHCP, ESSID broadcast ***
*** Sample conf. PEAP, AES, DHCP, ESSID broadcast ***

auto wlan0
iface wlan0 inet dhcp
wpa-driver wext
wpa-ssid
<your_essid>
wpa-ap-scan 1
wpa-proto RSN
wpa-pairwise CCMP
wpa-group CCMP
wpa-eap PEAP
wpa-key-mgmt WPA-EAP
wpa-identity
<your_identity>
wpa-password
<your_password>


*** Sample conf. PEAP, AES, DHCP, ESSID broadcast ***
*** Sample conf. TTLS, WEP, DHCP, ESSID broadcast ***

auto wlan0
iface wlan0 inet dhcp
wpa-driver wext
wpa-ssid
<your_essid>
wpa-ap-scan 1
wpa-eap TTLS
wpa-key-mgmt IEEE8021X
wpa-anonymous-identity
<anonymous_identity>
wpa-identity
<your_identity>
wpa-password
<your_password>
wpa-phase2
auth=PAP [Also: CHAP, MSCHAP, MSCHAPV2]


*** Sample conf. TTLS, WEP, DHCP, ESSID broadcast ***
*** NOT TESTED: Sample conf. EAP-FAST, WPA1/WPA2, DHCP, ESSID broadcast ***

auto wlan0
iface wlan0 inet dhcp
wpa-driver wext
wpa-ssid
<your_essid>
wpa-ap-scan 1
wpa-proto RSN WPA
wpa-pairwise CCMP TKIP
wpa-group CCMP TKIP
wpa-key-mgmt WPA-EAP
wpa-eap FAST
wpa-identity
<your_user_name>
wpa-password
<your_password>
wpa-phase1
fast_provisioning=1
wpa-pac-file
/path/to/eap-pac-file


*** NOT TESTED: Sample conf. EAP-FAST, WPA1/WPA2, DHCP, ESSID broadcast ****
***Tested adapters***

1. Linksys WUSB54G V4 (ndiswrapper; wpa-driver = wext)
2. Intel IPW2200 (Linux driver; wpa-driver = wext)
3. Linksys WPC54G (ndiswrapper; wpa-driver = wext)
4. D-Link WNA-2330 (Linux driver; wpa-driver = madwifi)
5. Linksys WMP54G V2 (ndiswrapper; wpa-driver = wext)
6. D-Link WDA-2320 (Linux driver; wpa-driver = madwifi)
7. Netgear WPN311 (Linux driver; wpa-driver = wext)
8. Netgear WG511v2 (ndiswrapper; wpa-driver = wext)


*** Tested adapters ***
*** Post this if you are stumped ***

# route
# iwconfig
# sudo iwlist scan
# sudo lshw -C network
# sudo cat /etc/network/interfaces
# sudo ifdown -v
<your_interface>

# sudo ifup -v
<your_interface>


*** Post this if you are stumped ***
*** Other useful commands ***

# Ubuntu version & kernel >> uname -a
# Root file access >> alt F2 then 'gksudo nautilus' in cli
# Get IP Address or Renew >> sudo dhclient wlan0 [or whatever your wl adapter is]
# Get wireless info >> iwconfig
# Get AP info >> iwlist scan
# Get wireless info >> iwlist (lots of options will list)
# Routes if wlan0 working >> route
# DNS resolving via eth1 >> cat /etc/resolv.conf
# List devices/modules >> lspci, lsusb, lshw, lsmod
# Restart network >> sudo /etc/init.d/networking restart
# Boot messages >> dmesg
# Kill NWM >> sudo killall NetworkManager
# Events from your wl >> iwevent
# Restart all daemons >> sudo /etc/init.d/dbus restart
# Restart network >> sudo /etc/init.d/networking restart


Taken From:

Saturday, July 2, 2016

Raspberry Pi – Media Server for Streaming (via DLNA)


Here I’m going to quickly show you how to set up you Raspberry Pi as a Media Server for Streaming via DLNA which is a protocol suported in many TVs, Windows PCs (Windows Media Player) and Android Devices (App: Media House).

## Install Mini DLNA ##
sudo apt-get update
sudo apt-get install minidlna

## Mount The Media Disk ##
sudo mkdir /media/HD1
sudo mount /dev/sda1 /media/HD1

## Create The MiniDLNA DB Folder ##
sudo mkdir -p /opt/minidlna
sudo chmod 777 /opt/minidlna

## Edit The MiniDLNA Config File ##
sudo nano /etc/minidlan.conf

minidlna.conf - My Config
------------------------------------
media_dir=V,/media/HD1/Movies
#root_container=B,/media/HD1
network_interface=eth0
inotify=yes
friendly_name=HomePi
db_dir=/opt/minidlna

sudo service minidlna force-reload
sudo service minidlna restart


minidlna.conf – My Config Detailed
-------------------------------------------------------
#################################################
# Path to the directory you want scanned
# for media files.
#
# This option can be specified more than
# once if you want multiple directories
# scanned.
#
# If you want to restrict a media_dir to
# a specific content type, you can prepend
# the directory name with a letter representing
# the type (A, P or V),followed by a comma, as so:
#   * "A" for audio    (eg. media_dir=A,/media/HD1/music)
#   * "P" for pictures (eg. media_dir=P,/media/HD1/pictures)
#   * "V" for video    (eg. media_dir=V,/media/HD1/videos)
#   * "PV" for pictures and video
#  (eg. media_dir=PV,/media/HD1/digital_camera)
#################################################
media_dir=V,/media/HD1/Movies
NOTE: Use media_dir or root_container

#################################################
# Use a different container as the root
# of the directory tree presented to
# clients.
#
# The possible values are:
#   * "." - standard container
#   * "B" - "Browse Directory"
#   * "M" - "Music"
#   * "P" - "Pictures"
#   * "V" - "Video"
#   * Or, you can specify the ObjectID
#     of your desired root container
#     (eg. 1$F for Music/Playlists)
#
# If you specify "B" and the client
# device is audio-only then "Music/Folders"
# will be used as root.
###########################################
#root_container=B,/media/HD1

#################################################
# Network interface(s) to bind to
#(e.g. eth0), comma delimited.
#
# This option can be specified more than once.
#################################################
network_interface=eth0

#################################################
# Automatic discovery of new files
# in the media_dir directory.
#################################################
inotify=yes

#################################################
# Name that the DLNA server presents to clients.
# Defaults to "hostname: username".
#################################################
friendly_name=HomePi

#################################################
# Path to the directory that should
# hold the database and album art cache
#################################################
db_dir=/opt/minidlna
 
 
Now from you TV or other media device, like Android (use MediaHouse) you can stream
or download you media, with no config required on the clients, because these automatically
detect the DLNA server on the LAN.

Related Links

Monday, June 20, 2016

GRUB - Rescue BootLoader on a USB Flash Drive

My goal is to just have a GRUB bootloader (without a Linux instalation) on a USB Flash Drive to:

  • Boot OS with Bootloaders without entering the BIOS
  • Boot OS with Broken Boot Loaders
  • Boot Linux Live CDs


Installing the GRUB Boot Loader

Run a live CD like Ubuntu, a boot i without installing it.

First list your disks in order to identify you USB Flash Drive

    sudo fdisk -l

if you have trouble identifying you USB Flash Drive just run the command above without the USB Flash Drive, the insert it and list again, compare the outputs, and the extra disk is you USB Flash Drive.

My USB Flash Drive is “sdb1” (b=second HD | 1=first partition), now let’s make a folder to mount the usb flash drive (my Flash Drive was formated with the ext4 filesystem), and mount it:

    sudo mkdir /mnt/USB
    sudo mount /dev/sdb1 /mnt/USB

Now let’s just install the the bootloader

    sudo grub-install --force --removable --boot-directory=/mnt/USB/boot /dev/sdb

boot code goes on /dev/sdb and grub files on /mnt/USB/boot.


Set Up the Grub Configuration FIle

Now just create/edit the grub config file

    nano /mnt/USB/boot/grub/grub.cfg

and input the following configuration:

grub.cfg
_____________________________________________

set timeout=10
set default=0

menuentry "#### Boot OS with Bootloaders without entering the BIOS ####" {set root=(hd1)}

menuentry "HD0 (First HD – This USB Flash Drive)" {
set root=(hd0)
chainloader +1
}

menuentry "HD1 (Second HD)" {
set root=(hd1)
chainloader +1
}

menuentry "HD2 (Third HD)" {
set root=(hd2)
chainloader +1
}

menuentry "HD3 (Fourth HD)" {
set root=(hd3)
chainloader +1
}


menuentry "#### Boot OS with Broken Boot Loaders ####" {set root=(hd1)}

menuentry "Ubuntu 16.04 (HD1 - First HD)"  {

    insmod part_msdos
    insmod ext2
    set root=(hd1,msdos1)

    echo 'Loading Linux Kernel...'
    linux /boot/vmlinuz-4.4.0-24-generic root=/dev/sda1
       
    echo 'Loading Initial Ramdisk ...'
    initrd /boot/initrd.img-4.4.0-24-generic
    boot
}

menuentry "Windows XP/7/10 (HD1 - First HD)"  {

    insmod part_msdos
    insmod ntfs
    set root=(hd1,msdos1)

    drivemap -s (hd0) ${root}
    chainloader +1
}


menuentry "#### Boot Linux Live CDs ####" {set root=(hd1)}
   
menuentry "Ubuntu 16.04 ISO (On This USB PEN Drive)" {

    set isofile="/ubuntu-16.04-desktop-amd64.iso"
    loopback loop (hd0,msdos1)$isofile
    linux (loop)/casper/vmlinuz.efi boot=casper iso-scan/filename=$isofile noprompt noeject
    initrd (loop)/casper/initrd.lz
}

This is what it looks like:

image

You migth need to adjust some things if you have more disks, partitions or diferent linux distro. To make it easyer I have put the things you migth need to change in bold.

The above config was for the following setup

  • One USB Flash Drive (with Grub Installed)
    • hd0,msdos1 - First HD | First Partition – MBR Geometry
    • This is was my USB Flash Drive
  • One Hard Drive for OS
    • hd1,msdos1 – Second HD | First Partition – MBR Geometry
    • This is the Disk with the OS

If you have trouble Identifying you disks and partion you can press ‘c’, on the grub menu, to get the GRUB command line and run “ls” :

image

this was very hepfull, specially identifying the the name for the MBR partitions aka “msdos” .

Related Links

Tuesday, June 14, 2016

Windows – SSH SOCKS Proxy

If you have a Raspberry Pi or any Linux machine at home, you can use it as an SSH Proxy with the help of SSH and exit to the Internet via you home conection/IP.

Some of the advantages are:

  • Privacy (SSH Traffic is Encrypted)
  • Bypassing Local Security Policies (Access Blocked Services)

no aditional configuration needed on the SSH server

You only need to forward port 22 on your internet router to the linux host on your LAN (no aditional configuration needed on youre Linux SSH server).

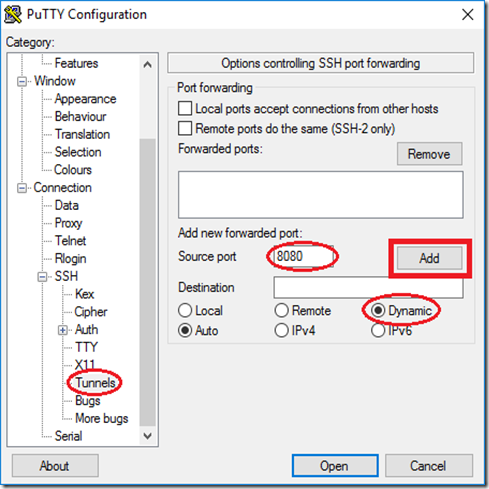
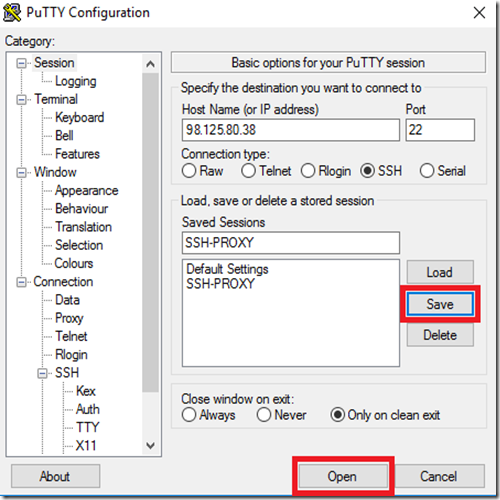
Now that you have port 22 forwarded to you Linux in you home Lan, from somewhere on the Internet setup an Dynamic SSH Tunnel on Putty like show bellow (replace the 98.125.80.38  with your own Public IP):

01

02

03

04

The tunnel will remain working as long this Putty windows is open:

04.1

Now on your Browser (or any other aplication that supports it) you must configure the Socks Proxy to point to the local end of the Dynamic SSH Tunnel, and that’s it.

Now all your browser’s traffic will be sent to the local port 8080 wich SSH wil tunnel it to you home where it will exit via you linux machine.

Here I show how to set up the Socks Proxy on IE (Internet Explorer).

Tools > Internet Options > Connections > LAN Settings > Proxy Server > Advanced

05

You can go on your browser to:

to confirm see Public IP and confirm from wich connection you entering the internet

Monday, May 30, 2016

Linux – Howto Boot an ISO from GRUB

Linux’s GRUB2 boot loader can boot Linux ISO files directly from your hard drive. Boot Linux live CDs or even install Linux on another hard drive partition without burning it to disc or booting from a USB drive.

We performed this process on Ubuntu 14.04 — Ubuntu and Ubuntu-based Linux distributions have good support for this. Other Linux distributions should work similarly.

This trick requires you have a Linux system installed on your hard drive. Your computer must be using the GRUB2 boot loader, which is a standard boot loader on most Linux systems. Sorry, you can’t boot a Linux ISO file directly from a Windows system using the Windows boot loader.

Download the ISO files you want to use and store them on your Linux partition. GRUB2 should support most Linux systems. if you want to use them in a live environment without installing them to your hard drive, be sure to download the “live CD” versions of each Linux ISO. Many Linux-based bootable utility discs should also work.


Check the Contents of the ISO File

You may need to look inside the ISO file to determine exactly where specific files are. For example, you can do this by opening the ISO file with the Archive Manager/File Roller graphical application that comes with Ubuntu and other GNOME-based desktop environments. In the Nautilus file manager, right-click the ISO file and select Open with Archive Manager.

Locate the kernel file and the initrd image. If you’re using a Ubuntu ISO file, you’ll find these files inside the casper folder — the vmlinuz file is the Linux kernel and the initrd file is the initrd image. You’ll need to know their location inside the ISO file later.

clip_image001


Determine the Hard Drive Partition’s Path

GRUB uses a different “device name” scheme than Linux does. On a Linux system, /dev/sda1 is the first partition on the first hard disk — a means the first hard disk and 1 means its first partition. In GRUB, (hd0,1) is equivalent to /dev/sda0. The 0 means the first hard disk, while the1 means the first partition on it. In other words, in a GRUB device name, the disk numbers start counting at 0 and the partition num6ers start counting at 1 — yes, it’s unnecessarily confusing. For example, (hd3,6) refers to the sixth partition on the fourth hard disk.

You can use the fdisk -l command to view this information. On Ubuntu, open a Terminal and run the following command:

sudo fdisk -l

You’ll see a list of Linux device paths, which you can convert to GRUB device names on your own. For example, below we can see the system partition is /dev/sda1 — so that’s (hd0,1) for GRUB.

clip_image002


Create the GRUB2 Boot Entry

The easiest way to add a custom boot entry is to edit the /etc/grub.d/40_custom script. This file is designed for user-added custom boot entries. After editing the file, the contents of your /etc/defaults/grub file and the /etc/grub.d/ scripts will be combined to create a /boot/grub/grub.cfg file — you shouldn’t edit this file by hand. It’s designed to be automatically generated from settings you specify in other files.

You’ll need to open the /etc/grub.d/40_custom file for editing with root privileges. On Ubuntu, you can do this by opening a Terminal window and running the following command:

sudo gedit /etc/grub.d/40_custom

Feel free to open the file in your favorite text editor. For example, you could replace “gedit” with “nano” in the command to open the file in the Nano text editor.

Unless you’ve added other custom boot entries, you should see a mostly empty file. You’ll need to add one or more ISO-booting sections to the file below the commented lines.

clip_image003

Here’s how you can boot an Ubuntu or Ubuntu-based distribution from an ISO file. We tested this with Ubuntu 14.04:

menuentry “Ubuntu 14.04 ISO” {
set isofile=”/home/name/Downloads/ubuntu-14.04.1-desktop-amd64.iso
loopback loop (hd0,1)$isofile
linux (loop)/casper/vmlinuz.efi boot=casper iso-scan/filename=${isofile} quiet splash
initrd (loop)/casper/initrd.lz
}

Customize the boot entry to contain your desiredmenu entry name, the correct path to the ISO file on your computer, and the device name of the hard disk and partition containing the ISO file. If the vmlinuz and initrd files have different names or paths, be sure to specify the correct path to those files, too.

(If you have a separate /home/ partition, omit the /home bit, like so: set isofile=”/name/Downloads/${isoname}”).

Important Note: Different Linux distributions require different boot entries with different boot options. The GRUB Live ISO Multiboot project offers a variety of menu entries for different Linux distributions. You should be able to adapt these example menu entries for the ISO file you want to boot. You can also just perform a web search for the name and release number of the Linux distribution you want to boot along with “boot from ISO in GRUB” to find more information.

clip_image004

If you want to add more ISO boot options, add additional sections to the file.

Save the file when you’re done. Return to a Terminal window and run the following command:

sudo update-grub

clip_image005

The next time you boot your computer, you’ll see the ISO boot entry and you can choose it to boot the ISO file. You may have to hold Shift while booting to see the GRUB menu.

If you see an error message or a black screen when you attempt to boot the ISO file, you misconfigured the boot entry somehow. Even if you got the ISO file path and device name right, the paths to the vmlinuz and intird files on the ISO file may not be correct or the Linux system you’re booting may require different options.

Taken From: http://www.howtogeek.com/196933/how-to-boot-linux-iso-images-directly-from-your-hard-drive/

Monday, March 28, 2016

Linux - Parted the CLI Disk Management Tool

Parted is a famous command line tool that allows you to easily manage hard disk partitions. It can help you add, delete, shrink and extend disk partitions along with the file systems located on them. Parted has gone a long way from when it first came out. Some of it’s functions have been removed, others have been added.

In this tutorial you will learn the basics of parted and we will show you some practical examples. If you don’t have any previous experience with parted, please be aware that parted writes the changes immediately to your disk, so be careful if you try to modify your disk partitions.

If you plan on testing parted, the better option would be to simply use a virtual machine or old computer/laptop without any valuable information on it. To make modifications on a disk partition it must not be in use. If you need to work on primary partition, you may boot into rescue mode.

Note: You will need to have root access to the machine you will be working on in order to use parted.


How to Install Parted on Linux

On many Linux distributions, parted comes pre-installed. If it is not included in your distro, you can install it with:

$ sudo apt-get install parted        [On Debian/Ubuntu systems]
# yum install parted                    [On RHEL/CentOS and Fedora]
# dnf install parted                      [On Fedora 22+ versions]

Once you have make sure that parted is installed, you can proceed further to check out some real world examples of parted command in the rest of this article.


1. Check Parted Version

Run the following command, you see message similar to the one shown on the image below. Don’t worry if your parted version is different. Unless specified otherwise, parted will use your primary drive, which in most cases will be/dev/sda.

$ parted

clip_image001

Check Parted Command Version

If you want to exit parted, simply type:

$ quit


2. List Linux Disk Partitions

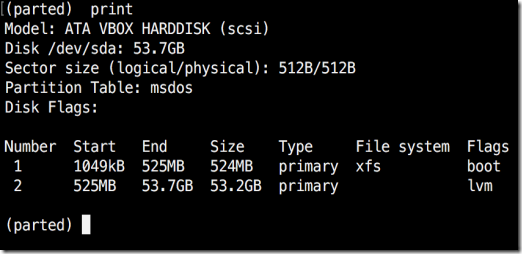
Now that parted is started, let’s list the partitions of the selected hard disk. As mentioned earlier, parted chooses your first drive by default. To see the disk partitions run print.

(parted) print

clip_image002

Check Linux Partitions

When running print, it will also display the hard disk information and model. Here is example from a real hard disk (not virtual as shown on the image above) :

(parted) print

Model: ATA TOSHIBA MQ01ACF0 (scsi)
Disk /dev/sda: 320GB
Sector size (logical/physical): 512B/4096B
Partition Table: msdos

Number  Start   End    Size   Type      File system  Flags

1      1049kB  256MB  255MB  primary   ext2         boot
2      257MB   320GB  320GB  extended
5      257MB   320GB  320GB  logical                    lvm

sector size and partition table.


3. List or Switch to Different Disk

If you have more than one hard disk, you can easily switch between disks, by using the “select” command. In the example below, I will switch from /dev/sda to/dev/sdb which is a secondary drive on my system.

To easily switch between disks you can use:

(parted) select /dev/sdX

clip_image003

Select Different Disk

Change "X" with the letter of the disk to which you wish to switch.


4. Create Primary or Logical Partition in Linux

Parted can be used to create primary and logical disk partitions. In this example, I will show you how to create primary partition, but the steps are the same for logical partitions.

To create new partition, parted uses “mkpart“. You can give it additional parameters like "primary" or "logical" depending on the partition type that you wish to create.

Before you start creating partitions, it’s important to make sure that you are using (you have selected) the right disk.

Start by using print:

(parted) print

clip_image004

Show Current Linux Disk

As shown on the above image, we are using a virtual drive of 34 GB. First we will give the new disk a label and then create a partition and set a file system on it.

Now the first step is to give the new disk a label name with:

(parted) mklabel msdos

Now create the new partition with  mkpart. The listed units are in megabytes (MB). We will create a 10 GB partition starting from 1 to 10000:

(parted) mkpart

Partition type?  primary/extended? primary
File system type?  [ext2]?
Start? 1
End? 10000
(parted) print
Model: ATA VBOX HARDDISK (scsi)
Disk /dev/sdb: 34.4GB
Sector size (logical/physical): 512B/512B
Partition Table: msdos
Disk Flags:
Number  Start   End     Size    Type     File system  Flags
1      1049kB  10.0GB  9999MB  primary   ext2         lba

clip_image005

Create Primary or Logical Linux Partitions

Next,  exit parted with "quit" command. We will format our new partition in ext4 file system using mkfs. To make this happen run the following command:

# mkfs.ext4 /dev/sdb1

Note: It’s important to select the right disk and partition when executing the above command!

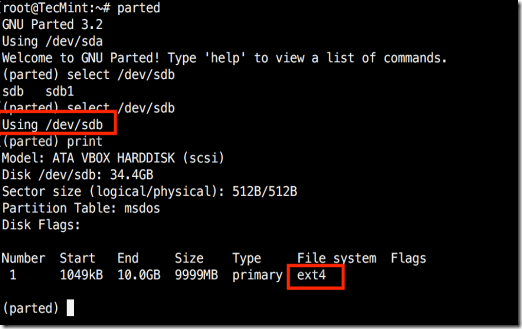
Now let’s verify our results, by printing the partition table on our secondary disk. Under file system column, you should see ext4 or the file system type that you have decided to use for your partition:

clip_image006

Verify Disk Partition Filesystem


5. Resize Linux Disk Partition

Parted includes multiple useful functions and one of them is "resizepart". As you have probably figured this out by now, "resizepart" helps you resize a partition.

In the example below, you will see how to resize an existing partition. For the purpose of this example, we will be using the earlier created partition.

First you will need to know the number of the partition that you will be resizing. This can be easily found by using "print":

(parted) print

clip_image007

Find Linux Partition Number

In our example, the partition number is "1". Now run the resizepart command:

(parted) resizepart

You will be asked for the number of the partition that you will resize. Enter it’s number. After that, you will be asked to set the new ending point for this partition. Remember that by default the units are in MB. In our example, we have set the new partition size to 15 GB:

(parted) resizepart
Partition number? 1
End?  [10.0GB]? 15000
Now verify the results with "print":
(parted) print

clip_image008

Verify Linux Resize Partition


6. Delete Linux Partition

The next thing you will learn is how to delete a partition from your hard drive. To do this, you will need to use the "rm" command within parted. To delete a disk partition you will need to know it’s number.

As mentioned earlier, you can easily obtain this number by using "print". In our example, we will delete the partition with number 1 from our secondary drive/dev/sdb1:

(parted) rm 1

Verify the results by printing the partitions table:

clip_image009

Delete a Linux Partition


7. Rescue Linux Disk Partition

Parted supports a “rescue" utility that helps you recover a lost partition between a starting and ending point. If a partition is found within that range, it will attempt to restore it.

Here is an example:

(parted) rescue
Start? 1
End? 15000
(parted) print
Model: Unknown (unknown)
Disk /dev/sdb1: 15.0GB
Sector size (logical/physical): 512B/512B
Partition Table: loop
Disk Flags:

Number Start End Size File system Flags
1 0.00B 15.0GB 15.0GB ext4


8 Change Linux Partition Flag

Using parted, you can change the state of a flag for disk partitions. The supported flags are:

  • boot
  • root
  • swap
  • hidden
  • raid
  • lvm
  • lba
  • legacy_boot
  • irst
  • esp
  • palo

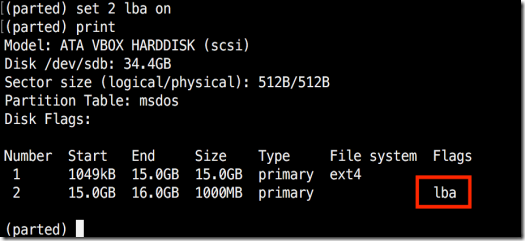
The states can be either "on" or "off". To change a flag simply run "set"command within parted:

(parted) set 2 lba on

The above command sets lba flag to on for second partition. Verify the results with print:

clip_image010

Change Partition Flag


Conclusion

Parted is a useful and powerful utility that can help you manage your disk partitions in Linux systems. As always, when working with disk partitions you need to be extra careful. It is strongly recommend to go through parted man pages to learn how you can customize it’s output and find more information about its capabilities.

If you have any questions or comments, please do not hesitate to use the comment section below.


Taken From: http://www.tecmint.com/parted-command-to-create-resize-rescue-linux-disk-partitions/

Sunday, February 14, 2016

Linux - GRE Tunnel

How to create a GRE tunnel on Linux

GRE tunnels are IP-over-IP tunnels which can encapsulate IPv4/IPv6 and unicast/multicast traffic. To create a GRE tunnel on Linux, you need ip_gre kernel module, which is GRE over IPv4 tunneling driver.

So first make sure that ip_gre is loaded.

  $ sudo modprobe ip_gre
  $ lsmod | grep gre

    ip_gre 22432 0
    gre 12989 1 ip_gre

Here, we assume that you want to create a GRE tunnel between two interfaces with the following IP addresses.

    - Host A: 192.168.233.204
    - Host B: 172.168.10.25

   
On host A, run the following command.

  $ sudo ip tunnel add gre0 mode gre remote 172.168.10.25 local 192.168.233.204 ttl 255
  $ sudo ip link set gre0 up
  $ sudo ip addr add 10.10.10.1/24 dev gre0

In the above, we create a GRE-type tunnel device called gre0, and set its remote address to 172.168.10.25. Tunneling packets will be originating from 192.168.233.204 (local IP address), and their TTL field will be set to 255. The tunnel device is assigned IP address 10.10.10.1 with netmask 255.255.255.0.

Now verify that route for the GRE tunnel is set up correctly:

  $ ip route show
    default via 135.112.29.1 dev eth0 proto static
    10.10.10.0/24 dev gre0 proto kernel scope link src 10.10.10.1

On host B, run similar commands as follows.

  $ sudo ip tunnel add gre0 mode gre remote 192.168.233.204 local 172.168.10.25 ttl 255
  $ sudo ip link set gre0 up
  $ sudo ip addr add 10.10.10.2/24 dev gre0

At this point, a GRE tunnel should be established between host A and host B.

To verify that, from one tunneling end point, ping the other end point.

  $ ping 10.10.10.2 (from host A)

    PING 10.10.10.2 (10.10.10.2) 56(84) bytes of data.
    64 bytes from 10.10.10.2: icmp_req=1 ttl=64 time=0.619 ms
    64 bytes from 10.10.10.2: icmp_req=2 ttl=64 time=0.496 ms
    64 bytes from 10.10.10.2: icmp_req=3 ttl=64 time=0.587 ms

If you want to tear down the GRE tunnel, run the following command from either end.

  $ sudo ip link set gre0 down
  $ sudo ip tunnel del gre0

Taken From: http://ask.xmodulo.com/create-gre-tunnel-linux.html