Monday, August 18, 2008

WiiMote on Linux - Install and Config

Hack and / - Wiimote Control

August 1st, 2008 by Kyle Rankin in

Why let your Wii have all the fun? Find out how to connect your Wiimote to your computer and use it as a mouse or an input device for any number of popular gaming emulators.

If you think about it, there are almost as many ways to interface with your computer as there are Debian-based distributions—and that's a lot. Besides the trusty keyboard and optical mouse, there are trackpoint mice, touchpads, touchscreens, twiddlers, joysticks, presentation remotes and even devices that measure your brain waves. Although I mostly stick with my tried-and-true keyboard and trackpoint mouse (fingers on home row, thank you), when I started hearing about all the interesting things people were doing with the Wiimote (the main controller from the Nintendo Wii), I knew I had to give it a try.

Now traditionally, connecting a brand-new device to a Linux machine was an investment in Internet research, kernel module hacking, prayer and obscure programming skills I haven't used since college. I figured the mere fact that this was a Bluetooth device meant I was going to have to spend some quality time with hcidump. To my surprise, all the hard work already had been done for me, and I could connect and use a Wiimote on my laptop with only a few basic steps.

Configure udev

First, your kernel needs the uinput module available and loaded. This module is available in modern kernels, and my Ubuntu Gutsy install already had it. If you want to be able to connect to the Wiimote as a regular user, however, you need to add a new udev rule to extend permissions to the uinput device. I created a file called /etc/udev/rules.d/95-uinput.rules that contained the following:

KERNEL=="uinput", GROUP="plugdev"

Then, I made sure my user was a member of the plugdev group. If your system doesn't have a plugdev group, you could choose or create another group to use for this device. Next, run /etc/init.d/udev reload to make sure your changes are seen. Finally, I ran modprobe uinput to make sure the module was loaded, and I also added uinput to /etc/modules to make sure it was loaded at boot.

Install wminput

The next step is to install the wminput software. For me, this was simple, as wminput is packaged for my distribution; otherwise, you can download the source from the official site (www.cwiid.org). Then, make sure the Bluetooth device in your computer is enabled. For my laptop, I had to flip a switch on the side, but if you have an external USB Bluetooth adapter, for instance, now is a good time to plug it in. Finally, run wminput in a console and follow the directions:

greenfly@minimus:~$ wminput
Put Wiimote in discoverable mode now (press 1+2)...
Ready.

When you press buttons 1 and 2 on your Wiimote, it goes into discoverable mode, and the blue LEDs along the bottom start blinking. Sometimes you might not start discoverable mode fast enough, or wminput won't detect it, but as long as the LEDs on the Wiimote are blinking, it is still in that mode. So if wminput times out, just run the program again.

If you continually can't connect, you probably should double-check that your Bluetooth device is working. To do this, press buttons 1 and 2 on the Wiimote and then use hcitool to scan for the Wiimote. A successful scan will look like the following:

greenfly@minimus:~$ hcitool scan
Scanning ...
00:1B:7A:3E:8C:54 Nintendo RVL-CNT-01

After wminput connects, you also can look in /var/log/dmesg for confirmation that the Wiimote is connected:

[ 1226.247203] usb 3-2: new full speed USB device using
↪uhci_hcd and address 13
[ 1226.288768] usb 3-2: configuration #1 chosen
↪from 1 choice
[ 1227.922403] input: Nintendo Wiimote as
↪/devices/virtual/input/input21
Use the Wiimote as a Mouse

Once the Wiimote is connected, the default bindings use it as a mouse. The accelerometers in the Wiimote are used to move the mouse pointer, so if you point the Wiimote down or up, the mouse will move down or up, respectively, and if you roll the Wiimote to the left or right, the mouse will move left or right, respectively. If you look at /etc/cwiid/wminput/buttons, you can see the default mappings:

Wiimote.A               = BTN_LEFT
Wiimote.B = BTN_RIGHT
Wiimote.Up = KEY_UP
Wiimote.Down = KEY_DOWN
Wiimote.Left = KEY_LEFT
Wiimote.Right = KEY_RIGHT
Wiimote.Minus = KEY_BACK
Wiimote.Plus = KEY_FORWARD
Wiimote.Home = KEY_HOME
Wiimote.1 = KEY_PROG1
Wiimote.2 = KEY_PROG2
...

By default, wminput reads the configuration listed in /etc/cwiid/wminput/default to get its mappings. In this file you will see:

#acc_ptr

include buttons

Plugin.acc.X = REL_X
Plugin.acc.Y = REL_Y

Essentially, this file includes the buttons file for keybindings, and it also enables the use of the accelerometers for X and Y movements. The great thing about wminput is that all these mappings are completely configurable. If you look in /etc/cwiid/wminput, you should see a number of other example mappings you can use as inspiration. You also can store custom mappings in your home directory under ~/.cwiid/wminput. The button mappings use standard names for keys and mouse buttons that can be found in /usr/include/linux/input.h, but most of the names are pretty straightforward.

Wiimotes for NES Emulation

One of the first things I wanted to do with my Wiimote after it was connected was to use it as a controller for my various game system emulators. But, before I go any further, if you do use a game system emulator like nestra, fceu, snes9x or MAME, be sure you have full rights to use any ROMs you might have. Make an appointment with your lawyer for details, but essentially, to play a commercial ROM, you should own the corresponding game.

With the legal disclaimers aside, the Wiimote makes a great wireless NES (Nintendo Entertainment System) controller. All the basic buttons are there, and all that's left to do is rearrange the button mappings to work with either nestra or fceu NES emulators. Both programs use slightly different mappings, so I created files called buttons-fceu and buttons-nestra and placed them in ~/.cwiid/wminput. First, buttons-nestra:

Wiimote.A               = KEY_0
Wiimote.B = KEY_1
Wiimote.Up = KEY_LEFT
Wiimote.Down = KEY_RIGHT
Wiimote.Left = KEY_DOWN
Wiimote.Right = KEY_UP
Wiimote.Minus = KEY_TAB
Wiimote.Plus = KEY_ENTER
Wiimote.Home = KEY_PAUSE
Wiimote.1 = KEY_Z
Wiimote.2 = KEY_SPACE

After I set the regular NES buttons, I had a few extra to bind, so I bound the A button to pause the emulator, the B button to set nestra to normal speed and the home button to reset the game.

The fceu emulator had completely different keybindings, so here is my buttons-fceu file:

Wiimote.A               = KEY_F7
Wiimote.B = KEY_F5
Wiimote.Up = KEY_A
Wiimote.Down = KEY_S
Wiimote.Left = KEY_Z
Wiimote.Right = KEY_W
Wiimote.Minus = KEY_TAB
Wiimote.Plus = KEY_ENTER
Wiimote.Home = KEY_F10
Wiimote.1 = KEY_KP2
Wiimote.2 = KEY_KP3

In addition to the standard buttons, I bound the B button to save a game state, A to restore and home to reset the game.

Now, to use either of these configuration files, all I need to do is tell wminput to load these files instead:

greenfly@minimus:~/$ wminput -c ~/.cwiid/wminput/buttons-nestra
Put Wiimote in discoverable mode now (press 1+2)...
Ready.

Because wminput sends regular keyboard events, I don't have to do anything special to nestra or fceu.

Wiimotes for SNES Emulation

The Wiimote worked great for NES games, but how about SNES (Super Nintendo) emulation? I actually purchased a few different SNES games for the Wii virtual console, and I also bought a Classic Controller so I would have all the standard SNES buttons. It turns out that wminput also can bind keys to the Nunchuck and Classic Controller attachments, so all I had to do for it to work with snes9x was create a new configuration file that mapped all the keys. Here is my buttons-snes9x file:

Wiimote.A               = KEY_X
Wiimote.B = KEY_S
Wiimote.Up = KEY_LEFT
Wiimote.Down = KEY_RIGHT
Wiimote.Left = KEY_DOWN
Wiimote.Right = KEY_UP
Wiimote.Minus = KEY_TAB
Wiimote.Plus = KEY_ENTER
Wiimote.Home = KEY_ESC
Wiimote.1 = KEY_C
Wiimote.2 = KEY_D

Nunchuk.C = BTN_LEFT
Nunchuk.Z = BTN_RIGHT

Classic.Up = KEY_UP
Classic.Down = KEY_DOWN
Classic.Left = KEY_LEFT
Classic.Right = KEY_RIGHT
Classic.Minus = KEY_SPACE
Classic.Plus = KEY_ENTER
Classic.Home = KEY_ESC
Classic.A = KEY_D
Classic.B = KEY_C
Classic.X = KEY_S
Classic.Y = KEY_X
#Classic.ZL =
#Classic.ZR =
Classic.L = KEY_A
Classic.R = KEY_Z

Even though I planned to use the Classic Controller, I tried to map as many of the regular Wiimote keys to buttons that made sense, so you could potentially play at least some games with the regular Wiimote as well. If you notice, I also left bindings for the special ZL and ZR keys blank, so you could bind them to extra keys.

Wiimote Control for MAME

One of the best game system emulators out there is MAME. MAME emulates classic arcade games, and there are many guides out there (including in Linux Journal itself) on how to use MAME to create your own arcade cabinet. Well, I haven't cleared away the time for that project yet, but I did want to use my Wiimote and Classic Controller attachment for MAME games. MAME has a large number of bindings (press Tab in MAME to see a list), so it was difficult to choose which to bind to the extra keys. Here is a sample buttons-xmame file I created:

Wiimote.A               = KEY_P
Wiimote.B = KEY_5
Wiimote.Up = KEY_LEFT
Wiimote.Down = KEY_RIGHT
Wiimote.Left = KEY_DOWN
Wiimote.Right = KEY_UP
Wiimote.Minus = KEY_2
Wiimote.Plus = KEY_1
Wiimote.Home = KEY_F3
Wiimote.1 = KEY_LEFTCTRL
Wiimote.2 = KEY_LEFTALT

Nunchuk.C = BTN_LEFT
Nunchuk.Z = BTN_RIGHT

Classic.Up = KEY_UP
Classic.Down = KEY_DOWN
Classic.Left = KEY_LEFT
Classic.Right = KEY_RIGHT
Classic.Minus = KEY_2
Classic.Plus = KEY_1
Classic.Home = KEY_F3
Classic.A = KEY_LEFTCTRL
Classic.B = KEY_LEFTALT
Classic.X = KEY_SPACE
Classic.Y = KEY_LEFTSHIFT
Classic.ZL = KEY_5
Classic.ZR = KEY_P
Classic.L = KEY_Z
Classic.R = KEY_X

In addition to the standard bindings you might expect, the home key resets MAME; the plus key selects single player; minus selects two players; ZL on the Classic Controller and B on the Wiimote insert a coin; and ZR on the Classic Controller and A on the Wiimote pause. These are by no means perfect bindings, so I recommend you experiment with different keys that work better for you.

The possibilities with wminput go much further than what I've presented here. There also are configuration files that use the analog joystick inputs on the Classic Controller, the IR sensors on the Wiimote and the accelerometers on the Nunchuck. Wminput isn't just a handy way to play video games on your laptop or desktop. The fact that the connection to the computer is wireless makes the Wiimote a great gaming input for a MythTV client or other computer connected to your PC. As for me, I think I'll be spending a few more days trying to beat this impossible Super Mario Brothers hack that has been floating around the Internet.

Kyle Rankin is a Senior Systems Administrator in the San Francisco Bay Area and the author of a number of books, including Knoppix Hacks and Ubuntu Hacks for O'Reilly Media. He is currently the president of the North Bay Linux Users' Group.


Taken From: Linux Journal Issue #172/August 2008 - Wiimote Control by Kyle Rankin
Render HTML in Your Applications (C/C++) - WebKit - QT

Using WebKit in Your Desktop Application

July 1st, 2008 by Benjamin Meyer in

Include Web content in your desktop application with WebKit.

Qt always has included the ability to render basic HTML and download files with HTTP. With the release of version 4.4.0, this has been taken to a whole new level with the inclusion of WebKit. Developers who use Qt now can utilize WebKit for everything—from simple HTML document viewers to full-blown Web browsers. Trolltech always has been known for creating high-quality APIs that are easy and intuitive to use, and this is just as true with QtWebKit, the integration of WebKit with Qt.

The WebKit rendering engine is used by Safari and has its roots in the KDE Project's KHTML engine, which drives the Konqueror Web browser. Licensed under the LGPL, this open-source engine has been praised for its performance and low memory usage. It was the ideal choice for small devices, such as the Nokia S60 and the iPhone. Beyond Web browsers, WebKit is used by many applications, including Adium, Colloquy, MSN Messenger and Mac OS X's Dashboard. With the addition of the Qt port to WebKit, there no doubt will be many more cross-platform applications in the near future that take advantage of this engine.

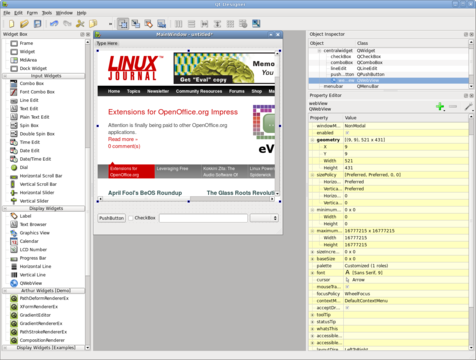
Figure 1. Designer lets you easily create forms with widgets, including WebKit.

QtWebKit provides developers with a handful of useful classes. At the very top level, there is QWebView, which is a QWidget with a number of convenience functions, such as setUrl(), loadProgress() and reload(). Inside Qt Designer, the GUI builder for Qt applications, you even can drag a QWebView into a form and set the URL. QWebView is built on top of QWebPage, which contains the Web content, history and settings. QWebPage is not a widget, but was built to be used on many surfaces, including QGraphicsView, Qt's canvas widget. Supporting QWebView and QWebPage are classes that let you build plugins, access the page history and walk the frames.

A lot of the fun of having WebKit in your application is having it pull content from the Internet. Qt 4.4.0 introduces new networking classes, including an all new HTTP implementation. QNetworkAccessManager handles all network requests and replies with support for HTTP 1.0, 1.1 and SSL. A custom cookie jar and proxy configuration also can be set. Qt's source code includes a demo browser and example applications that show off how to use many of the features of these classes.

Qt always has provided fantastic cross-platform support with integration into the desktop. With the introduction of QtWebKit, developers now can make a cross-platform desktop application for a Web site. Linux Journal provides a digital subscription that lets you download older issues. The Web site is very simple and a perfect candidate for building a small application around. Although the Web site does have the table of contents, it does not provide a way to search all the available issues for articles. So the application I am going to make provides an easy way to search through the issues and let you download them.

The GUI for the application was made with Qt Designer and has a matching main window class that contains the functionality. To compile the project, Qt includes a cross-platform build tool called qmake. Beyond the normal qmake template when using QtWebKit, the Qt variable also needs WebKit to be specified for the library to be linked in. Our application's project file (lj.pro) consists of the following:

TEMPLATE = app
QT += WebKit
FORMS += lj.ui
SOURCES += main.cpp mainwindow.cpp
HEADERS += mainwindow.h

Like most Qt applications, main.cpp contains only a small amount of code. It constructs a QApplication and the main window, and then starts the event loop. By setting the application name, we tell QtWebKit to include it in the user agent string automatically. That way, if Qt's networking in your application starts behaving badly, Web site developers know whom to contact. The user agent string is, of course, fully customizable by subclassing QWebPage if you need to. Here's the main.cpp file:

#include 
#include "mainwindow.h"

int main(int argc, char **argv)
{
QApplication app(argc, argv);
app.setApplicationName("LinuxJournalDigital");
MainWindow mainwindow;
mainwindow.show();
return app.exec();
}

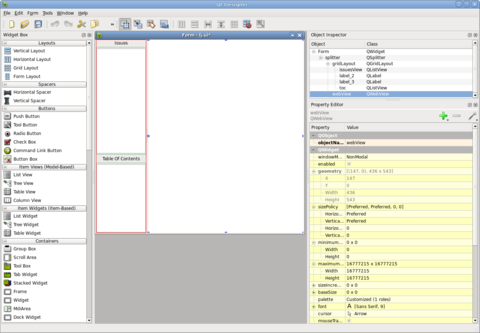
The interface was built in just a few minutes using Qt Designer. On the left-hand side are two QListViews. The one on the top will contain the list of available issues, and the bottom one will contain the table of contents of the currently selected issue. On the right-hand side is a QWebView.

Figure 2. Designer shows off the form for our application.

The interface file is turned into a header file (ui_lj.h) by uic during the compilation process. ui_lj.h contains the generated Ui_Form class along with all the objects in the interface. The main window class definition is a subclass of QMainWindow and Ui_Form. The only new objects in the MainWindow classes are the models that are used to contain the list of issues and the proxy, which is used for searching. The mainwindow.h file is as follows:

#include 
#include
#include "ui_lj.h"

class MainWindow :
public QMainWindow, public Ui_Form
{
Q_OBJECT
public:
MainWindow();

private slots:
void downloadFinished();
void clicked(const QModelIndex &);
void activated(const QModelIndex &);
void downloadRequested(const QNetworkRequest &);
void downloadingIssueFinished();
void downloadProgress(qint64, qint64);

private:
QStandardItemModel *issues;
QSortFilterProxyModel *proxy;
QStringListModel *tocModel;
};

mainwindow.cpp contains all the application's plumbing. The MainWindow constructor sets up the interface, creates the toolbar and begins to fetch the available issues. setupUi() is declared in the generated interface header and populates the central widget with the widgets that were specified in the interface file. The toolbar is populated with actions for the Web page and a line edit for searching. Rather than create and set up each QAction manually, QWebPage has built-in actions that can be used. Here's mainwindow.cpp:

#include "mainwindow.h"

#define SERVER "https://secure.linuxjournal.com/" \
"allsubs/"

MainWindow::MainWindow() : QMainWindow()
{
QWidget *w = new QWidget;
setCentralWidget(w);
setupUi(centralWidget());

connect(issuesView, SIGNAL(activated(QModelIndex))
,this, SLOT(activated(QModelIndex)));
connect(issuesView, SIGNAL(clicked(QModelIndex)),
this, SLOT(clicked(QModelIndex)));
issues = new QStandardItemModel(issuesView);
proxy = new QSortFilterProxyModel(issues);
proxy->setSourceModel(issues);
proxy->setFilterCaseSensitivity(Qt::CaseInsensitive);
proxy->setFilterRole(Qt::UserRole + 1);
issuesView->setModel(proxy);
connect(
webView, SIGNAL(statusBarMessage(QString)),
statusBar(), SLOT(showMessage(QString)));
connect(webView->page(),
SIGNAL(downloadRequested(QNetworkRequest)),
this, SLOT(downloadRequested(QNetworkRequest)));
tocModel = new QStringListModel(this);
toc->setModel(tocModel);

QToolBar *bar = addToolBar(tr("Navigation"));
bar->addAction(
webView->pageAction(QWebPage::Back));
bar->addAction(
webView->pageAction(QWebPage::Forward));
bar->addAction(
webView->pageAction(QWebPage::Stop));
bar->addAction(
webView->pageAction(QWebPage::Reload));
bar->addSeparator();

QLabel *label = new QLabel("Search:", bar);
bar->addWidget(label);
QLineEdit *search = new QLineEdit(bar);
QSizePolicy policy = search->sizePolicy();
search->setSizePolicy(QSizePolicy::Preferred,
policy.verticalPolicy());
bar->addWidget(search);
connect(search, SIGNAL(textChanged(QString)),
proxy, SLOT(setFilterFixedString(QString)));
QUrl home(SERVER "dlj.php?action=show-account");
webView->load(home);

setWindowTitle("Linux Journal Digital Archive");

QNetworkAccessManager *networkManager =
webView->page()->networkAccessManager();

QUrl url(SERVER "dlj.php?action=show-downloads");
QNetworkRequest request(url);
QNetworkReply *r = networkManager->get(request);
connect(r, SIGNAL(finished()),
this, SLOT(downloadFinished()));
}

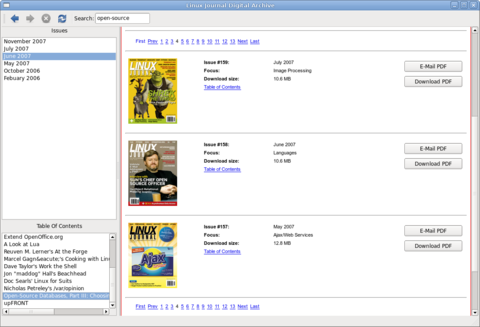
Figure 3. The application with all the found issues and the table of contents of the currently selected issue.

When the application launches, the user will see the main login page, and in the background, the “show-downloads” page is downloaded from Linux Journal. In an ideal world, Linux Journal would provide a simple XML file with all the available issues, table of contents and download location, but because this is just a demo, this information is acquired the hard way. It does this by using a regular expression to find any available issues, which is listed at the top of every Web page:

void MainWindow::downloadFinished()
{
QNetworkReply *reply =
((QNetworkReply *)sender());
QByteArray data = reply->readAll();
QTextStream out(&data);
QString file = out.readAll();

// The first page, find all of the pages that
// we can download issues from and fetch them.
if (issues->rowCount() == 0) {
QRegExp rx("show-downloads&row_offset=[0-9]*");
QStringList pages;
int pos = 0;
while (pos != -1) {
pos = rx.indexIn(file, pos + 1);
QString page = rx.capturedTexts().first();
if (!page.isEmpty() && !pages.contains(page))
pages.append(page);
}
QNetworkAccessManager *networkManager =
webView->page()->networkAccessManager();
foreach (QString page, pages) {
QUrl url(SERVER "dlj.php?action=" + page);
QNetworkReply *reply =
networkManager->get(QNetworkRequest(url));
connect(reply, SIGNAL(finished()),
this, SLOT(downloadFinished()));
}
}

Each Web page also contains several issues, usually three. Another regular expression is used to find each issue and the table of contents for that issue. After they are extracted, the data is put into the model where it is displayed:

  QRegExp issue("class=\"data-data\">([a-zA-Z]* " \
"20[0-9][0-9])");
int pos = 0;
while (pos != -1) {
pos = issue.indexIn(file, pos + 1);
QString page = issue.capturedTexts().value(1);
QStandardItem *item = new QStandardItem(page);
if (!page.isEmpty()) {
item->setData(reply->url(), Qt::UserRole);
item->setFlags(Qt::ItemIsSelectable
| Qt::ItemIsEnabled);
issues->insertRow(issues->rowCount(), item);
}

// Now that we have an issue, find the
// table of contents
QRegExp toc("
");
toc.setMinimal(true);
toc.indexIn(file, pos);
QStringList list =
toc.capturedTexts().first().split("
  • ");
    for (int j = list.count() - 1; j >= 0; --j) {
    QString s = list[j].simplified();
    if (!s.endsWith("
  • "))
    list.removeAt(j);
    else {
    s = s.mid(0, s.length() - 5);
    list[j] = s;
    }
    }

    // The table of contents is joined
    // together in one string and is used
    // by the proxy for searching
    item->setData(list.join(" "),
    Qt::UserRole + 1);

    // Save TOC which will be used to populate the
    // TOC list view if this issue is clicked on
    item->setData(list, Qt::UserRole + 2);
    }
    }

    The proxy is set to filter on Qt::UserRole + 1, which contains the full table of contents for each issue. When you type in the search box, any issue that doesn't contain the string will be filtered out.

    Figure 4. On-the-fly searching filters the issues only to those that contain the search string.

    When an issue is clicked, the table of contents is fetched out of the issuesView model and inserted into the tocModel where it is displayed in the lower list view:

    void MainWindow::clicked(const QModelIndex &index)
    {
    QVariant v = index.data(Qt::UserRole + 2);
    tocModel->setStringList(v.toStringList());
    }

    When an issue is activated (depending on the platform, this could be a double-click or single-click), the URL is fetched out of the issue model and set on the QWebView:

    void MainWindow::activated(const QModelIndex &index)
    {
    webView->load(index.data(Qt::UserRole).toUrl());
    }

    Once the user clicks on the download issue button, the Web site confirms authentication and then forwards to a Web page to download the actual file. Once there, downloadRequested() is called. From here on out, the example deals mostly with the new networking code. QWebPage has a built-in QNetworkAccessManager that is used to fetch the PDF:

    void MainWindow::downloadRequested(
    const QNetworkRequest &request)
    {
    // First prompted with a file dialog to make sure
    // they want the file and to select a download
    // location and name.
    QString defaultFileName =
    QFileInfo(request.url().toString()).fileName();
    QString fileName =
    QFileDialog::getSaveFileName(this,
    tr("Save File"),
    defaultFileName);
    if (fileName.isEmpty())
    return;

    // Construct a new request that stores the
    // file name that should be used when the
    // download is complete
    QNetworkRequest newRequest = request;
    newRequest.setAttribute(QNetworkRequest::User,
    fileName);

    // Ask the network manager to download
    // the file and connect to the progress
    // and finished signals.
    QNetworkAccessManager *networkManager =
    webView->page()->networkAccessManager();
    QNetworkReply *reply =
    networkManager->get(newRequest);
    connect(
    reply, SIGNAL(downloadProgress(qint64, qint64)),
    this, SLOT(downloadProgress(qint64, qint64)));
    connect(reply, SIGNAL(finished()),
    this, SLOT(downloadIssueFinished()));
    }

    Because Linux Journal PDFs are large files, it is important to give notification on the download progress. The simplest method is to update the status bar with the progress:

    void MainWindow::downloadProgress(qint64
    bytesReceived, qint64 bytesTotal)
    {
    statusBar()->showMessage(QString("%1/%2")
    .arg(bytesReceived)
    .arg(bytesTotal), 1000);
    }

    When the PDF has finished downloading successfully, the filename and location that were chosen by the user before are retrieved, and the full file is saved to disk:

    void MainWindow::downloadingIssueFinished()
    {
    QNetworkReply *reply = ((QNetworkReply*)sender());
    QNetworkRequest request = reply->request();
    QVariant v =
    request.attribute(QNetworkRequest::User);
    QString fileName = v.toString();
    QFile file(fileName);
    if (file.open(QFile::ReadWrite))
    file.write(reply->readAll());
    }

    Conclusion

    The inclusion of WebKit into Qt provides the opportunity for a number of very interesting applications to be developed. It will no doubt be utilized in many different types of applications, from desktop Web applications to applications that use it to display and manipulate HTML. QtWebKit has come a long way since the port was initially started two years ago. It will be exciting to see how QtWebKit improves and what people create with it.

    Benjamin Meyer is a happily married hacker. He has been developing with Qt for 11 years, and he has worked on many tools and applications, such as KDE's audiocd ioslave, System Settings, KAutoConfig, KAudiocreator, QAutotestGenerator, Valgrind Tools, NetflixRecommenderFramework, Zaurus applications and much more. He collects Transformers and runs the site

    Taken From: Linux Journal Issue #171/July 2008 - Using WebKit in Your Desktop Application by Benjamin Meyer

    Sunday, August 10, 2008

    Setting Up CPU Affinity (select cpus for a process)

    To set CPU HARD affinity (as opposed to the soft affinity already done by the kernel automatically) install schedtool. Then read the manual to understand how it works.

    The short version:

    To set a process’ affinity to only eg the first CPU (CPU0) and third CPU (CPU2) :

    #> schedtool -a 0,2


    Here is also a very good link to explain when and why HARD affinity could provide benefits vs SOFT affinity. I found way too many posts about "it's not needed" in my search instead of actual information, so clearing up the misconceptions might be a good thing in general.


    http://www-128.ibm.com/developerwork...-affinity.html

    Taken From: http://ubuntuforums.org/showthread.php?t=636521

    Friday, August 8, 2008

    PSP Video Converter (PSPVC) on Ubuntu 8.04

    I'm new to Linux and sure appreciate step by step instructions when I get stuck. Since I haven't been able to find any while trying to install pspvc, I figured I'd roll my own. I managed to successfully install it by piecing together bits from a bunch of posts. Let's see if we can put it all together in one place.

    This worked for me in Ubuntu Edgy. Hopefully, it'll work for you.

    1. Download pspvc from here: http://pspvc.sourceforge.net/, saving it to your desktop.

    2. Double click the pspvc tar.gz file on your desktop.

    3. Press "Extract", ensure "Desktop" is listed as the location to extract the files, and then press the "Extract" button (again).

    4. You should now have a pspvc-install-0.3 folder on your desktop.

    5. Open Terminal or Konsole (whichever you have installed).

    6. Install dependencies using this command:
    Code:

    $ sudo apt-get install libgtk2.0-dev libfaac-dev libxvidcore4-dev nasm build-essential


    7. Several development libraries that pspvc requires will install. You'll see a bunch of output and it'll take a few seconds to complete.

    8. Next, enter the following command, replacing user with your user name. This will change the prompt to the pspvc installation directory.
    Code:

    $ cd /home/user/Desktop/pspvc-install-0.3

    9. To begin the pspvc install, enter this command:
    Code:

    sudo ./install.sh

    10. When the install completes, you should see a message that says "PSPVC installation completed". You're done!

    11. Enter pspvc at the prompt to start the application.


    Taken From: http://ubuntuforums.org/showpost.php?p=2258647&postcount=5

    Tuesday, July 29, 2008

    Installing AddressBook

    Here we have how to install:


    - AddressBook v4.0
    - AddressBook v3.1.5


    AdressBook v4.0 HOWTO

    # Install Apache with it's documentation #####
    $ sudo apt-get install apache2 apache2-doc


    # Start Apache (it should already be started) #####
    $ sudo /etc/init.d/apache2 start


    # Test Apache #####

    Type in on Mozilla Firefox: http://127.0.0.1/
    It should read: It works!

    Nota: The page "It works!" is at /var/www,
    which is apaches root directory,
    so this is where we will put the addressbook.


    # Install the needed MySQL e PHP dependencies #####

    $ sudo apt-get install mysql-server mysql-client
    Type MySQL root password in the upcoming textbox.

    $ sudo apt-get install libapache2-mod-php5 libapache2-mod-perl2

    $ sudo apt-get install php5 php5-cli php5-common php5-curl php5-dev php5-gd php5-imap php5-ldap

    $ sudo apt-get install php5-mhash php5-mysql php5-odbc curl libwww-perl imagemagick


    # Download the AdressBook (http://sourceforge.net/projects/php-addressbook/)

    $ cd ~/Desktop

    $ wget http://downloads.sourceforge.net/php-addressbook/addressbookv4.0.zip?modtime=1212528743&big_mirror=0


    # Extrair o AddressBook #####

    $ cd ~/Desktop

    $ unzip addressbookv4.0.zip


    # Install o AdressBook no Apache #####

    # Copiar o AdressBook para /var/www (apache root dir)
    $ sudo cp -vr addressbookv4.0 /var/www


    # Give Apache (apache-user: www-data) permitions over the AddressBook files #####

    $ sudo chown www-data -vR /var/www/addressbookv4.0/*


    # Configure the AdressBook #####


    # Create AddressBook's database #####

    $ mysql -u root -p

    mysql> create database addressbook_db;

    mysql> exit


    # Configure AddressBook's connection to the database #####

    $ sudo gedit /var/www/addressbookv4.0/config/config.php

    No ficheiro:

    // Database access definition
    // $dbname = "your_database";
    // $dbserver = "localhost";
    // $dbuser = "username";
    // $dbpass = "password";


    // Database access definition
    $dbname = "addressbook_db";
    $dbserver = "localhost";
    $dbuser = "root";
    $dbpass = "12314467";


    # Create the necessary table at the AdressBook's database #####

    $ mysql addressbook_db -u root -p < /var/www/addressbookv4.0/addressbook.sql


    # Restart Apache #####

    $ sudo /etc/init.d/apache2 restart


    # Delete the test page #####

    $ sudo rm -rf /var/www/index.html


    # Configure AdressBook #####

    On Mozilla Firefox type in:
    http://127.0.0.1/addressbookv4.0 ou http://127.0.0.1/addressbookv4.0/index.php
    now just configure addressbook acording to the presented instructions.


    AdressBook v3.1.5 HOWTO

    # Install Apache with it's documentation #####
    $ sudo apt-get install apache2 apache2-doc

    # Start Apache (it should already be started) #####
    $ sudo /etc/init.d/apache2 start


    # Test Apache #####

    Type in on Mozilla Firefox: http://127.0.0.1/
    It should read: It works!

    Nota: The page "It works!" is at /var/www,
    which is apaches root directory,
    so this is where we will put the addressbook.


    #Install the needed MySQL e PHP dependencies #####

    $ sudo apt-get install mysql-server mysql-client
    Type MySQL root password in the upcoming textbox.

    $ sudo apt-get install libapache2-mod-php5 libapache2-mod-perl2

    $ sudo apt-get install php5 php5-cli php5-common php5-curl php5-dev php5-gd php5-imap php5-ldap

    $ sudo apt-get install php5-mhash php5-mysql php5-odbc curl libwww-perl imagemagick


    # Download the AddressBook (http://sourceforge.net/projects/php-addressbook/)

    $ cd ~/Desktop

    $ wget http://downloads.sourceforge.net/php-addressbook/addressbookv3.1.5.zip?modtime=1212528743&big_mirror=0


    # Extract the AddressBook #####

    $ cd ~/Desktop

    $ unzip addressbookv3.1.5.zip


    # Install AddressBook on Apache #####

    # Copiar o AdressBook para /var/www (apache root dir)

    $ sudo cp -vr addressbookv3.1.5 /var/www


    # Give Apache (apache-user: www-data) permitions over the AddressBook files #####

    $ sudo chown www-data -vR /var/www/addressbookv4.0/*


    # Configure the AdressBook #####

    # Create AddressBook's database #####

    $ mysql -u root -p

    mysql> create database addressbook_db;

    mysql> exit


    # Configure AddressBook's connection to the database #####

    $ sudo gedit /var/www/addressbookv3.1.5/include/config.php

    Change the following at the file:

    // Database access definition
    // $dbname = "your_database";
    // $dbserver = "localhost";
    // $dbuser = "username";
    // $dbpass = "password";


    // Database access definition
    $dbname = "addressbook_db";
    $dbserver = "localhost";
    $dbuser = "root";
    $dbpass = "12314467";


    # Create the necessary table at the AdressBook's database #####

    $ mysql addressbook_db -u root -p < /var/www/addressbookv3.1.5/addressbook.sql


    # Restart Apache #####

    $ sudo /etc/init.d/apache2 restart


    # Delete the test page #####

    $ sudo rm -rf /var/www/index.html


    # Configure AdressBook #####

    On Mozilla Firefox type in :

    http://127.0.0.1/addressbookv3.1.5
    or http://127.0.0.1/addressbookv3.1.5/index.php

    now just configure addressbook acording to the presented instructions.

    Wednesday, July 23, 2008

    List Partitions Information

    List Partitions Information


    [root@laptop ~]# sudo /sbin/fdisk -lu

    Disk /dev/hda: 60.0 GB, 60011642880 bytes
    255 heads, 63 sectors/track, 7296 cylinders, total 117210240 sectors
    Units = sectors of 1 * 512 = 512 bytes

    Device Boot Start End Blocks Id System
    /dev/hda1 * 63 20482874 10241406 7 HPFS/NTFS
    /dev/hda2 20482875 117065654 48291390 f W95 Ext'd (LBA)
    /dev/hda5 20482938 102414374 40965718+ c W95 FAT32 (LBA)
    /dev/hda6 115523478 117065654 771088+ 82 Linux swap / Solaris
    /dev/hda7 102414438 115523414 6554488+ 83 Linux

    Partition table entries are not in disk order

    Configure a Linux DNS Server - Cache and Private DNS

    Configure a Linux DNS Server - Part I (Caching Name Server)


    Not everybody's a Linux hacker straight out of the womb. For those who need a solid example or just want a little advice--no heckling involved--here's another how-to to get you going. We've helped you set up your home web server, so now let's get DNS working so you can have your very own domain.


    How to set up a home DNS server
    by Shannon Hughes


    Domain Name System

    The Domain Name System (DNS) is the crucial glue that keeps computer networks in harmony by converting human-friendly hostnames to the numerical IP addresses computers require to communicate with each other. DNS is one of the largest and most important distributed databases the world depends on by serving billions of DNS requests daily for public IP addresses. Most public DNS servers today are run by larger ISPs and commercial companies but private DNS servers can also be useful for private home networks. This article will explore some advantages of setting up various types of DNS servers in the home network.


    Why set up a private DNS server?

    This question is valid and the answer may vary depending on your home network environment. Maintaining a host file on each client with IP/hostname mappings in a home network that contains a router and a few machines may be sufficient for most users. If your network contains more than a few machines, then adding a private DNS server may be more attractive and worth the setup effort. Some advantages may include:

    *

    Maintenance: keeping track of the host file for every client in your network can be tedious. In fact, it may not even be feasible for roaming DHCP laptops or your occasional LAN party guests. Maintaining host information in one central area and allowing DNS to manage host names is more efficient.
    *

    Cache performance: DNS servers can cache DNS information, allowing your clients to acquire DNS information internally without the need to access public nameservers. This performance improvement can add up for tasks such as web browsing.
    *

    Prototyping: A private internal DNS server is an excellent first step to eventually setting up a public accessible DNS server to access a web server or other services hosted on your internal network. Learning from mistakes on an internal network can help prevent duplicate errors on a public DNS server that could result in loss of service for external users. Note: Some ISPs require customers to have a static IP or business subscription when hosting services in a home network environment.
    *

    Cool factor: Ok, I may be stretching it, but the "cool" factor did have some influence when I set up my first home network DNS server. Creating an internal domain that reflects an individual's personality without paying a domain registrar and issuing hostnames to your clients is cool. The cool factor doubles when your customized hostname glows from your friend's laptop screen.

    Let's start out simply by setting up a caching-only nameserver to handle client DNS requests. A caching-only nameserver won't allow references to internal clients by hostname, but it does allow clients to take advantage of frequently requested domains that are cached.
    Caching nameserver

    Fortunately, setting up a caching nameserver is easy using RHEL (Red Hat Enterprise Linux) or Fedora RPMs. The following RPMs need to be installed on the machine acting as the nameserver (use rpm -q to determine if these packages are installed):

    *

    bind (includes DNS server, named)
    *

    bind-utils (utilities for querying DNS servers about host information)
    *

    bind-libs (libraries used by the bind server and utils package)
    *

    bind-chroot (tree of files which can be used as a chroot jail for bind)
    *

    caching-nameserver (config files for a simple caching nameserver)

    A caching nameserver forwards queries to an upstream nameserver and caches the results. Open the file /var/named/chroot/etc/named.conf and add the following lines to the global options section:


    forwarders { xxx.xxx.xxx.xxx; xxx.xxx.xxx.xxx; }; #IP of upstream ISP nameserver(s)
    forward only; #rely completely on our upstream nameservers


    The block above will cause the caching name server to forward DNS requests it can't resolve to your ISP nameserver. Save the named.conf file and then assign 644 permissions:

    $ chmod 644 named.conf

    Check the syntax using the named-checkconf utility provided by the bind RPM:
    named-checkconf named.conf
    Correct any syntax errors (watch those semicolons) named-checkconf reports. Monitoring the /var/log/messages file may also be helpful in debugging any errors.


    We now need to set the local resolver to point to itself for DNS resolution. Modify the /etc/resolv.conf file to the following:

    nameserver 127.0.0.1

    If you are running a DHCP server on your router make sure your /etc/resolv.conf file does not get overwritten whenever your DHCP lease is renewed. To prevent this from happening, modify /etc/sysconfig/network-scripts/ifcfg-eth0 (replace eth0 with your network interface if different) and make sure the following settings are set:


    BOOTPROTO=dhcp
    PEERDNS=no
    TYPE=Ethernet


    Go ahead and start the nameserver as root and configure to start in runlevels 2-5:

    service named start
    chkconfig named on
    Testing

    The bind-utils RPM contains tools we can use to test our caching nameserver. Test your nameserver using host or dig and querying redhat.com:

    dig redhat.com
    .
    .
    ;; Query time: 42 msec
    ;; SERVER: 127.0.0.1#53(127.0.0.1)


    From the above dig query you can see it took 42 msec to receive the DNS request. Now test out the caching ability of your nameserver by running dig again on the redhat.com domain:

    dig redhat.com
    .
    .
    ;; Query time: 1 msec
    ;; SERVER: 127.0.0.1#53(127.0.0.1)


    We dropped from 42 msec to 1 msec after the previous DNS query was cached. Caching is working! Let's now put the cache to work by configuring the clients to use the new caching nameserver.
    Client Configuration

    For Linux and Windows clients you may have a couple of options for your resolver configuration depending on your network environment:

    1.

    If you have a router and your client's IP address is assigned via DHCP from the router, then you can use the router to assign the primary nameserver during the DHCP lease requested from the client. Log in to your router and make sure your primary nameserver points to your caching nameserver IP address in the router DHCP settings.


    2.

    For Linux clients, you can set up the resolver in the same procedure as the nameserver by modifying the /etc/resolv.conf file. For Windows clients you will need to set the nameserver IP address in the Control Panel -> Network Connections -> TCP/IP -> Properties -> Use the DNS Server Address option. NOTE: The Windows DNS server option may vary depending on your version.

    Test your new client configuration(s) using dig. You can use the nslookup command for Windows clients. Your DNS requests should have similar response times as we saw earlier when testing the nameserver directly.

    NOTE: If you are running a firewall on the nameserver system, make sure clients have access to port 53. An example iptables rule for the 192.168.15.0/24 subnet would be:
    iptables -A INPUT -s 192.168.15.0/24 -p udp --dport 53 -j ACCEPT
    service iptables save


    Summary

    Your new caching nameserver offers a performance improvement with a minimal amount of set up effort. Clients can now ask the caching nameserver for DNS information, and it only needs to ask the upstream ISP nameserver for cache misses. In the next issue we will setup a master nameserver that is responsible for the authoritative information for our internal client hostnames. An authoritative nameserver also caches by default but additionally allows managing both static and DHCP clients using personalized hostnames set up in zone files. In the meantime, enjoy your new caching nameserver and be thinking about a creative domain and hostname theme for your future authoritative nameserver.


    Configure a Linux DNS Server - Part II (Private DNS Server)


    Welcome back
    In the first part of this series on the Domain Name System (DNS), we set up a caching nameserver that allowed our clients to take advantage of faster network operations by caching frequently requested DNS queries. In this article, we will extend our caching nameserver to a master nameserver that is responsible for managing the authoritative information for our internal client hostnames.


    Overview

    As with our caching-only nameserver, we will see that BIND RPMS packaged by Red Hat® Enterprise Linux® and Fedora ease the process of configuring our master nameserver. Adding authoritative responsibility to the caching-only nameserver only requires us to add two more files and modify the existing named.conf file. For the purpose of this article we will assume the following:


    * The BIND 9.x RPMS discussed in Part 1 are installed on the machine that will serve as a nameserver.
    * Our internal network is in the 192.168.15.0/24 subnet. You will need to substitute your subnet if different.
    * The master nameserver will only allow DNS queries from internal clients in the 192.168.15.0/24 subnet.
    * The master nameserver will continue to forward any DNS requests it can't answer to your upstream ISP nameserver(s).
    * We will use the domain hughes.lan as our internal domain name.


    You might notice that we selected a mock top-level domain (sometimes referred as a TLD) named lan. Our internal domain name can be as creative as we wish since the domain is only known inside our home network. The naming convention for a public nameserver is not as relaxed, since we would need to follow certain rules that would allow our nameserver to respond to other nameservers requesting host information from around the world.


    Zones

    Nameservers store information about a domain namespace in files called zone data files. A zone data file contains all the resource records that describe the domain represented in the zone. The resource records further describe all the hosts in the zone. We will need to modify our existing named.conf to reference two zone files for our domain name:

    * Forward zone definitions that map hostnames to IP addresses.
    * Reverse zone definitions that map IP addresses to hostnames.

    Open /var/named/chroot/etc/named.conf and add the following forward and reverse zone file directives:

    # Forward Zone for hughes.lan domain
    zone "hughes.lan" IN {
    type master;
    file "hughes.lan.zone";
    };

    # Reverse Zone for hughes.lan domain
    zone "15.168.192.in-addr.arpa" IN {
    type master;
    file "192.168.15.zone";
    };

    Both the forward and reverse zones contain the type master indicating that our nameserver is the master or primary nameserver for the hughes.lan domain. The file keyword indicates which zone file contains the resource records for the corresponding zone. Note that the reverse zone contains a special domain named in-addr-arpa. DNS uses this special domain to support IP to hostname mappings. Reverse lookups are backwards since the name is read from the leaf to the root (imagine a domain name as a tree structure) so the resultant domain name has the topmost element at the right-hand side. For a home network the reverse lookup zones can be considered optional but we will include them for completeness.

    Included with the BIND RPMs is a root zone nameservers use when a query is unresolvable by any other configured zones. The root zone directive is named ".", has a type of hint and references a file named named.ca that contains a list of 13 root name servers located around the world. We will not directly use the root servers since we are forwarding any unresolvable queries to our ISP nameservers.

    We need to modify the named.conf global options to allow our internal clients to query the nameserver. Modify the existing global options block to the following:

    acl hughes-lan { 192.168.15.0/24; 127.0/8; };
    options {
    directory "/var/named";
    allow-query { hughes-lan; };
    forwarders { xxx.xxx.xxx.xxx; xxx.xxx.xxx.xxx; }; # ISP primary/secondary
    forward-only; # Rely completely on ISP for cache misses
    };

    The acl statement above sets up a range of IP addresses we can reference throughout the named.conf file. The allow-query specifies IP addresses of hosts that can query our nameserver. The forwarders statement tells our nameserver to forward any unresolvable queries to our upstream nameservers. The forward-only statement restricts our nameserver to only rely on our ISP nameservers and not contact other nameservers to find information that our ISP can not provide. It's very rare for a primary and secondary ISP nameserver to be down at the same time but you can comment forward-only if you want your nameserver to try the root nameservers when the upstream ISP nameservers cannot resolve a hostname.


    Zone files

    We are now ready to start defining our hostname mappings in the zone files we referenced in the named.conf configuration. Zone files need to be placed in the /var/named/chroot/var/named directory, have 644 permissions with an owner and group of named:

    $ cd /var/named/chroot/var/named
    $ touch hughes.lan.zone
    $ chown named:named hughes.lan.zone
    $ chmod 644 hughes.lan.zone

    Let's take a look at an example zone file for the hughes.lan forward zone and then dive into the various parts:

    $TTL 1D

    hughes.lan. IN SOA velma.hughes.lan. foo.bar.tld. (
    200612060 ; serial
    2H ; refresh slaves
    5M ; retry
    1W ; expire
    1M ; Negative TTL
    )

    @ IN NS velma.hughes.lan.

    velma.hughes.lan. IN A 192.168.15.10 ; RHEL server
    fred.hughes.lan. IN A 192.168.15.1 ; router
    scooby.hughes.lan. IN A 192.168.15.2 ; upstairs WAP
    shaggy.hughes.lan. IN A 192.168.15.3 ; downstairs WAP
    scooby-dum.hughes.lan. IN A 192.168.15.4 ; Fedora desktop
    daphne.hughes.lan. IN A 192.168.15.5 ; network printer
    mysterymachine IN A 192.168.15.6 ; mail server
    scrappy IN A 192.168.15.7 ; Windows box
    ; aliases
    www IN CNAME velma.hughes.lan. ; WWW server
    virtual IN CNAME velma ; virtual WWW tests
    mail IN CNAME mysterymachine ; sendmail host

    ; DHCP Clients
    dhcp01.hughes.lan. IN A 192.168.15.100
    dhcp02.hughes.lan. IN A 192.168.15.101
    dhcp03.hughes.lan. IN A 192.168.15.102
    dhcp04.hughes.lan. IN A 192.168.15.103
    dhcp05.hughes.lan. IN A 192.168.15.104

    @ IN MX 10 mail.hughes.lan.

    The very first line in the hughes.lan.zone contains the TTL (Time To Live) value and is set to one day. TTL is used by nameservers to know how long to cache nameserver responses. This value would have more meaning if our nameserver was public and had other external nameservers depending on our domain information. Notice the 'D' in the TTL value stands for Day. Bind also uses 'W' for weeks, 'H' for hours, and 'M' for minutes.

    The first resource record is the SOA (Start Of Authority) Record which indicates that this nameserver is the best authoritative resource for the hughes.lan domain. The IN stands for Internet Class and is optional. The first hostname after the SOA is the name of our master or primary nameserver. The second name, "foo.bar.tld.", is the email address for the person in charge of this zone. Notice the '@' is replaced with a '.' and also ends with a '.'. The third value is the serial number that indicates the current revision, typically in the YYYYMMDD format with a single digit at the end indicating the revision number for that day. The fourth, fifth, sixth, and seventh values can be ignored for the purposes of this article.

    The NS record lists each authoritative nameserver for the current zone. Notice the first '@' character in this line. The '@' character is a short-hand way to reference the domain, hughes.lan, that was referenced in the named.conf configuration file for this zone.

    The next block of A records contains our hostname to address mappings. The CNAME records act as aliases to previously defined A records. Notice how fully qualified domains end with a '.'. If the '.' is omitted then the domain, hughes.lan, is appended to the hostname. In our example the hostname, scrappy, will become scrappy.hughes.lan

    If you want to reference an internal mail server, then add a MX record that specifies a mail exchanger. The MX value "10" in our example indicates the preference value (number between 0 and 65535) for this mail exchanger's priority. Clients try the highest priorty exchanger first.

    The reverse zone file, 192.168.15.zone, is similar to our forward zone but contains PTR records instead of A records:


    $TTL 1D

    @ IN SOA velma.hughes.lan. foo.bar.tld. (
    200612060 ; serial
    2H ; refresh slaves
    5M ; retry
    1W ; expire
    1M ; Negative TTL
    )

    IN NS velma.hughes.lan.
    10 IN PTR velma.hughes.lan.
    1 IN PTR fred.hughes.lan.
    2 IN PTR scooby.hughes.lan.
    3 IN PTR shaggy.hughes.lan.
    4 IN PTR scooby-dum.hughes.lan.
    5 IN PTR daphne.hughes.lan.
    6 IN PTR mysterymachine.hughes.lan.
    7 IN PTR scrappy.hughes.lan.

    100 IN PTR dhcp01.hughes.lan.
    101 IN PTR dhcp02.hughes.lan.
    102 IN PTR dhcp03.hughes.lan.
    103 IN PTR dhcp04.hughes.lan.
    104 IN PTR dhcp05.hughes.lan.


    Testing

    Save your zone files, make sure you have the correct permissions and check the syntax using named-checkzone:

    named-checkzone hughes.lan hughes.lan.zone
    named-checkzone 15.168.192.in-addr.arpa 192.168.15.zone

    Correct any syntax errors reported by named-checkzone.


    Restart the nameserver:

    service named restart

    Browse through the tail of the /var/log/messages file and confirm the domain loaded successfully.


    Make the following DNS queries (substituting your domain):

    dig scooby.hughes.lan
    dig -x 192.168.15.2


    Your output should be similar to the following:

    .
    .
    .

    ;; QUESTION SECTION:
    ;scooby.hughes.lan. IN A

    ;; ANSWER SECTION:
    scooby.hughes.lan. 86400 IN A 192.168.15.2

    ;; AUTHORITY SECTION:
    hughes.lan. 86400 IN NS velma.hughes.lan.

    ;; ADDITIONAL SECTION:
    velma.hughes.lan. 86400 IN A 192.168.15.10
    .
    .
    .

    Continue to test each host you added to the zone file and then enjoy your new master nameserver.


    Conclusion

    The goal of this series of DNS articles was to pick the high-level features DNS can offer to improve the efficiency and management of the home network. In addition to the performance improvement we saw with the caching nameserver, the master nameserver helps manage both static and dynamic clients using human-friendly hostnames instead of IP addresses. For readers interested in learning more about DNS or expanding the nameservers discussed in this series, checkout the following resources:

    * BIND user documenation located in /usr/share/doc/bind-9.x.x
    * DNS and BIND (5th Edition)


    About the author

    Shannon Hughes is a Red Hat Network (RHN) engineer who enjoys using open source software to solve the most demanding software projects. When he is not cranking out code, tweaking servers, or coming up with new RHN projects, you can find him trying to squeeze in yet another plant in the yard/garden with his wife, watching Scooby Doo reruns with his two kids and dog, or incorporating the latest open source projects for his church.

    Copyright © 2006 Red Hat, Inc. All rights reserved.
    Privacy Policy : Terms of Use : Patent promise : Company : Contact
    Log in to Your Account


    Taken From: http://www.redhat.com/magazine/025nov06/features/dns/
    http://www.redhat.com/magazine/026dec06/features/dns/


    A much more complete howto can be found at: http://www.aboutdebian.com/dns.htm