Wednesday, August 4, 2010

KDE 4 on Windows

Have you ever found yourself working on Windows—for whatever reason—and reached for one of your favorite applications from the free software world only to remember that it is not available on Windows?

It is not a problem for some of the best-known free software applications, such as Firefox, Thunderbird, OpenOffice.org, GIMP or Pidgin. However, for some popular Linux applications, such as those from the KDE desktop software project, cross-platform support only recently became a possibility. KDE relies on the Qt toolkit from Nokia, which has long been available under the GPL for operating systems such as Linux that use the X Window System, but it was available under proprietary licenses for Windows only until the most recent series, Qt4. With the release of a GPL Qt for Windows, KDE developers started work on porting the libraries and applications to Windows, and the KDE on Windows Project was born. The project tracks the main KDE releases on Linux and normally has Windows versions of the applications available shortly after.

Installation

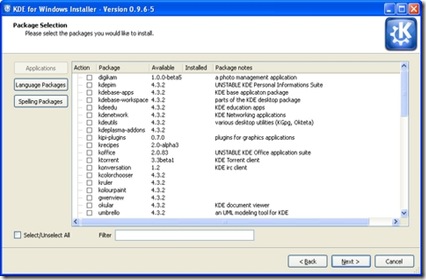
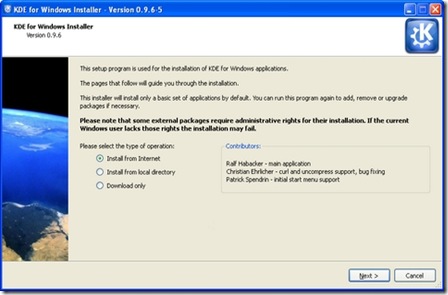
It is easy to try out KDE applications on Windows. Simply go to the project Web site (windows.kde.org), download and run the installer (Figure 1). You'll be presented with a few choices to make, such as the installation mode (a simple “End User” mode with a flat list of applications or the “Package Manager” mode that is categorized like many of the Linux package managers). You also are given the option of whether to install packages made with the Microsoft compiler or those made with a free software alternative—as many users are likely neither to care about nor understand this option, it may have been better to hide it in an advanced tab.

clip_image001

Figure 1. KDE on Windows Installer Welcome Screen

Next, you are presented with a choice of download mirrors, followed by the choice of which version of KDE software to install. It's hard to imagine why you wouldn't simply want the latest stable release, but the installer gives you a few options and, oddly, seems to preselect the oldest by default.

In the next step, you are presented with a list of applications and software groups available to install, or you can select everything (Figure 2). The installer then takes care of downloading and installing the software, and you don't need to make any further interventions. I did find that the speed of the various mirrors varied greatly; some were up to ten times faster than others. If you're short of time and things seem to be going slowly, it may be worth canceling the download and trying another mirror. The installer is intelligent enough to re-use what you already have downloaded, so you don't really lose anything in this way. When the installation is complete, your new KDE applications are available in a KDE Release subsection of the Windows application menu.

clip_image002

Figure 2. The installer provides a simple list of applications available for installation.

The main KDE 4 distribution for Linux is split into large modules—for example, Marble, a desktop globe application, is part of the KDE Education module with many other applications for subjects ranging from chemistry to astronomy. This works fine on Linux, where most of what you need is installed with your chosen distribution. But, if you're on Windows and want a desktop globe but have no interest in chemistry or physics, there are clear benefits in preserving your download bandwidth and hard-drive space by not downloading everything else. Patrick Spendrin, a member of both the KDE on Windows and Marble projects, says they recognize this issue: “as one can see, we are already working on splitting up packages into smaller parts, so that each application can be installed separately.” Many modules already have been split, so you can install the photo management application digiKam, individual games and key parts of the KDE software development kit separately from their companion applications. The productivity suite KOffice will be split up in a similar way in the near future, and Patrick hopes that the Education module will follow shortly afterward.

Overall, the installation process will feel familiar and easy if you've used Linux in the past. However, if you have used only Windows, the process of using a single installer to install whatever applications you want may seem a little strange. After all, most applications for Windows are installed by downloading a single self-contained executable file that installs the application and everything it needs to run in one go. The KDE on Windows installation process reflects the fact that KDE applications share a lot of code in common libraries.

Patrick explains that individual self-contained installers simply would not make sense at this stage: “the base libraries for a KDE application are around 200MB, so each single application installer would be probably this size.” A version of Marble, however, is available from its Web site as a self-contained installer—the map widget is pure Qt, so it is possible to maintain both a Qt and KDE user interface wrapping that widget. The pure Qt version is small enough to be packaged in this way.

As Torsten Rahn, Marble's original author and core developer puts it, having a standalone installer for the full KDE version of Marble “would increase the time a user needs to download and install Marble; installing the Qt version takes less than a minute.” It might be possible in the future to package a common runtime environment and provide applications as separate executables, similar to the approach taken by Java applications, but Patrick notes that this would take time, as “it would be a lot different from the current Linux-like layout.” In any case, the current approach has some advantages, because it makes you aware of other available applications and allows you to try them out simply by marking an extra check box.

First Impressions

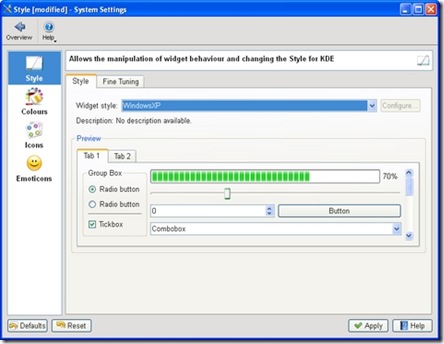
The KDE 4 Windows install comes with a slimmed-down version of the System Settings configuration module (Figure 3), which will be familiar to you if you've used KDE 4 on Linux. Here, you can adjust KDE 4 notifications and default applications in addition to language and regional settings. However, these apply only to the KDE applications, so you can encounter slightly odd situations. For example, if you open an image from Windows Explorer, it will be shown by the Windows Picture and Fax Viewer, but if you open the same file from KDE 4's Dolphin file manager, it will be opened with the KDE image viewer, Gwenview. Of course, you can use the Windows control panel to make Windows prefer KDE applications for opening images and documents and change the file associations for Dolphin so that it will use other Windows programs that you have installed, but you will need to make adjustments in both places to get consistent behavior.

clip_image003

Figure 3. The KDE System Settings module lets you adapt the look and feel of KDE applications to match your system.

System Settings also allows you to choose a selection of themes for your KDE applications, including some that tie in well with the Classic and Luna themes in Windows XP. At present, KDE 4 doesn't include special themes for Windows Vista or Windows 7. However, Windows users are accustomed to using mismatching software from many different vendors, and the KDE applications fit in as well as anything else.

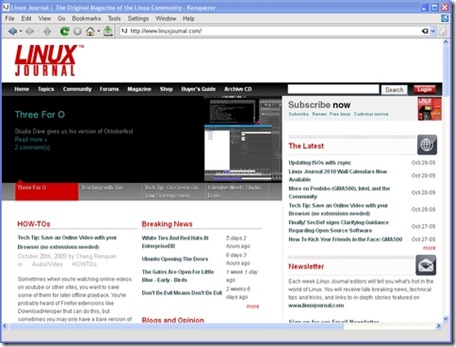
Most of the applications I tried seemed just fine, at least to start with. Konqueror, for example, correctly displayed the selection of major Web sites I visited (Figure 4). However, after using the applications for a while, I began to notice a less-than-perfect integration with the Windows environment. Okular, the KDE document viewer, used the default Windows dialog for open and save, with common Windows folders, such as Desktop and My Documents, available on the left-hand panel. However, other applications, such as KWord, used the KDE file dialog which, in common with the Dolphin file manager, has links on the left-hand panel to Home and Root. These labels probably will not mean a lot to a Windows user unfamiliar with a traditional Linux filesystem layout, and it would be nice to see Dolphin and KDE dialogs modified to show standard Windows folders, such as Desktop and My Documents instead.

clip_image004

Figure 4. KDE's Konqueror Web browser handled all the major sites I tried.

State of the Applications

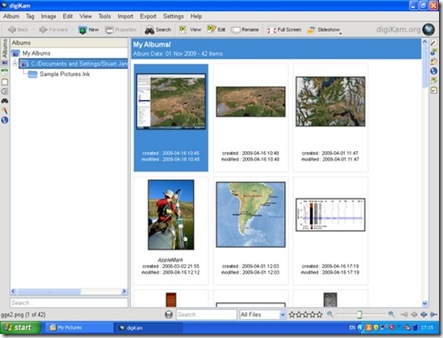
digiKam, the photo management application, is one of the real highlights of the KDE world on Linux (Figure 5). On Windows, it started fine, found all my images and allowed me to view a full-screen slideshow. I was able to use its powerful editing tool to crop a photo and adjust the color levels of an image, but when saving the modifications, I received an error that the save location was invalid. digiKam was attempting to prepend a forward slash (as found in a Linux filesystem) to the save location, so that it read “/C:/Documents and Settings...”. A small error, but one that makes practical use of the application difficult.

clip_image005

Figure 5. digiKam, the KDE photo manager, worked quite well, finding and organizing my photos.

KOffice2, still experimental on Linux, seemed to run quite well on Windows. I was able to create a document, save it in OpenDocument format and then open it in Okular. Windows users who primarily use Microsoft Office and don't want to use another office suite might consider Okular as a lightweight OpenDocument viewer.

One of my favorite KDE applications on Linux is Kopete, the universal messaging application (Figure 6). I was able to log in to my Windows Live Messenger account and chat to my contacts, but the XMPP protocol (used by Google Talk) wasn't available. Integration with KDE's secure password storage system, KWallet, also seemed imperfect, as I had to go through two rounds of unlocking the wallet before Kopete appeared to have access to the account passwords.

clip_image006

Figure 6. Kopete works well with the Windows Live Messenger service but currently lacks XMPP support on Windows.

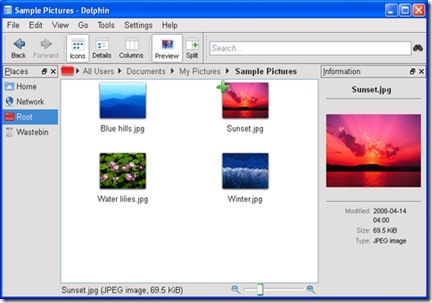
Dolphin, the file manager, seemed to work well (Figure 7), and its bread-crumb navigation structure made rapid switches between folders easy. It felt faster than Windows Explorer at loading thumbnails of images, and the preview pane provides excellent file overviews without having to open a dedicated application. If I spent a lot of time on Windows, I would be tempted to try Dolphin as an Explorer replacement. As mentioned previously, Konqueror also handled everything I threw at it.

clip_image007

Figure 7. The Dolphin file manager is an attractive and easy-to-use replacement for Explorer.

One notable application missing from the KDE installer is Amarok, the popular music player. The Amarok Web site explains that the Windows port is highly experimental and has been omitted from the KDE 4.3 release of the KDE on Windows installer, although it was available on Windows with KDE 4.2. In fact, no music or video player was available from the KDE installer for version 4.3, which is a shame, as the Phonon technology developed by KDE and integrated into Qt should make it easier than ever before to make such applications truly cross-platform.

KDE 4 comes with a great selection of simple games built in, including the likes ofHangman, Battleships and a few more exotic options, such as Mahjongg (Figures 8 and 9). Windows includes its own applications for playing many of these games, but the KDE alternatives were highly impressive with beautiful artwork. I encountered few problems that would give any indication that they hadn't been designed for Windows in the first place—only some problems saving partially completed games due to differences between the Linux and Windows filesystem structures.

clip_image008

Figure 8. KMahjongg is beautifully presented and very usable on Windows.

clip_image009

Figure 9. KHangMan comes with a selection of nice themes and worked flawlessly.

Going All the Way: Plasma on Your Desktop

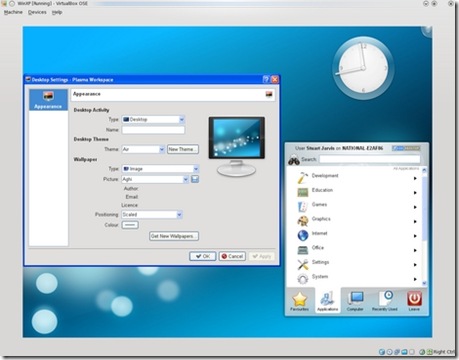
The desktop shell in KDE 4 on Linux is provided by Plasma, a flexible, integrated replacement for the separate desktop, widget and taskbar applications of KDE 3. It is possible to run Plasma as the desktop shell on Windows, but some major features are missing—such as a taskbar—and you need to make some changes to the Windows Registry to try it out. In fact, trying Plasma on Windows really is not a good idea on any machine that you care about, because once you have made the switch, you cannot easily revert it from within your KDE Plasma desktop session. The safest way to try Plasma on Windows is to use a new (and disposable) user account in Windows running in a virtual machine. If you do try it (see the Replacing the Windows Desktop Shell with KDE's Plasma sidebar for instructions), you'll be presented with a pretty KDE desktop (Figure 10) to which you can add a few of your favorite widgets, such as a clock or the KDE menu, run a few KDE applications and, well, that's about it. Windows programs are entirely inaccessible. Although there is a certain wow factor to having an almost complete KDE 4 desktop on your Windows machine, using it is not really practical in any serious way at present.

clip_image010

Figure 10. The KDE Plasma desktop shell running on Windows—attractive, but not yet very functional.

Replacing the Windows Desktop Shell with KDE's Plasma

First, this is a really bad idea and may make your Windows system unusable. If you must follow these instructions, use at least a spare user account and preferably a disposable install in a virtual machine. You have been warned.

If that has not put you off and you still want to see how Plasma looks on Windows, you need to download and run Autoruns for Windows from Microsoft (technet.microsoft.com/en-us/sysinternals/bb963902.aspx).

Next, simply unzip the downloaded archive and run autoruns.exe (not autorunsc.exe).

In the main program window that appears, you then have to select the Logon tab and find the entry that references explorer.exe. Double-click on that to open the registry editor and change the key to replace explorer.exe with the full path to plasma-desktop.exe (if you accepted the default KDE install options, this is probably C:\Program Files\KDE\bin\plasma-desktop.exe).

Log out and back in again. You should be presented with a pretty but largely nonfunctional Plasma desktop.

You'll probably have to press the computer reset button to escape.

Can KDE Succeed on Windows?

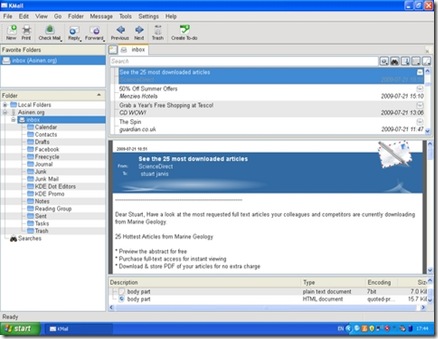
Some of the KDE applications are competing for your attention against better-known alternatives that you easily can install from a single executable file. KDE's Konqueror Web browser, although a fine application, finds itself in a very crowded market for Windows browsers with Internet Explorer already installed and the likes of Firefox, Opera, Safari and Google Chrome all available as alternatives. The potential for some other applications to become popular on Windows is, however, much higher. Kopete faces only Pidgin and the proprietary Trillian messenger as serious competition in the market for multiprotocol messaging clients. Okular is a lightweight but well featured alternative to Adobe Reader. Marble is almost in a class of its own—the nearest competitor perhaps being Google Earth. Kontact, the Personal Information Management suite, also has potential as a compelling cross-platform alternative to existing solutions (Figure 11). Mozilla Thunderbird is a clear competitor, but it lacks comprehensive calendar functionality. Benjamin Dietrich, working in IT support at a German university, who currently has to support many different mail applications across the various computing platforms, believes Kontact could “provide one solution, once it is as mature as it is on Linux”. However, a way to distribute Kontact as a self-contained installer easily would add to its appeal: “a single binary installer would be perfect.”

clip_image011

Figure 11. KMail, part of the KDE Kontact Personal Information Management suite, was able to connect to my mail server and download my e-mail.

The spread of KDE applications to Windows also has had benefits for the wider KDE Project. Amarok's integration with the Last.fm music service was largely put together by a developer who used Windows rather than Linux. It is unlikely that he would have become involved if it had not been possible at the time to run Amarok on Windows. Getting exposure to users on Windows also gives KDE the potential to attract users to trying KDE 4 on Linux and should make the transition for such users easier if they already know some of the applications.

Conclusion

The KDE on Windows Project still is quite young, and there are plenty of rough edges in many of the applications and some notable gaps in the application line-up. However, the installation process works well and is straightforward for anyone who has used a package manager on Linux. Although the installation process is different from that of most Windows applications, the installer is sufficiently well designed that it should not cause problems for most Windows users. The recent and continuing work to split up applications so that users can install exactly what they want also lowers the barriers to trying out KDE applications in Windows. Some of the applications have great potential to fill gaps in the Windows application world, particularly as free software alternatives to proprietary applications. As the project Web site freely admits, many of the applications may not yet be ready for day-to-day use, but they are well worth checking out and will only get better.

Stuart Jarvis is a scientist and longtime KDE user. He divides his time between digging up some of the world's finest mud and regretting ill-judged experiments with pre-release software.

Taken From: http://www.linuxjournal.com/article/10639
Virtual Appliances with Linux and Xen Hypervisor

Simple Virtual Appliances with Linux and Xen

From Issue #189
January 2010

Jan 01, 2010  By Matthew Hoskins
Use Xen and Linux to make your own ready-to-use software virtual appliances. Create a DNS server, a Web server, a MySQL server—whatever you need, ready to go when you need it.

Everyone is familiar with hardware appliances in one form or another. It could be a wireless access point at home or a DNS server appliance in the data center. Appliances offer a prebuilt software solution (with hardware) that can be deployed rapidly with minimal hassle. When you couple the “appliance” concept with virtualization, you get virtual appliances—a prebuilt software solution, ready to run on your own hardware with minimal work.
In this article, I provide a hands-on introduction to constructing a simple virtual appliance by assembling readily available components. The framework can be used to build a wide range of appliances.


What Is a Virtual Appliance?
Virtual appliances share many attributes in common with their hardware cousins. In general, both types of appliances have a small footprint, use an embedded or “thin” OS, are single-purpose, provide easy backup and restore, and are Web-managed. Most important, they come ready to rock and roll with minimal configuration. Virtual appliances have the additional benefit of being hosted on your own hardware, so you can host multiple virtual appliances on a single physical host.
Many Linux-based virtual appliances are constructed with an extremely thin OS. This can make installing common software complicated due to dependencies, especially for a beginner. For this example, I decided to use an off-the-shelf free distribution, specifically CentOS, because it uses tools most people are used to. However, we'll cut it to the bone as much as possible.


Collecting the Parts
We are going to build our virtual appliances using the Xen hypervisor, because it's free and comes with most Linux distributions these days. In my examples, I am using CentOS 5.3 for both the host and appliance. The host needs the Virtualization option selected during install, or you can retro-fit an existing Linux system by installing the xen and kernel-xen packages. I chose Xen because it's easy; alternatively, you could use VMware, KVM or any other hypervisor.
You can install CentOS directly from the Internet if you have a good connection, or download it to a local Web or NFS server. In this example, I point tomirror.centos.org for the install sources and to a local NFS server for the kickstart config.
We will use the Webmin package to provide Web-based management of our appliance. Webmin has been around for a long time and will provide our appliance with a lot of functionality, like complete Web-based management and simple backup/restore. I downloaded the webmin-1.480-1 RPM from www.webmin.com for our appliance. Everything else will be provided by standard CentOS packages.


Installing CentOS
To create a minimal CentOS install for our appliance, we will use a custom kickstart with the --nobase option set. One of the most important concepts of good system management is repeatability—a fully automated kickstart install is repeatable and self-documenting. Our entire OS installation will fit quite comfortably in a 2GB virtual disk and 256MB of memory. We are creating our appliance under /xen, which is a standard location for Xen virtual machines (also known as guests). If you choose another location, make sure either to disable SELinux or adjust your settings. Wherever you put Xen, the disk images need the system_u:object_r:xen_image_t context set.
First, let's create an “appliance-base” guest, which will be used like a template. All the files for this guest will be stored in /xen/appliance-base/. Start by logging in to the Xen host as root and create the virtual disk. Then, grab the Xen vmlinuz and initrd files from the install media:

xenhost$ mkdir -p /xen/appliance-base
xenhost$ cd /xen/appliance-base
xenhost$ dd if=/dev/zero of=appliance-base.img \
oflag=direct bs=1M seek=2048 count=1
1+0 records in
1+0 records out
1048576 bytes (1.0 MB) copied, 0.071271 seconds, 14.7 MB/s
xenhost$ cd /xen
xenhost$ wget \
http://mirror.centos.org/centos/5.3/os/i386/images/xen/initrd.img
xenhost$ wget \
http://mirror.centos.org/centos/5.3/os/i386/images/xen/vmlinuz

You have just created a 2GB virtual disk for your appliance. Now, create an appliance-base.install.cfg file and a ks.cfg file, as shown in Listings 1 and 2. Be sure to substitute your CentOS URL or a mirror on the Internet. The last three bytes of the MAC address in the .cfg file are made up; just make sure all your Xen guests are unique.


Listing 1. Xen Configuration for Install: appliance-base.install.cfg
# Xen Configuration for INSTALL of appliance-base
kernel  = "/xen/vmlinuz"
ramdisk = "/xen/initrd.img"
extra   = "text ks=nfs:192.168.200.10:/home/matt/ks.cfg"
name    = "appliance-base"
memory  = "256"
disk    = ['tap:aio:/xen/appliance-base/appliance-base.img,xvda,w',]
vif     = ['bridge=xenbr0,mac=00:16:3e:00:00:01',]
vcpus   = 1

on_reboot = 'destroy'
on_crash  = 'destroy'


Listing 2. Kickstart Configuration: ks.cfg

# Kickstart Configuration for MINIMAL CENTOS
install
text
reboot

url --url http://mirror.centos.org/centos/5.3/os/i386/
lang en_US.UTF-8
langsupport --default=en_US.UTF-8 en_US.UTF-8
keyboard us

skipx
network --device eth0 --bootproto dhcp

# The password is "password"
rootpw --iscrypted $1$h5ebo1pm$OHL3De9oalNzqIG1BUyJp0
firewall --disabled
selinux --permissive
authconfig --enableshadow --enablemd5
timezone America/New_York

bootloader --location=mbr
clearpart --all --initlabel
part /boot --fstype ext3 --size=100
part pv.2 --size=0 --grow
volgroup VolGroup00 --pesize=32768 pv.2
logvol /    --fstype ext3 --name=LogVol00 \
--vgname=VolGroup00 --size=1024 --grow
logvol swap --fstype swap --name=LogVol01 \
--vgname=VolGroup00 --size=256
%packages --nobase
coreutils
yum
rpm
e2fsprogs
lvm2
grub
sysstat
ntp
openssh-server
openssh-clients
%post

Now, all you have to do is boot up the Xen guest and watch your appliance's OS install. The install will be fully automated; simply execute the following command and sit back:

xenhost$ xm create -c /xen/appliance-base/appliance-base.install.cfg

After the install completes, it will shut down the Xen guest and drop back to a shell prompt. Next, still in the same directory, create an appliance-base.cfg, as shown in Listing 3, which will be used to run the appliance in normal mode.


Listing 3. Xen Configuration: appliance-base.cfg

# Xen Configuration for appliance-base
name   = "appliance-base"
memory = "256"
disk   = ['tap:aio:/xen/appliance-base/appliance-base.img,xvda,w',]
vif    = ['bridge=xenbr0,mac=00:16:3e:00:00:01',]
vcpus  = 1

bootloader ="/usr/bin/pygrub"
on_reboot  = 'restart'
on_crash   = 'restart'

Boot up the Xen guest again using the new config:

xenhost$ xm create -c /xen/appliance-base/appliance-base.cfg

And now, you're ready to start installing services.


Installing Web Management

Let's get this guest ready to be an appliance. When the guest is completely booted, log in as root. The password is “password” (this is somewhat of a de facto standard for virtual appliances). Execute the following commands to update fully; then, install Webmin and all its dependencies:

appliance-base# wm=http://sourceforge.net/projects/webadmin/files
appliance-base# yum -y update
appliance-base# yum -y install perl wget
appliance-base# wget $wm/webmin/webmin-1.480-1.noarch.rpm/download
appliance-base# rpm -Uvh webmin-1.480-1.noarch.rpm
appliance-base# chkconfig webmin on

Finally, add the following snippet of code to the bottom of the /etc/rc.local file:

appliance-base# echo "" >> /dev/console
appliance-base# echo "Connect to WEBMIN at: http://$(ifconfig eth0 |
grep 'inet addr:' |
awk '{ print $2; }' |
cut -d: -f2):10000/" >> /dev/console
appliance-base# echo "" >> /dev/console

This will output the current IP address for eth0 to tell the user how to connect to Webmin for the first time. This, of course, assumes that the appliance is booting up on a DHCP network. Often a virtual appliance is booted initially with DHCP and then configured via the Web with a static address.


Customizing and Installing Services

At this point, we have a generic virtual appliance ready to customize. To make a MySQL server appliance, run yum install mysql-server. To make a DNS appliance, run yum install bind bind-utils. To make a LAMP appliance, run yum install httpd php mysql-server. Reboot, or click Refresh Modules inside Webmin, and you will be presented with Web management for whatever you installed. Webmin supports a very wide range of software right out of the box, and even more with extension modules available on the Webmin Web site.

For our example, let's make a simple MySQL database server appliance. To customize your base appliance, run the following commands inside the VM:

appliance-base# yum -y install mysql-server
appliance-base# /etc/init.d/mysqld start
Initializing MySQL database:  Installing MySQL system tables...
OK
appliance-base# mysql_secure_installation

NOTE: RUNNING ALL PARTS OF THIS SCRIPT IS RECOMMENDED FOR ALL MySQL
SERVERS IN PRODUCTION USE!  PLEASE READ EACH STEP CAREFULLY!

Enter current password for root (enter for none):
OK, successfully used password, moving on...

Setting the root password ensures that nobody can log into the MySQL
root user without the proper authorization.

Set root password? [Y/n] Y
New password: password
Remove anonymous users? [Y/n] Y
Disallow root login remotely? [Y/n] n
Remove test database and access to it? [Y/n] Y
Reload privilege tables now? [Y/n] Y

All done! If you've completed all of the above steps, your MySQL
installation should now be secure.

Thanks for using MySQL!


Packaging and Deploying the Appliance

Next, let's package up the appliance and then go through the motions of deploying it as mysql.example.com. To package up the appliance, simply tar up the disk image and configuration:

xenhost$ cd /xen/appliance-base
xenhost$ tar -cvzf appliance-base.img appliance-base.cfg
xenhost$ mkdir /xen/mysql.example.com
xenhost$ cd /xen/mysql.example.com
xenhost$ tar -xvzf /xen/appliance-base.tar.gz
xenhost$ mv appliance-base.cfg /etc/xen/auto/mysql.example.com.cfg
xenhost$ vim /etc/xen/auto/mysql.example.com.cfg

Edit the Xen configuration file /etc/xen/auto/mysql.example.com.cfg as shown in Listing 4. Set the name, the path to the disk image, and give this guest a unique MAC address. Placing the configuration under /etc/xen/auto means the appliance will be started automatically when the Xen host boots.

Listing 4. /etc/xen/auto/mysql.example.com.cfg

name   = "mysql.example.com"
memory = "256"
disk   = ['tap:aio:/xen/mysql.example.com/appliance-base.img,xvda,w',]
vif    = ['bridge=xenbr0,mac=00:16:3e:00:00:02',]
vcpus  = 1

bootloader = "/usr/bin/pygrub"
on_reboot  = 'restart'
on_crash   = 'restart'

Start the new appliance using the following command:

xenhost$ xm create /etc/xen/auto/mysql.example.com.cfg
xenhost$ vm console mysql.example.com

Examine the console output as the guest boots; the last bit of output will have the DHCP-assigned IP, thanks to your rc.local additions. Point a Web browser at the URL shown; by default, Webmin listens on TCP port 10000. Once logged in as root, you will be able to manage your MySQL appliance. Webmin will allow you to set a static IP, maintain YUM updates, create additional users, configure firewall rules, create and maintain MySQL databases and tables, and configure automated system and MySQL backups.

Conclusion

Using these simple steps and readily available components, you can create a thin virtual appliance to do almost anything. Because its a virtual machine, you can move it between physical computers and deploy it multiple times with ease.

As I stated in the introduction, all of these steps could have been done with VMware virtualization products. VMware is certainly the most widely deployed technology and has its own tools for creating virtual appliances, including an on-line “Appliance Marketplace” for sharing prebuilt appliances. No matter whether you use VMware or Xen, virtual appliances are a simple way to deploy preconfigured services with minimal hassle. If you are a software author, it allows you to hand your customers a “known working configuration” every time.

Resources
CentOS Linux: www.centos.org
Webmin: www.webmin.com
VMware Virtual Appliance Marketplace: www.vmware.com/appliances

Matthew Hoskins is a UNIX/Storage and Virtualization Administrator for The New Jersey Institute of Technology where he maintains many of the corporate administrative systems. He enjoys trying to get wildly different systems and software working together, usually with a thin layer of Perl (locally known as “MattGlue”). When not hacking systems, he often can be found hacking in the kitchen. Matt can be reached at matthoskins@gmail.com.
Taken From: http://www.linuxjournal.com/article/10564

Port-Knocking Security (conditional port opening)

Implement Port-Knocking Security with knockd

When dealing with computer security, you should assume that hackers will be trying to get in through any available doors your system may have, no matter how many precautions you might have taken. The method of allowing entrance depending on a password is a classic one and is widely used. In order to “open a door” (meaning, connect to a port on your computer), you first have to specify the correct password. This can work (provided the password is tough enough to crack, and you don't fall prey to many hacking attacks that might reveal your password), but it still presents a problem. The mere fact of knowing a door exists is enough to tempt would-be intruders.
So, an open port can be thought of as a door with (possibly) a lock, where the password works as the key. If you are running some kind of public service (for example, a Web server), it's pretty obvious that you can't go overboard with protection; otherwise, no one will be able to use your service. However, if you want to allow access only to a few people, you can hide the fact that there actually is a door to the system from the rest of the world. You can “knock intruders away”, by not only putting a lock on the door, but also by hiding the lock itself! Port knocking is a simple method for protecting your ports, keeping them closed and invisible to the world until users provide a secret knock, which will then (and only then) open the port so they can enter the password and gain entrance.
Port knocking is appropriate for users who require access to servers that are not publicly available. The server can keep all its ports closed, but open them on demand as soon as users have authenticated themselves by providing a specific knock sequence (a sort of password). After the port is opened, usual security mechanisms (passwords, certificates and so on) apply. This is an extra advantage; the protected services won't require any modification, because the extra security is provided at the firewall level. Finally, port knocking is easy to implement and quite modest as far as resources, so it won't cause any overloads on the server.
In this article, I explain how to implement port knocking in order to add yet another layer to your system security.
Are You Safe?
Would-be hackers cannot attack your system unless they know which port to try. Plenty of port-scanning tools are available. A simple way to check your machine's security level is by running an on-line test, such as GRC's ShieldsUp (Figure 1). The test results in Figure 1 show that attackers wouldn't even know a machine is available to attack, because all the port queries were ignored and went unanswered.

clip_image001[7]

Figure 1. A completely locked-up site, in “stealth” mode, doesn't give any information to attackers, who couldn't even learn that the site actually exists.
Another common tool is nmap, which is a veritable Swiss Army knife of scanning and inspection options. A simple nmap -v your.site.url command will try to find any open ports. Note that by default, nmap checks only the 1–1000 range, which comprises all the “usual” ports, but you could do a more thorough test by adding a -p1-65535 parameter. Listing 1 shows how you can rest assured that your site is closed to the world. So, now that you know you are safe, how do you go about opening a port, but keep it obscured from view?
Listing 1. The standard nmap port-scanning tool provides another confirmation that your site and all ports are completely closed to the world.


$ nmap -v -A your.site.url
Starting Nmap 4.75 ( http://nmap.org ) at 2009-10-03 12:59 UYT
Initiating Ping Scan at 12:59
Scanning 190.64.105.104 [1 port]
Completed Ping Scan at 12:59, 0.00s elapsed (1 total hosts)
Initiating Parallel DNS resolution of 1 host. at 12:59
Completed Parallel DNS resolution of 1 host. at 12:59, 0.01s elapsed
Initiating Connect Scan at 12:59
Scanning r190-64-105-104.dialup.adsl.anteldata.net.uy (190.64.105.104)
[1000 ports]
Completed Connect Scan at 12:59, 2.76s elapsed (1000 total ports)
Initiating Service scan at 12:59
SCRIPT ENGINE: Initiating script scanning.
Host r190-64-105-104.dialup.adsl.anteldata.net.uy (190.64.105.104)
appears to be up ... good.
All 1000 scanned ports on r190-64-105-104.dialup.adsl.anteldata.net.uy
(190.64.105.104) are closed


Read data files from: /usr/share/nmap
Service detection performed. Please report any incorrect results
at http://nmap.org/submit/ .
Nmap done: 1 IP address (1 host up) scanned in 2.94 seconds

Secret Handshakes, Taps and Knocks

The idea behind port knocking is to close all ports and monitor attempts to connect to them. Whenever a very specific sequence of attempts (a knock sequence) is recognized, and only in that case, the system can be configured to perform some specific action, like opening a given port, so the outsider can get in. The knock sequence can be as complex as you like—for example, a simple list (like trying TCP port 7005, then TCP port 7006 and finally, TCP port 7007) to a collection of use-only-once sequences, which once used, will not be allowed again. This is the equivalent of “one-time pads”, a cryptography method that, when used correctly, provides perfect secrecy.

Before setting this up, let me explain why it's a good safety measure. There are 65,535 possible ports, but after discarding the already-used ones (see the list of assigned ports in Resources), suppose you are left with “only” 50,000 available ports. If attackers have to guess a sequence of five different ports, there are roughly 312,000,000,000,000,000,000,000 possible combinations they should try. Obviously, brute-force methods won't help! Of course, you shouldn't assume that blind luck is the only possible attack, and that's why port knocking ought not be the only security measure you use, but just another extra layer for attackers to go through (Figure 2).

clip_image002[6]

Figure 2. Would-be attackers (top) are simply rejected by the firewall, but when a legit user (middle) provides the correct sequence of “knocks”, the firewall (bottom) allows access to a specific port, so the user can work with the server.

On the machine you are protecting, install the knockd dæmon, which will be in charge of monitoring the knock attempts. This package is available for all distributions. For example, in Ubuntu, run sudo apt-get install knockd, and in OpenSUSE, run sudo zypper install knockd or use YaST. Now you need to specify your knocking rules by editing the /etc/knockd.conf file and start the dæmon running. An example configuration is shown in Listing 2. Note: the given iptables commands are appropriate for an OpenSUSE distribution running the standard firewall, with eth0 in the external zone; with other distributions and setups, you will need to determine what command to use.

Listing 2. A simple /etc/knockd.conf file, which requires successive knocks on ports 7005, 7007 and 7006 in order to enable secure shell (SSH) access.


[opencloseSSH]
  sequence      = 7005,7006,7007
  seq_timeout   = 15
  tcpflags      = syn
  start_command = /usr/sbin/iptables -s %IP% -I input_ext 1 -p tcp --dport ssh -j ACCEPT
  cmd_timeout   = 30
  stop_command  = /usr/sbin/iptables -s %IP% -D input_ext -p tcp --dport ssh -j ACCEPT


You probably can surmise that this looks for a sequence of three knocks—7005, 7006 and 7007 (not very safe, but just an example)—and then opens or closes the SSH port. This example allows a maximum timeout for entering the knock sequence (15 seconds) and a login window (30 seconds) during which the port will be opened. Now, let's test it out.


First, you can see that without running knockd, an attempt to log in from the remote machine just fails:

$ ssh your.site.url -o ConnectTimeout=10
ssh: connect to host your.site.url port 22: Connection timed out

Next, let's start the knockd server. Usually, you would run it as root via knockd -d or/etc/init.d/knockd start; however, for the moment, so you can see what happens, let's run it in debug mode with knock -D:

# knockd -D

config: new section: 'opencloseSSH'
config: opencloseSSH: sequence: 7005:tcp,7006:tcp,7007:tcp
config: opencloseSSH: seq_timeout: 15
config: tcp flag: SYN
config: opencloseSSH: start_command:
          /usr/sbin/iptables -s %IP% -I input_ext 1
                             -p tcp --dport ssh -j ACCEPT
config: opencloseSSH: cmd_timeout: 30
config: opencloseSSH: stop_command:
          /usr/sbin/iptables -s %IP% -D input_ext
                             -p tcp --dport ssh -j ACCEPT


ethernet interface detected
Local IP: 192.168.1.10


Now, let's go back to the remote machine. You can see that an ssh attempt still fails, but after three knock commands, you can get in:

$ ssh your.site.url -o ConnectTimeout=10
ssh: connect to host your.site.url port 22: Connection timed out

$ knock your.site.url 7005

$ knock your.site.url 7006
$ knock your.site.url 7007
$ ssh your.site.url -o ConnectTimeout=10

Password:
Last login: Sat Oct  3 14:58:45 2009 from 192.168.1.100

Looking at the console on the server, you can see the knocks coming in:


2009-09-03 15:29:47:
     tcp: 190.64.105.104:33036 -> 192.168.1.10:7005 74 bytes
2009-09-03 15:29:50:
     tcp: 190.64.105.104:53783 -> 192.168.1.10:7006 74 bytes
2009-09-03 15:29:51:
     tcp: 190.64.105.104:40300 -> 192.168.1.10:7007 74 bytes


If the remote sequence of knocks had been wrong, there would have been no visible results and the SSH port would have remained closed, with no one the wiser.

Configuring and Running knockd

The config file /etc/knockd.conf is divided into sections, one for each specific knock sequence, with a special general section, options, for global parameters. Let's go through the general options first:

· You can log events either to a specific file by using LogFile=/path/to/log/file, or to the standard Linux log files by using UseSyslog. Note: it's sometimes suggested that you avoid such logging, because it enables an extra possible goal for attackers—should they get their hands on the log, they would have the port-knocking sequences.


· When knockd runs as a dæmon, you may want to check whether it's still running. The PidFile=/path/to/PID/file option specifies a file into which knockd's PID (process ID) will be stored. An interesting point: should knockd crash, your system will be safer than ever—all ports will be closed (so safer) but totally unaccessible. You might consider implementing a cron task that would check for the knockd PID periodically and restart the dæmon if needed.

· By default, eth0 will be the observed network interface. You can change this with something like Interface=eth1. You must not include the complete path to the device, just its name.

Every sequence you want to recognize needs a name; the example (Listing 2) used just one, named openclosessh. Options and their parameters can be written in upper-, lower- or mixed case:

· Sequence is used to specify the desired series of knocks—for example,7005,7007:udp,7003. Knocks are usually TCP, but you can opt for UDP.

· One_Time_Sequences=/path/to/file allows you to specify a file containing “use once” sequences. After each sequence is used, it will be erased. You just need a text file with a sequence (in the format above) in each line.

· Seq_Timeout=seconds.to.wait.for.the.knock is the maximum time for completing a sequence. If you take too long to knock, you won't be able to get in.


· Start_Command=some.command specifies what command (either a single line or a full script) must be executed after recognizing a knock sequence. If you include the %IP% parameter, it will be replaced at runtime by the knocker's IP. This allows you, for example, to open the firewall port but only for the knocker and not for anybody else. This example uses an iptables command to open the port (see Resources for more on this).


· Cmd_Timeout=seconds.to.wait.after.the.knock lets you execute a second command a certain time after the start command is run. You can use this to close the port; if the knocker didn't log in quickly enough, the port will be closed.

· Stop_Command=some.other.command is the command that will be executed after the second timeout.

· TCPFlags=list.of.flags lets you examine incoming TCP packets and discard those that don't match the flags (FIN, SYN, RST, PSH, ACK or URG; see Resources for more on this). Over an SSH connection, you should useTCPFlags=SYN, so other traffic won't interfere with the knock sequence.

For the purposes of this example (remotely opening and closing port 22), you didn't need more than a single sequence, shown in Listing 2. However, nothing requires having a single sequence, and for that matter, commands do not have to open ports either! Whenever a knock sequence is recognized, the given command will be executed. In the example, it opened a firewall port, but it could be used for any other functions you might think of—triggering a backup, running a certain process, sending e-mail and so on.


The knockd command accepts the following command-line options:

· -c lets you specify a different configuration file, instead of the usual /etc/knockd.conf.
· -d makes knockd run as a dæmon in the background; this is the standard way of functioning.
· -h provides syntax help.
· -i lets you change which interface to listen on; by default, it uses whatever you specify in the configuration file or eth0 if none is specified.
· -l allows looking up DNS names for log entries, but this is considered bad practice, because it forces your machine to lose stealthiness and do DNS traffic, which could be monitored.
· -v produces more verbose status messages.
· -D outputs debugging messages.
· -V shows the current version number.


In order to send the required knocks, you could use any program, but the knock command that comes with the knockd package is the usual choice. An example of its usage is shown above (knock your.site.url 7005) for a TCP knock on port 7005. For a UDP knock, either add the -u parameter, or do knock your.site.url 7005:udp. The -h parameter provides the (simple) syntax description.

If You Are behind a Router
If you aren't directly connected to the Internet, but go through a router instead, you need to make some configuration changes. How you make these changes depends on your specific router and the firewall software you use, but in general terms you should do the following:

1) Forward the knock ports to your machine, so knockd will be able to recognize them.

2) Forward port 22 to your machine. Although in fact, you could forward any other port (say, 22960) to port 22 on your machine, and remote users would have to ssh -p 22960 your.site.url in order to connect to your machine. This could be seen as “security through obscurity”—a defense against script kiddies, at least.

3) Configure your machine's firewall to reject connections to port 22 and to the knock ports:

$ /usr/sbin/iptables -I INPUT 1 -p tcp --dport ssh -j REJECT
$ /usr/sbin/iptables -I INPUT 1 -p tcp --sport 7005:7007 -j REJECT


The command to allow SSH connections would then be:


$ /usr/sbin/iptables -I INPUT 1 -p tcp --dport ssh -j ACCEPT

And, the command for closing it again would be:

$ /usr/sbin/iptables -D INPUT -p tcp --dport ssh -j ACCEPT

Conclusion

Port knocking can't be the only security weapon in your arsenal, but it helps add an extra barrier to your machine and makes it harder for hackers to get a toehold into your system.

Resources

The knockd page is at www.zeroflux.org/projects/knock, and you can find the knockd man page documentation at linux.die.net/man/1/knockd, or simply do man knockd at a console.

For more on port knocking, check www.portknocking.org/view, and in particular, seewww.portknocking.org/view/implementations for several more implementations. Also, you might check the critique at www.linux.com/archive/articles/37888 and the answer at www.portknocking.org/view/about/critique for a point/counterpoint argument on port knocking.

Read en.wikipedia.org/wiki/Transmission_Control_Protocol for TCP flags, especially SYN. At www.faqs.org/docs/iptables/tcpconnections.html, you can find a good diagram showing how flags are used.

Port numbers are assigned by IANA (Internet Assigned Numbers Authority); seewww.iana.org/assignments/port-numbers for a list.

To test your site, get nmap at nmap.org, and also go to GRC's (Gibson's Research Corporation) site at https://www.grc.com, and try the ShieldsUp test.

Check www.netfilter.org if you need to refresh your iptables skills.

Federico Kereki is an Uruguayan Systems Engineer, with more than 20 years' experience teaching at universities, doing development and consulting work, and writing articles and course material. He has been using Linux for many years now, having installed it at several different companies. He is particularly interested in the better security and performance of Linux boxes.

Taken From: http://www.linuxjournal.com/article/10600

Tuesday, August 3, 2010

Windows XP VPN (PPTP)

Windows XP VPN (PPTP)

Setting up the VPN server

To setup the server end of the VPN connection, we need to create a new connection, and then check the firewall/router settings.
Firstly bring up the control panel by clicking on Start -> Control Panel. If the control panel is in Classic View as shown below, then click in Category View to see the simplified panel.
clip_image002
From the Category View click on Network and Internet Connections
clip_image004
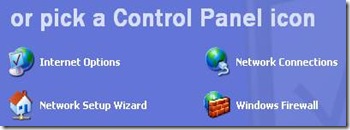
Now click on Network Connections from the or pick a control panel icon section
clip_image006
Select the Create a new connection from the menu on the left of the screen
clip_image008
You should now see the New Connection Wizard click next to start.
clip_image010
Select Set up an advanced connection and click next to continue.
clip_image012
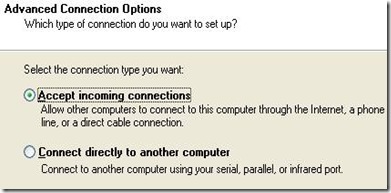
Select Accept incoming connections and click next to continue.
clip_image014
Leave the boxes unticked on this next screen and just click next to continue.
clip_image016
Select Allow virtual private connections and click next to continue.
clip_image018
You now need to pick which users are going to be allowed to vpn in. If you created a user earlier, then ensure that just that user is ticked, else pick which user you want to use - remember they need a secure password. Then click next to continue.
clip_image020
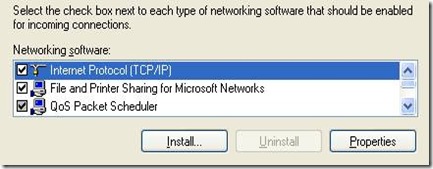
You can just click next to continue on this Networking Software screen, as you should already have everything you need installed, as you must already have either a modem or network card in the pc.
clip_image022
In the Incoming TCP/IP Properties dialog box (see below), place a check mark in the Allow Callers To Access My Local Area Network check box. This will allow VPN callers to connect to other computers on the LAN. If this check box isn’t selected, VPN callers will only be able to connect to resources on the Windows XP VPN server itself. Click OK to return to the Networking Software page and then click Next.
clip_image023
Granting LAN access to callers
Congratulations, you've now completed the second step in creating a VPN connection. Click Finish to close the wizard.
clip_image025
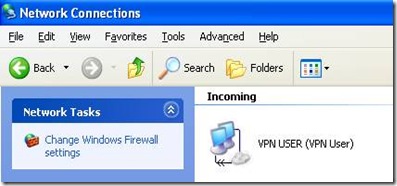
You should now see your new incoming connection in the Network ConnectionsWindow.
clip_image027
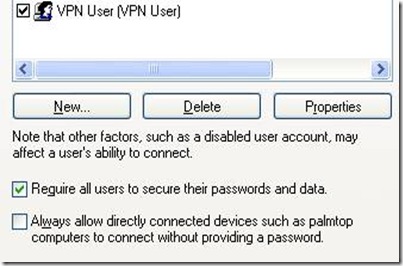
The last step is to ensure that all incoming connections use encryption (otherwise all this was for nothing !), so right click on the Incoming connections icon and select properties, then go to the second tab Users and tick the Require all users to secure their passwords and data checkbox, and then click the OK button to close the dialog
clip_image029

Setting up the VPN client

Now that the Server end of the VPN is set up, you need to create a vpn connection on your laptop to use whenever you are using an insecure wireless network.
Firstly bring up the control panel by clicking on Start -> Control Panel. If the control panel is in Classic View as shown below, then click in Category View to see the simplified panel.
clip_image002[1]
From the Category View click on Network and Internet Connections
clip_image004[1]
Now click on Network Connections from the or pick a control panel icon section
clip_image006[1]
Select the Create a new connection from the menu on the left of the screen
clip_image008[1]
You should now see the New Connection Wizard click next to start.
clip_image010[1]
Select Connect to the workplace at my work and click next to continue.
clip_image031
Select Virtual Private Network as the connection type and click next to continue.
clip_image033
Give the new VPN connection a name and click next to continue.
clip_image035
If you already have a dialup or VPN connection setup on your laptop you will now be asked if you want to always dial one of these existing connections before you make the VPN connection. Because we are going to be using a wireless link to get internet connectivity select Do not dial the initial connection and click next to continue. If you don't already have a dialup or VPN connection setup then this screen will not appear, and you will go straight to the next screen.
clip_image037
Now enter either the hostname your ISP has given you, or the IP address they've given you and click next to continue. If you don't have a static IP address, then it may be easier to use Dynamic DNS such as from dyndns.com to give you a static hostname for your dynamic address.
clip_image039
Now click finish and your new VPN connection will be ready to use.
clip_image041

Note: If you wish to connect to this VPN server from Internet by going through the router, then you need to enable port forwarding and allowPPTP passthrough options on the router.
Note: Since PPTP VPN uses port TCP-1723, you need to do port forwarding on TCP-1723. If you have problem to do port forwarding, then take a look on this port forwarding how to article. In this example, my VPN server IP is 192.168.1.99, so I do port forwarding to this computer’s port TCP-1723 on router.
clip_image042
Here is how I enabled PPTP Passthrough on Linksys router. Just go to your router management page to locate this option.
clip_image043

Testing the VPN Setup

Now the client and server are setup, we just need to make a few final checks before testing the setup.
If you use a modem on your home pc to share your internet connection, then you should be ready to start testing, as setting up the XP VPN Server will automatically update XP's built-in firewall with the rules necessary to allow incoming VPN connections, also you must already have Internet Connection Sharing setup in order to share your internet access.
If you use a router to access the internet and share your connection between computers then you will need to poke a hole in its firewall to the VPN connection through. You will probably need to look at the manual for your router to see how this is done, but you will most likely need to setup port-forwarding on the router to forward TCP connections on port 1723 to your home computer. This should be enough for most home routers.
Instead of going to the nearest internet cafe to test your vpn connection, the easiest way is to test it from home. Use the modem in your laptop to dial your dialup ISP ( most ISPs offer a dialup service with no monthly fees ) and then dial your VPN connection to connect through to your home PC.
clip_image045
Once successfully connected, you should see the new incoming connection shown in the Network Connections control panel of your home pc
clip_image047
If it has connected ok, you should now be able to surf all your regular sites and check your email from your laptop, all through this secure connection.
Once you are happy that it is working over a dialup link, you need to go to your regular wireless internet cafe and test the connection from there. It should obviously be much faster than over a dialup, while keeping all of your web and email traffic safe from prying eyes.

For other windows versions like windows 7 it should be similiar.
Based On:
http://wireless.gumph.org/content/6/4/011-howto-xp-pptp-vpn-user.html
http://www.zdnetasia.com/configure-windows-xp-professional-to-be-a-vpn-server-39050037.htm
http://www.home-network-help.com/pptp-vpn-server.html

Linux Switch (aka Bridge)

In this post Im going to show you how to configure a bridge (switch) in Linux. Here I will present several variations tha I have tested. The base cenário is the following:


# Set the eth1 IP address on the Rigth Laptop

ifconfig eth1 10.0.0.1 netmask 255.0.0.0

# Set the eth1 IP address on the Left Laptop

ifconfig eth1 10.0.0.2 netmask 255.0.0.0


Cenário 1 – No IPs on the Server NICs and Bridge

Server Configuration

# Load the bridge kernel module
modprobe bridge

# Activate eth1 and eth2 interface
ifconfig eth1 up

ifconfig eth2 up

# Create the bridge (virtual interface)
brctl addbr br0

# Add members to th
e bridge

brctl addif br0 eth1
brctl addif br0 eth2


Cenário 2 – No IPs on the Server NICs


Server Configuration

# Load the bridge kernel module
modprobe bridge

# Activate eth1 and eth2 interface
ifconfig eth1 up

ifconfig eth2 up

# Create the bridge (virtual interface)
brctl addbr br0

# Add members to the bridge
brctl addif br0 eth1
brctl addif br0 eth2

# Set the bridge IP address:
ifconfig br0 10.0.0.3 netmask 255.0.0.0

Now both computers are on the same LAN and can ping each other and the bridge interface, but can’t ping with the server NICs. This is like a switch with management ip.


Cenário 3 – IPs on the Server NICs and Bridge


Server Configuration

# Load the bridge kernel module
modprobe bridge

# Activate eth1 and eth2 interface
ifconfig eth1 up

ifconfig eth2 up

# Create the bridge (virtual interface)
brctl addbr br0

# Add members to the bridge
brctl addif br0 eth1
brctl addif br0 eth2

# Set the bridge IP address:
ifconfig br0 10.0.0.3 netmask 255.0.0.0

# Set the bridge IP address:
ifconfig br0 10.0.0.3 netmask 255.0.0.0

# Set the eth1 and eth2 IP address:
ifconfig eth1 10.0.0.4 netmask 255.0.0.0

ifconfig eth2 10.0.0.5 netmask 255.0.0.0

Now both computers are on the same LAN and can ping each other, the bridge interface, and also ping with the server NICs. It's like no switch I have ever seen.

Based On: http://openmaniak.com/openvpn_bridging.php


Monday, January 25, 2010

Extending Net-SNMP (Postfix Example)

This article is a great example that you can make anything to be monitored via SNMP. In this case Postfix, mas this applies to just about anything

Check it out on: http://thunder.jbdesign.net/docs/postfix-zenoss.html