Thursday, December 8, 2011

Windows Server 2008 Domain Controller and DNS Server Setup

This tutorial will explain how to setup Windows Server 2008 Domain Controller and DNS
Server.

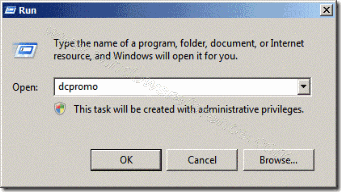
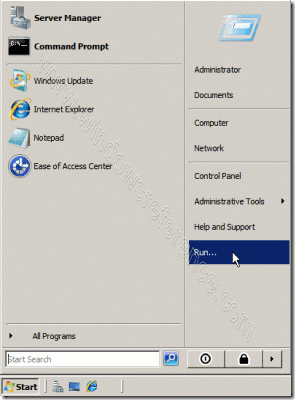
Click on Start > Run

clip_image002
Now type dcpromo > Click OK

clip_image004

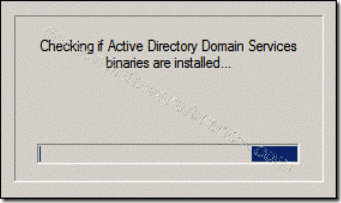
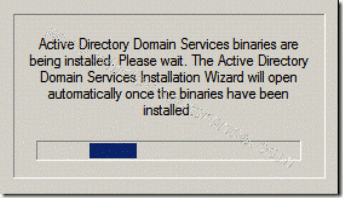
The system will start checking if Active Directory Domain Services ( AD DS) binaries are installed, then will start installing them. The binaries could be installed if you had run the dcpromo command previously and then canceled the operation after the binaries were installed.

clip_image006

clip_image008

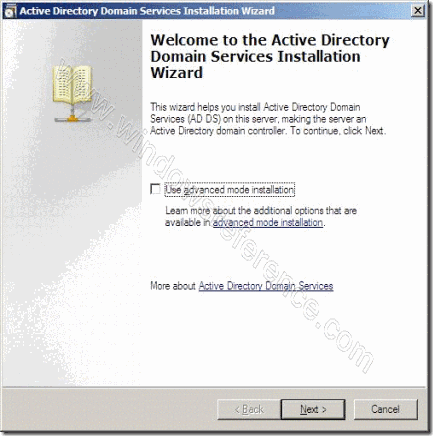
The Active Directory Domain Services Installation Wizard will start, either enable the checkbox beside Use Advanced mode installation and Click Next , or keep it unselected and click on Next

clip_image010

The Operating System Compatibility page will be displayed, take a moment to read it and click Next

clip_image012

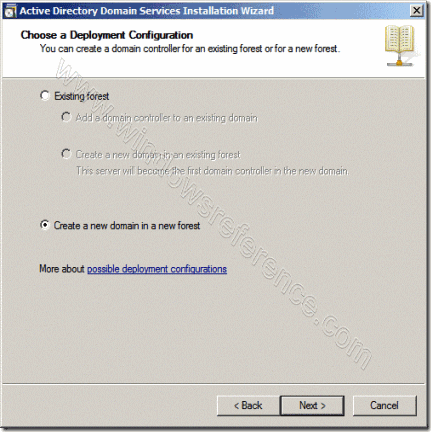
Choose Create a new domain in a new forest, Click Next

clip_image014

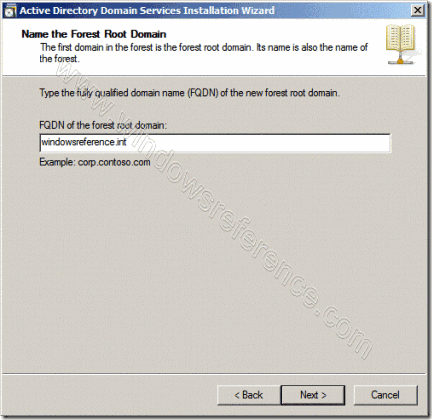
Enter the Fully Qualified Domain Name of the forest root domain inside the textbox, click Next

clip_image016

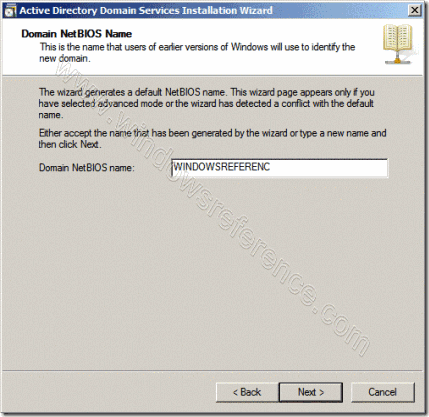
If you selected Use advanced mode installation on the Welcome page, the Domain NetBIOS Name page appears. On this page, type the NetBIOS name of the domain if necessary or accept the default name and then click Next.

clip_image018

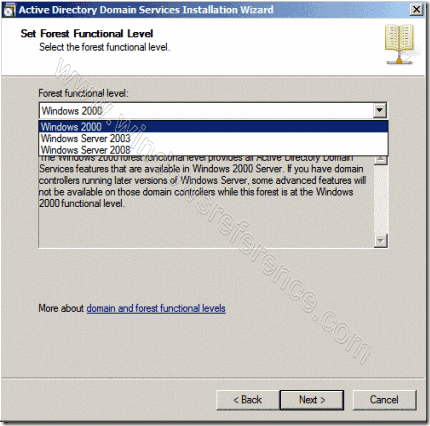
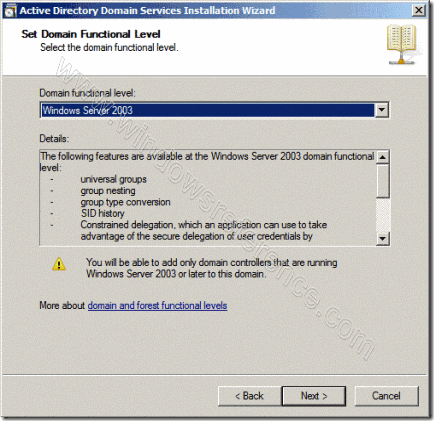
Select the Forest Functional Level, choose the level you desire and click on Next.

clip_image020

Make sure to read the description of each functional level to understand the difference between each one.

In the previous step, If you have selected any Forest Functional Level other than windows Server 2008 and clicked on Next , you would then get a page to select the domain Functional Level. Select it and then click on Next

clip_image022

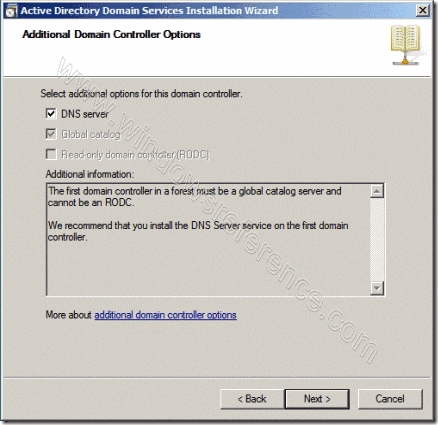
In the Additional Domain Controller Options page, you can select to install the domain Name Service to your server. Note that the First domain controller in a forest must be a Global Catalog that’s why the checkbox beside Global Catalog is selected and it cannot be cleared. The checkbox is also selected by default when you install an additional domain controller in an existing domain, however you can clear this checkbox if you do not want the additional domain controller to be a global catalog server. The first domain controller in a new forest or in a new domain can not be a Read Only Domain Controller (RODC), you can later add a RODC but you must have at least one Windows Server 2008 Domain Controller.

I want to set my DC as a DNS Server as well, so I will keep the checkbox beside DNS server selected and click on Next

clip_image024

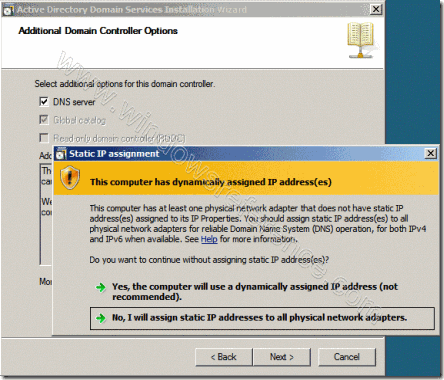
If you don’t have static ip assigned to your server you will see similar to the following screen now you need to assign static ip and start the above process.

clip_image026

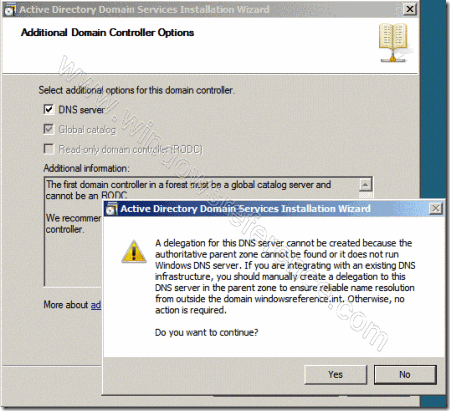
If the wizard cannot create a delegation for the DNS server, it displays a message to indicate that you can create the delegation manually. To continue, click Yes

clip_image028

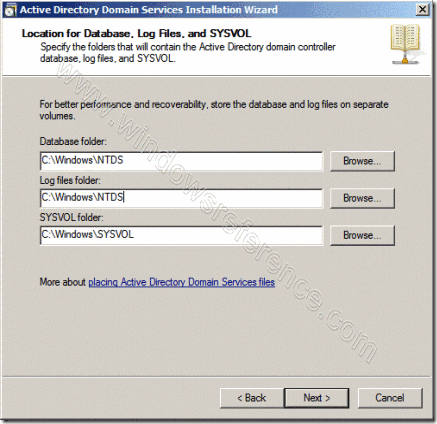
Now you will have the location where the domain controller database, log files and SYSVOL are stored on the server.

The database stores information about the users, computers and other objects on thenetwork. the log files record activities that are related to AD DS, such information about an object being updated. SYSVOL stores Group Policy objects and scripts. By default, SYSVOL is part of the operating system files in the Windows directory either type or browse to the volume and folder where you want to store each, or accept the defaults and click on Next

clip_image030

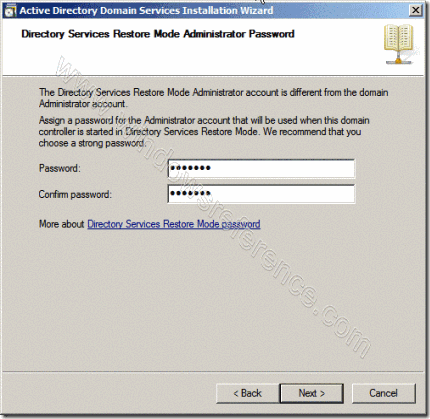
In the Directory Services Restore Mode Administrator Password (DSRM) page, write a password and confirm it. This password is used when the domain controller is started in Directory Services Restore Mode, which might be because Active Directory Domain services is not running, or for tasks that must be performed offline.Make sure that you memorize this password when you need it.

clip_image032

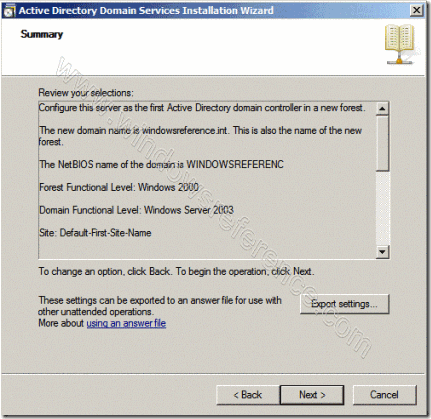
Summary page will be displayed showing you all the setting that you have set . It gives you the option to export the setting you have setup into an answer file for use with other unattended operations, if you wish to have such file, click on the Export settings button and save the file.

clip_image034

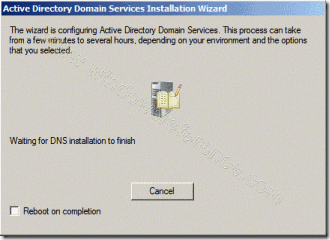
DNS Installation will start

clip_image036

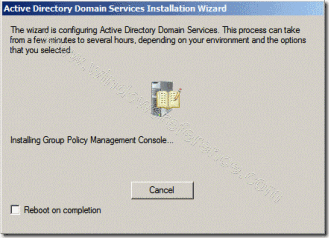
Followed by installing Group Policy Management Console, the system will check first if it is installed or not.

clip_image038

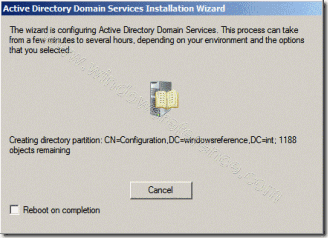
clip_image040

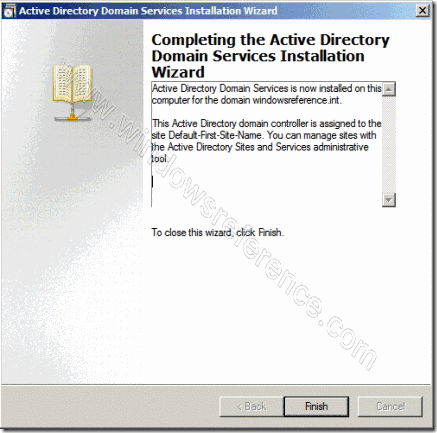
Configuring the local computer to host active directory Domain Services and other operations will take place setting up this server as a Domain Controller active Directory Domain Services installation will be completed, click Finish.

clip_image042

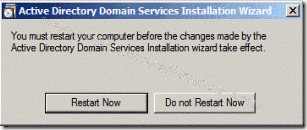
Click on Restart Now to restart your server for the changes to take effect.

clip_image044

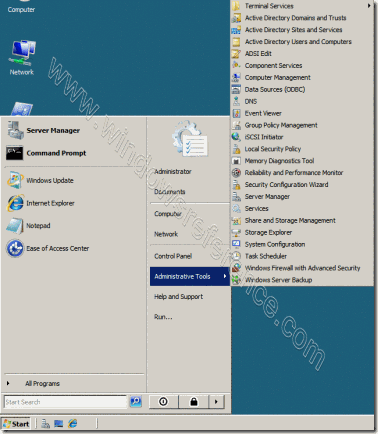
Once the server is booted and you logon to it, click on Start > Administrative Tools
you will notice that following have been installed :
Active Directory Domains and Trusts
Active Directory Sites and Services
Active Directory Users and Computers
ADSI Edit
DNS
Group Policy Management

clip_image046

That’s it now your new win server 2008 domain controller with dns server setup was completed.

Taken From: http://www.windowsreference.com/windows-server-2008/step-by-step-guide-for-windows-server-2008-domain-controller-and-dns-server-setup/

Wednesday, November 23, 2011

Turning Your PC into a DD-WRT Wired Router - From Windows

Normally, when we cover DD-WRT and other firmware replacements for wireless routers, we discuss flashing (or uploading) the firmware to a router. However, DD-WRT also has an X86 version that can be installed onto just about any generic PC.

This is great if you don’t have a compatible router lying around and don’t want to track one down with the right model and version number. Plus it lets you exceed the usual 16MB of RAM and slow CPU in the off-the-shelf consumer-level routers.

In this tutorial, we’ll build and set up a DD-WRT machine.

Features on a normal dd-wrt firmware (wifi router):
http://www.dd-wrt.com/wiki/index.php/What_is_DD-WRT%3F

Limitations of the X86 version

Keep in mind; if you want to go the free route, you’ll only have a wired router—but you can add separate access points. Wi-Fi support is only available in the registered version by purchasing a Professional Activation for € 20.00 ($28.36).

You also lose these features for any X86 version of DD-WRT:

  • USB Support. For example, you can’t connect USB drives or printers to share them on the network.
  • Journaling Flash File System (jffs). Normally this would let you store files directly on the router, such as for NoCatSplash hotspot captive portal pages and other custom configuration.
  • Itsy Package Management System (Ipkg). This would have let you add features from OpenWRT that aren’t already in DD-WRT.
Putting the DD-WRT machine together

First, make sure you have an X86 compatible PC, i386 or greater, which is just about any old PC. You need only 16MB or more of RAM. However, you do need at least two network (Ethernet) cards, one for the Internet and others for the LAN.

Don’t forget a spare hard drive. It must be dedicated to the cause as it will be reformatted and repartitioned.

Though a monitor and keyboard aren’t required, they’re useful if you run into problems, so you can access the console.

Getting ready for the installation

We’re going to use a Windows-based program to upload the DD-WRT disk image to the spare hard drive. So you need to take the drive out of the DD-WRT machine and temporarily put it into a working computer.

On your working computer, you need to download the transfer utility, physdiskwrite, and the desired X86 version of DD-WRT. At the time of this writing, the most current release is v24 Service Pack 1. If going the free route download dd-wrt_public_vga.image or dd-wrt_full_vga.image if you’re purchasing a license.

It’s easier to download the DD-WRT file to the physdiskwrite folder.

Verify the drive assignments

When you upload the disk image to the drive, the utility will be referencing the computer’s drives using the disk numbers. So you’re absolutely sure you have the right disk—and not the one you use every day—you should verify the drive assignments.

You can open the Computer Management program to view the Disk Management utility in Windows:

In Vista, click Control Panel > System and Maintenance > Administrative Tools > Computer Management.

In XP, Control Panel > Performance and Maintenance > Administrative Tools > Computer Management.

The disk numbers (Disk0, Disk1, Disk2, etc.) are shown on the graph of drives and partitions.

Transferring the image using physdiskwrite

When you’re ready, here’s how to install DD-WRT X86 onto your hard drive from your working computer:

1.    Bring up a Command Prompt. If using Vista, click the Start button, type cmd into the search box, right-click the cmd icon, and select Run as administrator. In XP, simply click Start > Run, type cmd and hit Enter.

2.    Navigate to the directory where you have the physdiskwrite utility and disk image. It might be easier to browse to the location in Windows and copy the location from the address bar. Then in the Command Prompt you’d type cd, paste in the path, and hit Enter.

3.    Type physdiskwrite -u dd-wrt_public_vga.image and hit Enter. Adjust the image file name if you’re using a different one.

4.    Type the disk number of the spare drive. WARNING: Remember, this completely erases everything from the drive and you’ll lose any files on it.

5.    After it completes, shut down and unplug the computer to remove the drive and put it back in the DD-WRT machine.

Getting started with DD-WRT X86

After DD-WRT boots up, the router should start working. You should hook the WAN/Internet cable up to the ether0 interface, which is usually the built-in or on-board Ethernet port, if any. The remaining interfaces are for the LAN/network. You can connect them to computers or to a switch.

You can figure out which interface is which by referencing the console screen after hooking up a cable to the interfaces. It tells you the status, which includes the interface number.

The default IP address is of the router is 192.168.1.1. The DHCP server is enabled, just like with the firmware versions, so users will automatically receive an IP. To access the Web GUI, type the IP of the router into a browser. To access the console on the machine, hit Enter. The default username is root and the password is admin.

Read our other DD-WRT tutorials

Now that you have a DD-WRT router up and running—hopefully—take a look at all the tutorials we have on the subject. Maybe extend your range with WDS, build a wireless bridge, use multiple SSIDs, and much more.

Eric Geier is the author of many networking and computing books, including Home Networking All-in-One Desk Reference For Dummies (Wiley 2008) and 100 Things You Need to Know about Microsoft® Windows Vista (Que 2007).

Taken From: http://www.wi-fiplanet.com/tutorials/article.php/3835526

Tuesday, November 22, 2011

TDR test in Cisco Devices - Cable Testing

I love finding stuff like this. In the course of my daily Internet browsing, today I came across this post from a while back on the CCNP Recertification blog. It turns out a number of Cisco switches (apparently the 3560/3750, and some 4500 and 6500 modules) have a TDR (Time Domain Reflectometer) embedded in each interface. How cool is that?

Cisco's documentation shows the simple but very handy two-part command syntax.

   Switch# test cable-diagnostics tdr interface g0/1

TDR test started on interface Gi0/1

A TDR test can take a few seconds to run on an interface

Use 'show cable-diagnostics tdr' to read the TDR results.
   Switch# show cable-diagnostics tdr int g0/1


TDR test last run on: March 01 00:09:06

Interface Speed Local pair Pair length Remote pair Pair status
--------- ----- ---------- ------------------ ----------- -----
Gi0/1 auto Pair A 20 +/- 4 meters N/A Open

Pair B 20 +/- 4 meters N/A Open

Pair C 21 +/- 4 meters N/A Open

Pair D 20 +/- 4 meters N/A Open
This output shows a cable approximately 20 meters in length connected to interface G0/1, with nothing attached to the far end. If you're like me, your first thought is "very cool, but is it accurate?" I grabbed a couple spare cables of various lengths and set about an unscientific benchmark. I measured each cable in three manners: by hand, with my Fluke TDR, and with a Catalyst 3560G-24PS-S. My observed results are below.

Cable Length Fluke 3560 ----------------------------------------------

A 69 ft 69 ft 20 +/- 4m (~66 ft)

B 21 ft 21 ft 6 +/- 4m (~20 ft)

C 83 ft 83 ft 25 +/- 4m (~82 ft)

As you can see, the 3560 is impressively accurate, even without its allowed 4m variance. My next consideration was whether a TDR test would disrupt interface operation. Trying it on a live port while running a constant ping yielded no observable effect, not even a brief disconnection pop-up. This is clearly a very handy tool. I only wish Cisco would do more to publicize cool features like this.
Taken From: http://packetlife.net/blog/2008/mar/28/investigating-ciscos-built-in-tdr/

Sunday, October 23, 2011

Windows 7 Streaming to TVs and Others via DLNA

Media Streaming with Windows 7

clip_image001Steven Sinofsky

12 May 2009 3:00 AM

We’ve blogged about a number of features related to home networking and media in Windows 7.  A scenario which brings all these together in a pretty cool way is Media Streaming.  This scenario allows you to use a Windows 7 PC as a hub for media sharing—where you can share media with other PCs and devices on your home network via streaming, and even stream this information securely over the internet.  Scott Manchester on the Devices & Media program management team coordinated this post, but as you will see it represents work across the Core User Experience, Media Center, Networking, and even Windows Live chose to take advantage of the new APIs in this scenario.  This is a pretty detailed post and there’s a lot to try out.  Those of you using the RC to test things out, you can always install on another PC and use it for the 30-day period without requiring a new PID key.  Have fun!  --Steven

Windows 7 includes a number of exciting new media streaming features that enable you to enjoy your media collection on other PCs and devices in the home and while on the road from across the internet. We’ve created a networked media experience that is more friendly to use and simpler to set up. Now enjoying music, pictures, and video on your network connected PC or media device “just works” without concern for media formats, transports, or protocols.

There are a growing number of Network Media Devices (NMDs) certified to interoperate using an open and widely embraced industry standard called the Digital Living Network Alliance (DLNA). Windows 7 implements this open standard, which means that sharing media between NMDs, Windows PCs, Windows Home Server, and Extenders for Windows Media Center (including Xbox 360) is easier and more natural. Supporting this standard also means that the myriad of NMDs such as electronic picture frames, network radios, televisions, and others are companions to Windows 7 PCs and may seamlessly participate in the whole-home media experience.

Not Just for the Techie

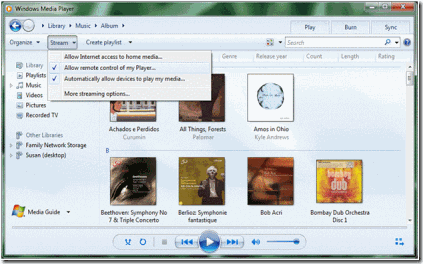
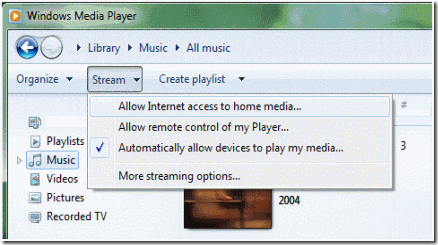
We made it much simpler to configure media streaming. Before Windows 7, media streaming features were focused on media enthusiasts. To improve the setup experience, media streaming has been integrated with the new HomeGroup feature so in a typical home network configuration, media streaming is enabled and works by default. There is also a new “Stream” menu prominently displayed in the Window Media Player user interface (see figure below) that exposes simple scenario-based configuration options. These options allow you to:

1. Set up your home PC so you can access your media libraries while away from home

2. Allow other Windows 7 PCs and devices to push media to your Player and control it

3. Quickly authorize all home PCs and devices to access your media collection

Each of these scenarios will be discussed throughout this post.
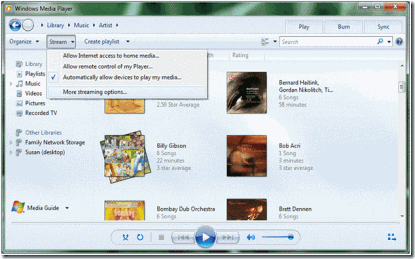
clip_image003

HomeGroup introduces the concept of “shared libraries” for music, pictures, and video. As described in a previous blog post, these shared libraries are accessible from within the navigation pane of Windows Explorer and Windows Media Player, and from the “shared” view of each media category within Windows Media Center (see figures below). The scope of these libraries is the same from each of these views.
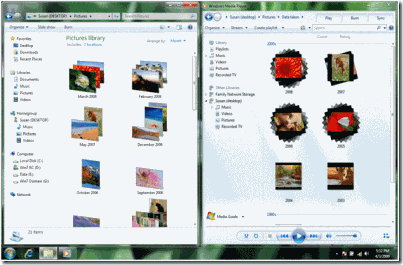
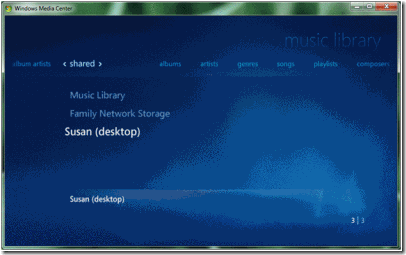
clip_image005

clip_image007

Windows Explorer will automatically discover and provide access to shared media libraries on other HomeGroup PCs. In addition, Windows Media Player and Windows Media Center will automatically discover shared libraries from:

1. Windows Media Player 11 and 12

2. Windows Home Server

3. All DLNA compliant media servers (e.g. network attached storage)

Who Can Access My Shared Media Libraries?

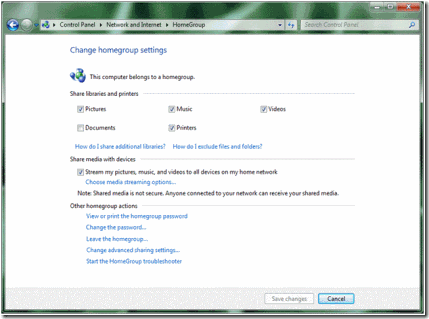
A HomeGroup is a secured set of Windows 7 PCs that can view and consume each other’s media seamlessly. Sharing is automatically set up among HomeGroup PCs and HomeGroup settings allow you to choose what types of media you would like to share; for example, you may choose to only share your music library and not your video or pictures.
clip_image009

In addition to all HomeGroup PCs being able to access your media, we made it easy to allow devices to access shared media libraries on Windows 7 PCs. This can be done conveniently from either HomeGroup settings or within Windows Media Player:
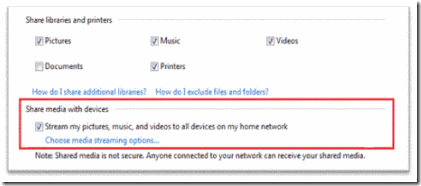
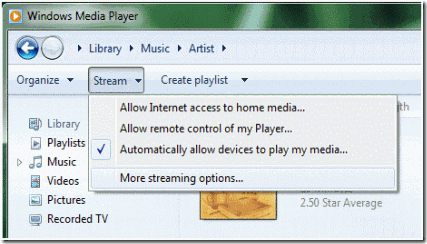
clip_image011

clip_image013

You can also choose to restrict which specific PCs or devices have access to your media by choosing “more streaming options…” from the Windows Media Player “Stream” menu.
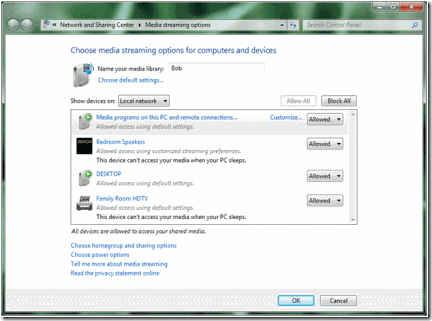
clip_image015

Play To: Windows 7 as a Universal Remote Control for your Media Collection

In addition to playing media streamed from other shared media libraries within Windows Media Player, Windows 7 can now send media to be played on other Windows 7 PCs and DLNA-certified digital media renderers. We call this feature “Play To.” With “Play To,” you can browse or search from within Windows Media Player or Windows Explorer to find your desired media, and then choose where you want it to be played. A versatile remote control window is presented for each “Play To” session, providing you with the ability to control the entire experience.
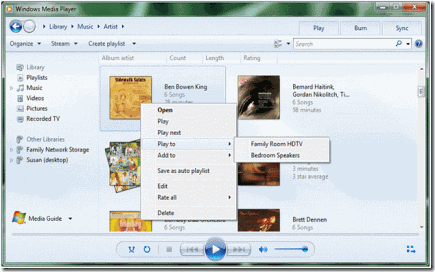
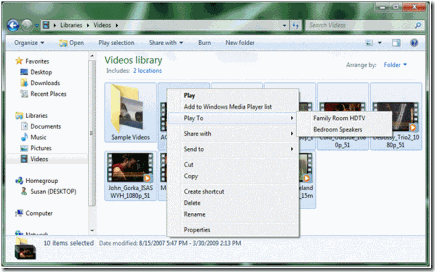
clip_image017

clip_image019

It does not matter where media collections are stored. “Play To” is available for both local media libraries and for shared media libraries. If you would like to send media from one Windows 7 PC to another, choose “Allow remote control of my Player” from the Windows Media Player “Stream” menu on the receiving PC. This will cause Windows Media Player to be discovered in the “Play To” menu of other Windows 7 PCs on the same network.
clip_image021

When media streaming is enabled on your Windows 7 PC, “Play To” will be available in Windows Media Player and Windows Explorer via the right click menu for media items. If Windows 7 has not discovered a “Play To” capable PC or device on the network, this context menu will not be available. DLNA provides guidelines to certify different device categories and roles. Not every DLNA-certified device supports the “Play To” feature. Look for DLNA-certified Digital Media Renderers (DMR), and for the best performance, look for DMR devices that carry the “Compatible with Windows 7” logo.
clip_image023

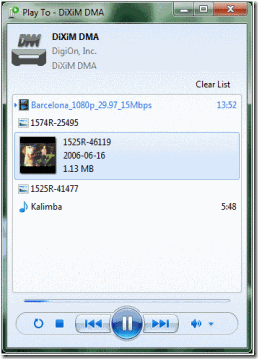
Once you’ve selected media items to play on another PC or device, a “Play To” remote control window will launch providing standard controls like play, pause, stop, skip forward and backward, seek forward and backward, volume, and mute. Not every device will support all of the control features and some media types may not support seek. Once the “Play To” remote control window is launched, you can reorder or delete items, add to the queue, or toggle repeat. It’s even possible to add new media items from Windows Media Player or Windows Explorer by dragging them into this window.
clip_image025

There is no artificial limit to the number of “Play To” sessions you can launch. You may send pictures to a picture frame, video clips to a TV, and music to another Windows 7 laptop all at the same time. Furthermore, different types of media can be sent to a single destination, as shown in the example above.

What About the Xbox 360 and Extenders for Windows Media Center?

Xbox 360 has two ways to receive media streams from other Windows 7 PCs, which we refer to casually as “dashboard” mode and “extender” mode.

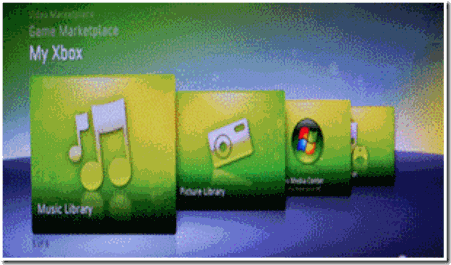
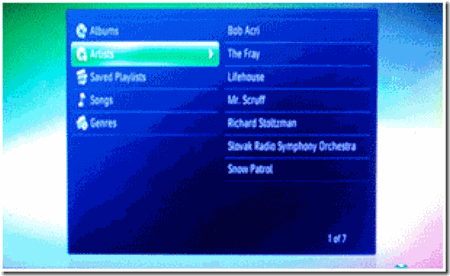
In dashboard mode, Xbox 360 functions in the role of a simple media player. While it’s not officially a DLNA-certified device, you can use Xbox 360 to browse the shared media libraries from Windows 7 PCs (there is also support for this in Windows Media Player 11) and pull content from those libraries for playback within the dashboard.
clip_image027

clip_image029

In extender mode, Xbox 360 (and other Extenders for Windows Media Center) is seen by Windows 7 PC’s on the network as both a Digital Media Player (DMP) and a Digital Media Renderer (DMR) device. Using the Extender for Windows Media Center on the Xbox 360, you can browse media libraries on other computers and pull that content for local playback, similar to the process of using Xbox 360 in dashboard mode. However, in extender mode Xbox 360 will also support “Play To” so that users of Windows 7 PC’s on the network can push content to it. All extenders, when associated with a Windows 7 PC, will be discovered in the “Play To” menu of other Windows 7 PCs.

Internet Access to Home Media

With Windows 7 we’ve also extended the media streaming experience outside the home and allow you to access your home media from anywhere in the world via the internet. We’ve made media streaming over the internet a natural extension of the experience within the home. For the experience to be seamless we needed to solve some significant technical challenges, such as:

1. Discovery – Resolving the computer name at home to a routable IP address

2. Privacy – Ensuring the home media is only accessible by authorized users

3. Security – Encrypting browsing and streaming of media to prevent eavesdropping

4. Reliability – Network connection speeds, media formats and bit rates, and router firewalls all create potential reliability issues for a seamless experience

To overcome these technical hurdles, we designed a model that uses an Online ID Provider to help facilitate discovery, privacy, and security. The new Online ID Provider infrastructure in Windows 7 allows you to link your Online ID (e.g. you@live.com) with your Windows user account. This enables an authentication/authorization server to provide the necessary privacy to establish a protected link between two Windows 7 PCs (e.g. your laptop on the road and your PC at home). Internet access to home media is enabled from the “Stream” menu in Windows Media Player.
clip_image031

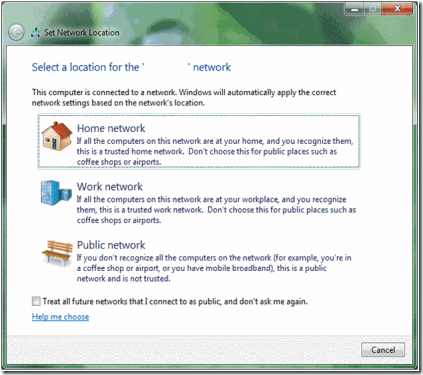
The setup process walks you through linking an online ID with your Windows user account, which must be performed on both the home PC and remote PC. The same online ID must be used on both PCs in order to establish the connection between them. In order for remote PCs to access the home media collection, the PC at home (acting as a server) must be on a “Home” network location. Remote PCs (acting as clients) can browse and receive content streamed from the home PC from any network location (Public, Work, or Home). The network location is chosen when first connecting to any network and can be changed later from the Network and Sharing Center.
clip_image033

Reliability - Network Connection Requirements

Streaming media over the internet from home works best with an “always on” broadband connection. Broadband uplink speeds vary from a modest 200Kbps to 10Mbps or more. Downlink connection speeds will also vary from crowded hotspots, hotel rooms, and wireless network connections in friends’ homes. Regardless of the uplink or downlink speeds, we wanted to ensure that even high bit rate content (e.g. high definition recorded TV) could be streamed with a good experience. The internet media streaming feature uses advanced bandwidth detection algorithms and end-to-end network heuristics to determine how to stream content that is at a higher bit rate than the smallest link in the network path.

Another challenge with internet access to home media is creating a peer-to-peer connection between the remote client PC and the home PC serving the media. A typical home network will get a single unique IP address from an internet service provider, and this IP address is shared by all the devices and PCs in the home using Network Address Translation (NAT), a function of an Internet Gateway Device (IGD) or Wireless Router. This creates a challenge for a remote PC or device to make an unsolicited connection inside the home, both in terms of resolving the home’s unique IP address and traversing the NAT to communicate directly to a unique PC or device on the home network.

Windows 7 employs some advanced NAT traversal technologies to establish the peer-to-peer connection and, with most IGDs, will allow a reliable connection to the home PC from any remote PC. For best results you should use a wireless router or IGD that has been certified by the Windows Logo program.

Media Formats

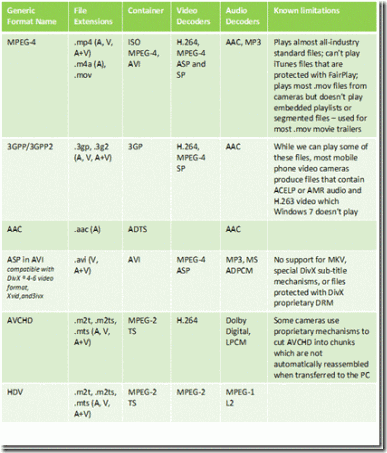
In Windows 7 we let you enjoy the media you want and don’t trouble you with the need to know about file types or codecs in most cases. (For more details, see Table 1 below). In addition to supporting local playback of new formats, we can also ensure that the content will play on devices that may not support the codec, bit rate, container, or format of that content. We accomplish this by using the new transcoding support in Windows 7.

Let’s say for instance you have a DivX movie you want to watch on your new DLNA certified television which only supports WMV and MPEG2. Windows 7 will determine the capability of the TV (codec, bit rate, etc.) and dynamically convert the DivX video to a format the TV can play. The general rule of thumb is: if Windows Media Player can play the content on the PC then the content will almost always play back on the network connected device. Bandwidth estimation techniques are used for media streaming within the home and over the internet, which enables Windows 7 to transcode using the most optimal format and bit rate.
clip_image035

Table 1: New Decoders in Windows 7

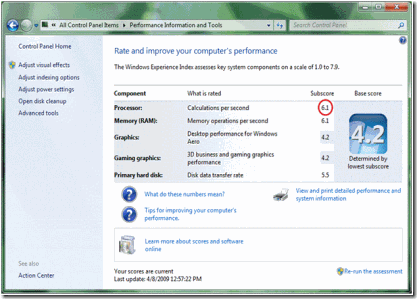
The format and bit rate chosen for transcoding, especially for video, is highly dependent on the CPU performance of the transcoding PC as identified by its Windows Experience Index:
clip_image037

We also created a flexible model for silicon partners to provide hardware accelerators that automatically work with media streaming and other Windows 7 features. This new acceleration model allows hardware developers to build media foundation proxies for media format encoders and decoders that are fully implemented in their hardware (perhaps in a GPU or additional hardware device). With hardware supported encoding and decoding, Windows 7 can offload the computationally demanding transcoding to dedicated hardware as a background task without affecting the CPU performance of the PC.

Digital Living Network Support in Windows 7

The Digital Living Network Alliance (DLNA) is a consortium of more than 200 companies interested in specifying technologies for exchanging media in home networks. The DLNA architecture is based on the UPnP specification, but in addition, DLNA specifies transport protocols (based on HTTP and RTP) and sets of media formats.

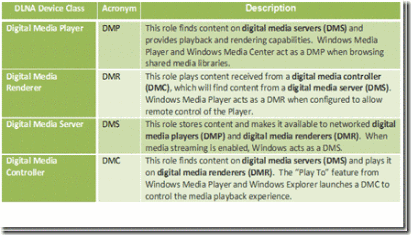
DLNA defines device roles (e.g. servers, players, renderers, etc.) and the protocols that these devices use to discover each other and communicate with each other (e.g. UPnP, HTTP, RTP, etc.). Windows 7 implements several of the DLNA device roles (see table 2 below) and it also implements the DLNA protocols required for communications and media exchange. With Windows 7, your PC will be able to interoperate with a broad variety of DLNA certified devices like TVs, stereo systems, cell phones, DVRs, game consoles, etc.
clip_image039

Table 2: DLNA Device Profiles Supported by Windows 7

Because Windows 7 implements several device roles, there are different ways in which you could choose to use a Windows 7 PC at home. The remainder of this section explains the different scenarios.

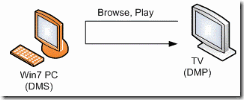
Scenario 1: You store your music, video, and pictures on a Windows 7 PC. You’ve recently acquired a TV with a DLNA logo. Using the TV, you can browse the media library available on the Windows 7 PC. You can use the TV to watch the video and pictures, and listen to music stored on the PC. Figure 1 illustrates this scenario. In this case, the Windows 7 PC behaves as a DMS. Notice that this scenario was already available in Windows Vista and in Windows XP using Windows Media Player 11.
clip_image041

Figure 1: The TV unit browses and plays content stored in a PC

Scenario 2: You have a Network Attached Storage (NAS) device where you store your music, video, and pictures. The NAS device implements a DMS. You open Windows Media Player on a Windows 7 PC. You can find the NAS device using Windows Media Player, and you can browse the media library available on the NAS device. You can watch the video or pictures, and listen to music stored on the NAS device. Figure 2 illustrates this scenario. In this case, the Windows 7 PC behaves as a DMP.

clip_image043

Figure 2: A Windows 7 PC browses and plays content stored on a NAS device

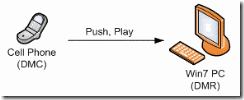
Scenario 3: You have a cell phone that not only takes pictures but can push the pictures to a Windows 7 PC. You can show the pictures to your friends using the large-screen display of the PC without the need to physically transfer the files to the PC with a USB thumb drive, for example. Figure 3 illustrates this scenario. In this case, the cell phone acts as a DMS and a DMC and the Windows 7 PC behaves as a DMR.
clip_image045

Figure 3: A cell phone pushes pictures for display on a Windows7 PC

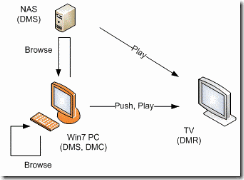
Scenario 4: You’ve acquired a stereo system with the DLNA logo. On his Windows 7 PC, you’ve accumulated a vast collection of music with thousands of songs. Because your collection is large, you prefer to search, organize, and select songs using the rich capabilities of the Windows Media Player. Once you select the songs, you simply push the songs to your stereo system using “Play To.” You also have a NAS device containing an additional collection of music and video. You can use the Windows 7 PC to browse the content on the NAS device and push it to the stereo system. Figure 4 illustrates this scenario. In this case, the Windows 7 PC behaves as a DMS and a DMC.
clip_image047

Figure 4: A Windows 7 PC browses local content or shared content on the network. The PC then pushes the content for playback in a TV unit (DMR).

There's definitely a lot to enjoy here.  Have fun!!

-- Scott, Tim and the Devices & Media team

Taken From: http://blogs.msdn.com/b/e7/archive/2009/05/12/media-streaming-with-windows-7.aspx
Sunday, March 27, 2011

Netcat Basics

I think if you were going to master only one of these two-letter commands for hacking purposes besides vi, nc is the best candidate. If you are unfamiliar with nc (or netcat), it is an incredibly versatile tool that allows you to open or listen for TCP and UDP connections. It's the original network Swiss Army knife, and it's a valuable tool to have in your arsenal whether you're a sysadmin or a hacker. In the case of both hacking and troubleshooting, it's useful because you can use it like telnet to connect to a remote server and port and start an interactive session:

$ nc mail.example.org 25

220 mail.example.net ESMTP Postfix

. . .

QUIT

Netcat as a Simple Chat Service

You also could open one nc session on a port in listen mode and start a second nc session on a remote host to connect to that port and send text back and forth like a basic chat program. On the listening host, run:

$ nc -l 31337

On the remote host, type:

$ nc hostname 31337

You also can substitute the IPs for hostnames in both examples. Once the connection is made, anything typed on one end is displayed on the other, and you can press Ctrl-D in either session to close the connection.

Netcat for File Transfers

A number of sysadmins have long used this functionality as a quick-and-dirty file-transfer protocol. Start the first nc session in listen mode, and redirect its output to a file:

$ nc -l 31337 > output_file

On the remote machine from which you want to send the file, you would type:

$ nc hostname 31337 < input_file

Once the file has finished transferring, the connection will close automatically.

Netcat as a Port Scanner

Another incredibly useful function of nc is as a port scanner when something more sophisticated isn't around. Just use the -z option to have nc test only whether a port is open instead of connecting to it, add -v for verbose output, and provide a port range as arguments. So to scan a host for open ports between 20 and 25 (good for testing for open FTP, telnet, SSH and SMTP services), you would type:

$ nc -zv host.example.org 20-25

nc: connect to host.example.org port 20 (tcp) failed:

↪Connection refused

Connection to host.example.org 21 port [tcp/ftp] succeeded!

Connection to host.example.org 22 port [tcp/ssh] succeeded!

nc: connect to host.example.org port 23 (tcp) failed:

↪Connection refused

nc: connect to host.example.org port 24 (tcp) failed:

↪Connection refused

Connection to host.example.org 25 port [tcp/smtp] succeeded!

Taken From: http://www.linuxjournal.com/article/10883

Internet Command Line Applications

If you're wondering when the command line will die, the answer is simple: when we all decide to give up and use Windows.

The Linux graphical desktop has improved vastly since its inception some 18 years ago. Gone are the days in which system configuration necessitated use of the command line. The Ubuntu generation has come to age in a world where using the command line is optional. Although many people still choose to hone their console skills, just as many do not.

The command line, however, is far from irrelevant. Whether you are trying to get the most out of an older system or wanting to access your applications from anywhere over SSH, the console still remains one of the most powerful tools in the Linux user's toolbox. From traditional system utilities to Web and multimedia applications, there are many CLI (command-line interface) versions of our desktop staples. Here's a small selection of my favorites that are still in popular use today.

Internet

A wide selection of Web applications run on the Linux shell. Dedicated downloading and torrenting applications are a natural choice for running at the command line. With the addition of a tool such as screen or dtach, long downloads can be run remotely on an always-on machine. Likewise, text-based browsers can be used for executing downloads that are too deeply buried behind redirects for curl or wget. Console browsers also are invaluable as tools for testing Web site accessibility or avoiding noxious advertising—especially on machines with limited resources.

rTorrent (libtorrent.rakshasa.no)

A popular text-based BitTorrent client, rTorrent boasts an impressive feature set. It supports partial downloading of multifile torrents and session saving, and it can be used with screen or dtach. rTorrent also has a built-in XMLRPC interface with a number of third-party Web-based front ends available. This combined with rTorrent's ability to watch a specified directory for the appearance of torrent files—and when found, execute them—allows users to create a powerful remote torrenting tool with ease.

Wget (www.gnu.org/software/wget)

Of course, a torrenting server with a Web-based front end is over-engineering the solution just a little if you need to download only an ISO or two without interruption. Wget is a simple utility for downloading files over HTTP, HTTPS and FTP. It is included in most Linux distributions. Wget can be used to download individual files or mirror entire Web sites. It supports downloading through proxies, resuming partial downloads and various forms of authentication.

Curl (curl.haxx.se)

Another simple downloader, Curl is both a tool and a library for transferring data over a range of protocols. Curl, of course, supports HTTP, HTTPS and FTP, but it differs from Wget in also supporting LDAP, POP3 and DICT, among others. Curl also supports downloading through proxies, resuming partial downloads and various forms of authentication.

w3m (w3m.sourceforge.net)

A pager like less or more for HTML files, w3m supports rendering both local HTML files and remote URLs. It supports operating through a proxy, cookies and SSL. As it is designed to act as a file pager or viewer, w3m must be invoked either with a remote URL or a local file as an argument.

ELinks (elinks.or.cz)

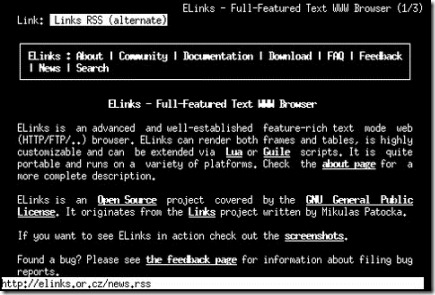
If you are looking for something with a little more functionality, ELinks is an extremely feature-rich text-mode browser. It's capable of displaying tables and frames, and as of version 0.10, ELinks can render CSS and supports up to 256 colors. ELinks makes for a powerful downloading tool. It's able to download multiple files at once and perform background file transfers while you are browsing.

clip_image001

Figure 1. ELinks, a Text-Mode Browser

Instant Messaging/Chat

Running a client in a screen session still is extremely popular among IRC users. Running IRC on a remote server accessed via SSH provides access to IRC from restricted networks and allows for messages to be left with your client for you to read on your return. Chat logs are kept in one place, instead of being spread across every computer you use. And, instant messaging can benefit from being run at the console for all of the same reasons.

Irssi (www.irssi.org)

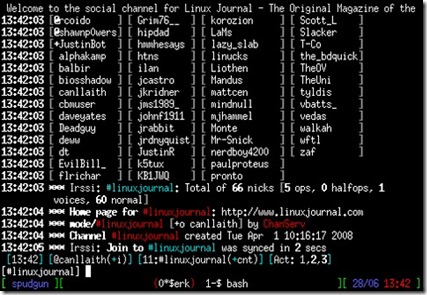
Irssi is a very popular IRC client for the console. Features include logging, custom formatting and themes, configurable key bindings and many, many others. Irssi provides a powerful Perl scripting interface, with many contributed scripts available from Irssi.org. Irssi uses a windowing interface that allows for dozens of server connections, channels and messaging windows to be open and accessible at once.

clip_image002

Figure 2. IRSSI IRC Client

Finch (pidgin.im)

If you've used Pidgin, you'll find Finch hauntingly familiar. Finch is a CLI instant-messaging program that is part of the Pidgin codebase and uses the libpurple instant-messaging libraries. Finch's user interface is modeled as closely to Pidgin as ncurses will allow. They both will save their configuration to the same directory (~/.libpurple), and if Pidgin already is configured on your machine, Finch will pick up its settings automatically. Finch supports chatting on all of the protocols included with libpurple: AIM, MSN, Yahoo! and Jabber, just to name a few.

naim (naim.n.ml.org)

Supporting AIM, ICQ, Lily and IRC, naim is an elegantly designed alternative to Finch if you don't need all of libpurple's protocols. naim uses a very simple command-driven interface. All text entered with a preceding / is considered a command, and all other text is sent as a message to the current active window. naim supports simultaneous connections to multiple networks and IRC servers, with each “window” displayed in a slide-out list that can be called up with the Tab key.

Taken From: http://www.linuxjournal.com/article/10854

Install SNMP on Windows 7

To install SNMP on Windows 7, open Control Panel and then click on Programs and Features. Then, click on "Turn Windows features on or off" link in the left pane. If UAC prompted, then click on Yes. Then, in the Windows Features window, scroll down and select "Simple Network Management Protocol (SNMP)" check box and click on OK. Then, wait for some time to install SNMP.
After installing SNMP, click on Start Orb and then type Services.msc in the Search box and hit Enter. Then, scroll down in the right pane and right click on SNMP Services and select Properties. Then, click on Traps tab. Now, in the Community Name box, type the community name to which your computer will send trap messages and then click on "Add to list" button. Then, click on Apply and then OK.
 
Taken From: http://www.itechtalk.com/thread7216.html