This blog is about: Open Source, Operating Systems (mainly linux), Networking and Electronics The information here is presented in the form of howtos. Sometimes the information migth be in portuguese! As vezes a informação pode estar em portugues!
Sunday, December 11, 2011
HTC Hero Modes - Key Combination
HTC Hero Root/Recovery and ADB (Debug Mode)
Not sure if this has been put anywhere yet but a noobs guide to Rooting and using ADB. If your new to Android lots of ADB commands in forums can look scary but its really not. This guide will hopefully help you understand it all.
Information from the Unlockr Video guide., I Recommend watching this first to help with understanding.
http://www.youtube.com/watch?v=7w_R4...layer_embedded
1. Download these 4 files:
Android SDK
http://developer.android.com/sdk/dow...ows-1.5_r3.zip
Fastboot (scroll to Fastboot tool and download the appropriate one for you computer’s OS)
http://www.htc.com/www/support/android/adp.html#s2
Fastboot is a command line tool used to directly flash the filesystem in Android devices from a host via USB. It allows flashing of unsigned partition images
CM-Hero-Recovery.img
http://rapidshare.com/files/26262114...covery.img.zip
- Alternative Link: https://rs271tl6.rapidshare.com/#download|271l32|263024280|cherorecovery.img.zip|3706|R~1778837DFC68F871E34809F3D3480E6F|0|0
Superuser.zip
http://forum.xda-developers.com/atta...9&d=1249225060
2. Once you download the SDK, extract the SDK files to “C:\AndroidSDK”. Then extract the fastboot program to the C:\AndroidSDK\tools\ folder.
3. Extract the CM-Hero-Recovery.img.zip contents into the Tools folder in the AndroidSDK folder on your computer.
4. Extract the Superuser.zip contents into the Tools folder in the AndroidSDK folder on your computer.
5. Turn off the phone, then turn it back on by holding down the Power and Back button (to enter bootloader mode).
6. Plug the phone into the computer via USB. Make sure that it says FASTBOOT USB instead of FASTBOOT now.
7. Your computer should say installing drivers right now (if this is the first time you have connected the phone in fastboot mode).
8. Goto the Start menu type cmd into the run section of the start menu and hit enter to bring up the Command Prompt.
9. Type the following into the command dos prompt on the computer (the black screen with white letters that just opened) while the phone is connected through USB, hitting enter at the end of the line:
cd\
cd androidsdk\tools\
fastboot devices
10.You should see a serial number pop up and the word fastboot to the right of it. This means that your USB drviers are all set up correctly and you can continue. If you do NOT see this, then you need to start over or Google for how to set up the USB drivers correctly.
11. If the serial number and the word fastboot next to it popped up, then go back to the command prompt on the computer and type
fastboot boot cm-hero-recovery.img
12. Once the phone boots up into the recovery screen type the following in the command prompt on the computer:
adb shell mount /system
adb push su /system/bin/
adb shell chmod 4755 /system/bin/su
adb push Superuser.apk /system/app/
adb shell reboot
13. Once the phone reboots, click the Menu button and click Settings.
14. Goto Applications > Development and check the USB debugging on.
15. While the phone is still plugged in, goto the Command Prompt still up on your computer and type:
adb devices
You should see a serial number, which means the computer is seeing the device.
16. Then type:
adb shell
su
The phone should pop up an su request. Click Always Allow on the phone.
17. Type:
adb reboot
18. Phone should reboot and you now have Root Access! Try downloading a program that needs root access and see if it works to test it out.
notes, I have a custom rom after step 16 I did not get the request rebooted and opened up shootMe and it asked for permission at that stage I clicked Always Allow
ADB (Android Debug Bridge) – Install App (ShootMe) From PC
If you are not a developer and just want custom roms and apps. You don’t need the full SKD, if you have ever looked at guides for that and been scared away. You only need the SKD from google,(which you downloaded to get root) and not the eclipse parts.
download ShootMe http://www.mediafire.com/?igmztlyzzwj (as this is a good test if root access worked)
Make a folder called apps in your tools folder
Make a folder called apps in your tools folder.
C:\AndroidSDK\tools\apps
In the apps folder put all the APK files you want to install.
Open CMD
Change directory to tools
cd \
cd AndroidSDK\tools\
Now type:
adb remount
(this is to make sure phone is mounted safety first)
Now type:
adb push apps\ com.bw.picme.local.apk /system/app/
(Replace com.bw.picme.local.apk with the title of your apk for other installs. )
Now type:
adb reboot
(after you have pushed your apps do a restart. And everything should be installed fine)
Open the application and have fun.
Please note that the slashes are different from each directory. The first uses “\” this is from your computer
Second uses “/” this is on your phone.
Taken From: http://htcpedia.com/forum/htc-hero/1523-noob-guide-htc-hero-root-adb.html
Saturday, December 10, 2011
Cyanogen Mod on HTC Hero
HTC Hero (GSM): Full Update Guide
This guide will walk you through the process of taking the HTC Hero (GSM) from stock to having the ability to flash the latest version of CyanogenMod.- This guide is only for the GSM version of the HTC Hero, for the CDMA version of the HTC Hero, see the HTC Hero (CDMA): Full Update Guide instructions.
Contents
Before you do anything — Make a backup
Don't forget to back up your data. If you have synced the device with a Google account, then the contacts, calendar, Gmail, & select other Google-related data will not be lost and will come back after the next sync. However, you should backup anything you want to keep that is not stored on the SD card:- SMS/MMS messages,
- Call Log,
- Bookmarks,
- Applications; use Titanium Backup or the Astro File Manager, for example,
- Any application data not on the SD card.
MyBackup Root, SMS Backup & Restore, and Call Backup & Restore are all free applications that can assist with backing up your data.
Installing a Custom Recovery Image
For the HTC Hero (GSM), there are two custom recovery images available, Amon_Ra's Recovery & the ClockworkMod Recovery. Choose one and follow the instructions below on how to install each custom recovery image. If the HTC Hero (GSM) already has a custom recovery image, skip this section.WARNING: INSTALLING A CUSTOM RECOVERY IMAGE ON THE HTC HERO (GSM) WILL VOID THE WARRANTY.
Amon_Ra's Recovery
- You will need ADB on the computer to install Amon_Ra's Recovery on the HTC Hero (GSM). Follow the Android SDK guide, to get the ADB shell on the computer.
- Download flash_image & the latest version of Amon_Ra's Recovery:
- Unzip the flash_image &and copy its contents with Amon_Ra's Recovery to the same folder as adb (the /platform-tools folder within the Android SDK folder).
- Connect the HTC Hero (GSM) to the computer via USB.
- On the computer, open terminal and run the following commands:
adb push recovery-RA-hero-v1.7.0.1.img /data/local/adb push flash_image /data/local/adb shell chmod 777 /data/local/recovery-RA-hero-v1.7.0.1.imgadb shell chmod 777 /data/local/flash_imageadb shell rm /data/local/rights/mid.txtadb shell ln -s /dev/mtd/mtd1 /data/local/rights/mid.txtadb reboot
- The HTC Hero (GSM) will reboot. Once it's booted back all the way, run the following command:
adb shell /data/local/flash_image recovery /data/local/recovery-RA-hero-v1.7.0.1.img
- Amon_Ra's Recovery should now be installed on the HTC Hero (GSM).
ClockworkMod Recovery
- You will need ADB on the computer to install the ClockworkMod Recovery on the HTC Hero (GSM). Follow the Android SDK guide, to get the ADB shell on the computer.
- Download flash_image & the latest version of the ClockworkMod Recovery:
- Unzip the flash_image &and copy its contents with the ClockworkMod Recovery to the same folder as adb (the /platform-tools folder within the Android SDK folder).
- Connect the HTC Hero (GSM) to the computer via USB.
- On the computer, open terminal and run the following commands:
adb push recovery-clockwork-2.5.0.7-hero.img /data/local/adb push flash_image /data/local/adb shell chmod 777 /data/local/recovery-clockwork-2.5.0.7-hero.imgadb shell chmod 777 /data/local/flash_imageadb shell rm /data/local/rights/mid.txtadb shell ln -s /dev/mtd/mtd1 /data/local/rights/mid.txtadb reboot
- The HTC Hero (GSM) will reboot. Once it's booted back all the way, run the following command:
adb shell /data/local/flash_image recovery /data/local/recovery-clockwork-2.5.0.7-hero.img
- The ClockworkMod Recovery should now be installed on the HTC Hero (GSM).
Flashing CyanogenMod
Amon_Ra's Recovery process
- Download the latest version of CyanogenMod.
- Optional: Download the Google Apps for the device.
- Place the CyanogenMod update.zip file on the root of the SD card.
- Optional: Place the Google Apps .zip on the root of the SD card also.
- Boot into Amon_Ra's Recovery.
- Once you enter Amon_Ra's Recovery, scroll up & down with the trackball, and the trackball button to select.
- Select Wipe, then Wipe data/factory reset
- Select Flash zip from sdcard.
- Select the CyanogenMod update.zip.
- Optional: Install the Google Apps by performing steps 6 & 7 again and choosing the Google Apps update.zip.
- Once the installation has finished, select Reboot system. The HTC Hero (GSM) now should boot into CyanogenMod.
ClockworkMod Recovery process
Method via Recovery
- Download the latest version of CyanogenMod.
- Optional: Download the Google Apps for the device.
- Place the CyanogenMod update.zip file on the root of the SD card.
- Optional: Place the Google Apps .zip on the root of the SD card also.
- Boot into the ClockworkMod Recovery.
- Once the device boots into the ClockworkMod Recovery, use the side volume buttons to move around, and either the power button or the trackball to select.
- Optional: Select backup and restore to create a backup of current installation on the HTC Hero (GSM).
- Select the option to Wipe data/factory reset.
- Then select the option to Wipe cache partition.
- Select Install zip from sdcard.
- Select Choose zip from sdcard.
- Select the CyanogenMod update.zip.
- Optional: Install the Google Apps by performing steps 7 - 9 again and choosing the Google Apps update.zip.
- Once the installation has finished, select +++++Go Back+++++ to get back to the main menu, and select the Reboot system now option. The HTC Hero (GSM) should now boot into CyanogenMod.
Method via ROM Manager
- Launch RomManager.
- Optional: Choose the first option in the app, Flash ClockworkMod Recovery to update to the latest version.
- Select the Download ROM option from the main menu in the ROM Manager.
- Select the CyanogenMod option, and then choose the latest version of CyanogenMod from the menu.
- Optional: When you select the latest version of CyanogenMod, check the Google Apps* option.
- Once the ROM is finished downloading, it asks if you would like to Backup Existing ROM and Wipe Data and Cache.
- If Superuser prompts for root permissions check to Remember and then Allow.
- The HTC Hero (GSM) will now reboot into the recovery, wipe data and cache, and then install CyanogenMod. When it's finished installing it will reboot into CyanogenMod.
Taken From: http://wiki.cyanogenmod.com/wiki/HTC_Hero_(GSM):_Full_Update_Guide
Thursday, December 8, 2011
Windows Server 2008 Domain Controller and DNS Server Setup
This tutorial will explain how to setup Windows Server 2008 Domain Controller and DNS
Server.
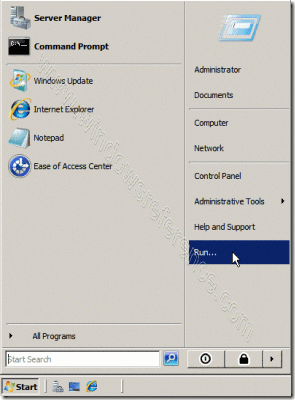
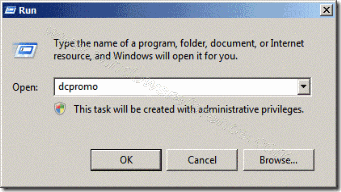
Click on Start > Run
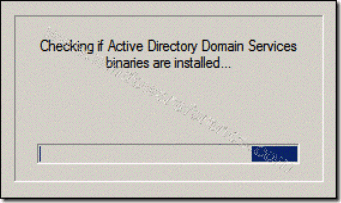
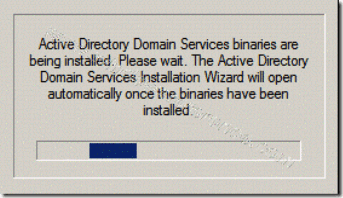
The system will start checking if Active Directory Domain Services ( AD DS) binaries are installed, then will start installing them. The binaries could be installed if you had run the dcpromo command previously and then canceled the operation after the binaries were installed.
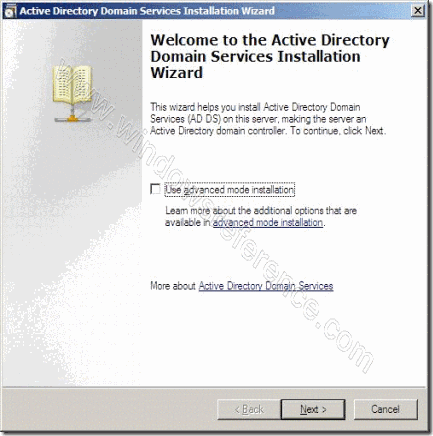
The Active Directory Domain Services Installation Wizard will start, either enable the checkbox beside Use Advanced mode installation and Click Next , or keep it unselected and click on Next
The Operating System Compatibility page will be displayed, take a moment to read it and click Next
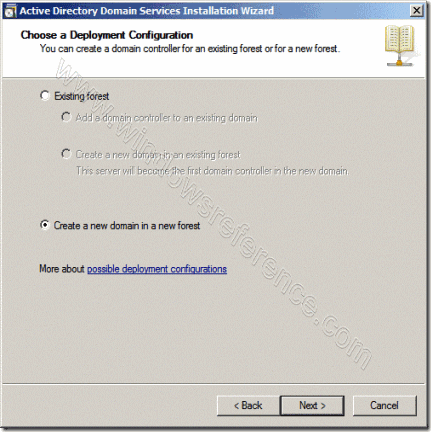
Choose Create a new domain in a new forest, Click Next
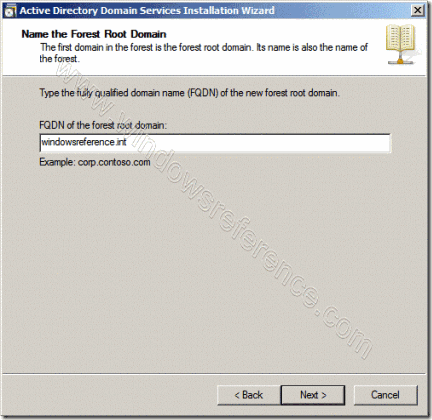
Enter the Fully Qualified Domain Name of the forest root domain inside the textbox, click Next
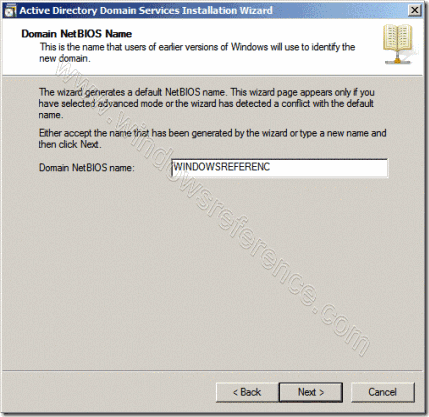
If you selected Use advanced mode installation on the Welcome page, the Domain NetBIOS Name page appears. On this page, type the NetBIOS name of the domain if necessary or accept the default name and then click Next.
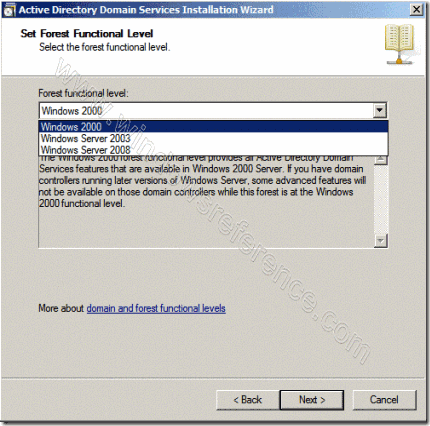
Select the Forest Functional Level, choose the level you desire and click on Next.
Make sure to read the description of each functional level to understand the difference between each one.
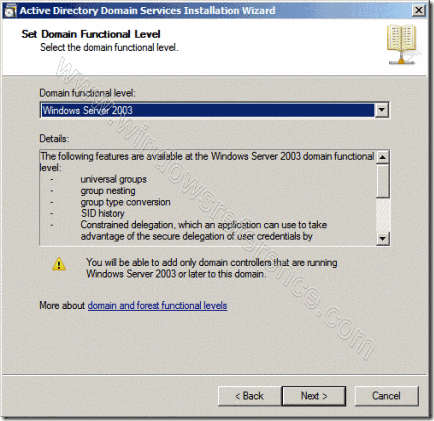
In the previous step, If you have selected any Forest Functional Level other than windows Server 2008 and clicked on Next , you would then get a page to select the domain Functional Level. Select it and then click on Next
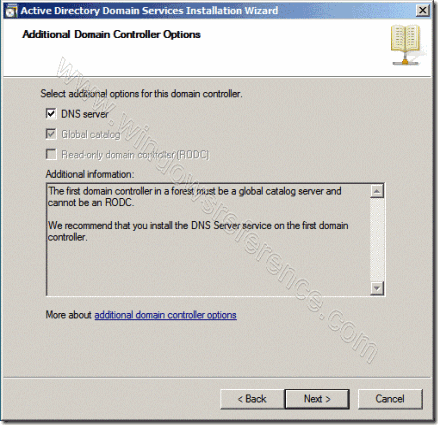
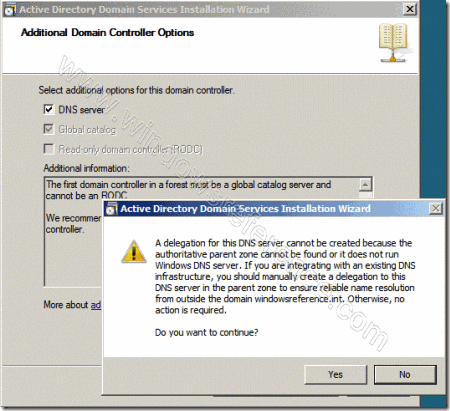
In the Additional Domain Controller Options page, you can select to install the domain Name Service to your server. Note that the First domain controller in a forest must be a Global Catalog that’s why the checkbox beside Global Catalog is selected and it cannot be cleared. The checkbox is also selected by default when you install an additional domain controller in an existing domain, however you can clear this checkbox if you do not want the additional domain controller to be a global catalog server. The first domain controller in a new forest or in a new domain can not be a Read Only Domain Controller (RODC), you can later add a RODC but you must have at least one Windows Server 2008 Domain Controller.
I want to set my DC as a DNS Server as well, so I will keep the checkbox beside DNS server selected and click on Next
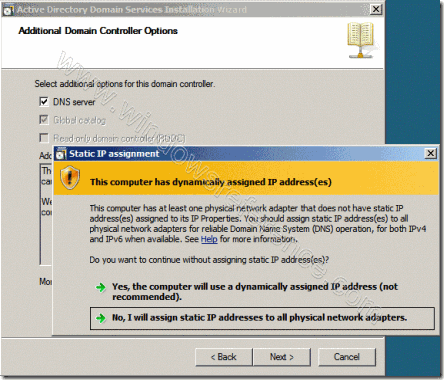
If you don’t have static ip assigned to your server you will see similar to the following screen now you need to assign static ip and start the above process.
If the wizard cannot create a delegation for the DNS server, it displays a message to indicate that you can create the delegation manually. To continue, click Yes
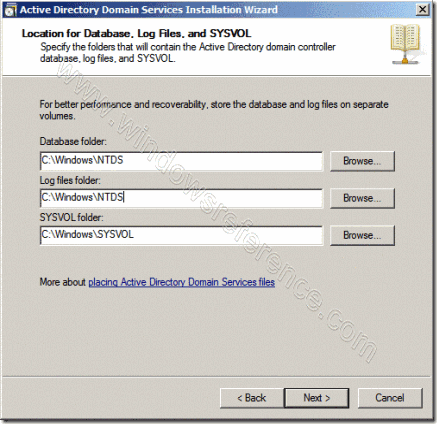
Now you will have the location where the domain controller database, log files and SYSVOL are stored on the server.
The database stores information about the users, computers and other objects on thenetwork. the log files record activities that are related to AD DS, such information about an object being updated. SYSVOL stores Group Policy objects and scripts. By default, SYSVOL is part of the operating system files in the Windows directory either type or browse to the volume and folder where you want to store each, or accept the defaults and click on Next
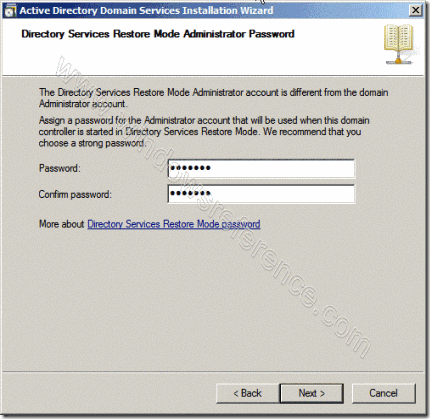
In the Directory Services Restore Mode Administrator Password (DSRM) page, write a password and confirm it. This password is used when the domain controller is started in Directory Services Restore Mode, which might be because Active Directory Domain services is not running, or for tasks that must be performed offline.Make sure that you memorize this password when you need it.
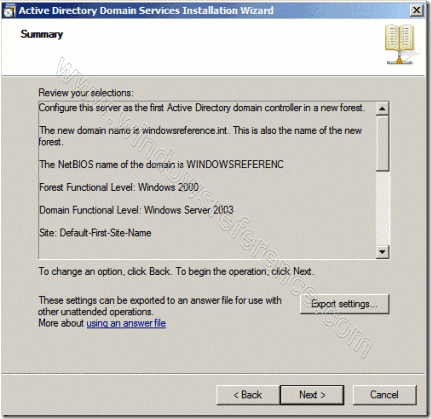
Summary page will be displayed showing you all the setting that you have set . It gives you the option to export the setting you have setup into an answer file for use with other unattended operations, if you wish to have such file, click on the Export settings button and save the file.
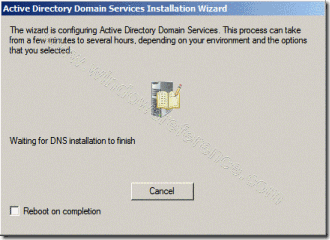
DNS Installation will start
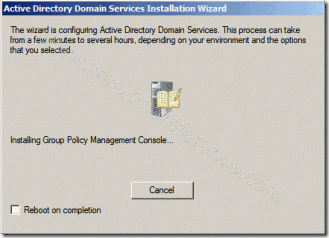
Followed by installing Group Policy Management Console, the system will check first if it is installed or not.
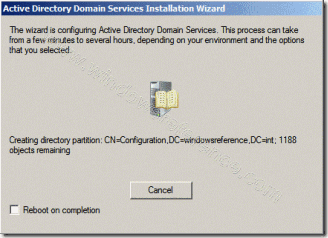
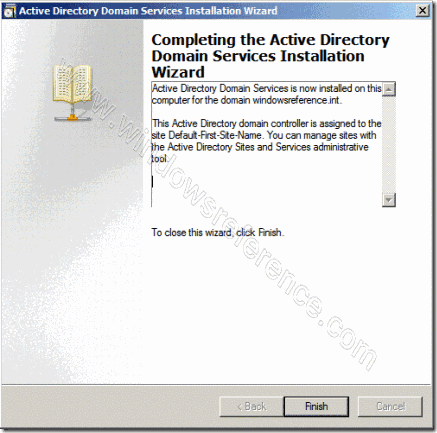
Configuring the local computer to host active directory Domain Services and other operations will take place setting up this server as a Domain Controller active Directory Domain Services installation will be completed, click Finish.
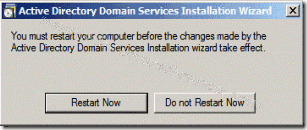
Click on Restart Now to restart your server for the changes to take effect.
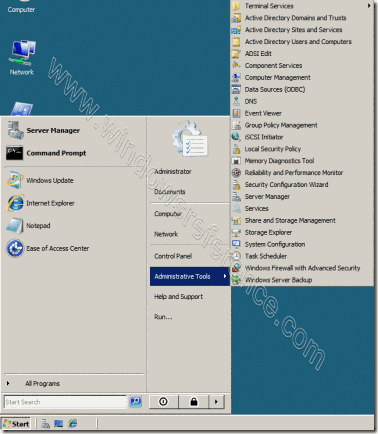
Once the server is booted and you logon to it, click on Start > Administrative Tools
you will notice that following have been installed :
Active Directory Domains and Trusts
Active Directory Sites and Services
Active Directory Users and Computers
ADSI Edit
DNS
Group Policy Management
That’s it now your new win server 2008 domain controller with dns server setup was completed.
Wednesday, November 23, 2011
Turning Your PC into a DD-WRT Wired Router - From Windows
Normally, when we cover DD-WRT and other firmware replacements for wireless routers, we discuss flashing (or uploading) the firmware to a router. However, DD-WRT also has an X86 version that can be installed onto just about any generic PC.
This is great if you don’t have a compatible router lying around and don’t want to track one down with the right model and version number. Plus it lets you exceed the usual 16MB of RAM and slow CPU in the off-the-shelf consumer-level routers.
In this tutorial, we’ll build and set up a DD-WRT machine.
Features on a normal dd-wrt firmware (wifi router):
http://www.dd-wrt.com/wiki/index.php/What_is_DD-WRT%3F
Limitations of the X86 version
Keep in mind; if you want to go the free route, you’ll only have a wired router—but you can add separate access points. Wi-Fi support is only available in the registered version by purchasing a Professional Activation for € 20.00 ($28.36).
You also lose these features for any X86 version of DD-WRT:
- USB Support. For example, you can’t connect USB drives or printers to share them on the network.
- Journaling Flash File System (jffs). Normally this would let you store files directly on the router, such as for NoCatSplash hotspot captive portal pages and other custom configuration.
- Itsy Package Management System (Ipkg). This would have let you add features from OpenWRT that aren’t already in DD-WRT.
Putting the DD-WRT machine together
First, make sure you have an X86 compatible PC, i386 or greater, which is just about any old PC. You need only 16MB or more of RAM. However, you do need at least two network (Ethernet) cards, one for the Internet and others for the LAN.
Don’t forget a spare hard drive. It must be dedicated to the cause as it will be reformatted and repartitioned.
Though a monitor and keyboard aren’t required, they’re useful if you run into problems, so you can access the console.
Getting ready for the installation
We’re going to use a Windows-based program to upload the DD-WRT disk image to the spare hard drive. So you need to take the drive out of the DD-WRT machine and temporarily put it into a working computer.
On your working computer, you need to download the transfer utility, physdiskwrite, and the desired X86 version of DD-WRT. At the time of this writing, the most current release is v24 Service Pack 1. If going the free route download dd-wrt_public_vga.image or dd-wrt_full_vga.image if you’re purchasing a license.
It’s easier to download the DD-WRT file to the physdiskwrite folder.
Verify the drive assignments
When you upload the disk image to the drive, the utility will be referencing the computer’s drives using the disk numbers. So you’re absolutely sure you have the right disk—and not the one you use every day—you should verify the drive assignments.
You can open the Computer Management program to view the Disk Management utility in Windows:
In Vista, click Control Panel > System and Maintenance > Administrative Tools > Computer Management.
In XP, Control Panel > Performance and Maintenance > Administrative Tools > Computer Management.
The disk numbers (Disk0, Disk1, Disk2, etc.) are shown on the graph of drives and partitions.
Transferring the image using physdiskwrite
When you’re ready, here’s how to install DD-WRT X86 onto your hard drive from your working computer:
1. Bring up a Command Prompt. If using Vista, click the Start button, type cmd into the search box, right-click the cmd icon, and select Run as administrator. In XP, simply click Start > Run, type cmd and hit Enter.
2. Navigate to the directory where you have the physdiskwrite utility and disk image. It might be easier to browse to the location in Windows and copy the location from the address bar. Then in the Command Prompt you’d type cd, paste in the path, and hit Enter.
3. Type physdiskwrite -u dd-wrt_public_vga.image and hit Enter. Adjust the image file name if you’re using a different one.
4. Type the disk number of the spare drive. WARNING: Remember, this completely erases everything from the drive and you’ll lose any files on it.
5. After it completes, shut down and unplug the computer to remove the drive and put it back in the DD-WRT machine.
Getting started with DD-WRT X86
After DD-WRT boots up, the router should start working. You should hook the WAN/Internet cable up to the ether0 interface, which is usually the built-in or on-board Ethernet port, if any. The remaining interfaces are for the LAN/network. You can connect them to computers or to a switch.
You can figure out which interface is which by referencing the console screen after hooking up a cable to the interfaces. It tells you the status, which includes the interface number.
The default IP address is of the router is 192.168.1.1. The DHCP server is enabled, just like with the firmware versions, so users will automatically receive an IP. To access the Web GUI, type the IP of the router into a browser. To access the console on the machine, hit Enter. The default username is root and the password is admin.
Read our other DD-WRT tutorials
Now that you have a DD-WRT router up and running—hopefully—take a look at all the tutorials we have on the subject. Maybe extend your range with WDS, build a wireless bridge, use multiple SSIDs, and much more.
Eric Geier is the author of many networking and computing books, including Home Networking All-in-One Desk Reference For Dummies (Wiley 2008) and 100 Things You Need to Know about Microsoft® Windows Vista (Que 2007).
Taken From: http://www.wi-fiplanet.com/tutorials/article.php/3835526
Tuesday, November 22, 2011
TDR test in Cisco Devices - Cable Testing
Cisco's documentation shows the simple but very handy two-part command syntax.
Switch# test cable-diagnostics tdr interface g0/1
TDR test started on interface Gi0/1
A TDR test can take a few seconds to run on an interface
Use 'show cable-diagnostics tdr' to read the TDR results.
Switch# show cable-diagnostics tdr int g0/1
TDR test last run on: March 01 00:09:06
Interface Speed Local pair Pair length Remote pair Pair status
--------- ----- ---------- ------------------ ----------- -----
Gi0/1 auto Pair A 20 +/- 4 meters N/A Open
Pair B 20 +/- 4 meters N/A Open
Pair C 21 +/- 4 meters N/A Open
Pair D 20 +/- 4 meters N/A Open
This output shows a cable approximately 20 meters in length connected to interface G0/1, with nothing attached to the far end. If you're like me, your first thought is "very cool, but is it accurate?" I grabbed a couple spare cables of various lengths and set about an unscientific benchmark. I measured each cable in three manners: by hand, with my Fluke TDR, and with a Catalyst 3560G-24PS-S. My observed results are below.
Cable Length Fluke 3560 ----------------------------------------------
A 69 ft 69 ft 20 +/- 4m (~66 ft)
B 21 ft 21 ft 6 +/- 4m (~20 ft)
C 83 ft 83 ft 25 +/- 4m (~82 ft)
As you can see, the 3560 is impressively accurate, even without its allowed 4m variance. My next consideration was whether a TDR test would disrupt interface operation. Trying it on a live port while running a constant ping yielded no observable effect, not even a brief disconnection pop-up. This is clearly a very handy tool. I only wish Cisco would do more to publicize cool features like this.
Taken From: http://packetlife.net/blog/2008/mar/28/investigating-ciscos-built-in-tdr/
Sunday, October 23, 2011
Windows 7 Streaming to TVs and Others via DLNA
Media Streaming with Windows 7
12 May 2009 3:00 AM
We’ve blogged about a number of features related to home networking and media in Windows 7. A scenario which brings all these together in a pretty cool way is Media Streaming. This scenario allows you to use a Windows 7 PC as a hub for media sharing—where you can share media with other PCs and devices on your home network via streaming, and even stream this information securely over the internet. Scott Manchester on the Devices & Media program management team coordinated this post, but as you will see it represents work across the Core User Experience, Media Center, Networking, and even Windows Live chose to take advantage of the new APIs in this scenario. This is a pretty detailed post and there’s a lot to try out. Those of you using the RC to test things out, you can always install on another PC and use it for the 30-day period without requiring a new PID key. Have fun! --Steven
Windows 7 includes a number of exciting new media streaming features that enable you to enjoy your media collection on other PCs and devices in the home and while on the road from across the internet. We’ve created a networked media experience that is more friendly to use and simpler to set up. Now enjoying music, pictures, and video on your network connected PC or media device “just works” without concern for media formats, transports, or protocols.
There are a growing number of Network Media Devices (NMDs) certified to interoperate using an open and widely embraced industry standard called the Digital Living Network Alliance (DLNA). Windows 7 implements this open standard, which means that sharing media between NMDs, Windows PCs, Windows Home Server, and Extenders for Windows Media Center (including Xbox 360) is easier and more natural. Supporting this standard also means that the myriad of NMDs such as electronic picture frames, network radios, televisions, and others are companions to Windows 7 PCs and may seamlessly participate in the whole-home media experience.
Not Just for the Techie
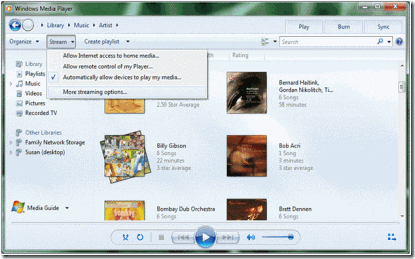
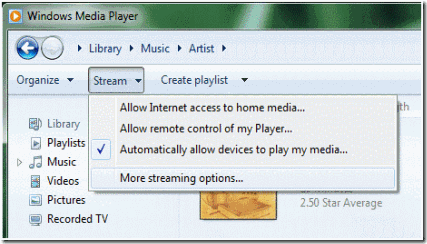
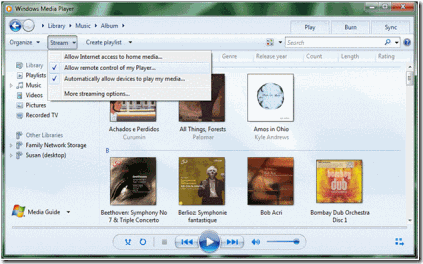
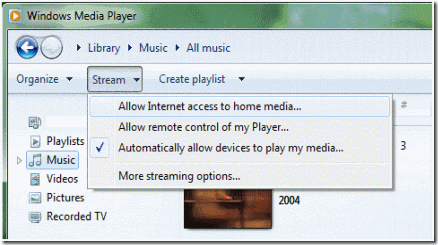
We made it much simpler to configure media streaming. Before Windows 7, media streaming features were focused on media enthusiasts. To improve the setup experience, media streaming has been integrated with the new HomeGroup feature so in a typical home network configuration, media streaming is enabled and works by default. There is also a new “Stream” menu prominently displayed in the Window Media Player user interface (see figure below) that exposes simple scenario-based configuration options. These options allow you to:
1. Set up your home PC so you can access your media libraries while away from home
2. Allow other Windows 7 PCs and devices to push media to your Player and control it
3. Quickly authorize all home PCs and devices to access your media collection
Each of these scenarios will be discussed throughout this post.
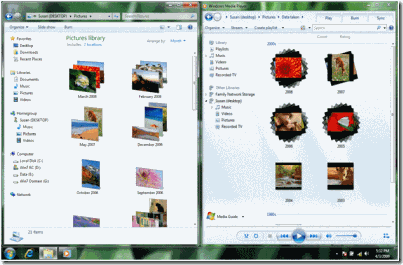
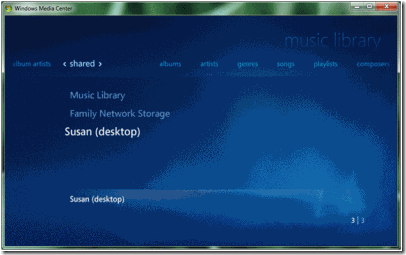
HomeGroup introduces the concept of “shared libraries” for music, pictures, and video. As described in a previous blog post, these shared libraries are accessible from within the navigation pane of Windows Explorer and Windows Media Player, and from the “shared” view of each media category within Windows Media Center (see figures below). The scope of these libraries is the same from each of these views.
Windows Explorer will automatically discover and provide access to shared media libraries on other HomeGroup PCs. In addition, Windows Media Player and Windows Media Center will automatically discover shared libraries from:
1. Windows Media Player 11 and 12
2. Windows Home Server
3. All DLNA compliant media servers (e.g. network attached storage)
Who Can Access My Shared Media Libraries?
A HomeGroup is a secured set of Windows 7 PCs that can view and consume each other’s media seamlessly. Sharing is automatically set up among HomeGroup PCs and HomeGroup settings allow you to choose what types of media you would like to share; for example, you may choose to only share your music library and not your video or pictures.
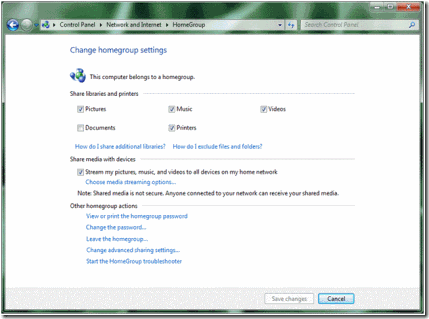
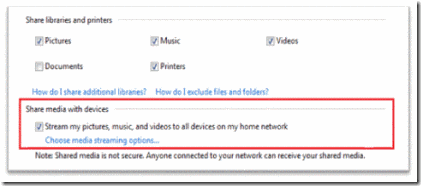
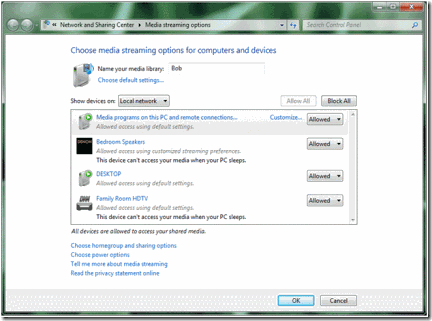
In addition to all HomeGroup PCs being able to access your media, we made it easy to allow devices to access shared media libraries on Windows 7 PCs. This can be done conveniently from either HomeGroup settings or within Windows Media Player:
You can also choose to restrict which specific PCs or devices have access to your media by choosing “more streaming options…” from the Windows Media Player “Stream” menu.
Play To: Windows 7 as a Universal Remote Control for your Media Collection
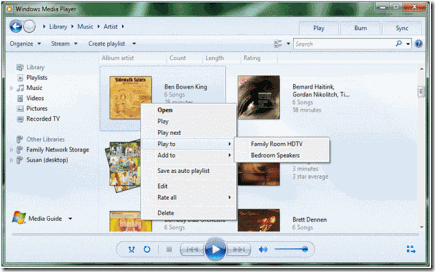
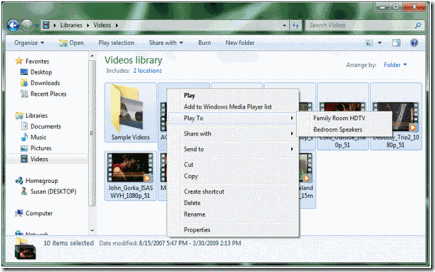
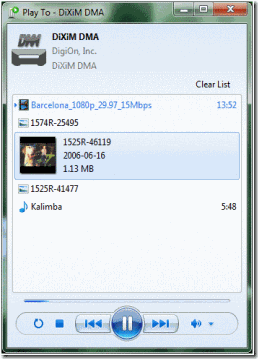
In addition to playing media streamed from other shared media libraries within Windows Media Player, Windows 7 can now send media to be played on other Windows 7 PCs and DLNA-certified digital media renderers. We call this feature “Play To.” With “Play To,” you can browse or search from within Windows Media Player or Windows Explorer to find your desired media, and then choose where you want it to be played. A versatile remote control window is presented for each “Play To” session, providing you with the ability to control the entire experience.
It does not matter where media collections are stored. “Play To” is available for both local media libraries and for shared media libraries. If you would like to send media from one Windows 7 PC to another, choose “Allow remote control of my Player” from the Windows Media Player “Stream” menu on the receiving PC. This will cause Windows Media Player to be discovered in the “Play To” menu of other Windows 7 PCs on the same network.
When media streaming is enabled on your Windows 7 PC, “Play To” will be available in Windows Media Player and Windows Explorer via the right click menu for media items. If Windows 7 has not discovered a “Play To” capable PC or device on the network, this context menu will not be available. DLNA provides guidelines to certify different device categories and roles. Not every DLNA-certified device supports the “Play To” feature. Look for DLNA-certified Digital Media Renderers (DMR), and for the best performance, look for DMR devices that carry the “Compatible with Windows 7” logo.
Once you’ve selected media items to play on another PC or device, a “Play To” remote control window will launch providing standard controls like play, pause, stop, skip forward and backward, seek forward and backward, volume, and mute. Not every device will support all of the control features and some media types may not support seek. Once the “Play To” remote control window is launched, you can reorder or delete items, add to the queue, or toggle repeat. It’s even possible to add new media items from Windows Media Player or Windows Explorer by dragging them into this window.
There is no artificial limit to the number of “Play To” sessions you can launch. You may send pictures to a picture frame, video clips to a TV, and music to another Windows 7 laptop all at the same time. Furthermore, different types of media can be sent to a single destination, as shown in the example above.
What About the Xbox 360 and Extenders for Windows Media Center?
Xbox 360 has two ways to receive media streams from other Windows 7 PCs, which we refer to casually as “dashboard” mode and “extender” mode.
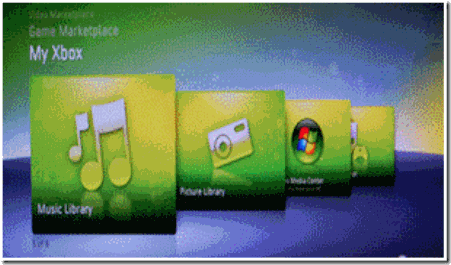
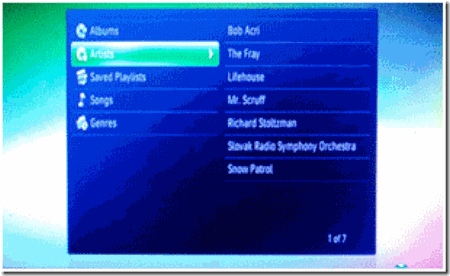
In dashboard mode, Xbox 360 functions in the role of a simple media player. While it’s not officially a DLNA-certified device, you can use Xbox 360 to browse the shared media libraries from Windows 7 PCs (there is also support for this in Windows Media Player 11) and pull content from those libraries for playback within the dashboard.
In extender mode, Xbox 360 (and other Extenders for Windows Media Center) is seen by Windows 7 PC’s on the network as both a Digital Media Player (DMP) and a Digital Media Renderer (DMR) device. Using the Extender for Windows Media Center on the Xbox 360, you can browse media libraries on other computers and pull that content for local playback, similar to the process of using Xbox 360 in dashboard mode. However, in extender mode Xbox 360 will also support “Play To” so that users of Windows 7 PC’s on the network can push content to it. All extenders, when associated with a Windows 7 PC, will be discovered in the “Play To” menu of other Windows 7 PCs.
Internet Access to Home Media
With Windows 7 we’ve also extended the media streaming experience outside the home and allow you to access your home media from anywhere in the world via the internet. We’ve made media streaming over the internet a natural extension of the experience within the home. For the experience to be seamless we needed to solve some significant technical challenges, such as:
1. Discovery – Resolving the computer name at home to a routable IP address
2. Privacy – Ensuring the home media is only accessible by authorized users
3. Security – Encrypting browsing and streaming of media to prevent eavesdropping
4. Reliability – Network connection speeds, media formats and bit rates, and router firewalls all create potential reliability issues for a seamless experience
To overcome these technical hurdles, we designed a model that uses an Online ID Provider to help facilitate discovery, privacy, and security. The new Online ID Provider infrastructure in Windows 7 allows you to link your Online ID (e.g. you@live.com) with your Windows user account. This enables an authentication/authorization server to provide the necessary privacy to establish a protected link between two Windows 7 PCs (e.g. your laptop on the road and your PC at home). Internet access to home media is enabled from the “Stream” menu in Windows Media Player.
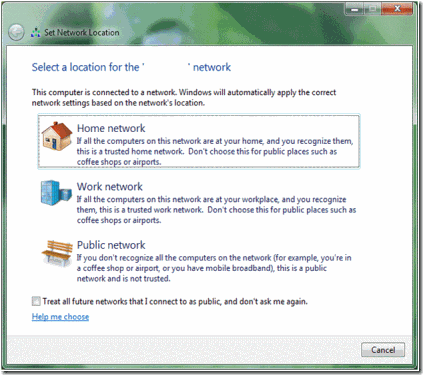
The setup process walks you through linking an online ID with your Windows user account, which must be performed on both the home PC and remote PC. The same online ID must be used on both PCs in order to establish the connection between them. In order for remote PCs to access the home media collection, the PC at home (acting as a server) must be on a “Home” network location. Remote PCs (acting as clients) can browse and receive content streamed from the home PC from any network location (Public, Work, or Home). The network location is chosen when first connecting to any network and can be changed later from the Network and Sharing Center.
Reliability - Network Connection Requirements
Streaming media over the internet from home works best with an “always on” broadband connection. Broadband uplink speeds vary from a modest 200Kbps to 10Mbps or more. Downlink connection speeds will also vary from crowded hotspots, hotel rooms, and wireless network connections in friends’ homes. Regardless of the uplink or downlink speeds, we wanted to ensure that even high bit rate content (e.g. high definition recorded TV) could be streamed with a good experience. The internet media streaming feature uses advanced bandwidth detection algorithms and end-to-end network heuristics to determine how to stream content that is at a higher bit rate than the smallest link in the network path.
Another challenge with internet access to home media is creating a peer-to-peer connection between the remote client PC and the home PC serving the media. A typical home network will get a single unique IP address from an internet service provider, and this IP address is shared by all the devices and PCs in the home using Network Address Translation (NAT), a function of an Internet Gateway Device (IGD) or Wireless Router. This creates a challenge for a remote PC or device to make an unsolicited connection inside the home, both in terms of resolving the home’s unique IP address and traversing the NAT to communicate directly to a unique PC or device on the home network.
Windows 7 employs some advanced NAT traversal technologies to establish the peer-to-peer connection and, with most IGDs, will allow a reliable connection to the home PC from any remote PC. For best results you should use a wireless router or IGD that has been certified by the Windows Logo program.
Media Formats
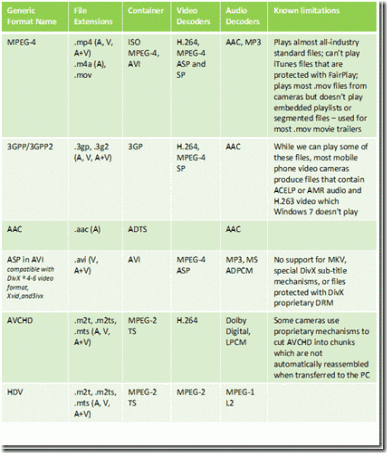
In Windows 7 we let you enjoy the media you want and don’t trouble you with the need to know about file types or codecs in most cases. (For more details, see Table 1 below). In addition to supporting local playback of new formats, we can also ensure that the content will play on devices that may not support the codec, bit rate, container, or format of that content. We accomplish this by using the new transcoding support in Windows 7.
Let’s say for instance you have a DivX movie you want to watch on your new DLNA certified television which only supports WMV and MPEG2. Windows 7 will determine the capability of the TV (codec, bit rate, etc.) and dynamically convert the DivX video to a format the TV can play. The general rule of thumb is: if Windows Media Player can play the content on the PC then the content will almost always play back on the network connected device. Bandwidth estimation techniques are used for media streaming within the home and over the internet, which enables Windows 7 to transcode using the most optimal format and bit rate.
Table 1: New Decoders in Windows 7
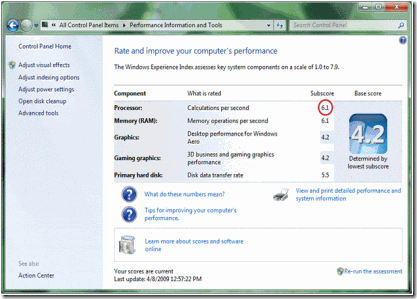
The format and bit rate chosen for transcoding, especially for video, is highly dependent on the CPU performance of the transcoding PC as identified by its Windows Experience Index:
We also created a flexible model for silicon partners to provide hardware accelerators that automatically work with media streaming and other Windows 7 features. This new acceleration model allows hardware developers to build media foundation proxies for media format encoders and decoders that are fully implemented in their hardware (perhaps in a GPU or additional hardware device). With hardware supported encoding and decoding, Windows 7 can offload the computationally demanding transcoding to dedicated hardware as a background task without affecting the CPU performance of the PC.
Digital Living Network Support in Windows 7
The Digital Living Network Alliance (DLNA) is a consortium of more than 200 companies interested in specifying technologies for exchanging media in home networks. The DLNA architecture is based on the UPnP specification, but in addition, DLNA specifies transport protocols (based on HTTP and RTP) and sets of media formats.
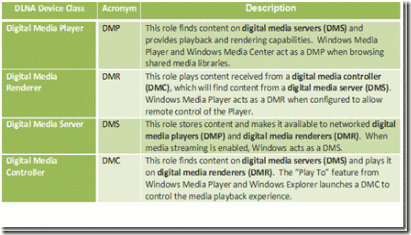
DLNA defines device roles (e.g. servers, players, renderers, etc.) and the protocols that these devices use to discover each other and communicate with each other (e.g. UPnP, HTTP, RTP, etc.). Windows 7 implements several of the DLNA device roles (see table 2 below) and it also implements the DLNA protocols required for communications and media exchange. With Windows 7, your PC will be able to interoperate with a broad variety of DLNA certified devices like TVs, stereo systems, cell phones, DVRs, game consoles, etc.
Table 2: DLNA Device Profiles Supported by Windows 7
Because Windows 7 implements several device roles, there are different ways in which you could choose to use a Windows 7 PC at home. The remainder of this section explains the different scenarios.
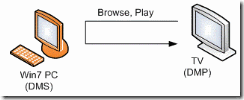
Scenario 1: You store your music, video, and pictures on a Windows 7 PC. You’ve recently acquired a TV with a DLNA logo. Using the TV, you can browse the media library available on the Windows 7 PC. You can use the TV to watch the video and pictures, and listen to music stored on the PC. Figure 1 illustrates this scenario. In this case, the Windows 7 PC behaves as a DMS. Notice that this scenario was already available in Windows Vista and in Windows XP using Windows Media Player 11.
Figure 1: The TV unit browses and plays content stored in a PC
Scenario 2: You have a Network Attached Storage (NAS) device where you store your music, video, and pictures. The NAS device implements a DMS. You open Windows Media Player on a Windows 7 PC. You can find the NAS device using Windows Media Player, and you can browse the media library available on the NAS device. You can watch the video or pictures, and listen to music stored on the NAS device. Figure 2 illustrates this scenario. In this case, the Windows 7 PC behaves as a DMP.
Figure 2: A Windows 7 PC browses and plays content stored on a NAS device
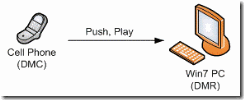
Scenario 3: You have a cell phone that not only takes pictures but can push the pictures to a Windows 7 PC. You can show the pictures to your friends using the large-screen display of the PC without the need to physically transfer the files to the PC with a USB thumb drive, for example. Figure 3 illustrates this scenario. In this case, the cell phone acts as a DMS and a DMC and the Windows 7 PC behaves as a DMR.
Figure 3: A cell phone pushes pictures for display on a Windows7 PC
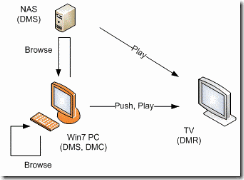
Scenario 4: You’ve acquired a stereo system with the DLNA logo. On his Windows 7 PC, you’ve accumulated a vast collection of music with thousands of songs. Because your collection is large, you prefer to search, organize, and select songs using the rich capabilities of the Windows Media Player. Once you select the songs, you simply push the songs to your stereo system using “Play To.” You also have a NAS device containing an additional collection of music and video. You can use the Windows 7 PC to browse the content on the NAS device and push it to the stereo system. Figure 4 illustrates this scenario. In this case, the Windows 7 PC behaves as a DMS and a DMC.
Figure 4: A Windows 7 PC browses local content or shared content on the network. The PC then pushes the content for playback in a TV unit (DMR).
There's definitely a lot to enjoy here. Have fun!!
-- Scott, Tim and the Devices & Media team
Taken From: http://blogs.msdn.com/b/e7/archive/2009/05/12/media-streaming-with-windows-7.aspx
