Thursday, April 3, 2014

Windows Concurrent Remote Desktop (RDP)

Professional and Ultimate editions of Windows come with a built in Remote Desktop (RDP) feature that allows you to access your machine remotely while away from home or the office. Unfortunately, it is limited by default to one concurrent user per session, meaning that if someone remotely connects to the computer, whoever was logged in at the moment will be automatically logged off, even if the user is physically at the computer.

This is not a technical limitation but rather a licensing one. Case in point, Remote Desktop in server editions of Windows by default supports two concurrent connections to remotely troubleshoot or administer a computer. More users can connect simultaneously, too, as long as the machine can handle it with the resources it has available and you have the required client access licenses for that particular server.

However, there are a few reasons why concurrent sessions would come in handy for power users not necessarily running a server. For example, if you have a dedicated Media Center PC running in the living room, you'll be able to remotely access all files on the machine without interrupting the person watching TV.

Or if you are sharing a computer with other users, concurrent Remote Desktop sessions will allow more than one person use that system under a different or even the same user account, without kicking each other off. By patching a file called termsrv.dll, located in %SystemRoot%System32, this is possible in all editions of Windows 7, Windows Vista and Windows XP.

clip_image001

Download: UniversalTermsrvPatch_20090425.zip (zip File, 66 KB, mirror #2)

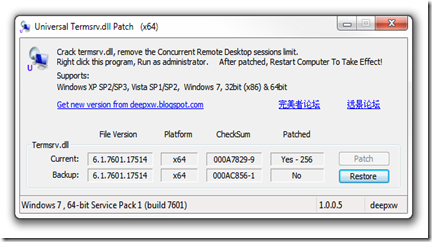
Fortunately for us, Internet user DeepXW already did all the dirty work a while ago and posted his Universal Termsrv.dll Patch for anyone to get their hands on. Simply download and unzip the file, then run the corresponding file as administrator (right-click the exe file and select Run as Administrator). For 32-bit systems use UniversalTermsrvPatch-x86.exe and for 64-bit versions of Windows use UniversalTermsrvPatch-x64.exe.

You should see a window like the one above where you can patch termsrv.dll to remove the Concurrent Remote Desktop sessions limit and restore the original file at any time (a backup file is located at 'windowssystem32termsrv.dll.backup'). After applying the patch, restart your system and you are ready to go.

clip_image002

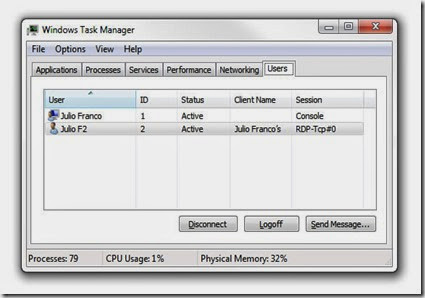
To test it out simply leave a session open on to the PC where you applied the patch, then from another machine try and connect to the computer remotely. If all goes well both users will be logged on and active.

· Contact the author: Jose Vilches

Taken From: http://www.techspot.com/guides/485-windows-concurrent-sessions/

Multivendor OSPF Lab - With GNS3 and VMware Fusion

clip_image001

DISCLAIMER: The information provided herein is for general informational and educational purposes only. 
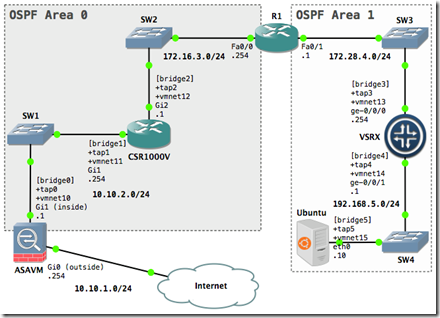
Do you have a Mac? Do you have VMware Fusion 6 Professional and GNS3 (with TunTap) installed? Are you ready to implement a multivendor OSPF lab? This post is a culmination of my previous GNS3 posts where we take most of that information to actualize a practical solution. 
The lab contains several virtual devices that consume a significant amount of hardware resources. I recommend your Mac computer have a minimum 8GB of memory, and I also recommend a quad-core CPU because the ASAVM device will absorb the full usage of a single core by default. A dual-core CPU will suffice but expect less "headroom". 
Core components required for this tutorial:

The following table maps each device to its GNS3 object, hypervisor, and software relationship:


Device

GNS3 Object

Hypervisor

Software

ASAVM

Host

VMware

Cisco Adaptive Security Appliance (ASA) 8.4(2)

CSR1000V

Host

VMware

Cisco CSR 1000V Series ADVANCED ENTERPRISE SERVICES 3.11.0S(ED)

R1

Router c3700

Dynamips

c3725-adventerprisek9-mz.124-15.T10.bin

VSRX

Host

VMware

Juniper Networks Firefly Perimeter 12.1X46-D10.2

Ubuntu

Host

VMware

Ubuntu Server 13.10

The R1 device can be any GNS3-compatible Cisco IOS router image that supports the OSPF protocol. The software (for the virtual devices) can be downloaded from their respective websites.

1. GNS3 Topology
Create a new GNS3 project. Drag and drop the GNS3 objects onto the blank workspace. Arrange them so it looks similar to the layout of the network diagram. The network diagram is the reference point for this tutorial.

1.1 Configure the GNS3 Host object attributes (right-click or control-click)

For example, if you were starting with the bottom left GNS3 Host object:
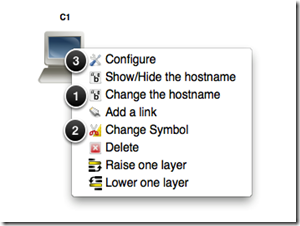
clip_image002

1. Change the hostname from C1 to ASAVM.
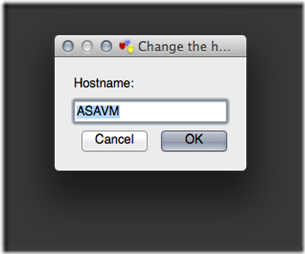
clip_image003

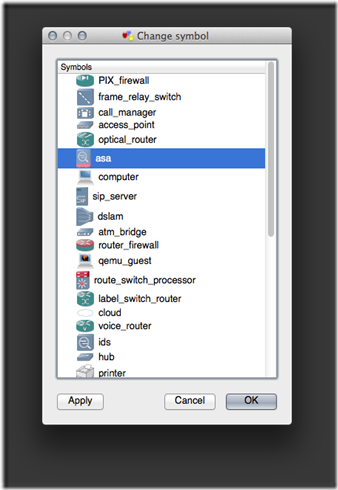
2. Change the object symbol.

clip_image004

3. Bind the TAP virtual network device(s) to the GNS3 Host object.
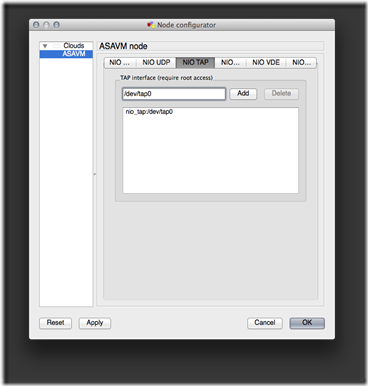
clip_image005

Repeat the previous steps for each of the remaining GNS3 Host objects by matching the specific object attributes with the network diagram.

1.2 Add a link between each of the devices
The GNS3 Host objects will be using their specific TAP interface(s) to connect to the Ethernet switches. In an upcoming section, you will understand why the TAP interface is such a vital component for GNS3 and VMware Fusion integration. 
We can verify all six TAP interfaces are available by running the following command from the terminal:

$ for i in {0..5}; do ifconfig tap$i; done

2. VMware Fusion
The R1 device and the Ethernet switches are ready, from the perspective of GNS3 (Dynamips) connectivity, so we will zero in on creating the VMware virtual machines and their associated vmnets.

2.1 Virtual Network Switches
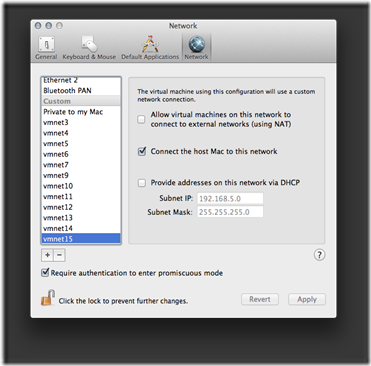
Our lab configuration will use host-only network switches. A host-only network (switch) is a network that is completely contained within the host computer. Host-only networking provides a network connection between the virtual machine and the host system by using a virtual network adapter that is visible on the host operating system. As the network diagram shows, we will be usingvmnet10 thru vmnet15.

Add a virtual switch with the following steps:

1. Open the Preferences window for VMware Fusion Professional.

2. Select the Network tab.

3. Click the + symbol to add a new virtual switch. As the following screenshot shows, we will leave the Allow virtual machines on this network to connect to external networks (using NAT) and Provide addresses on this network via DHCPoptions unchecked to create the host-only virtual switch (vmnet).

4. Click the Apply button to save the setting.
clip_image006

Close the Preferences window when you're finished creating the virtual switches. 
We can verify the virtual switches have been created by running this command from the terminal:

$ for i in {10..15}; do ifconfig vmnet$i; done

2.2 Juniper Networks VSRX (Firefly Perimeter)
Import the VMware virtual appliance with the following steps:

1. Click File -> Import... from the VMware Fusion menu bar.

2. Click the Choose File... button.

3. Navigate to and select the junos-vsrx-12.1X46-D10.2-domestic.ova file.

4. Click the Open button.

5. Click the Continue button.

6. Rename the package to VSRX.

7. Click the Save button to save the virtual machine in the default Virtual Machines folder.

8. Click the Accept button for the license agreement.

9. Click the Customize Settings button to change the network configuration.

By default, both the virtual network adapters are configured for Bridged Networking. We need to change them to use the virtual switches we created earlier.

1. Click the Network Adapter menu item.

2. Click the vmnet13 radio button.

3. Click the Show All button to return to the virtual machine settings menu.

4. Click the Network Adapter 2 menu item.

5. Click the vmnet14 radio button.

6. Click the Show All button to return to the virtual machine settings menu.

7. Close the settings window.

Directly edit the VSRX.vmx (virtual machine configuration) file to add the custom virtual serial port. My VSRX virtual machine is located in the default VMware Fusion folder (directory), so I would edit the file with the following command from the terminal:

$ nano $HOME/Documents/Virtual\ Machines.localized/VSRX.vmwarevm/VSRX.vmx

The virtual serial port has to be created for console port access. This is very similar to how we interface with our virtual routers in GNS3 (Dynamips). Add the following statements to the end of the VSRX.vmx file to create a virtual serial port that will allow us to emulate a console port connection via telnet:

serial0.present = "TRUE"

serial0.yieldOnMsrRead = "TRUE"

serial0.fileType = "network"

serial0.fileName = "telnet://127.0.0.1:52151"

We are finished configuring the .vmx file, so let's save (control + o) the file, press the enter key to confirm, then exit (control + x) the nano text editor. 
Run the following command to verify the configuration from the terminal:

$ grep serial $HOME/Documents/Virtual\ Machines.localized/VSRX.vmwarevm/VSRX.vmx

serial0.present = "TRUE"

serial0.yieldOnMsrRead = "TRUE"

serial0.fileType = "network"

serial0.fileName = telnet://127.0.0.1:52151

2.3 Cisco CSR1000V
The Open Virtual Appliance (OVA) import process and network configuration is essentially the same as the VSRX. 
Import the VMware virtual appliance with the following steps:

1. Click File -> Import... from the VMware Fusion menu bar.

2. Click the Choose File... button.

3. Navigate to and select the csr1000v-universalk9.03.11.00.S.154-1.S-std-C1-M2560-N3-DS8.ova file.

4. Click the Open button.

5. Click the Continue button.

6. Rename the package to CSR1000V.

7. Click the Save button to save the virtual machine in the default Virtual Machines folder.

8. Click the Customize Settings button to change the network configuration.

By default, all three of the virtual network adapters are configured for Bridged Networking. We need to change them to use the virtual switches we created earlier. We will only use the first two network adapters in our topology. Network Adapter 3 can be attached to the default host-only network (Private to my Mac).

1. Click the Network Adapter menu item.

2. Click the vmnet11 radio button.

3. Click the Show All button to return to the virtual machine settings menu.

4. Click the Network Adapter 2 menu item.

5. Click the vmnet12 radio button.

6. Click the Show All button to return to the virtual machine settings menu.

7. Click the Network Adapter 3 menu item.

8. Click the Private to my Mac radio button.

9. Click the Show All button to return to the virtual machine settings menu.

10. Close the settings window.

Just like for the VSRX, directly edit the CSR1000V.vmx (virtual machine configuration) file to add the custom virtual serial port. My CSR1000V virtual machine is located in the default VMware Fusion folder (directory), so I would edit the file with the following command from the terminal:

$ nano $HOME/Documents/Virtual\ Machines.localized/CSR1000V.vmwarevm/CSR1000V.vmx

Add the following statements to the end of the CSR1000V.vmx file to create a virtual serial port that will allow us to emulate a console port connection via telnet:

serial0.present = "TRUE"

serial0.yieldOnMsrRead = "TRUE"

serial0.fileType = "network"

serial0.fileName = "telnet://127.0.0.1:52152"

We are finished configuring the .vmx file, so let's save (control + o) the file, press the enter key to confirm, then exit (control + x) the nano text editor. 
Run the following command to verify the configuration from the terminal:

$ grep serial $HOME/Documents/Virtual\ Machines.localized/CSR1000V.vmwarevm/CSR1000V.vmx

serial0.present = "TRUE"

serial0.yieldOnMsrRead = "TRUE"

serial0.fileType = "network"

serial0.fileName = telnet://127.0.0.1:52152

2.4 Cisco Adaptive Security Appliance (ASA)
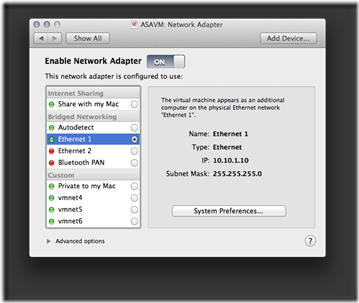
Refer to my previous post on how to create a Cisco ASA virtual machine in VMware Fusion. For our topology, the outside logical interface will be Network Adapter, and the inside logical interface will be Network Adapter 2 (attached to vmnet10). The outsidelogical interface will be using Bridged Networking because it's the interface that connects our virtual network to the physical world. For my setup, Ethernet 1 is the wired Ethernet network interface on my Mac that has access to the Internet.
clip_image007

Important: Quit (and reopen) the VMware Fusion application for the .vmx file changes to take effect. 
3. Basic Device Configuration
With the GNS3 and VMware sections complete, it's time to focus on each device configuration. I will start with the innermost network device and verify adjacent connections along the path to the ASAVM.

3.1 VSRX
The SRX is typically deployed as a network security device, but it will perform solely as a router in our lab. It runs Junos, so it has the potential to function with practically any network role we would need. 
Start VSRX in VMware Fusion, and establish a console port connection to the VSRX device via telnet. Run this command from a new terminal window (tab):

$ telnet 127.0.0.1 52151

Log in as root with no password.

Amnesiac (ttyd0)

login: root

Start the CLI.

root@% cli

Show version information. 

root> show version

Model: firefly-perimeter

JUNOS Software Release [12.1X46-D10.2]

Enter configuration mode. 

root> configure

Set the root authentication password with a cleartext password.

[edit]

root# set system root-authentication plain-text-password

New password: Pa$$worD1

Retype new password: Pa$$worD1

Set the hostname. 

[edit]

root# set system host-name vsrx

Configure the network interfaces.

[edit]

root# set int ge-0/0/0.0 family inet addr 172.28.4.254/24

[edit]

root# set int ge-0/0/1.0 family inet addr 192.168.5.1/24

Remove the ge-0/0/0 interface from the untrust security zone. ge-0/0/0 is a management interface by default, but it will be used as a traffic interface in our topology.

root# delete security zones security-zone untrust interfaces ge-0/0/0.0

Assign the interfaces to the trust security zone. 

root# edit security zones security-zone trust

[edit security zones security-zone trust]

root# set interfaces ge-0/0/0

[edit security zones security-zone trust]

root# set interfaces ge-0/0/1

Configure the trust zone to support inbound traffic for the ping system service. 

[edit security zones security-zone trust]

root# set host-inbound-traffic system-services ping

Check correctness of syntax for current set of changes.

[edit security zones security-zone trust]

root# commit check

configuration check succeeds

Commit current set of changes and quit configuration mode. 

[edit security zones security-zone trust]

root# commit and-quit

commit complete

Exiting configuration mode

Verify the IP configuration for the network interfaces.

root@vsrx> show interfaces ge* terse

Interface Admin Link Proto Local Remote

ge-0/0/0 up up

ge-0/0/0.0 up up inet 172.28.4.254/24

ge-0/0/1 up up

ge-0/0/1.0 up up inet 192.168.5.1/24

From the viewpoint of the host operating system, we need to "glue" a couple of network interfaces together to create a compoundinterface. If you remember from our initial GNS3 Host object configuration, we attached two TAP interfaces to the VSRX object; interface tap3 for ge-0/0/0 and tap4 for ge-0/0/1. GNS3 uses a TAP interface to pass network traffic to the host operating system.

What about VMware? Virtual network adapters are attached to a host-only vmnet (virtual switch); one (or more) network adapters for the VM and another for the host operating system. 
What we need is a construct to bind a single TAP interface with the VMware virtual network adapter allocated to the host operating system. That construct is a bridge interface. For our purposes, a bridge interface contains both a TAP interface and the VMware virtual network adapter (for the host OS) as members. Essentially, the members of the bridge interface are put into promiscuous mode, so they're able to "see" each other's network traffic.

Clear the IP configuration for the vmnet13 virtual network interface before adding it as a member to the bridge. Run the following commands from a separate terminal window (tab):

$ sudo ifconfig vmnet13 down

$ sudo ifconfig vmnet13 inet delete

Create a bridge interface for ge-0/0/0 with the following commands from the terminal:

$ sudo ifconfig bridge3 create

$ sudo ifconfig bridge3 addm tap3

$ sudo ifconfig bridge3 addm vmnet13

$ sudo ifconfig bridge3 up

Verify the configuration with the following command from the terminal: 

$ ifconfig bridge3

bridge3: flags=8863<UP,BROADCAST,SMART,RUNNING,SIMPLEX,MULTICAST> mtu 1500

options=3<RXCSUM,TXCSUM>

ether 02:1f:5b:a3:f3:03

Configuration:

id 0:0:0:0:0:0 priority 0 hellotime 0 fwddelay 0

maxage 0 holdcnt 0 proto stp maxaddr 100 timeout 1200

root id 0:0:0:0:0:0 priority 0 ifcost 0 port 0

ipfilter disabled flags 0x2

member: tap3 flags=3<LEARNING,DISCOVER>

ifmaxaddr 0 port 14 priority 0 path cost 0

member: vmnet13 flags=3<LEARNING,DISCOVER>

ifmaxaddr 0 port 28 priority 0 path cost 0

Address cache:

0:c:29:b4:c9:e4 Vlan1 vmnet13 1196 flags=0<>

c2:0:2c:1c:0:1 Vlan1 tap3 1190 flags=0<>

media: <unknown type>

status: inactive

Clear the IP configuration for the vmnet14 virtual network interface before adding it as a member to the bridge. Run the following commands from the terminal:

$ sudo ifconfig vmnet14 down

$ sudo ifconfig vmnet14 inet delete

And create a bridge interface for ge-0/0/1 with the following commands from the terminal:

$ sudo ifconfig bridge4 create

$ sudo ifconfig bridge4 addm tap4

$ sudo ifconfig bridge4 addm vmnet14

$ sudo ifconfig bridge4 up

3.2 R1
Start R1 in GNS3. Identify the console port number for R1 in the GNS3 management console with the list R1 command.

clip_image008

Establish a console port connection to the R1 device via telnet. Run this command from a new terminal window (tab):

$ telnet 127.0.0.1 2101

Configure the Fast Ethernet interfaces and bring them up. 

R1# conf t

R1(config)# int f0/0

R1(config-if)# ip addr 172.16.3.254 255.255.255.0

R1(config-if)# duplex full

R1(config-if)# speed 100

R1(config-if)# no shut

R1(config-if)# int f0/1

R1(config-if)# ip addr 172.28.4.1 255.255.255.0

R1(config-if)# duplex full

R1(config-if)# speed 100

R1(config-if)# no shut

R1(config-if)# end

Save the running configuration to local NVRAM. 

R1# copy run start

Verify network connectivity to the ge-0/0/0 interface of VSRX. 

R1# ping 172.28.4.254

Type escape sequence to abort.

Sending 5, 100-byte ICMP Echos to 172.28.4.254, timeout is 2 seconds:

.!!!!

Success rate is 80 percent (4/5), round-trip min/avg/max = 8/22/52 ms

Display the ARP cache. 

R1# sh arp

Protocol Address Age (min) Hardware Addr Type Interface

Internet 172.16.3.254 - c200.b04b.0000 ARPA FastEthernet0/0

Internet 172.28.4.1 - c200.b04b.0001 ARPA FastEthernet0/1

Internet 172.28.4.254 0 000c.29b4.c9e4 ARPA FastEthernet0/1

3.3 CSR1000V
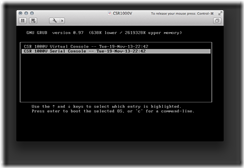
Start CSR1000V in VMware Fusion. Select CSR 1000V Serial Console at the GRUB menu.
clip_image009

Establish a console port connection to the CSR1000V device via telnet. Run this command from a new terminal window (tab):

$ telnet 127.0.0.1 52152

Enter “no” to bypass the setup command facility.

...

cisco CSR1000V (VXE) processor with 814729K/6147K bytes of memory.

Processor board ID 9LX4G1A6QS5

3 Gigabit Ethernet interfaces

32768K bytes of non-volatile configuration memory.

3145728K bytes of physical memory.

7774207K bytes of virtual hard disk at bootflash:.

--- System Configuration Dialog ---

Would you like to enter the initial configuration dialog? [yes/no]: no

Change the technology package license boot level, and reload for the configuration to take effect.

Router> en

Router# conf t

Router(config)# license boot level premium

Router(config)# end

Router# copy run start

Router# reload

Verify the license. 

Router> en

Router# sh license | in Type

License Type: Evaluation

Router# sh license | in Period

Period left: 8 weeks 3 days

Show the current maximum throughput level.

Router# show platform hardware throughput level

The current throughput level is 50000 kb/s

Set the hostname. 

Router# conf t

Router(config)# hostname csr1000v

Set lab options.

csr1000v(config)# no ip domain-lookup

csr1000v(config)# line con 0

csr1000v(config-line)# exec-timeout 0 0

csr1000v(config-line)# logging sync

csr1000v(config-line)# end

We can display the interface mapping with the following command:

csr1000v# show platform software vnic-if interface-mapping

-------------------------------------------------------------

Interface Name Driver Name Mac Addr

-------------------------------------------------------------

GigabitEthernet3 vmxnet3 000c.29cb.09b2

GigabitEthernet2 vmxnet3 000c.29cb.09a8

GigabitEthernet1 vmxnet3 000c.29cb.099e

-------------------------------------------------------------

From a separate terminal window (tab), run the following command to verify the CSR1000V virtual machine configuration vNIC order is correct for our topology:

$ grep 00:0c $HOME/Documents/Virtual\ Machines.localized/CSR1000V.vmwarevm/CSR1000V.vmx

ethernet0.generatedAddress = "00:0c:29:cb:09:9e"

ethernet1.generatedAddress = "00:0c:29:cb:09:a8"

ethernet2.generatedAddress = "00:0c:29:cb:09:b2"

Back in the CSR1000V terminal window (tab), configure the Gigabit Ethernet interfaces and bring them up.

csr1000v# conf t

csr1000v(config)# int g1

csr1000v(config-if)# ip addr 10.10.2.254 255.255.255.0

csr1000v(config-if)# no shut

csr1000v(config-if)# int g2

csr1000v(config-if)# ip addr 172.16.3.1 255.255.255.0

csr1000v(config-if)# no shut

csr1000v(config-if)# exit

Enable Cisco Discovery Protocol (CDP).

csr1000v(config)# cdp run

csr1000v(config)# int g2

csr1000v(config-if)# cdp enable

csr1000v(config-if)# end

Save the running configuration to local NVRAM.

csr1000v# copy run start

Clear the IP configuration for the vmnet12 virtual network interface before adding it as a member to the bridge. Run the following commands from a separate terminal window (tab):

$ sudo ifconfig vmnet12 down

$ sudo ifconfig vmnet12 inet delete

Create a bridge interface for Gi2 with the following commands from the terminal:

$ sudo ifconfig bridge2 create

$ sudo ifconfig bridge2 addm tap2

$ sudo ifconfig bridge2 addm vmnet12

$ sudo ifconfig bridge2 up

Clear the IP configuration for the vmnet11 virtual network interface before adding it as a member to the bridge. Run the following commands from the terminal:

$ sudo ifconfig vmnet11 down

$ sudo ifconfig vmnet11 inet delete

And create a bridge interface for Gi1 from the terminal.

$ sudo ifconfig bridge1 create

$ sudo ifconfig bridge1 addm tap1

$ sudo ifconfig bridge1 addm vmnet11

$ sudo ifconfig bridge1 up

Back in the CSR1000V terminal window (tab), run the following command to verify data link layer connectivity with R1:

csr1000v# sh cdp neigh detail

-------------------------

Device ID: R1

Entry address(es):

IP address: 172.16.3.254

Platform: Cisco 3725, Capabilities: Router Switch IGMP

Interface: GigabitEthernet2, Port ID (outgoing port): FastEthernet0/0

Holdtime : 121 sec

Version :

Cisco IOS Software, 3700 Software (C3725-ADVENTERPRISEK9-M), Version 12.4(15)T10, RELEASE SOFTWARE (fc3)

Technical Support: http://www.cisco.com/techsupport

Copyright (c) 1986-2009 by Cisco Systems, Inc.

Compiled Mon 14-Sep-09 15:53 by prod_rel_team

advertisement version: 2

VTP Management Domain: ''

Duplex: full

Total cdp entries displayed : 1

3.4 ASAVM
Start ASAVM in VMware Fusion, and establish a console port connection to the ASAVM device via telnet. Run this command from a new terminal window (tab):

$ telnet 127.0.0.1 52150

Set the hostname.

ciscoasa> en

Password:

ciscoasa# conf t

ciscoasa(config)# hostname asavm

Configure the Gigabit Ethernet interfaces and bring them up. 

asavm(config)# int g0

asavm(config-if)# nameif outside

INFO: Security level for "outside" set to 0 by default.

asavm(config-if)# ip addr 10.10.1.254 255.255.255.0

asavm(config-if)# no shut

asavm(config-if)# int g1

asavm(config-if)# nameif inside

INFO: Security level for "inside" set to 100 by default.

asavm(config-if)# ip addr 10.10.2.1 255.255.255.0

asavm(config-if)# no shut

asavm(config-if)# exit

Create a network object for the inside security zone, and enable dynamic Port Address Translation (PAT).

asavm(config)# object network OBJ-INSIDE

asavm(config-network-object)# subnet 0 0

asavm(config-network-object)# nat (inside,outside) dynamic interface

asavm(config-network-object)# exit

Create the default route. For my configuration, the next hop IP address is my physical router's private IP address NAT'd to the Internet. It's also the gateway IP address for the host computer.

asavm(config)# route outside 0 0 10.10.1.1

Permit ping and traceroute traffic.

asavm(config)# access-list outside_access_in extended permit icmp any any time-exceeded

asavm(config)# access-list outside_access_in extended permit icmp any any unreachable

asavm(config)# access-group outside_access_in in interface outside

asavm(config)# fixup protocol icmp

INFO: converting 'fixup protocol icmp ' to MPF commands

asavm(config)# icmp unreachable rate-limit 10 burst-size 5

asavm(config)# policy-map global_policy

asavm(config-pmap)# class class-default

asavm(config-pmap-c)# set connection decrement-ttl

asavm(config-pmap-c)# end

Save the running configuration to local NVRAM.

asavm# copy run start

Clear the IP configuration for the vmnet10 virtual network interface before adding it as a member to the bridge. Run the following commands from a separate terminal window (tab):

$ sudo ifconfig vmnet10 down

$ sudo ifconfig vmnet10 inet delete

Create a bridge interface for Gi1 with the following commands from the terminal:

$ sudo ifconfig bridge0 create

$ sudo ifconfig bridge0 addm tap0

$ sudo ifconfig bridge0 addm vmnet10

$ sudo ifconfig bridge0 up

Back in the ASAVM terminal window (tab), check network connectivity to the Gi1 interface of CSR1000V.

asavm# ping 10.10.2.254

Type escape sequence to abort.

Sending 5, 100-byte ICMP Echos to 10.10.2.254, timeout is 2 seconds:

!!!!!

Success rate is 100 percent (5/5), round-trip min/avg/max = 1/1/1 ms

And check network connectivity to the next hop IP address for the default route.

asavm# ping 10.10.1.1

Type escape sequence to abort.

Sending 5, 100-byte ICMP Echos to 10.10.1.1, timeout is 2 seconds:

!!!!!

Success rate is 100 percent (5/5), round-trip min/avg/max = 1/1/1 ms

Display the ARP cache.

asavm# sh arp

outside 10.10.1.1 000c.41d6.9928 1

inside 10.10.2.254 000c.29cb.099e 28

4. OSPF
After we've established (and verified) network connectivity among the adjacent devices, we need to configure OSPF for full reachability.

4.1 VSRX
From the VSRX terminal window (tab): 
Enter configuration mode.

root@vsrx> configure

Allow OSPF traffic for the trust zone.

[edit]

root@vsrx# edit security zones security-zone trust

[edit security zones security-zone trust]

root@vsrx# set host-inbound-traffic protocols ospf

Configure the loopback interface.

[edit security zones security-zone trust]

root@vsrx# top set interfaces lo0.0 family inet address 3.3.3.3/32

Set the Router ID. 

[edit security zones security-zone trust]

root@vsrx# top set routing-options router-id 3.3.3.3

Configure OSPF. 

[edit security zones security-zone trust]

root@vsrx# top edit protocols

[edit protocols]

root@vsrx# set ospf area 1 interface lo0.0 passive

[edit protocols]

root@vsrx# set ospf area 1 interface ge-0/0/0.0

[edit protocols]

root@vsrx# set ospf area 1 interface ge-0/0/1.0 passive

Check correctness of syntax for current set of changes.

[edit protocols]

root@vsrx# commit check

configuration check succeeds

Commit current set of changes and quit configuration mode. 

[edit protocols]

root@vsrx# commit and-quit

commit complete

Exiting configuration mode

Verify OSPF configuration.

root@vsrx> show ospf overview

Instance: master

Router ID: 3.3.3.3

Route table index: 0

LSA refresh time: 50 minutes

Area: 0.0.0.1

Stub type: Not Stub

Authentication Type: None

Area border routers: 0, AS boundary routers: 0

Neighbors

Up (in full state): 0

Topology: default (ID 0)

Prefix export count: 0

Full SPF runs: 3

SPF delay: 0.200000 sec, SPF holddown: 5 sec, SPF rapid runs: 3

Backup SPF: Not Needed

4.2 R1
R1 will be configured as an Area Border Router (ABR). From the R1 terminal window (tab): 
Configure the loopback interface.

R1# conf t

R1(config)# int lo0

R1(config-if)# ip addr 1.1.1.1 255.255.255.255

R1(config-if)# exit

Configure OSPF.

R1(config)# router ospf 1

R1(config-router)# passive-interface lo0

R1(config-router)# log-adjacency-changes

R1(config-router)# exit

R1(config)# int lo0

R1(config-if)# ip ospf 1 area 0

R1(config-if)# int f0/0

R1(config-if)# ip ospf 1 area 0

R1(config-if)# int f0/1

R1(config-if)# ip ospf 1 area 1

R1(config-if)# end

Save the running configuration to local NVRAM. 

R1# copy run start

Verify VSRX as an OSPF neighbor.

Taken From: http://binarynature.blogspot.pt/2014/02/implement-multivendor-ospf-lab-gns3-vmware-fusion.html
How to Stream a PC Games (and more) - With Twitch TV

clip_image001

Game-streaming services like Twitch TV are becoming bigger and bigger. Whether you want to let your friends watch you play a game or try to build up a larger audience, streaming is easy.

The PlayStation 4 and Xbox One have built-in support for streaming to Twitch. Some PC games even have built-in Twitch TV support — but, for most games, you’ll need a third-party streaming program to stream.

Important Notes

Note that Twitch only supports public streams at this time. If you want to broadcast a private stream, you may want to try Justin.tv, a competing service. The process should be similar.

Twitch recommends fairly powerful hardware for streaming. Twitch itself recommends you use an Intel Core i5-2500K 3.3GHz or AMD equivalent CPU, at least 8GB of DDR3 SDRAM, and Windows 7 — Windows Vista or XP are not ideal. If your stream doesn’t perform smoothly, you probably need a faster CPU and perhaps more RAM.

Get a Twitch TV Stream Key

We’re broadcasting using Twitch TV because it’s the most popular option. Sure, you could host your own stream and stream directly to your viewers, but it takes much less upload bandwidth to stream a game to a website like Twitch and allow that website to rebroadcast it to your viewers. This also frees you up from having to forward ports and deal with other nasty networking issues.

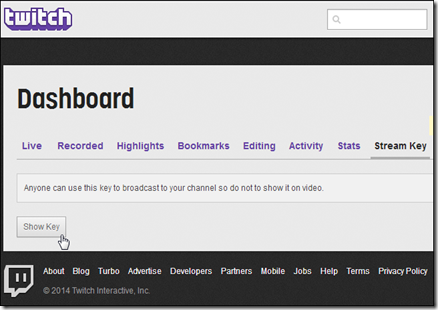
First, you’ll need to make a free Twitch account you’ll stream the game with. Just visit Twitch TV and create an account. After creating an account, click your account name at the top-right corner of the Twitch homepage, select Dashboard, and click the Stream Key heading. Click the Show Key button.

You’ll need this key to stream to your channel. Anyone who has the key can stream to your channel, so don’t share it.

clip_image002

Set Up OBS Game Capture Mode

Open Broadcaster Software is a free, open-source video recording and streaming application that’s ideal for streaming on Twitch. We recently covered using Open Broadcaster Software to record a screencast, but you can also use Open Broadcaster Software to stream live to a channel like Twitch. OBS also allows you to add additional elements to your stream, so you can add live video from your webcam, image overlays, and other things.

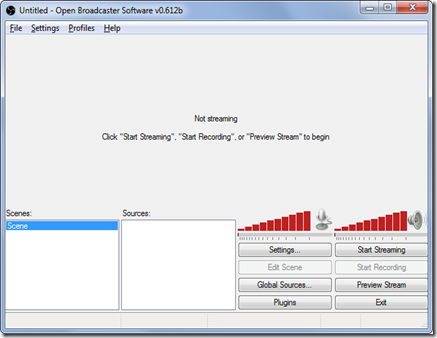
Download Open Broadcaster Software, install it, and fire it up. OBS uses “scenes” and “sources.” It comes with one scene by default, and that will work fine. A scene can have one or more sources — so you could have a scene that displays the contents of a game window, or the contents of a game window and a webcam. You could have a separate scene for each game you want to stream and switch between them on the fly.

clip_image004

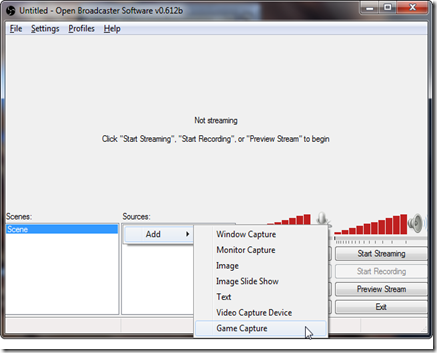
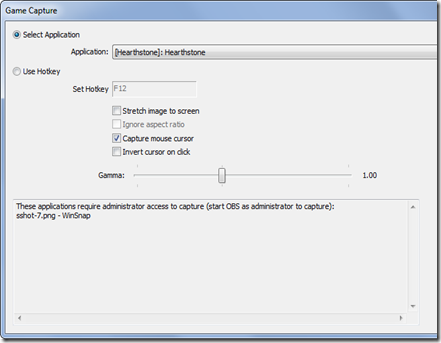
The first thing we’ll need to do is add the game’s window as a source to our scene. First, you’ll need to open the game and have it running in the background. With the game running, right-click in the Sources box, point to Add, and select Game Capture.

clip_image005

Select the application window you want to capture and click OK. You can change these options later, too — just right-click the game capture source in your Sources list and select Properties.

clip_image006

The Preview Stream button will now allow you to preview your stream. A black stream is normal if you’re Alt+Tabbed out of a full-screen game.

Using Monitor Capture Mode

Game Capture mode just doesn’t work with every game. If you see a black screen while you’re playing the game, things aren’t working properly.

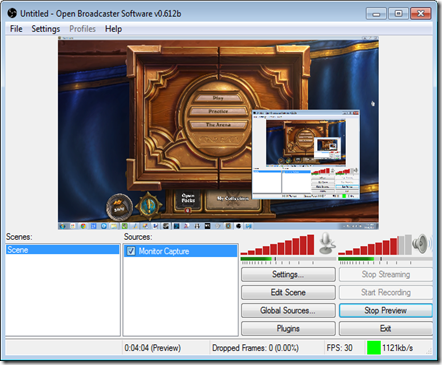
OBS’s FAQ notes that OpenGL games — including Minecraft — have issues with Game Capture mode. If your game doesn’t seem to stream properly, you’ll need to use Monitor Capture mode. This captures your entire desktop, including the game on it. You’ll want to disable Aero in Windows’ settingsbefore doing this — the Aero graphics require more resources and will slow down your stream.

To use Monitor Capture mode, first right-click your Game Capture source and click Remove to remove it rom the list. Right-click inside the Sources box and add the Monitor Capture source. The default settings should work fine.

clip_image008

Set up Twitch Streaming

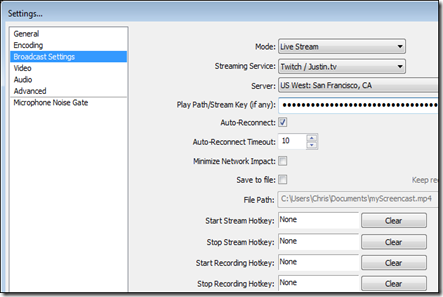
You’ll now need to connect OBS to your Twitch channel. Click the Settings button in OBS and select Settings. Click the Broadcast Settings category, set the Mode to Live Streaming, and set the Streaming Service to Twitch / Justin.tv.

Select the closest server to you and enter your Twitch stream key. These are the only essential settings here.

clip_image009

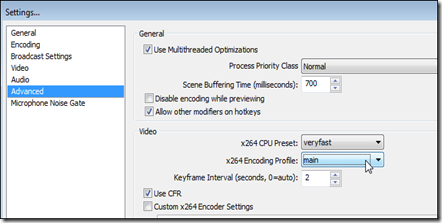
You’ll also need to change some encoding settings to ensure you’re streaming in an optimized format.

clip_image010

The Broadcast Settings pane will tell you exactly what you need to change. By default, you’ll just need to visit the Advanced settings pane and tweak a few video encoding settings.

clip_image011

You can now stream to Twitch, but it won’t necessarily be smooth. You’ll probably want to visit the Encoding pane in OBS’s settings and change your quality settings. The ideal setting depends on your hardware and connection speed. Higher quality settings require more hardware resources and a upload bandwidth. OBS provides a Stream Settings Estimator toolthat will help you decide on the optimal settings.

Start Streaming

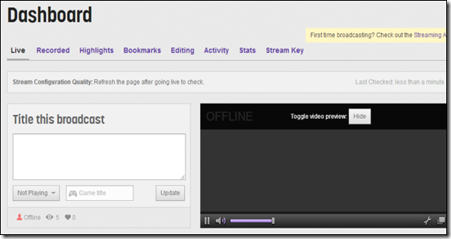
After setting everything up, all you need to do is click Start Streaming in OBS. You can then see a preview of your stream, provide a title, and set your “Now Playing” status on the Dashboard page — click your username at the top-right corner of the Twitch page and select Dashboard.

To share your stream with other people, just direct them to your channel page — it’s twitch.tv/user , where “user” is your username.

clip_image012

To add webcam videos and other elements, just add them to your scene as additional sources and reposition them. You’ll find more information on configuring multiple sources for a single scene in our guide to screencasting with OBS.

Taken From: http://www.howtogeek.com/183900/how-to-stream-a-pc-game-online-with-twitch-tv/

HP ProCurve Switch - Reset and Basic Configuration

clip_image001

Reset switch to factory defaults

If I’m not using brand new switch, I normally like to reset it back to factory defaults before doing anything.
Use a pointy object (like paper clip) and press “Reset” and “Clear” buttons on the front of the switch at the same time.
Release “Reset” button. When “Self Test” LED start to blink, release “Clear” button too. Now the switch should do it test routines. After that it should be back on factory defaults.

IP-Address

HP ProCurve Switch 2524# configure
HP ProCurve Switch 2524(config)# vlan 1
HP ProCurve Switch 2524(vlan-1)# ip address 10.0.0.1 255.255.255.0
HP ProCurve Switch 2524(vlan-1)# wr mem
HP ProCurve Switch 2524(vlan-1)# exit
HP ProCurve Switch 2524(config)# exit
HP ProCurve Switch 2524#

Configure VLANs

HP ProCurve Switch 2524# configure
HP ProCurve Switch 2524(config)# vlan 1
HP ProCurve Switch 2524(vlan-1)# name "Default"
HP ProCurve Switch 2524(vlan-1)# untag 2-6
HP ProCurve Switch 2524(vlan-1)# vlan 10
HP ProCurve Switch 2524(vlan-10)# name "First"
HP ProCurve Switch 2524(vlan-10)# untag 7-12
HP ProCurve Switch 2524(vlan-10)# vlan 20
HP ProCurve Switch 2524(vlan-20)# name "Second"
HP ProCurve Switch 2524(vlan-20)# untag 13-18
HP ProCurve Switch 2524(vlan-20)# exit
HP ProCurve Switch 2524(config)# exit
HP ProCurve Switch 2524#

Set up trunk ports

HP ProCurve Switch 2524# config
HP ProCurve Switch 2524(config)# trunk 23-24 trk1
HP ProCurve Switch 2524(config)# vlan 10
HP ProCurve Switch 2524(vlan-10)# tagged trk1
HP ProCurve Switch 2524(vlan-10)# vlan 20
HP ProCurve Switch 2524(vlan-20)# tagged trk1
HP ProCurve Switch 2524(vlan-20)# wr mem
HP ProCurve Switch 2524(vlan-20)# exit
HP ProCurve Switch 2524(config)# exit
HP ProCurve Switch 2524#

Disable all (but trunk) ports

HP ProCurve Switch 2524# configure
HP ProCurve Switch 2524(config)# int 2-22 disable
HP ProCurve Switch 2524(config)# wr mem
HP ProCurve Switch 2524(config)# exit
HP ProCurve Switch 2524#

Enable only necessary ports

HP ProCurve Switch 2524# configure
HP ProCurve Switch 2524(config)# int 2-4 enable
HP ProCurve Switch 2524(config)# int 13-15 enable
HP ProCurve Switch 2524(config)# wr mem
HP ProCurve Switch 2524(config)# exit
HP ProCurve Switch 2524#

Set up speed etc.

HP ProCurve Switch 2524# configure
HP ProCurve Switch 2524(config)# int 2-4 speed-duplex 100-full
HP ProCurve Switch 2524(config)# int 13-15 speed-duplex auto
HP ProCurve Switch 2524(config)# wr mem
HP ProCurve Switch 2524(config)# exit
HP ProCurve Switch 2524#

Set time and date

Time and date on hh:mm and mm:dd:yyyy format

HP ProCurve Switch 2524# configure
HP ProCurve Switch 2524(config)# time 10:05
Mon Jan 1 10:05:28 1990
HP ProCurve Switch 2524(config)# time 08/24/2010
Tue Aug 24 10:05:41 2010
HP ProCurve Switch 2524(config)# wr mem
HP ProCurve Switch 2524(config)# exit
HP ProCurve Switch 2524#

Set hostname

HP ProCurve Switch 2524# configure
HP ProCurve Switch 2524(config)# hostname "ServerRoom1"
ServerRoom1(config)# wr mem
ServerRoom1(config)# exit
ServerRoom1#

Backup settings

After running “sh run” copy/paste all between line which start with “hostname” to “ServerRoom1#” example to notepad and save that file.

ServerRoom1# sh run
ServerRoom1#

Restore settings from backup

All you have to do is copy/paste all (except the first “Running configuration:” line) to notepad on “Backup settings” part to “HP ProCurve Switch 2524#”.
If you have set operator and/or manager passwords, don’t copy/paste the lines which start with password.

HP ProCurve Switch 2524# configure
HP ProCurve Switch 2524(config)#

Set manager and operator password

ServerRoom1# configure
ServerRoom1(config)# password all
New password for Operator: ********
Please retype new password for Operator: ********
New password for Manager: ********
Please retype new password for Manager: ********
ServerRoom1(config)#

Update firmware using tftp server

If you are using windows machine and need tftp server software, you should try 3CDaemon. It’s free, portable, and it works like a dream =)

Download newest firmware from HP’s website: Software for switches.
For my switch HP ProCurve 2524gl, newest firmware was F.05.72. I downloaded 2300_2500-Software-F0572.zip package and extracted it to “2300_2500-Software-F0572″ folder.

Now I have directory “2300_2500-Software-F0572″ with 2300_2500-RelNotes-F0572-59903102.pdf (Release Notes). I also have F_05_72.swi file and this .swi file is the firmware which you are going to use to update your switch.

ServerRoom1# configure
ServerRoom1(config)# copy tftp flash 10.0.0.100 F_05_72.swi
Device will be rebooted, do you want to continue [y/n]? y
00126K

After F_05.72.swi is copied to the switch, you should get this kind of line. When eve everything goes ok your switch will reboot itself:

Validating and Writing System Software to FLASH...

Update firmware using xmodem over serial connection

I normally use Microsoft Hyperterminal when I’m doing this because it’s pretty easy to use xmodem to upload files with hyperterminal

Download newest firmware from HP’s website: Software for switches For my switch HP ProCurve 2524gl newest firmware was F.05.72 so I downloaded 2300_2500-Software-F0572.zip package and extracted it to “2300_2500-Software-F0572″.

Now I have directory “2300_2500-Software-F0572″ with 2300_2500-RelNotes-F0572-59903102.pdf (Release Notes) and F_05_72.swi file and this .swi file is the firmware which you are going to use to update your switch)

HP ProCurve Switch 2524# configure
HP ProCurve Switch 2524(config)# copy xmodem flash
The Primary OS Image will be deleted, continue [y/n]? y
Press 'Enter' and start XMODEM on your host...

After hitting ‘Enter’, start uploading using hyperterminal from menu: “Transfer” => “Send File…” then click “Browse…” and find that F_05_72.swi file and choose Xmodem (Not “1K Xmodem”) protocol. Then hit “Send” button. When everything is done you should see this kind of message and after that switch should boot:

Validating and Writing System Software to FLASH...

[note]This configuration was done with HP ProCurve 2524 (J4813A) but most of this command should work with other procurve switches too.[/note]

Related posts:

  1. HP ProCurve CLI CheatSheet
  2. How to reset Cisco Catalyst 2948G-L3 Switch
  3. Raspberry Pi: Get GPS Working with Kismet
  4. Raspberry Pi: Wireless Network

Taken From: http://blog.petrilopia.net/info/configuring-hp-procurve-switch/

PS4 Controller on your Mac or PC

Sony made a host of improvements to their controller, with the PlayStation 4′s DualShock 4. It seems slightly smaller, but the handholds are thicker, giving it a markedly more comfortable grip. The joysticks have been modified too, now convex and with a button click that’s easier to trigger. These and other changes make theDualShock 4 controller a joy to use. While we wait for PlayStation 4 games to grow in number, we’ll also show you how to use the DualShock 4 on your Mac or PC.

1. Connect the DualShock 4 to a PC

Using your DualShock 4 on a PC takes some tweaking to begin with, but compatibility is great. We’ll use DS4Tool, a wrapper application created by InhexSTER that makes the DualShock 4 look like an Xbox 360 controller. It’s thanks to this piggybacking off the support for the this device that we can ensure such good compatibility for the DualShock 4.

1.1 Download and Install Prerequisites

Before you’re able to use DS4Tool, you’ll need to install some prerequisite software on your computer. Start by downloading and installing the Xbox 360 Wireless Controller for Windows drivers. Also download the latest version of DS4Tool (currently 1.2.2) to your computer. The archive contains only executables, no installer wizard, so you’ll want to extract its contents to an easily accessible location on your computer.

Other prerequisites will be installed on a lot of PCs already. Verify, or re-install these if you are experiencing trouble:

o Microsoft .NET Framework 4.0

o Microsoft Visual C 2010 (or 2012) Runtime

o Latest DirectX Runtime

1.2 Install SCP Virtual Bus Driver

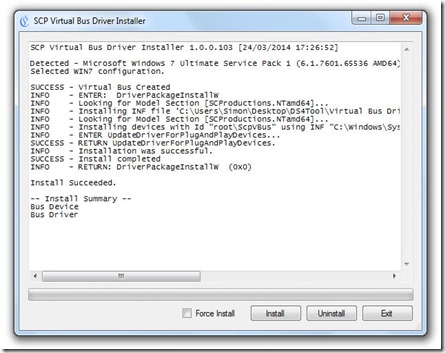
Head to the folder where you extracted DS4Tool in the previous step and run Virtual Bus Driver > SCPDriver.exe. Make sure to run it as Administrator, otherwise it won’t work.

clip_image001

In the application, press the Install button. This should only take a second. The application ends with an ‘Install Succeeded’ message, even if it failed. Check in the log that all operations are marked with SUCCESS, instead of ERROR. If you encounter errors, make sure you’re running the application as Administrator.

1.3 Connect the DualShock 4 Controller

This is where you connect your PlayStation 4′s DualShock 4 to your computer. You can use either a Micro-USB cable, like the one that comes with the PS4, or connect wirelessly over Bluetooth.

If you’re going with USB, just use a Micro-USB to connect your controller with your computer. Windows should recognise the device and start installing drivers. Easy as pie.

clip_image002

For Bluetooth, you’ll need a Bluetooth 2.1 and EDR (Enhanced Data Rate) support. First make sure your console and controller are both powered off. The LED light bar on the back of your controller should be off, too. Press and hold the PS and Share buttons on your controller until the LED light bar starts flashing. At this point, you should be able to pair with the controller on your computer’s Bluetooth Add Device menu. Chris Hoffman wrote a great walkthrough to pair with Bluetooth devices on Windows 7.

After playing over Bluetooth, press and hold the PS button to turn your controller off.

1.4 Run the DS4Tool Mapper

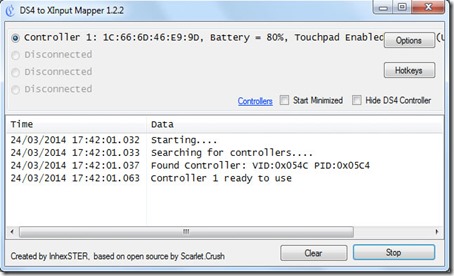
Go back to the folder to which you extracted DS4Tool and run ScpServer.exe. This is the application that actively maps the controls of your DualShock 4 controller to Xbox 360′s signals. If all went well, the application will recognize your controller as ‘Controller 1′.

clip_image003

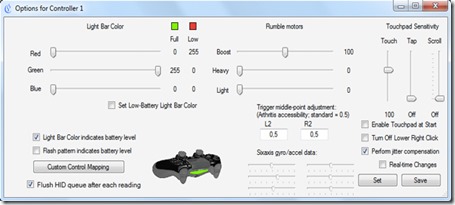
Press Options to tweak the settings for an individual controller. This is mostly for advanced users, so the golden rule of thumb is: if you don’t know what it’s for, don’t touch it. One fun extra is that you can let the Light Bar colour indicate battery level. To use this, tick off the box in the lower left and play with the colours above it.

clip_image004

There’s nothing more to it, so go play with your DualShock 4 controller! All games that support the Xbox 360 controller will now support yours out of the box.

2. Connect the DualShock 4 to a Mac

The set-up process for connecting a DualShock 4 to your Mac is a lot less complicated than for the PC. However, there’s also very little out of the box compatibility, so you’ll have to manually configure your controller for a lot of games.

2.1 Connect the DualShock 4 Controller

There are two ways to connect a DualShock 4 controller to your Mac. Either use a Micro-USB cable, like the one that comes with the PS4, or connect wirelessly over Bluetooth.

To connect over USB, just find a Micro-USB cable and plug your controller into your Mac. Your Mac will automatically detect it and the LED Light Bar on the controller back will light up.

clip_image005

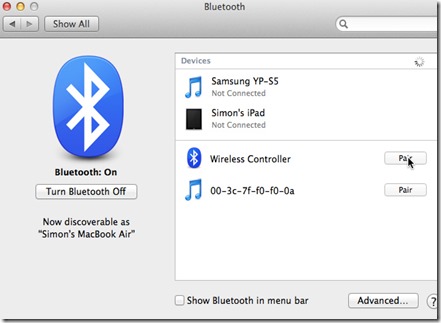
To connect over Bluetooth, first make sure your console and controller are both turned off. The Light Bar on the back should also be off. Go to System Preferences > Bluetooth and make sure Bluetooth is turned on. Hold the PS and Share buttons until the Light Bar starts flashing. When your controller shows up in the list of Bluetooth devices, press the pair button. The Light Bar will stop flashing after pairing.

After playing over Bluetooth, press and hold the PS button to turn your controller off.

2.2 Add Controller Mappings

At this point, your DualShock 4 is recognized by your Mac as a generic controller. Out of the box compatibility is scarce, however. Steam Big Picture works flawlessly and some games are catching on quick. If you want more extensive support, you’ll need to use a third-party controller mapper, basically binding buttons on your controller to key presses and mouse movements.

clip_image006

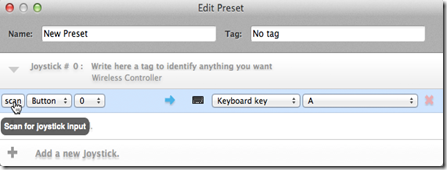
One of the best tools for the job is Joystick Mapper ($4.99). It’s perhaps the best controller mapper for Mac OS X, and definitely worth the five bucks if you regularly use a controller on your Mac. You’ll need to create a new preset and manually bind your controller buttons, D-pad and joysticks. You can create multiple presets to use different key bindings for different games.

clip_image007

In your preset, first Add a new Joystick and then add your custom controls. For each button, or each joystick axis, press Add a new bind and press scan. Press and hold one of the controls on your DualShock 4 until Joystick Mapper picks it up and binds it to a key or mouse movement. When you’re finished, close the preset editing window and tick off the checkbox next to one of your presets to start using it. Just make sure to disable controller input in games that also pick up your generic controller, so the game controls aren’t triggered twice.

How are you going to use your DualShock 4 controller? Any specific games you have in mind? Share your experience in the comments section below the article!

Image credit: CraigJ

Taken From: http://www.makeuseof.com/tag/how-to-use-the-ps4-controller-on-your-mac-or-pc/

Sunday, March 23, 2014

Getting Arduino Online – Via the HR911105A Board + uIP TCP/IP Stack

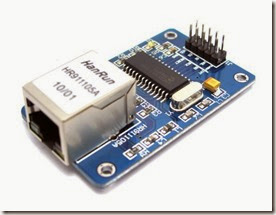
I have wanted to connect my arduino to my home network and also to the internet, for quite some time, so i bought this very cheap board, the HR911105A breakout board / NIC:

ENC28J60_1

I connected my Arduino Uno to it like this:

Arduino UNO pin 12 -- SO  (SPI MISO)
Arduino UNO pin 11 -- SI  (SPI MOSI)
Arduino UNO pin 13 -- SCK (SPI SCK)

Arduino UNO pin 10 -- CS  (SPI SS)
Arduino UNO 3v3    -- VCC
Arduino UNO GND   -- GND

I saw many webpages on the internet about connecting this board to the Arduino, and all said that the CS pin on the board connected to the Arduino pin 8, I tried it and i never worked (even with other TCP/IP stacks, besides the uIP). I searched the code and found out that i was actually the SPI SS pin, wich is pin 10 on the Arduino Uno.

image

to use it on the Arduino Mega, you need to connect it like this:

Arduino MEGA pin 50 -- SO  (SPI MISO)
Arduino MEGA pin 51 -- SI  (SPI MOSI)
Arduino MEGA pin 52 -- SCK (SPI SCK)
Arduino MEGA pin 53 -- CS  (SPI SS)
Arduino MEGA 3v3    -- VCC
Arduino MEGA GND   -- GND

I saw in the arduino page:

http://playground.arduino.cc/Hardware/ArduinoEthernet#.Uy4hFvl_tsM

that the uIP TCP/IP stack is available for the HR911105A Boards / NICs since October 2013 (just a coupple of months ago). You can find more information about this stack here:

http://en.wikipedia.org/wiki/UIP_(micro_IP)

this stack is quickly becoming the “de facto” standart for an for 8-and 16-bit microcontrollers, as you can see  even cisco is supporting it (“In October 2008, Cisco, Atmel, and SICS announced a fully compliant IPv6 extension to uIP, called uIPv6”)

I downloaded the uIP IP stack and followed the instructions here:

https://github.com/ntruchsess/arduino_uip

basically what I downloaded the uIP, extracted it, and put it on the arduino libraries folder

image

To test it, go to arduino IDE and select an example like the EchoServer

image

and change the IP, to one that it’s on your network (my network: 192.168.1.xx/24)

image

upload it to the Arduino and test it out.

FIrst ping it:

image

and then telnet into it, the EchoServer example will return all that you type:

image

image

You can also buy the HR911105A module / NIC in the form of an Arduino Uno Shield:

imageimage

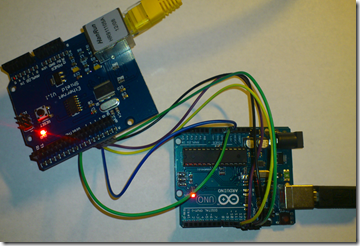
this version is a bit more expensive, but is the same as the breakout board. All the steps above are the same (you can go from the breakout board to the sheild without reprograming the Arduino), the main diference is that you don’t need to do the wiring:

imageBut if you don’t want to put the shield on top of the arduino for some reason, you can connect it like this:

image

Arduino UNO pin 12 -- Shield  pin 12  (SPI MISO)
Arduino UNO pin 11 -- Shield  pin 11  (SPI MOSI)
Arduino UNO pin 13 -- Shield  pin 13  (SPI SCK)
Arduino UNO pin 10 -- Shield  pin 10  (SPI SS)
Arduino UNO 5v     -- Shield  pin 5v  (VCC)
Arduino UNO GND   -- Shield  pin GND (GND)

to use the Arduino Mega, just connect it like this:

Arduino MEGA pin 50 -- Shield  pin 12  (SPI MISO)
Arduino MEGA pin 51 -- Shield  pin 11  (SPI MOSI)
Arduino MEGA pin 52 -- Shield  pin 13  (SPI SCK)
Arduino MEGA pin 53 -- Shield  pin 10  (SPI SS)
Arduino MEGA 5v     -- Shield  pin 5v  (VCC)
Arduino MEGA GND    -- Shield  pin GND (GND)

And the internet of things / internet of everything starts Alegre


You can find the documentation about the uIP library here:

http://arduino.cc/en/Reference/Ethernet

this is not exactly the HR911105A breakout board / NIC documentation, but it the looks like it has the same methods / functions.


Check out my online community at: https://www.facebook.com/BragaLab

This post was made specially for the BragaLab fans