Friday, April 3, 2015

Arduino – EPLUG: Ethernet Controlled Power Plug

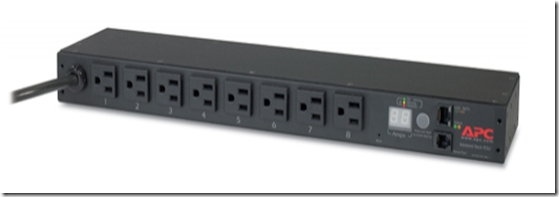
When I started  preparing for my CCNP SWITCH exam I bought some switches and set them up in my basement. After a couple of labs I realized I did a lot of trips to the basement to start / stop / restart the equipments. That’s when I started searching for remote controlled PDU, like this:

image

these are great but are very expensive for personal use (normally used in datacenters).

I already had an Arduino, so I started searching for a relay and cheap Ethernet NIC (the one on the arduino store was way to expensive), and I found the components below.

I put the components together and started programing the EPLUG program.

EPLUG is basically a small telnet Command Line Interface (CLI) that you can use to control multiple relays atached to Power Plugs. With this you can turn ON and OFF just about any electronic appliance you own from any device with telnet (PC, SmartPhone, Tablet, etc), using your Home Network or the Internet.
 
EPLUG was built as a framework that can be used for other projects. You can easily change the commands syntax by changing the text on the command patterns and add new commands by adding a new "else if(..){...}" statements on the "loop()" function.


Components

Relay Model: SRD-05VDC-SL-C

clip_image002

This relay board uses opto-couplers / opto-isolators to drive the relays, these isolate your Arduino from the relays, protecting it from voltage spikes. For more information check these videos:

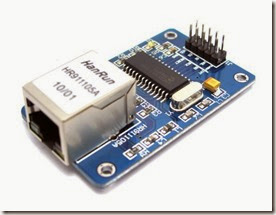
Ethernet NIC Model: HR911105A

Shield Version

image

Breakout Board Version

ENC28J60_1

when i bought these components i did some basic tutorials on wich we are going to build upon, so you should check them out for more details or to test each component individually:


EPLUG Prototype

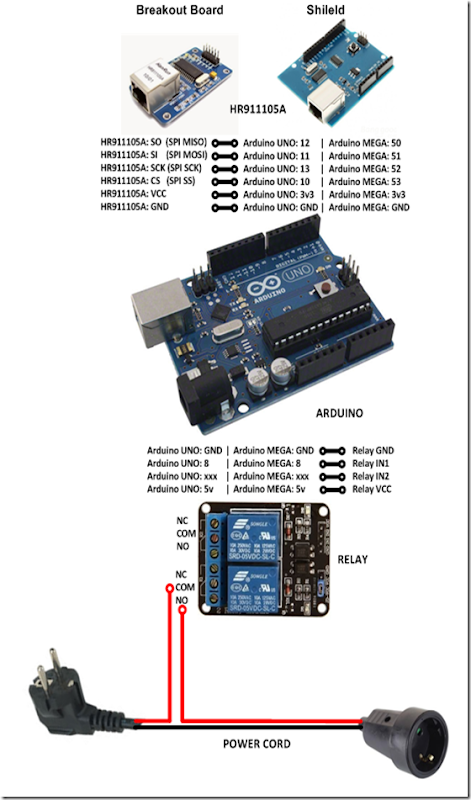
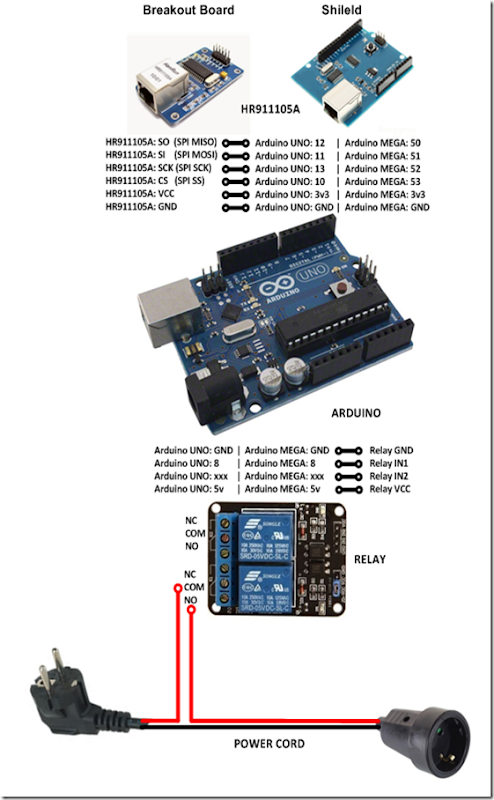
The complete build looks like this:

2015.04.04_Diagrama_Final

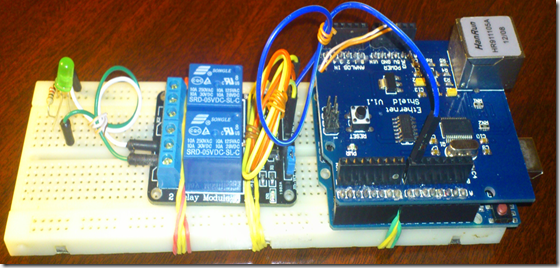
for the prototype I replaced the POWER CORD with an LED for testing:

image

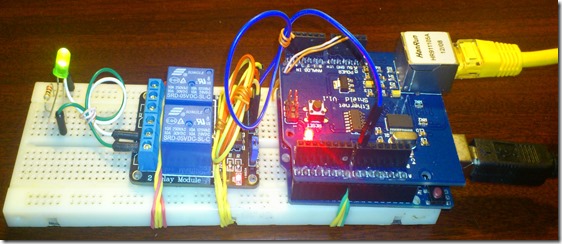
my prototype looked like this:

image

The next step is to add the IP stack (uIP) for the Ethernet NIC (HR911105A).

You basically download the uIP IP stack here:

extract it, and put it on the arduino libraries folder

image


EPLUG as a Framework

The EPLUG program a simple and flexible Command Line Interface (CLI):

image

it receives the command on the function:

  • rcv_cmd(cmd, cmd_len)

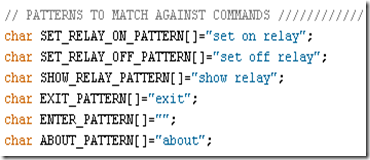
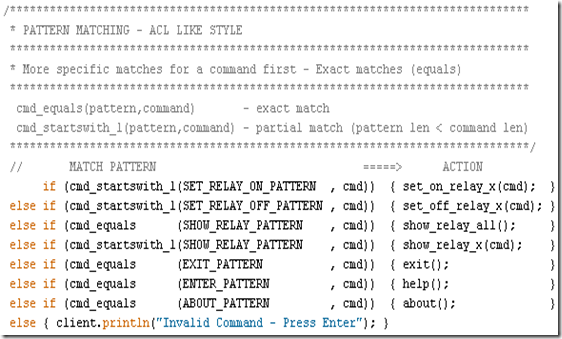
 and matches them against the predefined patterns:

image

using the following functions:

  • cmd_equals (pattern,command) - exact match
  • cmd_startswith_l (pattern,command) - partial match, allow the commands to have a option (in this case the pin number)

and when it finds a match it executes an the function/actions for the corresponding command, as you can see below:

image

the structure above makes EPLUG very flexible, so that it’s easy to:

  • Change the current commands text
  • Add more commands (just add an else if (..){...} line)

my goal was to build EPLUG as a Framework for future projects.

For example if you want to do a program to set LEDs ON/OFF LEDs, you just need to change the patterns and the action functions and in 10 minutes or less your program is done.


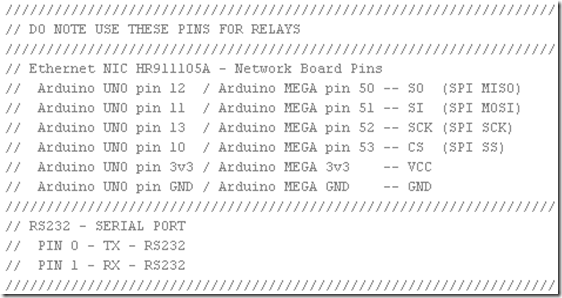
Available Pins for Relays

There are some pins that that you should not use:

image

so you should only use the following pins:

  • Pin 2
  • Pin 3
  • Pin 4
  • Pin 5
  • Pin 6
  • Pin 7
  • Pin 8 I used this PIN
  • Pin 9

you can basically plug up to 8 relays to an Arduino UNO and controll them with the EPLUG program.


Loading EPLUG

Get the EPLUG code here:

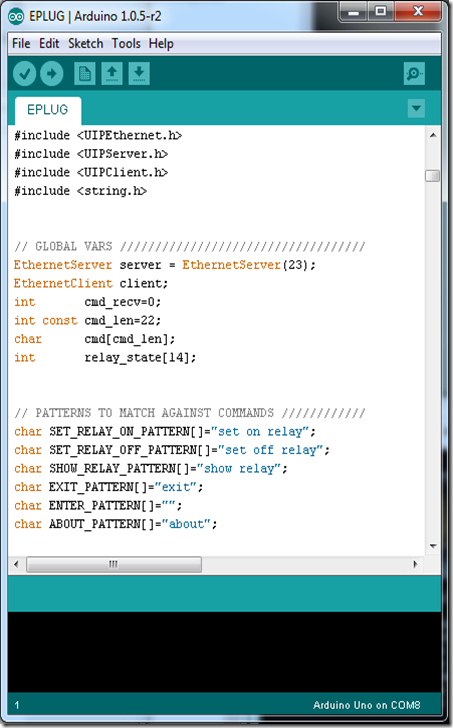
Open the EPLUG code on the Arduino IDE:

image

To upload the program to Arduino just press:

image

after compiling and uploading the IDE show the program size, and it should be 25.xxx bytes.

Problem: I found out that, for some reason, if the program is a bit over 26.000 bytes the Ethernet NIC doesn’t work properly. The maximum on the Arduino UNO is 32.256 bytes so this shouldn`t happen.


Testing EPLUG

First you need to find the IP of the Arduino NIC and make sure it’s on the correct network (your LAN network), you can do that here:

image

now telnet to it:

image

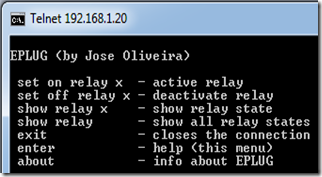
press ENTER to start the CLI and show the options:

image

to set the “relay” (for now the LED) on you type:

image

you should get something like this:

Prototype1

Problem: After some time (1-3 min) the LED goes off for no aparent reason. After some research I found that this behavior is the the Arduino’s In System Programer (ISP) checking  if you want to reprogram Arduino from your PC (basically resets Arduino). The solution is very simple, you just don’t power the Arduino from your PC, you use a power supply.

to show the “relay” (LED) current state, you type:

image

to show all the “relays” (LEDs) current state, you type:

image

to set off the “relay” (LED), you type:

image

to show info about EPLUG, you type:

image

to close the telnet session, you type:

image


Putting It All Together

Now we can replace the LED with the POWER CORD, and use/test EPLUG in the real world.

2015.04.04_Diagrama_Final

In this diagram the POWER CORD starts OFF, if you want it to start ON just change the wire on the relay from NO (normally open) to NC (normally closed).

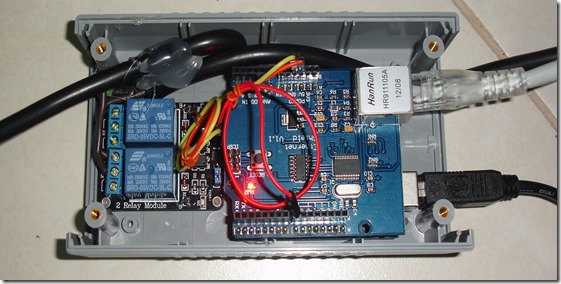
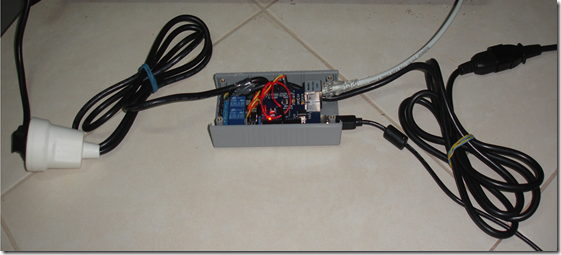
My build looked like this:

REAL1

image

image

now you can test/use it in the real world, check out my test video:

EPLUG Test

Next Steps

  • Add an internal USB power supply
  • Make it a lot smaller/cheaper (microntroller + breakout board)
  • Make a version with GSM aka GPLUG (SMS or GPRS)
  • Make a version with Radio modules aka RPLUG
  • Map relays to numbers different from the PINs
  • Save the pins state to a non-volatile memory (EEPROM)
  • Add a current sensor

Check out my makers community at:
Sunday, March 29, 2015

Cisco – Router as a DNS Server

As many didn’t know (me included) you can configure cisco router as DNS server.

A cisco router can:

  • Reply to requests for locally defined DNS entries.
  • Forward the request the public DNS servers (max 6)

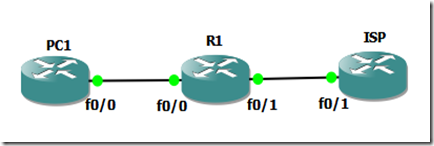
In the cenario bellow we are going setup and test this.

Topology2


Configs

-- R1 --

interface FastEthernet0/0
description *** LAN ***
ip address 192.168.1.254 255.255.255.0
no shutdown

interface FastEthernet0/1
description *** WAN ***
ip address 200.0.0.2 255.255.255.252
no shutdown
 
ip route 0.0.0.0 0.0.0.0 200.0.0.1 name DefaultRoute
 
!!!!!!!!!!!!!!!!!!!!!!!!!!!!!!!!!!!!!!!!!!!!!!!!!!!!!!!!!!!!!!!!!!!!
! Enable the router as a DNS server
! and domain lookup on the router
!!!!!!!!!!!!!!!!!!!!!!!!!!!!!!!!!!!!!!!!!!!!!!!!!!!!!!!!!!!!!!!!!!!!
ip dns server
ip domain-lookup

!!!!!!!!!!!!!!!!!!!!!!!!!!!!!!!!!!!!!!!!!!!!!!!!!!!!!!!!!!!!!!!!!!!!
! Public name-servers, for the router to query
! the names it doesn't know
! Maximum 6x DNS servers
!!!!!!!!!!!!!!!!!!!!!!!!!!!!!!!!!!!!!!!!!!!!!!!!!!!!!!!!!!!!!!!!!!!!
ip name-server 4.2.2.5
ip name-server 4.2.2.6

!!!!!!!!!!!!!!!!!!!!!!!!!!!!!!!!!!!!!!!!!!!!!!!!!!!!!!!!!!!!!!!!!!!!
! Local DNS Entries
!!!!!!!!!!!!!!!!!!!!!!!!!!!!!!!!!!!!!!!!!!!!!!!!!!!!!!!!!!!!!!!!!!!!
ip host PC1 192.168.1.1
ip host PC2 192.168.1.2
ip host PC3 192.168.1.3

The big secret here is the “ip dns server”, because the rest of the config you could have it to solve name locally on the router.

With the “ip dns server” you extend the router’s local name resolution, to the hosts on the network.


-- PC1 --

PCx

The PCs on my topology are actually routers so here is my config:

-- PC1 (Router) --
interface FastEthernet0/0
ip address 192.168.1.1 255.255.255.0
no shutdown

ip route 0.0.0.0 0.0.0.0 192.168.1.254 name GW

ip domain-lookup
ip name-server 192.168.1.254


-- PC2 (Router) --
interface FastEthernet0/0
ip address 192.168.1.2 255.255.255.0
no shutdown
 
ip route 0.0.0.0 0.0.0.0 192.168.1.254 name GW

ip domain-lookup
ip name-server 192.168.1.254


-- PC3 (Router) --
interface FastEthernet0/0
ip address 192.168.1.3 255.255.255.0
no shutdown

ip route 0.0.0.0 0.0.0.0 192.168.1.254 name GW

ip domain-lookup
ip name-server 192.168.1.254


Tests

-- Test the Local Entries for The PCs on the LAN --

PC1#ping PC2
Translating "PC2"...domain server (192.168.1.254) [OK]

Type escape sequence to abort.
Sending 5, 100-byte ICMP Echos to 192.168.1.2, timeout is 2 seconds:
.!!!!
Success rate is 80 percent (4/5), round-trip min/avg/max = 1/1/1 ms

PC1#ping PC3
Translating "PC3"...domain server (192.168.1.254) [OK]

Type escape sequence to abort.
Sending 5, 100-byte ICMP Echos to 192.168.1.3, timeout is 2 seconds:
!!!!!
Success rate is 100 percent (5/5), round-trip min/avg/max = 1/1/5 ms
PC1#

-- Test Forwarding Request to Public DNS Servers--

PC1#ping www.google.com

Translating "www.google.com"...domain server (192.168.1.254) [OK]

Type escape sequence to abort.
Sending 5, 100-byte ICMP Echos to 216.58.208.4, timeout is 2 seconds:
!!!!!
Success rate is 100 percent (5/5), round-trip min/avg/max = 52/69/84 ms


Related Links:

Monday, March 2, 2015

Cisco IOS on UNIX (IOU) – On GNS3 v1.x

Today I’m going to discuss How to install and configure Cisco IOU in GNS3-1.2.1. In this way you can emulate Cisco Switch in GNS3. This article explains to get a working layer 2 switch in GNS3-1.1. Cisco IOS on UNIX (IOU) is a fully working version of IOS that runs UNIX/LINUX platform. Cisco IOS on UNIX is intended for Cisco employees for research and experiments. Distribution of IOU images to customers or external persons is strictly prohibited.

Table of Contents

  1. Tools required
  2. Import GNS3 IOU VM.ova
  3. Uploading IOU image to UNIX
  4. GNS3 Local and Remote Server
  5. IOS on UNIX Configuration for GNS3

Tools required

  1. GNS3-1.2.1
  2. Oracle VirtualBox
  3. GNS3 IOU VM.ova:- Is the Virtual UNIX platform to run IOU image. It is a virtual box OVA file.
  4. IOU image: IOU image is intended to use only for Cisco employees, distribution of IOU is strictly prohibited. Please don’t ask me! Google is your friend always.
  5. iourc.txt file: Is the license of Cisco IOU image. I have no privilege to provide it publically, but I found a discussion related to it here. It may help you.


Step 1: Import GNS3 IOU VM.ova

Import GNS3 IOU VM.ova to VirtualBox.

1.png

Go to Settings → Network → Adapter 1. Make sure it is attached to Host-only Adapter with name VirtualBox Host-Only Ethernet Adapter. Then click OK.

Start the GNS3 IOU VM, and login with following credentials.

  • User name : root
  • Password  : cisco


Step 2: Configuring the GNS3 IOU VM Ethernet Adapter

First define the IP of the eth0 interface on GNS3 IOU VM:

nano /etc/network/interfaces

image

save the interface configuration: Ctlr+X – Yes

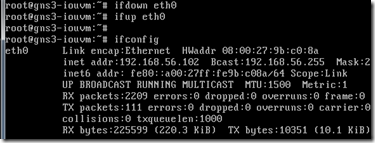
Next restart the eth0 (down/up) interface, so that it loads the configuration from the /etc/network/interfaces file

image

If you restart the VM, the initial banner will shows the configured IP, along with the Web interface URL that we will use latter to load IOU images.

image

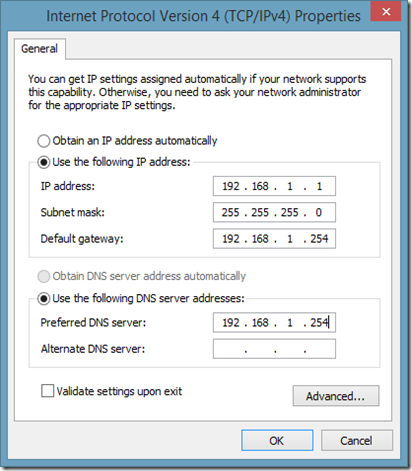
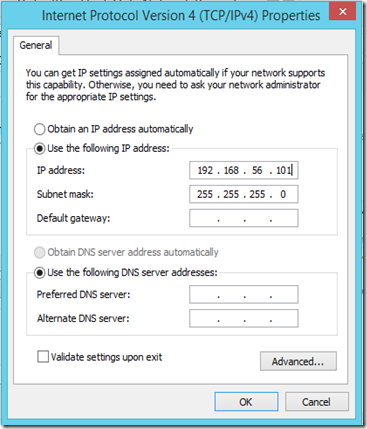
On your computer set the VirtualBox Host-Only Ethernet Adapter with an IP in the same network.

Go to Control Panel → Network and Internet → Network Connections

image

image

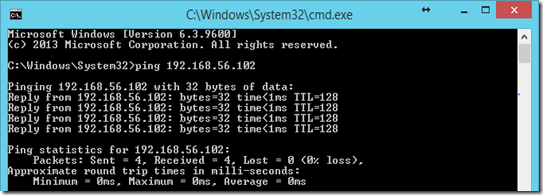
to test that you have a connection between you computer and the VM, ping the VM from your computer:

image


Step 3: Uploading IOU image to UNIX

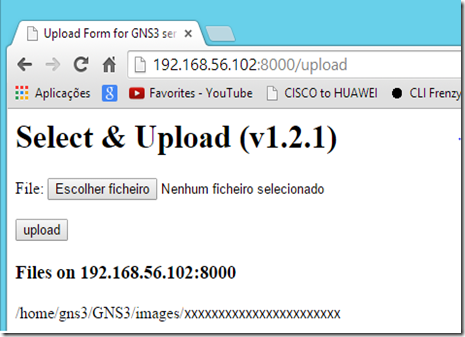
Check the IP address of the GNS3 IOU VM by issuing ifconfig (or as seen on step 2) command and note down the IP (mine 192.168.56.102). Now open any web browser in host machine and enter the following link in the address bar:

http://192.168.56.102:8000/upload

image

Choose your IOU image and click Upload button.

 image

Note the location of IOU image being copied:

/home/gns3/GNS3/images/XXXXXXXXXXXXXXXXXXX


Step 4: GNS3 Local and Remote Server

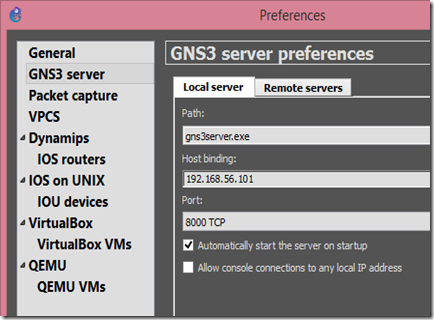
Go GNS3, Edit → Preferences → GNS3 Server → Local Server

Drop down the Host Binding section and choose 192.168.56.XX, VirtualBox Host-Only Adapter IP (mine 192.168.56.101) and click Apply.

This binds the local server to:

image

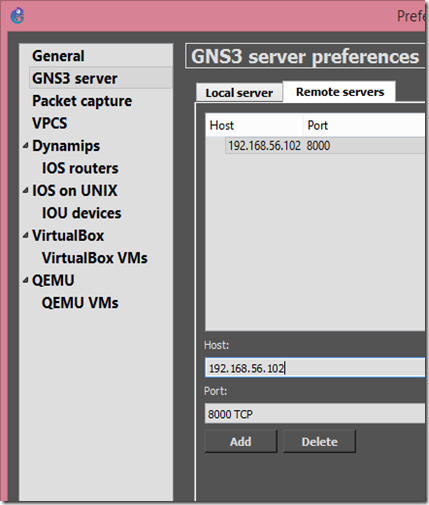
Again Edit → Preferences → GNS3 Server → Remote Server

Enter GNS3 IOU VM address (mine 192.168.56.102) and 8000 as port.

image


Step 5: IOS on UNIX Configuration for GNS3

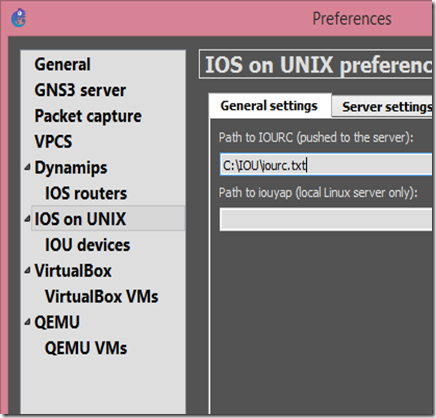
Go to Edit → Preferences → IOS on UNIX → General Settings

Browse iourc.txt (iourc.txt can be stored on any directory of your local PC, eg: Desktop).

image

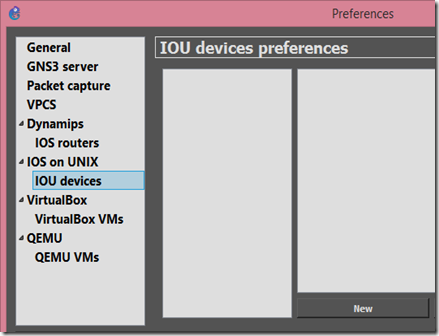
Go to IOU Devices → New button and select server type as Remote. Your remote server will be listed there. → Next

image

image

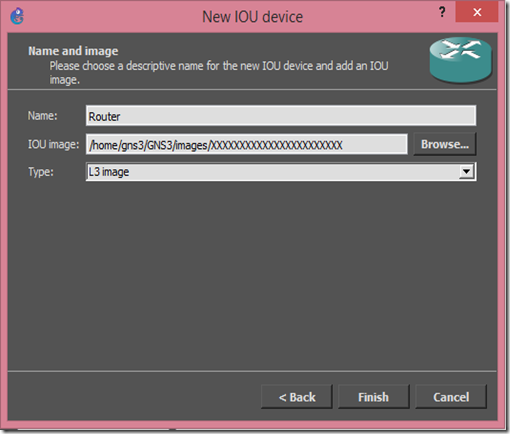
Put a Name for the IOU image and set IOU image path that you noted already in Step 2. (/home/gns3/GNS3/images/XXXXXXXXXXXXXXXXXXX)

Type the image must be L2 if switch IOU.

image

Click Finish button. and you are done:

image

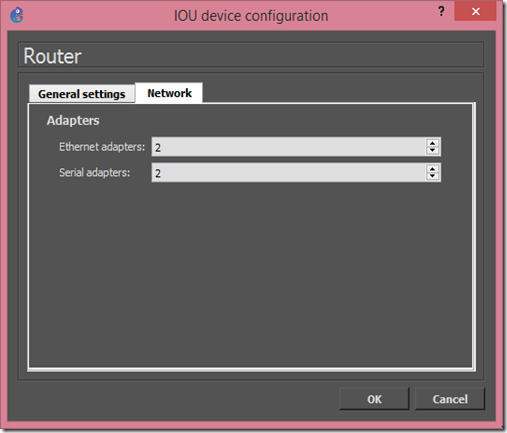
If you want more Interfaces click on Edit to add more:

image

note that on IOU you add the interfaces in cards of four interfaces, so the above means:

  • 8 Ethernet Interfaces (2x4)
  • 8 Serial Interfaces (2x4)

Now you have one more router to select:
image

Based On:

Sunday, February 15, 2015

Cisco – 1:1 NAT (static NAT) with Exceptions

You have probably come across with this cenario:

PC1

where you want to forward the Public IP of R1 to PC1. To do this you just do a 1:1 NAT / Static Nat, and you are done.

The problem with this, is that you loose the management of R1, because all is forwarded to PC1.

Wouldn´t it be great if you could create an exception for the Telnet or SSH, port so that you keep managemnt of your router.

This is possible, basically you do the 1:1 NAT / Static Nat, and a Port Forwarding, to a Loopback on R1. This works because the Port Forwarding is more specific, so the port is forwarded to the Loopback of R1 instead of PC1.

The example bellow forwards the telnet port (23), to R1 Loopback Interface so that you can manage R1 it via Telnet.


Configs

## PC1 Config ##
hostname PC1

username cisco password 0 cisco

interface FastEthernet0/0
description *** LAN ***
ip address 192.168.1.1 255.255.255.0
no shutdown

ip route 0.0.0.0 0.0.0.0 192.168.1.254

!-- SSH Key Generation --
ip domain name cisco.com
crypto key generate rsa general-keys modulus 1024

line vty 0 4
login local
transport input ssh


## R1 Config ##
hostname R1
username cisco password 0 cisco

interface FastEthernet0/0
description *** LAN1 ***
ip address 192.168.1.254 255.255.255.0
 
ip nat inside
no shutdown

interface FastEthernet0/1
description *** WAN ***
ip address 203.103.3.110 255.255.255.252
ip nat outside
no shutdown

interface Loopback0
ip address 1.1.1.1 255.255.255.255
 

access-list 110 remark *** NAT ACL ***
access-list 110 permit ip 192.168.1.0 0.0.0.255 any

ip nat inside source list 110 interface FastEthernet0/1 overload

!-- 1:1 NAT / Static NAT  --
ip nat inside source static 192.168.1.1 interface FastEthernet0/1

!—EXCEPTION – Fw Port 23 to Loopback0 - Telnet Access --
ip nat inside source static tcp 1.1.1.1 23 interface FastEthernet0/1 23

line vty 0 4
login local
transport input telnet


## ISP Config ##
hostname ISP
username cisco password 0 cisco

interface FastEthernet0/1
description *** WAN ***
ip address 203.103.3.109 255.255.255.252
no shutdown

line vty 0 4
login local
transport input telnet


Tests (on ISP)

## Check The Management of R1 via Telnet ##

telnet 203.103.3.110
Trying 203.103.3.110 ... Open
User Access Verification
Username: cisco
Password:*****
R1>

As expected we reach R1 via Telnet


## Check That The Other Ports Go to PC1 ##
ssh -l cisco 203.103.3.110
Password:****
 PC1>


Another Cenario

If you want, you can have this scenario:

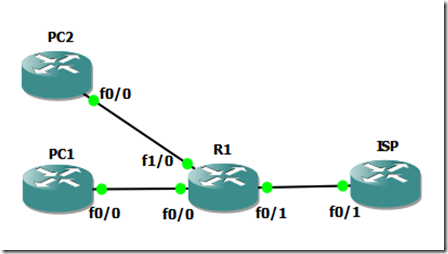
PC2

where instead of forwarding the Telnet port to R1 Loopback, you forward it to another equipment, in this case PC2.

The configs bellow build upon the configs above.


Configs

## PC2 Config ##
hostname PC2

username cisco password 0 cisco

interface FastEthernet0/0
description *** LAN ***
ip address 192.168.2.1 255.255.255.0
no shutdown

ip route 0.0.0.0 0.0.0.0 192.168.2.254

line vty 0 4
login local
transport input telnet


## R1 - Config (addon) ##
interface FastEthernet1/0
description *** LAN2 ***
ip address 192.168.2.254 255.255.255.0
ip nat inside
no shutdown


!—REMOVE: Fw Port 23 to Loopback0 - Telnet Access --
no ip nat inside source static tcp 1.1.1.1 23 interface FastEthernet0/1 23

!—EXCEPTION - Fw Port 23 to PC2 - Telnet Access --
ip nat inside source static tcp 192.168.2.1 23 interface FastEthernet0/1 23


Tests (on ISP)

## Check The Management of PC2 via Telnet ##
telnet 203.103.3.110
Trying 203.103.3.110 ... Open
User Access Verification
Username: cisco
Password:****
PC2>

As expected we reach PC2 via Telnet
 
 
## Check That The Other Ports Go to PC1 ##
ssh -l cisco 203.103.3.110
Password:*****
PC1>

Hope this was informative, and thant you for reading.