Parted is a famous command line tool that allows you to easily manage hard disk partitions. It can help you add, delete, shrink and extend disk partitions along with the file systems located on them. Parted has gone a long way from when it first came out. Some of it’s functions have been removed, others have been added.
In this tutorial you will learn the basics of parted and we will show you some practical examples. If you don’t have any previous experience with parted, please be aware that parted writes the changes immediately to your disk, so be careful if you try to modify your disk partitions.
If you plan on testing parted, the better option would be to simply use a virtual machine or old computer/laptop without any valuable information on it. To make modifications on a disk partition it must not be in use. If you need to work on primary partition, you may boot into rescue mode.
Note: You will need to have root access to the machine you will be working on in order to use parted.
How to Install Parted on Linux
On many Linux distributions, parted comes pre-installed. If it is not included in your distro, you can install it with:
$ sudo apt-get install parted [On Debian/Ubuntu systems]
# yum install parted [On RHEL/CentOS and Fedora]
# dnf install parted [On Fedora 22+ versions]
Once you have make sure that parted is installed, you can proceed further to check out some real world examples of parted command in the rest of this article.
1. Check Parted Version
Run the following command, you see message similar to the one shown on the image below. Don’t worry if your parted version is different. Unless specified otherwise, parted will use your primary drive, which in most cases will be/dev/sda.
$ parted
Check Parted Command Version
If you want to exit parted, simply type:
$ quit
2. List Linux Disk Partitions
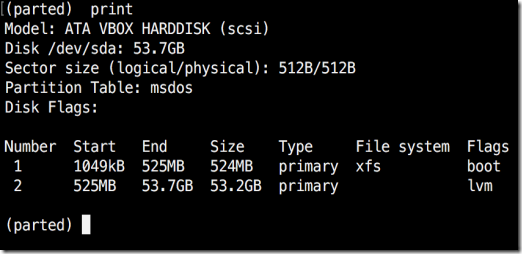
Now that parted is started, let’s list the partitions of the selected hard disk. As mentioned earlier, parted chooses your first drive by default. To see the disk partitions run print.
(parted) print
Check Linux Partitions
When running print, it will also display the hard disk information and model. Here is example from a real hard disk (not virtual as shown on the image above) :
(parted) print
Model: ATA TOSHIBA MQ01ACF0 (scsi)
Disk /dev/sda: 320GB
Sector size (logical/physical): 512B/4096B
Partition Table: msdos
Number Start End Size Type File system Flags
1 1049kB 256MB 255MB primary ext2 boot
2 257MB 320GB 320GB extended
5 257MB 320GB 320GB logical lvm
sector size and partition table.
3. List or Switch to Different Disk
If you have more than one hard disk, you can easily switch between disks, by using the “select” command. In the example below, I will switch from /dev/sda to/dev/sdb which is a secondary drive on my system.
To easily switch between disks you can use:
(parted) select /dev/sdX
Select Different Disk
Change "X" with the letter of the disk to which you wish to switch.
4. Create Primary or Logical Partition in Linux
Parted can be used to create primary and logical disk partitions. In this example, I will show you how to create primary partition, but the steps are the same for logical partitions.
To create new partition, parted uses “mkpart“. You can give it additional parameters like "primary" or "logical" depending on the partition type that you wish to create.
Before you start creating partitions, it’s important to make sure that you are using (you have selected) the right disk.
Start by using print:
(parted) print
Show Current Linux Disk
As shown on the above image, we are using a virtual drive of 34 GB. First we will give the new disk a label and then create a partition and set a file system on it.
Now the first step is to give the new disk a label name with:
(parted) mklabel msdos
Now create the new partition with mkpart. The listed units are in megabytes (MB). We will create a 10 GB partition starting from 1 to 10000:
(parted) mkpart
Partition type? primary/extended? primary
File system type? [ext2]?
Start? 1
End? 10000
(parted) print
Model: ATA VBOX HARDDISK (scsi)
Disk /dev/sdb: 34.4GB
Sector size (logical/physical): 512B/512B
Partition Table: msdos
Disk Flags:
Number Start End Size Type File system Flags
1 1049kB 10.0GB 9999MB primary ext2 lba
Create Primary or Logical Linux Partitions
Next, exit parted with "quit" command. We will format our new partition in ext4 file system using mkfs. To make this happen run the following command:
# mkfs.ext4 /dev/sdb1
Note: It’s important to select the right disk and partition when executing the above command!
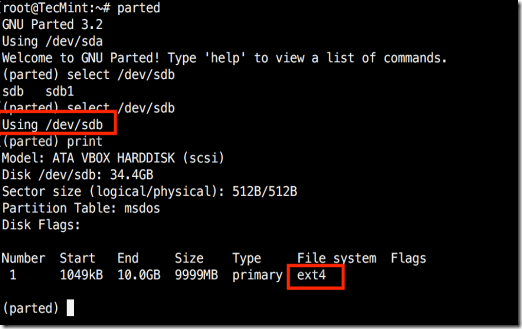
Now let’s verify our results, by printing the partition table on our secondary disk. Under file system column, you should see ext4 or the file system type that you have decided to use for your partition:
Verify Disk Partition Filesystem
5. Resize Linux Disk Partition
Parted includes multiple useful functions and one of them is "resizepart". As you have probably figured this out by now, "resizepart" helps you resize a partition.
In the example below, you will see how to resize an existing partition. For the purpose of this example, we will be using the earlier created partition.
First you will need to know the number of the partition that you will be resizing. This can be easily found by using "print":
(parted) print
Find Linux Partition Number
In our example, the partition number is "1". Now run the resizepart command:
(parted) resizepart
You will be asked for the number of the partition that you will resize. Enter it’s number. After that, you will be asked to set the new ending point for this partition. Remember that by default the units are in MB. In our example, we have set the new partition size to 15 GB:
(parted) resizepart
Partition number? 1
End? [10.0GB]? 15000
Now verify the results with "print":
(parted) print
Verify Linux Resize Partition
6. Delete Linux Partition
The next thing you will learn is how to delete a partition from your hard drive. To do this, you will need to use the "rm" command within parted. To delete a disk partition you will need to know it’s number.
As mentioned earlier, you can easily obtain this number by using "print". In our example, we will delete the partition with number 1 from our secondary drive/dev/sdb1:
(parted) rm 1
Verify the results by printing the partitions table:
Delete a Linux Partition
7. Rescue Linux Disk Partition
Parted supports a “rescue" utility that helps you recover a lost partition between a starting and ending point. If a partition is found within that range, it will attempt to restore it.
Here is an example:
(parted) rescue
Start? 1
End? 15000
(parted) print
Model: Unknown (unknown)
Disk /dev/sdb1: 15.0GB
Sector size (logical/physical): 512B/512B
Partition Table: loop
Disk Flags:
Number Start End Size File system Flags
1 0.00B 15.0GB 15.0GB ext4
8 Change Linux Partition Flag
Using parted, you can change the state of a flag for disk partitions. The supported flags are:
- boot
- root
- swap
- hidden
- raid
- lvm
- lba
- legacy_boot
- irst
- esp
- palo
The states can be either "on" or "off". To change a flag simply run "set"command within parted:
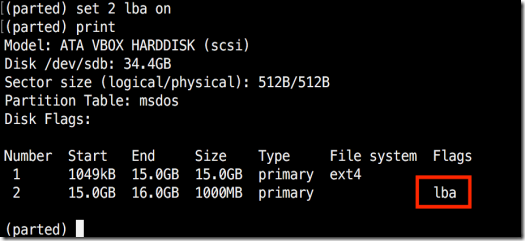
(parted) set 2 lba on
The above command sets lba flag to on for second partition. Verify the results with print:
Change Partition Flag
Conclusion
Parted is a useful and powerful utility that can help you manage your disk partitions in Linux systems. As always, when working with disk partitions you need to be extra careful. It is strongly recommend to go through parted man pages to learn how you can customize it’s output and find more information about its capabilities.
If you have any questions or comments, please do not hesitate to use the comment section below.
Taken From: http://www.tecmint.com/parted-command-to-create-resize-rescue-linux-disk-partitions/

