Wednesday, July 2, 2008

Encripted Partitions and LiveCD - On The Fly (Linux, Mac, Windows)

Paranoid Penguin - Customizing Linux Live CDs, Part II

May 1st, 2008 by Mick Bauer

Note that Ubuntu 8.4 includes the packages easycrypt and gdecrypt, two graphical front ends for TrueCrypt, but no packages for TrueCrypt itself, on which both easycrypt and gdecrypt depend (though the latter, even without TrueCrypt, can create non-TrueCrypt-compatible encrypted volumes). So the instructions I give here on downloading and installing TrueCrypt itself still are applicable to Ubuntu 8.4.

Installing TrueCrypt

Although I just disclaimed the intention of making this a TrueCrypt primer, a little introduction is in order. TrueCrypt is a free, open-source, cross-platform volume-encryption utility. It's also highly portable. The TrueCrypt binary itself is self-contained, and any TrueCrypt volume can be mounted on any Windows or Linux system on which the TrueCrypt binary will run or compile. TrueCrypt can be run either from a command line or in the X Window System.

TrueCrypt is becoming quite popular and is held in high regard by crypto experts I know (it appears to be a sound implementation of known, good algorithms like AES and Twofish), but its license is a bit complicated. For this reason, TrueCrypt hasn't yet been adopted into Debian or Ubuntu officially, even though Ubuntu 8.10's universe packages easycrypt and gdecrypt depend on it (see the Ubuntu 7.10 vs. 8.4 sidebar).

So, to install TrueCrypt on an Ubuntu system, you need to download it directly from www.truecrypt.org/downloads.php. When I was writing this article, TrueCrypt version 5.1 was current, and the Ubuntu deb file I downloaded was called truecrypt-5.1-ubuntu-x86.tar.gz, though by the time you read this, it may be something else. Besides an Ubuntu deb package, TrueCrypt also is available as a SUSE RPM file (that also might work on other RPM-based distros) and as source code.

Now, it's time to install TrueCrypt. You're going to need to install TrueCrypt in at least two places: on the master system you're using to create your custom live CD and either on the live CD image itself or on whatever removable media (such as a USB drive) you're going to keep your encrypted volume.

First, let's install TrueCrypt on the master system. Open a command shell, unpack the TrueCrypt archive in your home directory, and change your working directory to the directory that gets unpacked:

bash-$ tar -xzvf ./truecrypt-5.1-ubuntu-x86.tar.gz

bash-$ cd truecrypt-5.1

Next, use the dpkg command to install the deb file:

bash-$ sudo dpkg -i ./truecrypt_5.1-0_i386.deb

With TrueCrypt 5.1, only three files are installed on your system: its license and user guide, both in /usr/share/truecrupt/doc/, and the binary itself, /usr/bin/truecrypt. TrueCrypt doesn't require any special kernel modules; it's a monolothic process. This means that if you copy /usr/bin/truecrypt to the same Flash drive on which you keep your encrypted volume, you won't need to install it on your Ubuntu live CD.

You may prefer doing so anyhow. Here's how:

  1. Follow steps 00–12 in the procedure I described last month for mounting your custom ISO and chrooting into it (see Appendix).

  2. From a different, non-chrooted shell, copy the TrueCrypt deb package truecrypt_5.1-0_i386.deb into the ISO root you just chrooted into (isonew/custom/ in last month's examples).

  3. Back in your chrooted shell, run dpkg -i ./truecrypt_5.1-0_i386.deb (no sudo necessary here, as you're already root).

  4. Finally, follow steps 19–33 from last month's procedure to clean up, unmount and repackage your custom live CD image. And, of course, use your CD-burning application of choice to burn your image into a shiny new live CD

Creating an Encrypted Volume

Now, you can create an encrypted volume. For our purposes here, it will be a simple “file vault” to mount as a subdirectory of your home directory. But, it just as easily could be an entire home directory that you mount over the one your live CD uses. Come to think of it, you also could do that with /etc. For now, however, I'll leave it to you to explore the technical subtleties of those usage scenarios (see Resources for some pointers on home directory encryption).

TrueCrypt can be run either in text mode, via the truecrypt -t command (followed by various options) or in graphical mode. For now, let's stick to graphical mode. To start it, simply type the following from within a terminal window:

bash-$ truecrypt &

And, you should see what's shown in Figure 1.

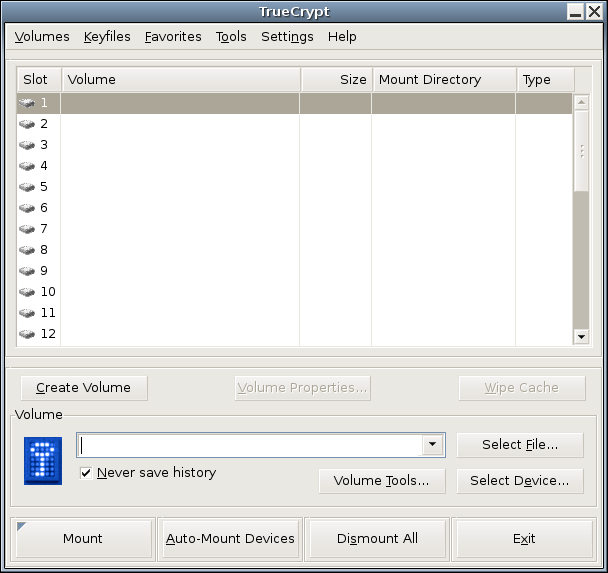
Figure 1. TrueCrypt 5.1 GUI for Linux

Click Create Volume to start the TrueCrypt Volume Creation Wizard. We'll create a standard TrueCrypt volume, not a hidden one (you can hide one TrueCrypt volume inside the “empty” space of another, as all unused space in a TrueCrypt volume is filled with random characters). So, click Next.

In the wizard's next screen, you can specify the path and name of the file in which your encrypted volume will be stored or the name of an entire disk partition to encrypt. Here, we're creating a file-hosted volume, and in our example scenario, this file will be /home/ubuntu/realhome2 (no file extension is necessary). After typing that path, click Next.

In the wizard's third screen, we must specify the volume's size. In this example, I'm creating a 500MB volume.

After clicking Next, you can choose an Encryption Algorithm and a Hash Algorithm. The defaults, AES and RIPEMD-160, respectively, are good choices. You also can click the Test button to make sure TrueCrypt's built-in cryptographic functions work properly on your system.

The next step is to set a volume password. Choose a strong one! You also can specify and create keyfiles—files that TrueCrypt will look for every time you mount this volume. If any keyfile is missing, or if its contents have changed in any way since you created the volume, TrueCrypt won't mount the volume. Properly used, keyfiles can provide another level of authentication to your encrypted volume. But, we aren't going to use any in this example. Enter a password (twice) and click Next.

Important note: TrueCrypt has no back doors of any kind. For this reason, if you forget your volume's password, or if any of its keyfiles are lost or corrupted, you will not be able to recover the contents of your encrypted volume. By all means, choose a difficult-to-guess volume password, but make sure you won't forget or lose it yourself!

Now we come to the Format Options screen, which asks a subtle question: which filesystem? The choices here are FAT, which is actually the Windows 95 vfat filesystem (MS-DOS FAT16 with long filenames), and None. If you select FAT, TrueCrypt will format your new encrypted volume for you. However, vfat isn't a journaling filesystem; it isn't very resilient to file corruption and other filesystem errors.

Worse, strange things can happen if you store certain kinds of Linux system files on a vfat partition, because vfat can't store certain Linux file attributes. The only reason to choose vfat is if you intend to use the volume with both Linux and Windows systems. If you're going to use it only on Linux, especially if you're going to use it as a home directory (or /etc), you should choose None, and formate the virtual partition yourself, which I'll show you how to do in a minute.

For now, click Next to proceed to the Volume Format screen. This is your chance to generate some entropy (randomness) with which TrueCrypt can initialize its crypto engine, pursuant to encrypting your volume. To do so, move your mouse randomly within the window a while, and then click Format.

That's it! You've created /home/ubuntu/realhome2 and now are ready to format it. Click Exit to close the Volume Creation Wizard.

Formatting the Volume

My personal favorite native-Linux journaling filesystem is ext3, so that's what we use here. Before we format our new volume though, we need to have TrueCrypt map it to a virtual device. This isn't really mounting per se, but that's the TrueCrypt function we need to use.

Back in the TrueCrypt GUI (Figure 1), type the full path of our new volume (/home/ubuntu/realhome2) in the text box next to the key icon (or navigate to it using the Select File... dialog), and click Mount. In the box that pops up, enter your volume's password, and then click Options >. Here's where things get a little strange. Click the box next to Do not mount (Figure 2). Now you can click OK.

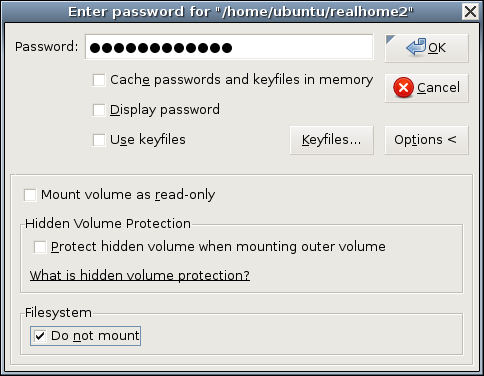
Figure 2. Not Mounting Our Unformatted Volume

Why, you may wonder, are you telling TrueCrypt “do not mount” in the middle of the Mount dialog? Because, of course, you can't mount an unformatted partition. But, TrueCrypt can map it to a virtual device, and this is, in fact, what TrueCrypt has just done.

Back in the TrueCrypt main screen, your volume file now should be listed in Slot 1. To find the virtual device to which it's been mapped, click Volume Properties. As shown in Figure 3, realhome3 has been mapped to /dev/loop0.

Figure 3. Volume Properties

Now, we can format the new encrypted volume. In your terminal window, type:

05-$ sudo mkfs.ext3 /dev/loop0
Volume Ownership

Voilà! You now have a mountable, usable encrypted virtual volume! If you want to test it or begin populating it with confidential data you intend to use with your live CD, you can mount it “for real” by going back to the TrueCrypt GUI, clicking Dismount, and then clicking Mount (the same button; it's context-sensitive). (This time, do not select the Do not mount button.) If you don't specify a mountpoint, TrueCrypt automatically creates one called /media/truecrypt1.

Note that if you mount different TrueCrypt volumes in succession, the mountpoints will be named /media/truecrypt1, /media/truecrypt2 and so on, where the trailing digit corresponds to the Slot number TrueCrypt uses in creating virtual device mappings (Figure 1). Note also that when mounting a TrueCrypt volume from the GUI, you may need to click on an empty slot number before clicking the Mount number, if one isn't selected already.

By default, TrueCrypt mounts your ext3-formatted TrueCrypt volume with root ownership. Depending on how you plan to use it, that may be appropriate. But, as a matter of principle, you don't want to use root privileges for ordinary tasks like word processing. If you're going to use this volume as your Documents directory, it's going to need to be usable by some unprivileged user.

The custom live CD image we created last month has only the default Ubuntu accounts on it. For now, let's stick with those—that way, you'll be able to use this encrypted volume with any Ubuntu 7.10 live CD, not just your custom image. Here's how to make your volume usable by the default live CD user account ubuntu.

First, create, map, format and mount your volume as described above. I'll assume that TrueCrypt mounted it to /media/truecrypt1.

Open or switch to a terminal window. If you do an ls -l of /media, the listing for your volume should look like this:

drwxr-xr-x  3 root     root  1024 2008-03-09 23:21 truecrypt1

As you can see, only root can use this directory. Because we want it to be usable by our live CD's ubuntu account, and because that account's user ID (UID) and group ID (GID) are 999 and 999, respectively, we issue this command:

05-$ sudo chown -R 999:999 /media/truecrypt1

This performs a bit of magic. The user/group ownerships you just specified are now embedded in your TrueCrypt volume's filesystem. From this point on, wherever you mount this volume, regardless of the mountpoint's ownership and permissions when it isn't in use, your volume will be mounted with UID and GID both set to 999.

If you subsequently mount the TrueCrypt volume on a system on which some user or group other than ubuntu has a numeric ID of 999 (per its local /etc/passwd and /etc/group files), then that user or group will own the mounted volume, even if that system has an account or group named ubuntu. And, if on that system the UID 999 doesn't correspond to any user, you'll need to be root in order to use the mounted volume. (But, in that case, you'll be no worse off than if you had skipped the chown exercise!)

Using the TrueCrypt Volume with Your Live CD

And now, the moment of truth. To use your encrypted TrueCrypt volume with an Ubuntu live CD, such as the one we modified last month, simply boot a system off that CD; insert the USB drive; execute the truecrypt binary from the USB drive or from the CD, if you installed TrueCrypt on your custom image; and mount your encrypted volume, specifying a mountpoint of /home/ubuntu/Documents (Figure 4).

Figure 4. Mounting Your Volume on /home/ubuntu/Documents

If TrueCrypt prompts you for an administrative password, leave it blank and click OK. By default, the ubuntu account on Ubuntu CDs has no password.

This brings me to the topic of next month's column: further securing and customizing your encrypted-Documents-enabled live CD image. Until then, be safe!

Mick Bauer (darth.elmo@wiremonkeys.org) is Network Security Architect for one of the US's largest banks. He is the author of the O'Reilly book Linux Server Security, 2nd edition (formerly called Building Secure Servers With Linux), an occasional presenter at information security conferences and composer of the “Network Engineering Polka”.


Taken From: Linux Journal, nº 170 2008 - Paranoid Penguin - Customizing Linux Live CDs, Part II, by Mick Bauer

Booting Thin Clients - Over a Wireless Bridge

Thin Clients Booting over a Wireless Bridge

May 1st, 2008 by Ronan Skehill, Alan Dunne and John Nelson

How quickly can thin clients boot over a wireless bridge, and how far apart can they really be?

In the 1970s and 1980s, the ubiquitous model of corporate and academic computing was that of many users logging in remotely to a single server to use a sliver of its precious processing time. With the cost of semiconductors holding fast to Moore's Law in the subsequent decades, however, the next advances in computing saw desktop computing become the standard as it became more affordable.

Although the technology behind thin clients is not revolutionary, their popularity has been on the increase recently. For many institutions that rely on older, donated hardware, thin-client networks are the only feasible way to provide users with access to relatively new software. Their use also has flourished in the corporate context. Thin-client networks provide cost-savings, ease network administration and pose fewer security implications when the time comes to dispose of them. Several computer manufacturers have leaped to stake their claim on this expanding market: Dell and HP Compaq, among others, now offer thin-client solutions to business clients.

And, of course, thin clients have a large following of hobbyists and enthusiasts, who have used their size and flexibility to great effect in countless home-brew projects. Software projects, such as the Etherboot Project and the Linux Terminal Server Project, have large and active communities and provide excellent support to those looking to experiment with diskless workstations.

Connecting the thin clients to a server always has been done using Ethernet; however, things are changing. Wireless technologies, such as Wi-Fi (IEEE 802.11), have evolved tremendously and now can start to provide an alternative means of connecting clients to servers. Furthermore, wireless equipment enjoys world-wide acceptance, and compatible products are readily available and very cheap.

In this article, we give a short description of the setup of a thin-client network, as well as some of the tools we found to be useful in its operation and administration. We also describe a test scenario we set up, involving a thin-client network that spanned a wireless bridge.

What Is a Thin Client?

A thin client is a computer with no local hard drive, which loads its operating system at boot time from a boot server. It is designed to process data independently, but relies solely on its server for administration, applications and non-volatile storage.

Figure 1. LTSP Traffic Profile and Boot Sequence

Following the client's BIOS sequence, most machines with network-boot capability will initiate a Preboot EXecution Environment (PXE), which will pass system control to the local network adapter. Figure 1 illustrates the traffic profile of the boot process and the various different stages, which are numbered 1 to 5. The network card broadcasts a DHCPDISCOVER packet with special flags set, indicating that the sender is trying to locate a valid boot server. A local PXE server will reply with a list of valid boot servers. The client then chooses a server, requests the name of the Linux kernel file from the server and initiates its transfer using Trivial File Transfer Protocol (TFTP; stage 1). The client then loads and executes the Linux kernel as normal (stage 2). A custom init program is then run, which searches for a network card and uses DHCP to identify itself on the network. Using Sun Microsystems' Network File System (NFS), the thin client then mounts a directory tree located on the PXE server as its own root filesystem (stage 3). Once the client has a non-volatile root filesystem, it continues to load the rest of its operating system environment (stage 4)—for example, it can mount a local filesystem and create a ramdisk to store local copies of temporary files. The fifth stage in the boot process is the initiation of the X Window System. This transfers the keystrokes from the thin client to the server to be processed. The server in return sends the graphical output to be displayed by the user interface system (usually KDE or GNOME) on the thin client.

The X Display Manager Control Protocol (XDMCP) provides a layer of abstraction between the hardware in a system and the output shown to the user. This allows the user to be physically removed from the hardware by, in this case, a Local Area Network. When the X Window System is run on the thin client, it contacts the PXE server. This means the user logs in to the thin client to get a session on the server.

In conventional fat-client environments, if a client opens a large file from a network server, it must be transferred to the client over the network. If the client saves the file, the file must be again transmitted over the network. In the case of wireless networks, where bandwidth is limited, fat client networks are highly inefficient. On the other hand, with a thin-client network, if the user modifies the large file, only mouse movement, keystrokes and screen updates are transmitted to and from the thin client. This is a highly efficient means, and other examples, such as ICA or NX, can consume as little as 5kbps bandwidth. This level of traffic is suitable for transmitting over wireless links.

How to Set Up a Thin-Client Network with a Wireless Bridge

One of the requirements for a thin client is that it has a PXE-bootable system. Normally, PXE is part of your network card BIOS, but if your card doesn't support it, you can get an ISO image of Etherboot with PXE support from ROM-o-matic (see Resources). Looking at the server with, for example, ten clients, it should have plenty of hard disk space (100GB), plenty of RAM (at least 1GB) and a modern CPU (such as an AMD64 3200).

The following is a five-step how-to guide on setting up an Edubuntu thin-client network over a fixed network.

1. Prepare the server.

In our network, we used the standard standalone configuration. From the command line:

sudo apt-get install ltsp-server-standalone

You may need to edit /etc/ltsp/dhcpd.conf if you change the default IP range for the clients. By default, it's configured for a server at 192.168.0.1 serving PXE clients.

Our network wasn't behind a firewall, but if yours is, you need to open TFTP, NFS and DHCP. To do this, edit /etc/hosts.allow, and limit access for portmap, rpc.mountd, rpc.statd and in.tftpd to the local network:

portmap: 192.168.0.0/24
rpc.mountd: 192.168.0.0/24
rpc.statd: 192.168.0.0/24
in.tftpd: 192.168.0.0/24

Restart all the services by executing the following commands:

sudo invoke-rc.d nfs-kernel-server restart
sudo invoke-rc.d nfs-common restart
sudo invoke-rc.d portmap restart

2. Build the client's runtime environment.

While connected to the Internet, issue the command:

sudo ltsp-build-client

If you're not connected to the Internet and have Edubuntu on CD, use:

sudo ltsp-build-client --mirror file:///cdrom

Remember to copy sources.list from the server into the chroot.

3. Configure your SSH keys.

To configure your SSH server and keys, do the following:

sudo apt-get install openssh-server
sudo ltsp-update-sshkeys

4. Start DHCP.

You should now be ready to start your DHCP server:

sudo invoke-rc.d dhcp3-server start

If all is going well, you should be ready to start your thin client.

5. Boot the thin client.

Make sure the client is connected to the same network as your server.

Power on the client, and if all goes well, you should see a nice XDMCP graphical login dialog.

Once the thin-client network was up and running correctly, we added a wireless bridge into our network. In our network, a number of thin clients are located on a single hub, which is separated from the boot server by an IEEE 802.11 wireless bridge. It's not an unrealistic scenario; a situation such as this may arise in a corporate setting or university. For example, if a group of thin clients is located in a different or temporary building that does not have access to the main network, a simple and elegant solution would be to have a wireless link between the clients and the server. Here is a mini-guide in getting the bridge running so that the clients can boot over the bridge:

  • Connect the server to the LAN port of the access point. Using this LAN connection, access the Web configuration interface of the access point, and configure it to broadcast an SSID on a unique channel. Ensure that it is in Infrastructure mode (not ad hoc mode). Save these settings and disconnect the server from the access point, leaving it powered on.

  • Now, connect the server to the wireless node. Using its Web interface, connect to the wireless network advertised by the access point. Again, make sure the node connects to the access point in Infrastructure mode.

  • Finally, connect the thin client to the access point. If there are several thin clients connected to a single hub, connect the access point to this hub.

We found ad hoc mode unsuitable for two reasons. First, most wireless devices limit ad hoc connection speeds to 11Mbps, which would put the network under severe strain to boot even one client. Second, while in ad hoc mode, the wireless nodes we were using would assume the Media Access Control (MAC) address of the computer that last accessed its Web interface (using Ethernet) as its own Wireless LAN MAC. This made the nodes suitable for connecting a single computer to a wireless network, but not for bridging traffic destined to more than one machine. This detail was found only after much sleuthing and led to a range of sporadic and often unreproducible errors in our system.

The wireless devices will form an Open Systems Interconnection (OSI) layer 2 bridge between the server and the thin clients. In other words, all packets received by the wireless devices on their Ethernet interfaces will be forwarded over the wireless network and retransmitted on the Ethernet adapter of the other wireless device. The bridge is transparent to both the clients and the server; neither has any knowledge that the bridge is in place.

For administration of the thin clients and network, we used the Webmin program. Webmin comprises a Web front end and a number of CGI scripts, which directly update system configuration files. As it is Web-based, administration can be performed from any part of the network by simply using a Web browser to log in to the server. The graphical interface greatly simplifies tasks, such as adding and removing thin clients from the network or changing the location of the image file to be transferred at boot time. The alternative is to edit several configuration files by hand and restart all dæmon programs manually.

Evaluating the Performance of a Thin-Client Network

The boot process of a thin client is network-intensive, but once the operating system has been transferred, there is little traffic between the client and the server. As the time required to boot a thin client is a good indicator of the overall usability of the network, this is the metric we used in all our tests.

Our testbed consisted of a 3GHz Pentium 4 with 1GB of RAM as the PXE server. We chose Edubuntu 5.10 for our server, as this (and all newer versions of Edubuntu) come with LTSP included. We used six identical thin clients: 500MHz Pentium III machines with 512MB of RAM—plenty of processing power for our purposes.

Figure 2. Six thin clients are connected to a hub, and in turn, this is connected to wireless bridge device. On the other side of the bridge is the server. Both wireless devices are placed in the Azimuth chamber.

When performing our tests, it was important that the results obtained were free from any external influence. A large part of this was making sure that the wireless bridge was not affected by any other wireless networks, cordless phones operating at 2.4GHz, microwaves or any other sources of Radio Frequency (RF) interference. To this end, we used the Azimuth 301w Test Chamber to house the wireless devices (see Resources). This ensures that any variations in boot times are caused by random variables within the system itself.

The Azimuth is a test platform for system-level testing of 802.11 wireless networks. It holds two wireless devices (in our case, the devices making up our bridge) in separate chambers and provides an artificial medium between them, creating complete isolation from the external RF environment. The Azimuth can attenuate the medium between the wireless devices and can convert the attenuation in decibels to an approximate distance between them. This gives us the repeatability, which is a rare thing in wireless LAN evaluation. A graphic representation of our testbed is shown in Figure 2.

We tested the thin-client network extensively in three different scenarios: first, when multiple clients are booting simultaneously over the network; second, booting a single thin client over the network at varying distances, which are simulated by altering the attenuation introduced by the chamber; and third, booting a single client when there is heavy background network traffic between the server and the other clients on the network.

Figure 3. A Boot Time Comparison of Fixed and Wireless Networks with an Increasing Number of Thin Clients

Figure 4. The Effect of the Bridge Length on Thin-Client Boot Time

Figure 5. Boot Time in the Presence of Background Traffic

Conclusion

As shown in Figure 3, a wired network is much more suitable for a thin-client network. The main limiting factor in using an 802.11g network is its lack of available bandwidth. Offering a maximum data rate of 54Mbps (and actual transfer speeds at less than half that), even an aging 100Mbps Ethernet easily outstrips 802.11g. When using an 802.11g bridge in a network such as this one, it is best to bear in mind its limitations. If your network contains multiple clients, try to stagger their boot procedures if possible.

Second, as shown in Figure 4, keep the bridge length to a minimum. With 802.11g technology, after a length of 25 meters, the boot time for a single client increases sharply, soon hitting the three-minute mark. Finally, our test shows, as illustrated in Figure 5, heavy background traffic (generated either by other clients booting or by external sources) also has a major influence on the clients' boot processes in a wireless environment. As the background traffic reaches 25% of our maximum throughput, the boot times begin to soar. Having pointed out the limitations with 802.11g, 802.11n is on the horizon, and it can offer data rates of 540Mbps, which means these limitations could soon cease to be an issue.

In the meantime, we can recommend a couple ways to speed up the boot process. First, strip out the unneeded services from the thin clients. Second, fix the delay of NFS mounting in klibc, and also try to start LDM as early as possible in the boot process, which means running it as the first service in rc2.d. If you do not need system logs, you can remove syslogd completely from the thin-client startup. Finally, it's worth remembering that after a client has fully booted, it requires very little bandwidth, and current wireless technology is more than capable of supporting a network of thin clients.

Acknowledgement

This work was supported by the National Communications Network Research Centre, a Science Foundation Ireland Project, under Grant 03/IN3/1396.

Ronan Skehill works for the Wireless Access Research Centre at the University of Limerick, Ireland, as a Senior Researcher. The Centre focuses on everything wireless-related and has been growing steadily since its inception in 1999.

Alan Dunne conducted his final-year project with the Centre under the supervision of John Nelson. He graduated in 2007 with a degree in Computer Engineering and now works with Ericsson Ireland as a Network Integration Engineer.

John Nelson is a senior lecturer in the Department of Electronic and Computer Engineering at the University of Limerick. His interests include mobile and wireless communications, software engineering and ambient assisted living.


Taken From: Linux Journal, nº 170 2008 - Thin Clients Booting over a Wireless Bridge, by Kyle Ronan Skehill, Alen Dunne and John Nelson

Tuesday, July 1, 2008

PXE Magic - Boot OS from the Network (with Menus)

PXE Magic: Flexible Network Booting with Menus
April 1st, 2008 by Kyle Rankin in

* SysAdmin

Set up a PXE server and then add menus to boot kickstart images, rescue disks and diagnostic tools all from the network.

It's funny how automation evolves as system administrators manage larger numbers of servers. When you manage only a few servers, it's fine to pop in an install CD and set options manually. As the number of servers grows, you might realize it makes sense to set up a kickstart or FAI (Debian's Fully Automated Installer) environment to automate all that manual configuration at install time. Now, you boot the install CD, type in a few boot arguments to point the machine to the kickstart server, and go get a cup of coffee as the machine installs.

When the day comes that you have to install three or four machines at once, you either can burn extra CDs or investigate PXE boot. The Preboot eXecution Environment is an open standard developed by Intel to allow machines to boot over a network instead of from local media, such as a floppy, CD or hard drive. Modern servers and newer laptops and desktops with integrated NICs should support PXE booting in the BIOS—in some cases, it's enabled by default, and in other cases, you need to go into your BIOS settings to enable it.

Because many modern servers these days offer built-in remote power and remote terminals or otherwise are remotely accessible via serial console servers or networked KVM, if you have a PXE boot environment set up, you can power on remotely, then boot and install a machine from miles away.

If you have never set up a PXE boot server before, the first part of this article covers the steps to get your first PXE server up and running. If PXE booting is old hat to you, skip ahead to the section called PXE Menu Magic. There, I cover how to configure boot menus when you PXE boot, so instead of hunting down MAC addresses and doing a lot of setup before an install, you simply can boot, select your OS, and you are off and running. After that, I discuss how to integrate rescue tools, such as Knoppix and memtest86+, into your PXE environment, so they are available to any machine that can boot from the network.
PXE Setup

You need three main pieces of infrastructure for a PXE setup: a DHCP server, a TFTP server and the syslinux software. Both DHCP and TFTP can reside on the same server. When a system attempts to boot from the network, the DHCP server gives it an IP address and then tells it the address for the TFTP server and the name of the bootstrap program to run. The TFTP server then serves that file, which in our case is a PXE-enabled syslinux binary. That program runs on the booted machine and then can load Linux kernels or other OS files that also are shared on the TFTP server over the network. Once the kernel is loaded, the OS starts as normal, and if you have configured a kickstart install correctly, the install begins.
Configure DHCP

Any relatively new DHCP server will support PXE booting, so if you don't already have a DHCP server set up, just use your distribution's DHCP server package (possibly named dhcpd, dhcp3-server or something similar). Configuring DHCP to suit your network is somewhat beyond the scope of this article, but many distributions ship a default configuration file that should provide a good place to start. Once the DHCP server is installed, edit the configuration file (often in /etc/dhcpd.conf), and locate the subnet section (or each host section if you configured static IP assignment via DHCP and want these hosts to PXE boot), and add two lines:

next-server ip_of_pxe_server;
filename "pxelinux.0";

The next-server directive tells the host the IP address of the TFTP server, and the filename directive tells it which file to download and execute from that server. Change the next-server argument to match the IP address of your TFTP server, and keep filename set to pxelinux.0, as that is the name of the syslinux PXE-enabled executable.

In the subnet section, you also need to add dynamic-bootp to the range directive. Here is an example subnet section after the changes:

subnet 10.0.0.0 netmask 255.255.255.0 {
range dynamic-bootp 10.0.0.200 10.0.0.220;
next-server 10.0.0.1;
filename "pxelinux.0";
}

Install TFTP

After the DHCP server is configured and running, you are ready to install TFTP. The pxelinux executable requires a TFTP server that supports the tsize option, and two good choices are either tftpd-hpa or atftp. In many distributions, these options already are packaged under these names, so just install your distribution's package or otherwise follow the installation instructions from the project's official site.

Depending on your TFTP package, you might need to add an entry to /etc/inetd.conf if it wasn't already added for you:

tftp dgram udp wait root /usr/sbin/in.tftpd
/usr/sbin/in.tftpd -s /var/lib/tftpboot

As you can see in this example, the -s option (used for tftpd-hpa) specified /var/lib/tftpboot as the directory to contain my files, but on some systems, these files are commonly stored in /tftpboot, so see your /etc/inetd.conf file and your tftpd man page and check on its conventions if you are unsure. If your distribution uses xinetd and doesn't create a file in /etc/xinetd.d for you, create a file called /etc/xinetd.d/tftp that contains the following:

# default: off
# description: The tftp server serves files using
# the trivial file transfer protocol.
# The tftp protocol is often used to boot diskless
# workstations, download configuration files to network-aware
# printers, and to start the installation process for
# some operating systems.
service tftp
{
disable = no
socket_type = dgram
protocol = udp
wait = yes
user = root
server = /usr/sbin/in.tftpd
server_args = -s /var/lib/tftpboot
per_source = 11
cps = 100 2
flags = IPv4
}

As tftpd is part of inetd or xinetd, you will not need to start any service. At most, you might need to reload inetd or xinetd; however, make sure that any software firewall you have running allows the TFTP port (port 69 udp) as input.
Add Syslinux

Now that TFTP is set up, all that is left to do is to install the syslinux package (available for most distributions, or you can follow the installation instructions from the project's main Web page), copy the supplied pxelinux.0 file to /var/lib/tftpboot (or your TFTP directory), and then create a /var/lib/tftpboot/pxelinux.cfg directory to hold pxelinux configuration files.
PXE Menu Magic

You can configure pxelinux with or without menus, and many administrators use pxelinux without them. There are compelling reasons to use pxelinux menus, which I discuss below, but first, here's how some pxelinux setups are configured.

When many people configure pxelinux, they create configuration files for a machine or class of machines based on the fact that when pxelinux loads it searches the pxelinux.cfg directory on the TFTP server for configuration files in the following order:

*

Files named 01-MACADDRESS with hyphens in between each hex pair. So, for a server with a MAC address of 88:99:AA:BB:CC:DD, a configuration file that would target only that machine would be named 01-88-99-aa-bb-cc-dd (and I've noticed it does matter that it is lowercase).
*

Files named after the host's IP address in hex. Here, pxelinux will drop a digit from the end of the hex IP and try again as each file search fails. This is often used when an administrator buys a lot of the same brand of machine, which often will have very similar MAC addresses. The administrator then can configure DHCP to assign a certain IP range to those MAC addresses. Then, a boot option can be applied to all of that group.
*

Finally, if no specific files can be found, pxelinux will look for a file named default and use it.

One nice feature of pxelinux is that it uses the same syntax as syslinux, so porting over a configuration from a CD, for instance, can start with the syslinux options and follow with your custom network options. Here is an example configuration for an old CentOS 3.6 kickstart:

default linux
label linux
kernel vmlinuz-centos-3.6
append text nofb load_ramdisk=1 initrd=initrd-centos-3.6.img
↪network ks=http://10.0.0.1/kickstart/centos3.cfg

Why Use Menus?

The standard sort of pxelinux setup works fine, and many administrators use it, but one of the annoying aspects of it is that even if you know you want to install, say, CentOS 3.6 on a server, you first have to get the MAC address. So, you either go to the machine and find a sticker that lists the MAC address, boot the machine into the BIOS to read the MAC, or let it get a lease on the network. Then, you need to create either a custom configuration file for that host's MAC or make sure its MAC is part of a group you already have configured. Depending on your infrastructure, this step can add substantial time to each server. Even if you buy servers in batches and group in IP ranges, what happens if you want to install a different OS on one of the servers? You then have to go through the additional work of tracking down the MAC to set up an exclusion.

With pxelinux menus, I can preconfigure any of the different network boot scenarios I need and assign a number to them. Then, when a machine boots, I get an ASCII menu I can customize that lists all of these options and their number. Then, I can select the option I want, press Enter, and the install is off and running. Beyond that, now I have the option of adding non-kickstart images and can make them available to all of my servers, not just certain groups. With this feature, you can make rescue tools like Knoppix and memtest86+ available to any machine on the network that can PXE boot. You even can set a timeout, like with boot CDs, that will select a default option. I use this to select my standard Knoppix rescue mode after 30 seconds.
Configure PXE Menus

Because pxelinux shares the syntax of syslinux, if you have any CDs that have fancy syslinux menus, you can refer to them for examples. Because you want to make this available to all hosts, move any more specific configuration files out of pxelinux.cfg, and create a file named default. When the pxelinux program fails to find any more specific files, it then will load this configuration. Here is a sample menu configuration with two options: the first boots Knoppix over the network, and the second boots a CentOS 4.5 kickstart:

default 1
timeout 300
prompt 1
display f1.msg
F1 f1.msg
F2 f2.msg

label 1
kernel vmlinuz-knx5.1.1
append secure nfsdir=10.0.0.1:/mnt/knoppix/5.1.1
↪nodhcp lang=us ramdisk_size=100000 init=/etc/init
↪2 apm=power-off nomce vga=normal
↪initrd=miniroot-knx5.1.1.gz quiet BOOT_IMAGE=knoppix
label 2
kernel vmlinuz-centos-4.5-64
append text nofb ksdevice=eth0 load_ramdisk=1
↪initrd=initrd-centos-4.5-64.img network
↪ks=http://10.0.0.1/kickstart/centos4-64.cfg

Each of these options is documented in the syslinux man page, but I highlight a few here. The default option sets which label to boot when the timeout expires. The timeout is in tenths of a second, so in this example, the timeout is 30 seconds, after which it will boot using the options set under label 1. The display option lists a message if there are any to display by default, so if you want to display a fancy menu for these two options, you could create a file called f1.msg in /var/lib/tftpboot/ that contains something like:

----| Boot Options |-----
| |
| 1. Knoppix 5.1.1 |
| 2. CentOS 4.5 64 bit |
| |
-------------------------

Main | Help
Default image will boot in 30 seconds...


Notice that I listed F1 and F2 in the menu. You can create multiple files that will be output to the screen when the user presses the function keys. This can be useful if you have more menu options than can fit on a single screen, or if you want to provide extra documentation at boot time (this is handy if you are like me and create custom boot arguments for your kickstart servers). In this example, I could create a /var/lib/tftpboot/f2.msg file and add a short help file.

Although this menu is rather basic, check out the syslinux configuration file and project page for examples of how to jazz it up with color and even custom graphics.
Extra Features: PXE Rescue Disk

One of my favorite features of a PXE server is the addition of a Knoppix rescue disk. Now, whenever I need to recover a machine, I don't need to hunt around for a disk, I can just boot the server off the network.

First, get a Knoppix disk. I use a Knoppix 5.1.1 CD for this example, but I've been successful with much older Knoppix CDs. Mount the CD-ROM, and then go to the boot/isolinux directory on the CD. Copy the miniroot.gz and vmlinuz files to your /var/lib/tftpboot directory, except rename them something distinct, such as miniroot-knx5.1.1.gz and vmlinuz-knx5.1.1, respectively. Now, edit your pxelinux.cfg/default file, and add lines like the one I used above in my example:

label 1
kernel vmlinuz-knx5.1.1
append secure nfsdir=10.0.0.1:/mnt/knoppix/5.1.1 nodhcp
↪lang=us ramdisk_size=100000 init=/etc/init 2
↪apm=power-off nomce vga=normal
↪initrd=miniroot-knx5.1.1.gz quiet BOOT_IMAGE=knoppix

Notice here that I labeled it 1, so if you already have a label with that name, you need to decide which of the two to rename. Also notice that this example references the renamed vmlinuz-knx5.1.1 and miniroot-knx5.1.1.gz files. If you named your files something else, be sure to change the names here as well. Because I am mostly dealing with servers, I added 2 after init=/etc/init on the append line, so it would boot into runlevel 2 (console-only mode). If you want to boot to a full graphical environment, remove 2 from the append line.

The final step might be the largest for you if you don't have an NFS server set up. For Knoppix to boot over the network, you have to have its CD contents shared on an NFS server. NFS server configuration is beyond the scope of this article, but in my example, I set up an NFS share on 10.0.0.1 at /mnt/knoppix/5.1.1. I then mounted my Knoppix CD and copied the full contents to that directory. Alternatively, you could mount a Knoppix CD or ISO directly to that directory. When the Knoppix kernel boots, it will then mount that NFS share and access the rest of the files it needs directly over the network.
Extra Features: Memtest86+

Another nice addition to a PXE environment is the memtest86+ program. This program does a thorough scan of a system's RAM and reports any errors. These days, some distributions even install it by default and make it available during the boot process because it is so useful. Compared to Knoppix, it is very simple to add memtest86+ to your PXE server, because it runs from a single bootable file. First, install your distribution's memtest86+ package (most make it available), or otherwise download it from the memtest86+ site. Then, copy the program binary to /var/lib/tftpboot/memtest. Finally, add a new label to your pxelinux.cfg/default file:

label 3
kernel memtest

That's it. When you type 3 at the boot prompt, the memtest86+ program loads over the network and starts the scan.
Conclusion

There are a number of extra features beyond the ones I give here. For instance, a number of DOS boot floppy images, such as Peter Nordahl's NT Password and Registry Editor Boot Disk, can be added to a PXE environment. My own use of the pxelinux menu helps me streamline server kickstarts and makes it simple to kickstart many servers all at the same time. At boot time, I can not only indicate which OS to load, but also more specific options, such as the type of server (Web, database and so forth) to install, what hostname to use, and other very specific tweaks. Besides the benefit of no longer tracking down MAC addresses, you also can create a nice colorful user-friendly boot menu that can be documented, so it's simpler for new administrators to pick up. Finally, I've been able to customize Knoppix disks so that they do very specific things at boot, such as perform load tests or even set up a Webcam server—all from the network.

Resources

tftp-hpa: www.kernel.org/pub/software/network/tftp

atftp: ftp.mamalinux.com/pub/atftp

Syslinux PXE Page: syslinux.zytor.com/pxe.php

Red Hat's Kickstart Guide: www.redhat.com/docs/manuals/enterprise/RHEL-4-Manual/sysadmin-guide/ch-kickstart2.html

Knoppix: www.knoppix.org

Memtest86+: www.memtest.org

Kyle Rankin is a Senior Systems Administrator in the San Francisco Bay Area and the author of a number of books, including Knoppix Hacks and Ubuntu Hacks for O'Reilly Media. He is currently the president of the North Bay Linux Users' Group.


Taken From: Linux Journal, nº 168 April 2008 - PXE Magic: Flexible Network Booting with Menus, by Kyle Rankin

Live CD From Your In Installation / Running System - Ubuntu - Easy Way

In the previous posts I have shown howto remaster an Ubuntu LiveCd, which could also be used to make a LiveCd from your running system with some minor modifications, but the method I will be showing is fully automatic and effortless, and it works i tested it under ubuntu 8.04 and worked like a charm.

You can also use this, to customize an Ubuntu LiveCd if you install it on your hard drive and them use this method.


First off all you have to get remastersys:

$ wget http://www.mirrorservice.org/sites/download.sourceforge.net/pub/sourceforge/r/re/remastersys/remastersys_2.0-5_all.deb

$ sudo dpkg -i remastersys_2.0-5_all.deb


Now you just have to use remastersys either in the "Bash Shell" or via its "Gui":


-----------
Bash Sell
-----------

You have basically you have three options:


backup - backs up your system including your /home folder with
your users on it.

dist - omits the /home folder thus making it a distributable cd
that you can give to your friends.

clean - removes the temporary folder that was created, including the
new iso so burn it and copy it elsewhere before you run
"sudo remastersys clean"


If you want to make a LiveCd you choices are either 'backup' or 'dist', I'm going for 'dist':

$ sudo remastersys dist

Now the process starts and you have to do is wait, be sure have enough space in your system because remastersys is going to make /home/remastersys dir and work there.

When it all ends, you have an iso off your LiveCd, that you can burn with K3B or other, at:

/home/remastersys/remastersys/customdist.iso

Now burn it or move it and clean all the temp files remastersys created under /home/remastersys, using the following command:

$ sudo remastersys clean


-----------
Gui
-----------

To run the remastersys gui, which is very basic, just type:

$ sudo remastersys-gui

The gui presents you, with the following options:

Back Complete System including User Data
Make a Distributable copy to share with friends
Modify the remastersys config file to customize options
Remove temporary files
About Remastersys Backup
Quit Remastersys Backup

If you want to make a LiveCd you choices are either 'Back Complete System including User Data' (backup) or 'Make a Distributable copy to share with friends' (dist), I'm going for 'Make a Distributable copy to share with friends'.

Now the process starts and you have to do is wait, be sure have enough space in your system because remastersys is going to make /home/remastersys dir and work there.

When it all ends, you have an iso off your LiveCd, that you can burn with K3B or other, at:

/home/remastersys/remastersys/customdist.iso

Now burn it or move it and clean all the temp files remastersys created under /home/remastersys, execute the remastersys gui once again:

$ sudo remastersys-gui

and chose:

Remove temporary files


Happy LiveCD Making.

Thursday, June 26, 2008

Customizing Linux Live CDs - Ubuntu 8.04 - Desktop

This is based on the an article from Linux Journal for Ubuntu 7.04, and i have made some adjustments, with the following tags:

my - is where i added something it wasn't there.

myc - is where i corrected something

----------------------------------------------------------------
Paranoid Penguin - Customizing Linux Live CDs, Part I
May 1st, 2008 by Mick Bauer in


Make your desktop completely portable with a custom live CD.

In my recent column “Security Features in Ubuntu” (LJ, March 2008), I mentioned that the live CD method of running Linux from a CD-ROM or DVD rather than directly from a hard drive has important and useful security ramifications. I went on to promise that this would be the topic of a future column.

Never one to renege on a promise, this month I bring you the first of a multipart series about Linux live CDs. In this month's column, I describe some security usages for bootable Linux CDs and demonstrate a quick-and-easy way to customize the standard Ubuntu Desktop CD that allows you to change its included bundle of software.
Uses of Bootable Linux CDs

At this point, you may be wondering, “What's the big deal about bootable Linux CDs? Aren't all Linux installation CDs bootable?”

On the one hand, yes. Linux installation CDs always have been bootable. But, not all Linux installation CDs offer you the option of simply running Linux from the CD without installing it right away. This is the difference between a live Linux CD and an installer CD.

Live CDs are especially handy for trying out a distribution before committing it to your hard disk. Usually, they include an installer applet that makes it easy to make that commitment, if you so choose. But, these are very general live CD uses.

For the security-conscious user, or for the conscientious-security user (but not for the unconscious user), live CDs also are useful, among other things, for the following:

* Using untrusted hardware, such as public-use PCs at coffee shops.

* Analyzing computers that may have been compromised.

* Recovering data from systems that no longer boot for some reason.

* Running software you'd prefer not to install on your hard disk.

Depending on your needs, you might be perfectly happy using an existing Linux live CD distribution, such as Knoppix, BackTrack or Ubuntu Desktop. But, what if you want to apply the very latest security patches to the live CD's installed applications? What if your favorite live CD lacks an application you really need? Or, what if you don't want to have to configure things manually, such as network settings, after every single time you boot?

These are some of the many reasons you might want to customize your Linux live CD. For the remainder of this month's column, I walk through the process of patching and adding security software to Ubuntu Desktop 7.10. Much of what follows applies directly to other squashfs-based distributions, such as Linux Mint, SLAX and BackTrack, and indirectly to most other live CD distributions.
Prerequisites

Before you can customize your Ubuntu Desktop live CD, you need several things:

1. An ISO file for the current version of Ubuntu Desktop (or Linux Mint).

2. The squashfs-tools package installed on your system.

3. The mkisofs package installed on your system.

You can get the ISO file in one of two ways: download it from www.ubuntu.com, or create it from an actual Ubuntu CD via the dd command, like this:

bash-$ dd if=/dev/cdrom of=./ubuntu-7.10-desktop-i386.iso

For the remainder of this article, I assume your ISO image resides in your home directory. I also assume you're running Ubuntu, but if you aren't, for commands that begin with sudo, you instead should do whatever else you usually do to become root temporarily (for example, su or su -c).

The squashfs-tools package provides utilities for creating and mounting squashfs filesystems. Most of an Ubuntu live CD is taken up by one enormous squashfs image that is uncompressed and mounted as / when you boot the CD. To remaster the CD, you need to mount a copy of its squashfs image, change various files and directories in it, and save the edited directory structure as a new squashfs image.

Finally, you'll use the mkisofs command to convert the various files and directories you've just edited into a single ISO image file.

In describing how these three prerequisites relate to each other, I also discuss the three stages of the live CD remastering process: mounting the squashfs image, changing it in various ways and incorporating it into a new ISO image.
The Procedure

The procedure I'm about to step through is based on the one at www.debuntu.org (see Resources). Much of what follows won't be very security-focused; in subsequent columns, I'll go into greater depth in applying this stuff to security applications. Right now, my immediate goal is to tell you what you need to know to begin experimenting with your own customized live CDs right away, and I'm sure you'll think of cool things to do between now and my next column.

In demonstrating these commands, I'm going to try a new convention that bends reality a little bit and will number each bash-prompt: 01-$, 02-$, and so on. This way, I'll be able to refer to each command by line number. We'll see whether this helps, or whether I'm just getting nostalgic for my BASIC programming days—send me an e-mail if you have an opinion either way.

First, log on as a nonprivileged user, open a command window (none of what we do here will require the X Window System), and navigate to your home directory. Type this command to create mountpoints for the old ISO image and its squashfs image, a top-level directory for creating the new CD file hierarchy and a directory for rebuilding the root filesystem that will become the new squashfs image:

01-$ mkdir -p ./isomount ./isonew/squashfs ./isonew/cd ./isonew/custom

Next, mount the original ISO image, and copy everything in it, except the squashfs image itself, into the ./isonew/cd directory:

02-$ sudo mount -o loop ./ubuntu-7.10-desktop-i386.iso ./isomount/

03-$ rsync --exclude=/casper/filesystem.squashfs -a ./isomount/ ./isonew/cd

Line 03 uses rsync rather than cp, so you don't need to repopulate the isonew/cd directory every time you make a new ISO image. Whenever rsync encounters identical files, it copies only the differences in the new file to the old one, rather than copying the entire file (if there are no differences, it leaves the “target” version alone).

Note: if you're working within some directory other than your home directory, and if that directory is on a Windows partition rather than a native Linux partition (such as ext2, ext3 or ReiserFS), you'll get many errors when copying files around—some of which may cause this procedure to fail. You don't need to do all of this within your home directory, but you should do it on a Linux partition.

You've copied the skeleton of the original CD into isonew/cd, so now you can get busy with the squashed root filesystem by enabling squashfs support in your running kernel and mounting the squashfs image:

04-$ sudo modprobe squashfs

05-$ sudo mount -t squashfs -o loop ./isomount/casper/filesystem.squashfs ./isonew/squashfs/

Next, copy the original root filesystem into the rebuild directory:

06-$ sudo rsync -a ./isonew/squashfs/ ./isonew/custom

Before you enter the Matrix by chrooting into this root filesystem and customizing it, you should make sure networking and the apt system will work once you do, by copying some configuration files from your running system:

07-$ sudo cp /etc/resolv.conf /etc/hosts ./isonew/custom/etc/

08-$ sudo cp /etc/apt/sources.list ./isonew/custom/etc/apt/

This assumes, of course, that your running system is communicating with the network properly and that its sources.list file includes entries for the universe, multiverse and partner repositories (or anywhere else from whence you intend to obtain packages). If you have anything else you'd like to include in your custom live CD, such as other configuration files, documents, images and so on, now is a good time to copy those over too. Just remember that space is precious.

Now you're ready to enter your new root filesystem. I've written extensively about using chroot jails to contain server dæmons, so that if they're hijacked, the attacker gains access to only a small subset of your filesystem. Well, right now, you're about to chroot yourself, so that all changes you make—adding and removing packages, downloading updates, editing configuration files and so on—are applied to your custom ISO's root filesystem, not your underlying system's root filesystem.

Here's how to swallow the Blue Pill:

09-$ sudo chroot ./isonew/custom

From this point on, until you type the command exit (step 22, below), you'll be in an environment in which / is no longer your underlying filesystem's root, but actually /home/you/isonew/custom (where /home/you is your local home directory, or wherever else you created the isonew hierarchy).

Now that you're jacked in, you need to bring the proc and sysfs filesystems on-line, so that your “real” system's kernel can interact properly with the “fake” system represented by your soon-to-be-customized root filesystem. Now, set your home directory to /root (actually /home/you/isonew/custom/root):

10-# mount -t proc none /proc/

11-# mount -t sysfs none /sys/

11.5(my)# mount -t devpts none /dev/pts

12-# export HOME=/root

Note that the prompts in my examples have switched to # from $, indicating that you're now running in a root shell. This is necessary, because you'll need to be root in order to exit the chroot jail you've voluntarily entered.

Now you're ready to customize. This is the part when you don't necessarily need my help; you can be creative. For example purposes though, let's make some space for new packages and update the ones that are left.

What are you going to use your new live CD for? Secure Web browsing using untrusted hardware isn't a bad start. You shouldn't need OpenOffice.org for that, and it takes up something like 85MB of your compressed squashfs image (remember, a standard CD ISO can't be larger than 650MB).

You can remove OpenOffice.org, plus a couple of things upon which only OpenOffice.org depends, like this:

13-# apt-get remove --purge `dpkg-query -W --showformat='${Package}\n'
↪|grep openoffice`

Did you notice the embedded dpkg-query...|grep... command? It queries the root filesystem's deb-package database for a complete list of installed packages. The output of this is piped through a grep search for the string “openoffice”. You can use the command in line 13 to find and purge other groups of packages by simply changing the grep query.

Suppose you also want to get rid of The GIMP, which takes up more than 6.5MB (after compression) on your live CD image. So, swap out the string “openoffice” in the previous command with “gimp”, like this:

14-# apt-get remove --purge `dpkg-query -W --showformat='${Package}\n'
↪|grep gimp`

Other good candidates for removal include non-English language packs (which take up anywhere from 0.5–1.5MB compressed), and multimedia applications such as Rhythmbox, totem and sound-juicer, which take up a few megabytes each, even after compression, and are unlikely to be useful for security purposes.

Decide for yourself. Browse through the list of installed packages with a quick aptitude search ~i |less. If you mistakenly purge something you decide you actually need, you always can exit the chroot jail and re-execute the rsync command on line 06.

aptitude vs. apt-get

Note that I'm using apt-get here, rather than the more-sophisticated aptitude. This is because one of aptitude's key features, the ability to delete packages that are no longer necessary automatically, can be dangerous when used on any system on which packages have been installed by any tool other than aptitude.

Because aptitude maintains its own database of installation histories, it can miss key dependencies in this context and remove packages that you do, in fact, need. Therefore, you should use aptitude only to remove programs that you installed with aptitude. If you later need to undo an installation that included automatically installed dependencies, you can use apt-get autoremove to achieve the same thing.

So, now you've made room for your custom toolkit. If you want to use your live CD for anonymous Web surfing, you may want to install Tor and Privoxy. First, you need to update your custom root filesystem's package database to synchronize it with the sources.list file you copied over in line 08:

15-# apt-get update

Now, you can use apt-get install just as you would on any other live system to install your custom packages:

16-# apt-get install tor privoxy

As a professional paranoiac, I'd be remiss if I didn't point out that both of these packages are from Ubuntu's universe repository, and as such, they aren't provided with the same level of support as packages in the main and restricted repositories, although the Ubuntu MOTO Security Team does its best to keep up with security patches. This is a trade-off you'll probably find yourself making frequently, however. As I pointed out in my column in the March 2008 issue, many of Ubuntu's most useful security utilities are available only in the universe and metaverse repositories.

After you've installed your custom applications, make sure your entire system is fully patched. As with any other Ubuntu (or other Debian-based) system, you can use apt-get dist-upgrade. Because this will result in quite a bit of updates being downloaded and installed, and because space is at a premium on our ISO image, immediately follow the upgrade with a clean:

17-# apt-get dist-upgrade

18-# apt-get clean

Come to think of it, this one step—upgrading the live CD's packages—may be the only security-related reason you need to customize your live CD. Applying security patches is that important!

There's just one more thing to do before packing up your new ISO: custom configuration. You may want to edit the hosts or resolv.conf files you copied over before (or, after exiting the chroot jail, you simply may want to copy over them with the originals from ./isonew/squashfs/etc). You may want to preconfigure Tor by editing /etc/tor/torrc and /etc/tor/tor-socks.conf, and Privoxy via the files in /etc/privoxy.

As with removing and installing packages, this process is the same as on any other system: fire up your (non-GUI) text editor of choice (nano, vi and ed are all present in the standard Ubuntu ISO), and edit anything that needs editing.

Are you done customizing? If so, you can take your Red Pill and exit the Matrix—I mean, the chroot jail. On your way out, empty the /tmp directory, and unmount the chrooted /proc and /sys filesystems:

19-# rm -rf /tmp/*

20-# umount /proc/

21-# umount /sys/

21.5(my)-# umount /dev/pts

22-# exit

You're back in reality (at least, back in your previous working directory on the underlying system). Before you pack up your ISO, you'll have to build a new manifest file (a list of all packages in the new live CD root filesystem), recompress the customized root filesystem into a squashfs file and regenerate the md5sum of your live CD files.

First, to rebuild your manifest file:

23(myc)-$ chmod a+w ./isonew/cd/casper/filesystem.manifest

24-$ sudo chroot ./isonew/custom dpkg-query -W --showformat='${Package} ${Version}\n' > ./isonew/cd/casper/filesystem.manifest

25-$ sudo cp ./isonew/cd/casper/filesystem.manifest ./isonew/cd/casper/filesystem.manifest-desktop

In line 23, you made the old manifest file writeable, so you could copy over it. In line 24, you temporarily popped back into the root filesystem chroot jail to generate the package list with dpkg-query. And in line 25, you copied the new manifest into an identical file called filesystem.manifest-desktop.

Now you can resquash your root filesystem:

26-$ sudo mksquashfs ./isonew/custom ./isonew/cd/casper/filesystem.squashfs

If you like, you can edit the DISKNAME parameter in the file ./isonew/cd/README.diskdefines. Regardless, next you should regenerate your live CD's md5sum, so you can detect tampering later on:

27-$ sudo rm ./isonew/cd/md5sum.txt

28-$ sudo -s

29-# cd ./isonew/cd

30-# find . -type f -print0 | xargs -0 md5sum > md5sum.txt

31-# exit

And, you've reached the final step. Now you can write your finished ISO image file:

32-$ cd ./isonew/cd

33(myc)-$ sudo mkisofs -r -V "Ubuntu-Live-PrivateSurf" -b isolinux/isolinux.bin -c isolinux/boot.cat -cache-inodes -J -l -no-emul-boot -boot-load-size 4 -boot-info-table -o ~/Ubuntu-Live-7.10-PrivateSurf.iso -pathspec ./

Your home directory now contains a new customized live CD ISO file, named Ubuntu-Live-7.10-PrivateSurf.iso. You can boot it directly from hard disk using VMware, QEMU or some other virtualization engine to test it. Or, of course, simply burn it to CD using your CD-writing utility of choice.
Conclusion

You've now got the basic technique for customizing an Ubuntu live CD. Although I didn't go into much depth showing actual customizations beyond removing and adding packages, I'll continue this series next time with detailed guidance on bundling and preconfiguring specific security tools into your live CD.

Until then, have fun experimenting with live CDs, and of course, be safe!

Appendix

Here's the complete procedure, in the form of a raw list of all commands described in this article. The $ prompt indicates commands executed as an unprivileged user, and the # prompt shows commands that are executed by root.

00-$ dd if=/dev/cdrom of=./ubuntu-7.10-desktop-i386.iso

01-$ mkdir -p ./isomount ./isonew/squashfs ./isonew/cd ./isonew/custom

02-$ sudo mount -o loop ./ubuntu-7.10-desktop-i386.iso ./isomount/

03-$ rsync --exclude=/casper/filesystem.squashfs -a ./isomount/ ./isonew/cd

04-$ sudo modprobe squashfs

05-$ sudo mount -t squashfs -o loop ./isomount/casper/filesystem.squashfs ./isonew/squashfs/

06-$ sudo rsync -a ./isonew/squashfs/ ./isonew/custom

07-$ sudo cp /etc/resolv.conf /etc/hosts ./isonew/custom/etc/

08-$ sudo cp /etc/apt/sources.list ./isonew/custom/etc/apt/

09-$ sudo chroot ./isonew/custom

10-# mount -t proc none /proc/

11-# mount -t sysfs none /sys/

11.5(my)# mount -t devpts none /dev/pts

12-# export HOME=/root

13-# apt-get remove --purge `dpkg-query -W --showformat='${Package}\n' |grep openoffice`

14-# apt-get remove --purge `dpkg-query -W --showformat='${Package}\n'
↪|grep gimp`

15-# apt-get update

16-# apt-get install tor privoxy

17-# apt-get dist-upgrade

18-# apt-get clean

19-# rm -rf /tmp/*

20-# umount /proc/

21-# umount /sys/

21.5(my)# umount /dev/pts

22-# exit

23(myc)-$ chmod a+w ./isonew/cd/casper/filesystem.manifest

24-$ sudo chroot ./isonew/custom dpkg-query -W --showformat='${Package} ${Version}\n' > ./isonew/cd/casper/filesystem.manifest

25-$ sudo cp ./isonew/cd/casper/filesystem.manifest
↪./isonew/cd/casper/filesystem.manifest-desktop

26-$ sudo mksquashfs ./isonew/custom
↪./isonew/cd/casper/filesystem.squashfs

27-$ sudo rm ./isonew/cd/md5sum.txt

28-$ sudo -s

29-# cd ./isonew/cd

30-# find . -type f -print0 | xargs -0 md5sum > md5sum.txt

31-# exit

32-$ cd ./isonew/cd

33(myc)-$ sudo mkisofs -r -V "Ubuntu-Live-PrivateSurf" -b isolinux/isolinux.bin -c isolinux/boot.cat -cache-inodes -J -l -no-emul-boot -boot-load-size 4 -boot-info-table -o ~/Ubuntu-Live-7.10-PrivateSurf.iso -pathspec ./

Resources

Debuntu.org's “Customize Your Ubuntu Live CD” Tutorial: www.debuntu.org/how-to-customize-your-ubuntu-live-cd

Jeffery Douglas Waddel's “Secure Boot CDs for VPN HOWTO”: www.linux.org/docs/ldp/howto/Secure-BootCD-VPN-HOWTO.html

Daniel Barlow's “Building Your Own Live CD”: www.linuxjournal.com/article/7246

Mick Bauer (darth.elmo@wiremonkeys.org) is Network Security Architect for one of the US's largest banks. He is the author of the O'Reilly book Linux Server Security, 2nd edition (formerly called Building Secure Servers With Linux), an occasional presenter at information security conferences and composer of the “Network Engineering Polka”.

Copyright © 1994 - 2008 Linux Journal. All rights reserved.


Taken From: Linux Journal, nº 169 May 2008 - Customizing Linux Live CDs, Part I,
by Mick Bauer's Paranoid Penguin

Customizing Linux Live CDs - Ubuntu 7.10 - Desktop

Paranoid Penguin - Customizing Linux Live CDs, Part I
May 1st, 2008 by Mick Bauer in

Make your desktop completely portable with a custom live CD.

In my recent column “Security Features in Ubuntu” (LJ, March 2008), I mentioned that the live CD method of running Linux from a CD-ROM or DVD rather than directly from a hard drive has important and useful security ramifications. I went on to promise that this would be the topic of a future column.

Never one to renege on a promise, this month I bring you the first of a multipart series about Linux live CDs. In this month's column, I describe some security usages for bootable Linux CDs and demonstrate a quick-and-easy way to customize the standard Ubuntu Desktop CD that allows you to change its included bundle of software.
Uses of Bootable Linux CDs

At this point, you may be wondering, “What's the big deal about bootable Linux CDs? Aren't all Linux installation CDs bootable?”

On the one hand, yes. Linux installation CDs always have been bootable. But, not all Linux installation CDs offer you the option of simply running Linux from the CD without installing it right away. This is the difference between a live Linux CD and an installer CD.

Live CDs are especially handy for trying out a distribution before committing it to your hard disk. Usually, they include an installer applet that makes it easy to make that commitment, if you so choose. But, these are very general live CD uses.

For the security-conscious user, or for the conscientious-security user (but not for the unconscious user), live CDs also are useful, among other things, for the following:

* Using untrusted hardware, such as public-use PCs at coffee shops.

* Analyzing computers that may have been compromised.

* Recovering data from systems that no longer boot for some reason.

* Running software you'd prefer not to install on your hard disk.

Depending on your needs, you might be perfectly happy using an existing Linux live CD distribution, such as Knoppix, BackTrack or Ubuntu Desktop. But, what if you want to apply the very latest security patches to the live CD's installed applications? What if your favorite live CD lacks an application you really need? Or, what if you don't want to have to configure things manually, such as network settings, after every single time you boot?

These are some of the many reasons you might want to customize your Linux live CD. For the remainder of this month's column, I walk through the process of patching and adding security software to Ubuntu Desktop 7.10. Much of what follows applies directly to other squashfs-based distributions, such as Linux Mint, SLAX and BackTrack, and indirectly to most other live CD distributions.
Prerequisites

Before you can customize your Ubuntu Desktop live CD, you need several things:

1. An ISO file for the current version of Ubuntu Desktop (or Linux Mint).

2. The squashfs-tools package installed on your system.

3. The mkisofs package installed on your system.

You can get the ISO file in one of two ways: download it from www.ubuntu.com, or create it from an actual Ubuntu CD via the dd command, like this:

bash-$ dd if=/dev/cdrom of=./ubuntu-7.10-desktop-i386.iso

For the remainder of this article, I assume your ISO image resides in your home directory. I also assume you're running Ubuntu, but if you aren't, for commands that begin with sudo, you instead should do whatever else you usually do to become root temporarily (for example, su or su -c).

The squashfs-tools package provides utilities for creating and mounting squashfs filesystems. Most of an Ubuntu live CD is taken up by one enormous squashfs image that is uncompressed and mounted as / when you boot the CD. To remaster the CD, you need to mount a copy of its squashfs image, change various files and directories in it, and save the edited directory structure as a new squashfs image.

Finally, you'll use the mkisofs command to convert the various files and directories you've just edited into a single ISO image file.

In describing how these three prerequisites relate to each other, I also discuss the three stages of the live CD remastering process: mounting the squashfs image, changing it in various ways and incorporating it into a new ISO image.
The Procedure

The procedure I'm about to step through is based on the one at www.debuntu.org (see Resources). Much of what follows won't be very security-focused; in subsequent columns, I'll go into greater depth in applying this stuff to security applications. Right now, my immediate goal is to tell you what you need to know to begin experimenting with your own customized live CDs right away, and I'm sure you'll think of cool things to do between now and my next column.

In demonstrating these commands, I'm going to try a new convention that bends reality a little bit and will number each bash-prompt: 01-$, 02-$, and so on. This way, I'll be able to refer to each command by line number. We'll see whether this helps, or whether I'm just getting nostalgic for my BASIC programming days—send me an e-mail if you have an opinion either way.

First, log on as a nonprivileged user, open a command window (none of what we do here will require the X Window System), and navigate to your home directory. Type this command to create mountpoints for the old ISO image and its squashfs image, a top-level directory for creating the new CD file hierarchy and a directory for rebuilding the root filesystem that will become the new squashfs image:

01-$ mkdir -p ./isomount ./isonew/squashfs ./isonew/cd ./isonew/custom

Next, mount the original ISO image, and copy everything in it, except the squashfs image itself, into the ./isonew/cd directory:

02-$ sudo mount -o loop ./ubuntu-7.10-desktop-i386.iso ./isomount/

03-$ rsync --exclude=/casper/filesystem.squashfs -a ./isomount/
↪./isonew/cd

Line 03 uses rsync rather than cp, so you don't need to repopulate the isonew/cd directory every time you make a new ISO image. Whenever rsync encounters identical files, it copies only the differences in the new file to the old one, rather than copying the entire file (if there are no differences, it leaves the “target” version alone).

Note: if you're working within some directory other than your home directory, and if that directory is on a Windows partition rather than a native Linux partition (such as ext2, ext3 or ReiserFS), you'll get many errors when copying files around—some of which may cause this procedure to fail. You don't need to do all of this within your home directory, but you should do it on a Linux partition.

You've copied the skeleton of the original CD into isonew/cd, so now you can get busy with the squashed root filesystem by enabling squashfs support in your running kernel and mounting the squashfs image:

04-$ sudo modprobe squashfs

05-$ sudo mount -t squashfs -o loop
↪./isomount/casper/filesystem.squashfs ./isonew/squashfs/

Next, copy the original root filesystem into the rebuild directory:

06-$ sudo rsync -a ./isonew/squashfs/ ./isonew/custom

Before you enter the Matrix by chrooting into this root filesystem and customizing it, you should make sure networking and the apt system will work once you do, by copying some configuration files from your running system:

07-$ sudo cp /etc/resolv.conf /etc/hosts ./isonew/custom/etc/

08-$ sudo cp /etc/apt/sources.list ./isonew/custom/etc/apt/

This assumes, of course, that your running system is communicating with the network properly and that its sources.list file includes entries for the universe, multiverse and partner repositories (or anywhere else from whence you intend to obtain packages). If you have anything else you'd like to include in your custom live CD, such as other configuration files, documents, images and so on, now is a good time to copy those over too. Just remember that space is precious.

Now you're ready to enter your new root filesystem. I've written extensively about using chroot jails to contain server dæmons, so that if they're hijacked, the attacker gains access to only a small subset of your filesystem. Well, right now, you're about to chroot yourself, so that all changes you make—adding and removing packages, downloading updates, editing configuration files and so on—are applied to your custom ISO's root filesystem, not your underlying system's root filesystem.

Here's how to swallow the Blue Pill:

09-$ sudo chroot ./isonew/custom

From this point on, until you type the command exit (step 22, below), you'll be in an environment in which / is no longer your underlying filesystem's root, but actually /home/you/isonew/custom (where /home/you is your local home directory, or wherever else you created the isonew hierarchy).

Now that you're jacked in, you need to bring the proc and sysfs filesystems on-line, so that your “real” system's kernel can interact properly with the “fake” system represented by your soon-to-be-customized root filesystem. Now, set your home directory to /root (actually /home/you/isonew/custom/root):

10-# mount -t proc none /proc/

11-# mount -t sysfs none /sys/

12-# export HOME=/root

Note that the prompts in my examples have switched to # from $, indicating that you're now running in a root shell. This is necessary, because you'll need to be root in order to exit the chroot jail you've voluntarily entered.

Now you're ready to customize. This is the part when you don't necessarily need my help; you can be creative. For example purposes though, let's make some space for new packages and update the ones that are left.

What are you going to use your new live CD for? Secure Web browsing using untrusted hardware isn't a bad start. You shouldn't need OpenOffice.org for that, and it takes up something like 85MB of your compressed squashfs image (remember, a standard CD ISO can't be larger than 650MB).

You can remove OpenOffice.org, plus a couple of things upon which only OpenOffice.org depends, like this:

13-# apt-get remove --purge `dpkg-query -W --showformat='${Package}\n'
↪|grep openoffice`

Did you notice the embedded dpkg-query...|grep... command? It queries the root filesystem's deb-package database for a complete list of installed packages. The output of this is piped through a grep search for the string “openoffice”. You can use the command in line 13 to find and purge other groups of packages by simply changing the grep query.

Suppose you also want to get rid of The GIMP, which takes up more than 6.5MB (after compression) on your live CD image. So, swap out the string “openoffice” in the previous command with “gimp”, like this:

14-# apt-get remove --purge `dpkg-query -W --showformat='${Package}\n'
↪|grep gimp`

Other good candidates for removal include non-English language packs (which take up anywhere from 0.5–1.5MB compressed), and multimedia applications such as Rhythmbox, totem and sound-juicer, which take up a few megabytes each, even after compression, and are unlikely to be useful for security purposes.

Decide for yourself. Browse through the list of installed packages with a quick aptitude search ~i |less. If you mistakenly purge something you decide you actually need, you always can exit the chroot jail and re-execute the rsync command on line 06.

aptitude vs. apt-get

Note that I'm using apt-get here, rather than the more-sophisticated aptitude. This is because one of aptitude's key features, the ability to delete packages that are no longer necessary automatically, can be dangerous when used on any system on which packages have been installed by any tool other than aptitude.

Because aptitude maintains its own database of installation histories, it can miss key dependencies in this context and remove packages that you do, in fact, need. Therefore, you should use aptitude only to remove programs that you installed with aptitude. If you later need to undo an installation that included automatically installed dependencies, you can use apt-get autoremove to achieve the same thing.

So, now you've made room for your custom toolkit. If you want to use your live CD for anonymous Web surfing, you may want to install Tor and Privoxy. First, you need to update your custom root filesystem's package database to synchronize it with the sources.list file you copied over in line 08:

15-# apt-get update

Now, you can use apt-get install just as you would on any other live system to install your custom packages:

16-# apt-get install tor privoxy

As a professional paranoiac, I'd be remiss if I didn't point out that both of these packages are from Ubuntu's universe repository, and as such, they aren't provided with the same level of support as packages in the main and restricted repositories, although the Ubuntu MOTO Security Team does its best to keep up with security patches. This is a trade-off you'll probably find yourself making frequently, however. As I pointed out in my column in the March 2008 issue, many of Ubuntu's most useful security utilities are available only in the universe and metaverse repositories.

After you've installed your custom applications, make sure your entire system is fully patched. As with any other Ubuntu (or other Debian-based) system, you can use apt-get dist-upgrade. Because this will result in quite a bit of updates being downloaded and installed, and because space is at a premium on our ISO image, immediately follow the upgrade with a clean:

17-# apt-get dist-upgrade

18-# apt-get clean

Come to think of it, this one step—upgrading the live CD's packages—may be the only security-related reason you need to customize your live CD. Applying security patches is that important!

There's just one more thing to do before packing up your new ISO: custom configuration. You may want to edit the hosts or resolv.conf files you copied over before (or, after exiting the chroot jail, you simply may want to copy over them with the originals from ./isonew/squashfs/etc). You may want to preconfigure Tor by editing /etc/tor/torrc and /etc/tor/tor-socks.conf, and Privoxy via the files in /etc/privoxy.

As with removing and installing packages, this process is the same as on any other system: fire up your (non-GUI) text editor of choice (nano, vi and ed are all present in the standard Ubuntu ISO), and edit anything that needs editing.

Are you done customizing? If so, you can take your Red Pill and exit the Matrix—I mean, the chroot jail. On your way out, empty the /tmp directory, and unmount the chrooted /proc and /sys filesystems:

19-# rm -rf /tmp/*

20-# umount /proc/

21-# umount /sys/

22-# exit

You're back in reality (at least, back in your previous working directory on the underlying system). Before you pack up your ISO, you'll have to build a new manifest file (a list of all packages in the new live CD root filesystem), recompress the customized root filesystem into a squashfs file and regenerate the md5sum of your live CD files.

First, to rebuild your manifest file:

23-$ chmod +w ./isonew/cd/casper/filesystem.manifest

24-$ sudo chroot ./isonew/custom dpkg-query -W --showformat='${Package}
↪${Version}\n' > ./isonew/cd/casper/filesystem.manifest

25-$ sudo cp ./isonew/cd/casper/filesystem.manifest
↪./isonew/cd/casper/filesystem.manifest-desktop

In line 23, you made the old manifest file writeable, so you could copy over it. In line 24, you temporarily popped back into the root filesystem chroot jail to generate the package list with dpkg-query. And in line 25, you copied the new manifest into an identical file called filesystem.manifest-desktop.

Now you can resquash your root filesystem:

26-$ sudo mksquashfs ./isonew/custom
↪./isonew/cd/casper/filesystem.squashfs

If you like, you can edit the DISKNAME parameter in the file ./isonew/README.diskdefines. Regardless, next you should regenerate your live CD's md5sum, so you can detect tampering later on:

27-$ sudo rm ./isonew/cd/md5sum.txt

28-$ sudo -s

29-# cd ./isonew/cd

30-# find . -type f -print0 | xargs -0 md5sum > md5sum.txt

31-# exit

And, you've reached the final step. Now you can write your finished ISO image file:

32-$ cd ./isonew/cd

33-$ sudo mkisofs -r -V "Ubuntu-Live-PrivateSurf" -b
↪isolinux/isolinux.bin -c isolinux/boot.cat -cache-inodes -J -l
↪-no-emul-boot -boot-load-size 4 -boot-info-table -o
↪~/Ubuntu-Live-7.10-PrivateSurf.iso .

Your home directory now contains a new customized live CD ISO file, named Ubuntu-Live-7.10-PrivateSurf.iso. You can boot it directly from hard disk using VMware, QEMU or some other virtualization engine to test it. Or, of course, simply burn it to CD using your CD-writing utility of choice.
Conclusion

You've now got the basic technique for customizing an Ubuntu live CD. Although I didn't go into much depth showing actual customizations beyond removing and adding packages, I'll continue this series next time with detailed guidance on bundling and preconfiguring specific security tools into your live CD.

Until then, have fun experimenting with live CDs, and of course, be safe!

Appendix

Here's the complete procedure, in the form of a raw list of all commands described in this article. The $ prompt indicates commands executed as an unprivileged user, and the # prompt shows commands that are executed by root.

00-$ dd if=/dev/cdrom of=./ubuntu-7.10-desktop-i386.iso

01-$ mkdir -p ./isomount ./isonew/squashfs ./isonew/cd
↪./isonew/custom

02-$ sudo mount -o loop ./ubuntu-7.10-desktop-i386.iso ./isomount/

03-$ rsync --exclude=/casper/filesystem.squashfs -a ./isomount/
↪./isonew/cd

04-$ sudo modprobe squashfs

05-$ sudo mount -t squashfs -o loop
↪./isomount/casper/filesystem.squashfs ./isonew/squashfs/

06-$ sudo rsync -a ./isonew/squashfs/ ./isonew/custom

07-$ sudo cp /etc/resolv.conf /etc/hosts ./isonew/custom/etc/

08-$ sudo cp /etc/apt/sources.list ./isonew/custom/etc/apt/

09-$ sudo chroot ./isonew/custom

10-# mount -t proc none /proc/

11-# mount -t sysfs none /sys/

12-# export HOME=/root

13-# apt-get remove --purge `dpkg-query -W --showformat='${Package}\n'
↪|grep openoffice`

14-# apt-get remove --purge `dpkg-query -W --showformat='${Package}\n'
↪|grep gimp`

15-# apt-get update

16-# apt-get install tor privoxy

17-# apt-get dist-upgrade

18-# apt-get clean

19-# rm -rf /tmp/*

20-# umount /proc/

21-# umount /sys/

22-# exit

23-$ chmod +w ./isonew/cd/casper/filesystem.manifest

24-$ sudo chroot ./isonew/custom dpkg-query -W --showformat='${Package}
↪${Version}\n' > ./isonew/cd/casper/filesystem.manifest

25-$ sudo cp ./isonew/cd/casper/filesystem.manifest
↪./isonew/cd/casper/filesystem.manifest-desktop

26-$ sudo mksquashfs ./isonew/custom
↪./isonew/cd/casper/filesystem.squashfs

27-$ sudo rm ./isonew/cd/md5sum.txt

28-$ sudo -s

29-# cd ./isonew/cd

30-# find . -type f -print0 | xargs -0 md5sum > md5sum.txt

31-# exit

32-$ cd ./isonew/cd

33-$ sudo mkisofs -r -V "Ubuntu-Live-PrivateSurf" -b
↪isolinux/isolinux.bin -c isolinux/boot.cat -cache-inodes -J -l
↪-no-emul-boot -boot-load-size 4 -boot-info-table -o
↪~/Ubuntu-Live-7.10-PrivateSurf.iso .

Resources

Debuntu.org's “Customize Your Ubuntu Live CD” Tutorial: www.debuntu.org/how-to-customize-your-ubuntu-live-cd

Jeffery Douglas Waddel's “Secure Boot CDs for VPN HOWTO”: www.linux.org/docs/ldp/howto/Secure-BootCD-VPN-HOWTO.html

Daniel Barlow's “Building Your Own Live CD”: www.linuxjournal.com/article/7246

Mick Bauer (darth.elmo@wiremonkeys.org) is Network Security Architect for one of the US's largest banks. He is the author of the O'Reilly book Linux Server Security, 2nd edition (formerly called Building Secure Servers With Linux), an occasional presenter at information security conferences and composer of the “Network Engineering Polka”.

Copyright © 1994 - 2008 Linux Journal. All rights reserved.


Taken From: Linux Journal, nº 169 May 2008 - Customizing Linux Live CDs, Part I,
by Mick Bauer's Paranoid Penguin