This blog is about: Open Source, Operating Systems (mainly linux), Networking and Electronics The information here is presented in the form of howtos. Sometimes the information migth be in portuguese! As vezes a informação pode estar em portugues!
Wednesday, September 23, 2009
PPPoE and DSL Connections - Public IP
Remote Desktop (XDMCP) on Ubuntu
Here some notes on the roles of the XDMCP server and client
Server - The remote machine were we want to login.
Client - The local machine were we will login on the Server
Before trying anything on XDMCP, you should make
sure that on the server your firewall is either disabled
or allows Udp port 177.
Here I'm going to show how to open a UDP 177 (rule),
on Iptables (firewall) using the bash, but you use a
very simple and usefull, Gui for Iptables nown as
"Firestarter" (to install on ubuntu just do
sudo apt-get install iptables).
$ sudo iptables -A INBOUND -p udp --destination-port 177 -j ACCEPT
Here are a couple off other usefull comands on Iptables
## Checking Iptables Rules #####
$ sudo iptables -nvL
if you have already executed the rule to open UDP port 177,
by executing this comand, you should see it there.
## Clearing All the Rules #####
$ sudo iptables -F
be aware that this comand clears all off the rules, and this
does not mean that all is allowed, on the contrary,
IPtables default beaviour, when it has no rules is to
deny all, so be very carefull.
XDMCP GNOME - via Bash
=====================================
XDMCP Server Configuration
----------------------------------
## Allowing the remote login on the Server #####
$ sudo gedit /etc/gdm/gdm.conf-custom
...
[xdmcp]
Enable=true
...
You should have the above on the file.
If you want the remote login screen to be the same as
the graphical greeter that is the default in the Ubuntu
install make sure that the following is present.
...
[daemon]
RemoteGreeter=/usr/lib/gdm/gdmgreeter
...
For these changes to take efect you can either,
reboot:
$ sudo reboot
or restart the service, for that go to text terminal (Ctlr+Alt+F2)
and type:
$ sudo /etc/init.d/gdm restart
to go back to you Gnome environment try Ctlr+Alt+F7, or some
Ctlr+Alt+Fx, close to F7.
XDMCP Client Login
------------------------
$ sudo X :1 -query server_ip
After this if all went well you should see
Ubuntu's graphical login screen, as if you
were on the remote computer fisicaly.
If don't want to see it fullscreen, you can
show the remote desktop on a window by
using the following command instead:
$ sudo Xnest :1 -query server_ip
XDMCP GNOME - via Gui
=====================================
This is equivelent to the shown above, the diference
is that, the server here is configured via Gui.
XDMCP Server Configuration
-----------------------------------
Allowing the remote login on the Server
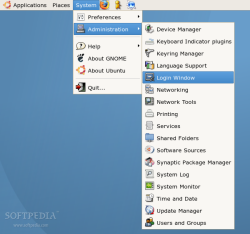
As shown above System > Administration > Login Window
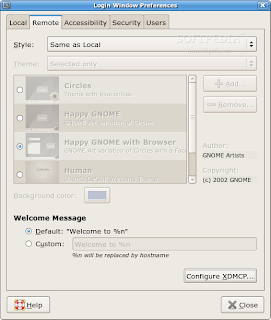
And then change the Style to "Same as Local", and that's it.
Aditional confuguration can be done on "Configure XDMCP"
For these changes to take efect you can either,
reboot:
$ sudo reboot
or restart the service, for that go to text terminal (Ctlr+Alt+F2)
and type
$ sudo /etc/init.d/gdm restart
to go back to you Gnome environment try Ctlr+Alt+F7, or some
Ctlr+Alt+Fx, close to F7.
XDMCP Client Login
------------------------
$ sudo X :1 -query server_ip
After this if all went well you should see
Ubuntu's graphical login screen, as if you
were on the remote computer fisicaly.
If don't want to see it fullscreen, you can
show the remote desktop on a window
by using the following command instead:
$ sudo Xnest :1 -query server_ip
XDMCP KDE - via Bash
(didn't test it, give me feedback if you do)
=====================================
XDMCP Server Configuration
----------------------------------
Still working on it...
XDMCP Client Login
------------------------
$ sudo X :1 -query server_ip
After this if all went well you should see
Ubuntu's graphical login screen, as if you
were on the remote computer fisicaly.
If don't want to see it fullscreen, you can
show the remote desktop on a window
by using the following command instead:
$ sudo Xnest :1 -query server_ip
Based On:
GNOME
http://megaf.wordpress.com/2009/04/15/xdmcp-internet-seu-linux-onde-voce-estiver/
http://stochasticflux.com/blog/?p=4
KDE
http://www.guiadohardware.net/tutoriais/configurando-servidor-xdmcp/pagina3.html
http://megaf.wordpress.com/2009/04/15/xdmcp-internet-seu-linux-onde-voce-estiver/
Iptables
http://www.cyberciti.biz/tips/linux-iptables-open-bittorrent-tcp-ports-6881-to-6889.html
Saturday, September 19, 2009
Remote Applications via X11 - Easy Way (over ssh)
So whit this you can show and interact with the graphical applications on the Ubuntu Server, using your Desktop's, graphical environment. So in the X11 world you have the following:
Ubuntu Server - X11 Client --> Application is executed
Ubuntu Desktop - X11 Server --> Application is shown
It's a bit confusing at first, that your Ubuntu Server is your X11 Client, and you Desktop is the X11 Server.
Note: this was tested on Ubuntu 8.04 and 9.04.
X11 Server - Where the remote apps will be shown
===================================
my_user@my_desktop:~$ ssh -X root@remote_server
root@remote_server:~$
Now you have a what looks like a normal ssh remote terminal on the "remote_server". But when you execute an graphical apps on the remote server it will be displayed on your desktop, for example:
root@remote_server:~$ gedit
With this you can make a text file on your machine tha will be saved on the remote server.
If you want ssh to always act like this, have the following line in your /etc/ssh/ssh_config:
ForwardX11 yes
With this method all the data over the network will be encrypted, because of ssh, but if you want to kick it old school, whit no encryption an a lot more complicated using X11 directly, you can check the post "Run Applications Remotely via X11 - Hard Way"
Based on: http://wiki.linuxquestions.org/wiki/X11_forwarding_with_OpenSSH
Remote Applications via X11 - Hard Way
So whit this you can show and interact with the graphical applications on the Ubuntu Server, using your Desktop's, graphical environment. So in the X11 world you have the following:
Ubuntu Server - X11 Client --> Application is executed
Ubuntu Desktop - X11 Server --> Application is shown
It's a bit confusing at first, that your Ubuntu Server is you X11 Client, and you Desktop is the X11 Server.
Note: this was tested on Ubuntu 8.04 and 9.04.
X Server - 192.168.1.68 (Where the remote apps will be shown)
=======================================
## Allow that the remote applicatilõns to be show on the X11 Server #####
$ sudo gedit /etc/gdm/gdm.conf
DisallowTCP=true
change it to
DisallowTCP=false
## Reboot to load the new gdm.conf file #####
$ sudo reboot
## Check if the X Server TCP Connections ######
$ netstat -natp |grep :6000
(Not all processes could be identified, non-owned process info
will not be shown, you would have to be root to see it all.)
tcp 0 0 0.0.0.0:6000 0.0.0.0:* LISTEN -
tcp6 0 0 :::6000 :::* LISTEN -
## Add permission for the remote X Client applications #####
## to be shown locally this is temporary, when you #####
## reboot, you must do this again #####
$ sudo xhost 192.168.1.71
## Find the id of the display you are in currently, #####
## and were we see the remote apps, from the X Clinet #####
$ echo $DISPLAY
:0.0
X client - 192.168.1.71 (Where the remote apps will be executed)
========================================
In order to show an application remotely you should use one of the options bellow, where 192.168.1.68 is the IP of the remote computer were the applications will be shown and 0.0 is the id of the graphical terminal on that computer, found earlier, were the remote applications will be displayed.
In this example we execute the application "nautilus", you should change it to the application you want to see remotely.
$ sudo DISPLAY=192.168.1.68:0.0 nautilus
or
$ sudo export DISPLAY=192.168.1.68:0.0
$ nautilus
some applications will not work with the first option so try the second.
After executing one of the two options above, the applications
will be running locally on the X Client (192.168.1.71) but displayed remotely on X Server (192.168.1.68), the applications will not be able to see or use anything on the X Server, there you can only interact with it, and all the resources it may use are from the X Client (local machine).
For example if you replace "nautilus" with "gedit", write something on it and save it the file will be saved on the X Client and not on the X Server were you are interacting with it.
With this method all the data over the network will not be encrypted, if you want a method with encription and a lot easyer using X11 over ssh, you can check the post "Run Applications Remotely via X11 - Easy Way (over ssh)"
Inspired on:
http://ubuntuforums.org/showthread.php?t=162566
http://www.cisl.ucar.edu/docs/ssh/guide/node29.html
http://www.hackinglinuxexposed.com/articles/20040513.html
http://www.linuxquestions.org/questions/linux-newbie-8/how-do-i-restart-x-without-rebooting-418785/
http://www.linuxplanet.com/linuxplanet/tutorials/857/3/
http://www.codingdomain.com/linux/remote/x11/
Wednesday, September 2, 2009
NIC Auto-Negotiation and Duplex Settings - NIC satus
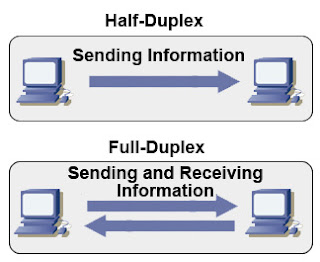
Q: How to disable auto-negotiation option of my network interface card and set up half/full duplex mode manually from Linux command line (CLI)? By the way, how to see current settings?
A: There are several Linux utilities coming with almost any distribution including Debian, Ubuntu, Fedora, RedHat, Mandriva, Centos whatever. See details below.
This is rather powerful utility can display and change settings of ethernet network interface card. You can easily disable/enable autonegotiation option for your NIC, also it’s possible to manually set up duplex mode, configure wake-on-lan options, set speed settings. Just look through full manual page for ethtool. Here are several ethtool usage examples:
ethtool eth0 - shows current NIC settings
Settings for eth0:
     Supported ports: [ TP MII ]
     Supported link modes:   10baseT/Half 10baseT/Full
                             100baseT/Half 100baseT/Full
     Supports auto-negotiation: Yes
     Advertised link modes:  10baseT/Half 10baseT/Full
                             100baseT/Half 100baseT/Full
     Advertised auto-negotiation: No
     Speed: 10Mb/s
     Duplex: Half
     Port: MII
     PHYAD: 32
     Transceiver: internal
     Auto-negotiation: off
     Supports Wake-on: pumbg
     Wake-on: d
     Current message level: 0x00000007 (7)
     Link detected: yes
ethtool -s eth0 duplex half autoneg off - disables auto-negotiation, enables Half Duplex.ethtool -s eth1 duplex full speed 1000 autoneg off - disables auto-negotiation, enables Falf Duplex and sets up Speed to 1000 Mb/s.
According to manual it allows to manipulate and see media-independent interface status. Let’s see examples:
bash-3.1# mii-tool eth0 - shows 100 Mbps speed, Full Duplex, Auto-negotiation is on.
eth0: negotiated 100baseTx-FD, link okbash-3.1# mii-tool eth0 -F 10baseT-HD - enables 10 Mb/s Half Duplex connection.
Taken From: http://www.linuxscrew.com/2008/11/20/faq-how-to-change-duplex-andor-auto-negotiation-nic-settings-in-linux/
Tuesday, July 7, 2009
Setting up a dial-up VPN on the Juniper NetScreen Remote (client)
Note: To see the pictures at full quality just click on them.
This article was graciously contributed by mwdmeyer which was originally posted on his site here.
I've been getting lots of hits to the post about a site to site VPN setup with a netscreen. So I've decided to do one for a dial-up VPN user connecting to a netscreen.
A dial-up user is anyone who needs access into the network and has a dynamic ip address. We don't wish to be able to access them (the dial-up user) from within the network. This is how we setup most connections at work. This allows people to access file shares and outlook (without the need to setup RPC over HTTP).
Background
- Netscreen 5GT running ScreenOS 5.4.0r1 (Should be the same process for any netscreen running ScreenOS 5.x)
- Netscreen Remote 8.7 (The Windows VPN client)
- Local Network (the one in which the vpn users want to access) of 10.0.0.0/22 (10.0.0.0 - 10.0.3.255)
- External Address of 59.167.253.89
Setting up the Netscreen
1) First we need to create a user. This can be found in Objects -> Users -> Local (Note: Follow the screen shot below, you don't need a password here, you do need the IKE User info though)
So we have our user, Test.User
2) Create Phase 1 of the VPN tunnel. This can be found in VPNs -> AutoKey Advanced -> Gateway (Note: Security level is set to custom, password for VPN is entered here, Outgoing interface is your untrust interface).

3) Now we'll modify the advanced settings. Click Advanced (Note: We're using DES and MD5 here. Mode is set to Aggressive)

Now click return and okay to save your settings.
4) Now we'll create the Phase 2 information. This can be found in VPNs -> AutoKey IKE (Note: Security level is set to custom, Remote Gateway is set to "Test.UserP1")

5) Now we'll modify the advanced settings. Click Advanced (Note: We're using DES and MD5 here. Replay Protection is on)

Now click return and okay to save your settings.
6) Now we'll need to create a policy. This will go from untrust to trust. This can be found in Policies.

Click new (Note: Source Address is Any-IPv4 or just Any if IPv6 is disabled, Destination Address is your local subnet, tunnel the connection though the VPN user "Test.UserP2")

Now the Netscreen has been setup.
Setting up Netscreen Remote
1) Open the policy editor in Netscreen Remote
NetScreen Remote 12) Create a new connection (Note: Type in the remote subnet details and set the secure gateway to your netscreens external address)
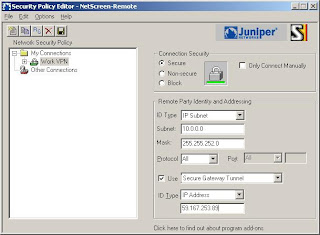
3) Now we'll setup the login details (Note: The Certificate is None, The ID Type is Domain Name and the value is "Test.User")
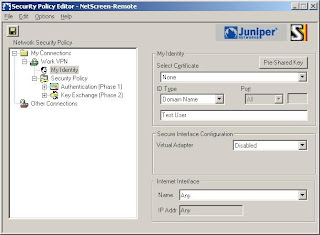
4) Now click Pre-Shared Key (Note: Type in the password you used when setting up the connection in the netscreen)
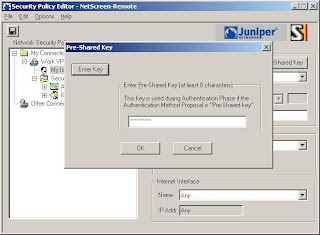
5) Now we'll set the connection to aggressive (Note: Enable PFS, DH is Group 2 and Enable Replay Dection)

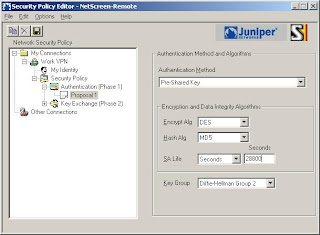
6) Now we'll setup the Phase 1 details (Note: We're using DES and MD5 here. SA Life is 28800 seconds)
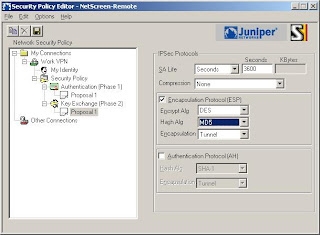
7) Now we'll setup the Phase 2 details (Note: The SA Life here is 3600 Seconds)
8) Save the settings and Test!
That should be all you need to do.
Notes
- The VPN may not work behind some NAT routers. You can try turning on NAT-T within the netscreen, although I find it doesn't normally work.
- Make sure the details in the Netscreen and Netscreen Remote Match (i.e Phase 1 policies etc)
- You can check the logs from both Netscreen and Netscreen Remote
- You cannot connect to the VPN while within the local subnet
- Netscreen Remote should be disabled when you're directly connected to the network
- Only traffic for the subnet is passed over the VPN.
Taken From: http://www.juniperforum.com/index.php?page=20
Added minor correction in te policy source that has to be "Dial Up"
Friday, June 12, 2009
Save, Guess and Restore the Master Boot Record (MBR)
The following is a continuation of a series of columns on Linux disasters and how to recover from them, inspired in part by a Halloween Linux Journal Live episode titled “Horror Stories”. You can watch the original episode at www.linuxjournal.com/video/linux-journal-live-horror-stories.
I have to admit, I've learned more about how Linux works by breaking it and fixing it, than I have by any other method. There really is nothing quite like the prospect of losing valuable data, or the idea that your only computer won't boot, to motivate you to learn more about your system. In this month's installment of “When Disaster Strikes”, I discuss a surprisingly small part of your computer that plays a surprisingly large role in booting and using it—the Master Boot Record, or MBR for short. I cover some of my favorite ways to destroy an MBR and a few ways to restore it once you have.
Before you can fully understand how to restore the MBR, you should have a good idea of what it actually is. The MBR comprises the first 512 bytes of a hard drive. Now that's bytes, not megabytes or even kilobytes. In our terabyte age, it's hard to appreciate how very small that is, but to give you an idea, at this point in the column, I've already written about three MBRs worth of text.
This 512-byte space then is split up into two smaller sections. The first 446 bytes of the MBR contain the boot code—code like the first stage of GRUB that allows you to load an operating system. The final 66 bytes contain a 64-byte partition table and a 2-byte signature at the very end. That partition table is full of information about the primary and extended partitions on a disk, such as at which cylinder they start, at which cylinder they end, what type of partition they are and other useful data you typically don't think much about after a disk is set up—at least, until it's gone.
This is the part of the column where I repeat some of the best disaster recovery advice I know—make backups. In this case, we are talking about MBR disasters, so here are a few ways to back up your MBR. After all, it's only 512 bytes; there's no reason why you can't afford to back it up. Heck, it's small enough to tattoo on your arm, except I guarantee once you do you'll end up migrating to a new system or changing the partition layout.
The best tool to back up the MBR is coincidentally the best tool at destroying it (more on that later), dd. In fact, dd is one of those ancient, powerful and blunt UNIX tools that blindly does whatever you tell it to, and it's adept at destroying all sorts of valuable data (more precisely, it's adept at following your explicit orders to destroy your valuable data). The following command backs up the MBR on the /dev/sda disk to a file named mbr_backup:
$ sudo dd if=/dev/sda of=mbr_backup bs=512 count=1
Basically, this tells dd to read from /dev/sda 512 bytes at a time and output the result into mbr_backup, but to do only one 512-byte read. Now you can copy mbr_backup to another system or print it out and do the tattoo thing I mentioned before. Later on, if you were to wipe out your MBR, you could restore it (likely from some sort of rescue disk) with a slight twist on the above command. Simply swap the input and output sources:
$ sudo dd if=mbr_backup of=/dev/sda bs=512 count=1
There are a number of elaborate ways you can destroy some or all of your MBR. Please be careful with this first command. It actually deletes your MBR at the very least, and with a typo, it potentially could delete the entire disk, so step lightly. Let's start with the most blunt, dd:
$ sudo dd if=/dev/zero of=/dev/sda bs=512 count=1
This command basically blanks out your MBR by overwriting it with zeros. Now, unless you are masochistic, or you are like me and used this in a demonstration of MBR recovery tools, you probably wouldn't ever run this command. Most people end up destroying part of their MBR in one of two ways: mistakes with bootloaders and mistakes with fdisk or other partitioning tools.
Mistakes with partitioning tools probably are the most common way people break their MBRs, or more specifically, their partition tables. It could be that you ran fdisk on sda when you meant to run it on sdb. It could be that you just made a mistake when resizing a partition, and after a reboot, it wouldn't mount. The important thing to keep in mind is that when you use partitioning tools, they typically update only the partition table on the drive. Even if you resize a drive, unless you tell a partitioning tool to reformat the drive with a fresh filesystem, the actual data on the drive doesn't change. All that has changed are those 64 bytes at the beginning of the drive that say where the partitions begin and end. So, if you make a partitioning mistake, your data is fine. You just have to reconstruct that partition table.
It would figure that the first time I really destroyed my MBR, it was through the second, less-common way—mistakes with bootloaders. In my case, it was a number of years ago, and I was struggling to get an early version of GRUB installed on a disk. After the standard command-line commands didn't work, I had the bright idea that maybe I could use the GRUB boot floppy image. After all, it was 512 bytes and so was my MBR, right? Well, it sort of worked. GRUB did appear; however, what I didn't realize was that in addition to writing GRUB over the first 446 bytes of my MBR, I also wrote over the last 66 bytes, my partition table. So although GRUB worked, it didn't see any partitions on the drive.
I had at least used Linux long enough that after I made my mistake, I realized my actual data was still there and that there must be some way to restore the partition table. This was when I first came across the wonderful tool called gpart.
gpart is short for Guess Partition, and that is exactly what it does. When you run the gpart command, it scans through a disk looking for signs of partitions. If it finds what appears to be the beginning of a Windows FAT32 partition, for instance, it jots it down and continues until eventually it sees what appears to be the end. Once the tool has scanned the entire drive, it outputs its results to the screen for you to check and edit. It also optionally can write this reconstructed partition table back to the disk.
gpart has been around for quite some time and is packaged by all of the major distributions, so you should be able to install it with your standard package manager. Don't confuse it with gparted, which is a graphical partitioning tool. Of course, if your main system is the one with the problem, you need to find a rescue disk that has it. Knoppix and a number of other rescue-focused disks all include gpart out of the box.
To use gpart, run it with root privileges and give it the disk device to scan as an argument. Here's gpart's output from a scan of my laptop's drive:
greenfly@minimus:~$ sudo gpart /dev/sda

Begin scan...
Possible partition(Linux ext2), size(9773mb), offset(0mb)
Possible partition(Linux swap), size(980mb), offset(9773mb)
Possible partition(SGI XFS filesystem), size(20463mb), offset(10754mb)
End scan.

Checking partitions...
Partition(Linux ext2 filesystem): primary
Partition(Linux swap or Solaris/x86): primary
Partition(Linux ext2 filesystem): primary
Ok.
Guessed primary partition table:
Primary partition(1)
type: 131(0x83)(Linux ext2 filesystem)
size: 9773mb #s(20016920) s(63-20016982)
chs:  (0/1/1)-(1023/254/63)d (0/1/1)-(1245/254/56)r

Primary partition(2)
type: 130(0x82)(Linux swap or Solaris/x86)
size: 980mb #s(2008120) s(20016990-22025109)
chs:  (1023/254/63)-(1023/254/63)d (1246/0/1)-(1370/254/58)r

Primary partition(3)
type: 131(0x83)(Linux ext2 filesystem)
size: 20463mb #s(41909120) s(22025115-63934234)
chs:  (1023/254/63)-(1023/254/63)d (1371/0/1)-(3979/184/8)r

Primary partition(4)
type: 000(0x00)(unused)
size: 0mb #s(0) s(0-0)
chs:  (0/0/0)-(0/0/0)d (0/0/0)-(0/0/0)r
To hammer home the point about how easy it is to back up the MBR, now I have an extra backup of my laptop partition table—in this magazine.
As you can see, it correctly identified the two primary partitions (/ and /home) and the swap partition on my laptop and noted that the fourth primary partition was unused. Now, after reviewing this, if I decided that I wanted gpart to write its data to the drive, I would run:
$ sudo gpart -W /dev/sda /dev/sda
That isn't a typo; the -W argument tells gpart to which disk to write the partition table, but you still need to tell it which drive to scan. gpart potentially could scan one drive and write the partition table to another. Once you specify the -W option, gpart gives you some warnings to accept, but it also prompts you to edit the results from within gpart itself. Personally, I've always found it a bit more difficult to do it that way than it needs to be, so I skip the editor, have it write to the disk, and then use a tool like fdisk or cfdisk to examine the drive afterward and make tweaks if necessary.
gpart is a great tool and has saved me a number of times, but it does have some limitations. For one, although gpart works very well with primary partitions, it is much more difficult for it to locate extended partitions, depending on which tool actually created them. Second, take gpart results with a grain of salt. It does its best to reconstruct drives, but you always should give its results a sanity check. For instance, I've seen where it has identified the end of a partition one or two megabytes short from the actual end. Typically, when we partition drives, we put one partition immediately after another, so these sorts of errors are pretty easy to find.
Now, if you have destroyed only the partition table, you hopefully should be restored at this point. If you managed to destroy the boot code as well, you need to restore it too. These days, most Linux distributions use GRUB, so with your restored partition table, if you are currently booted into the affected system, run:
$ sudo grub-install --recheck /dev/sda
Replace /dev/sda with the path to your primary boot device. If you use an Ubuntu system, you optionally could use the update-grub tool instead. If you are currently booted in to a rescue disk, you first need to mount your root partition at, say, /mnt/sda1, and then use chroot to run grub-install within it:
$ sudo mkdir /mnt/sda1
$ sudo mount /dev/sda1 /mnt/sda1
$ sudo chroot /mnt/sda1 /usr/sbin/grub-install
↪--recheck /dev/sda
If the chrooted grub-install doesn't work, you typically can use your rescue disk's grub-install with the --root-directory option:
$ sudo /usr/sbin/grub-install --recheck
↪--root-directory /mnt/sda1 /dev/sda
Well hopefully, if you didn't have a profound respect for those 512 bytes at the beginning of your hard drive, you do now. The MBR is like many things in life that you don't miss until they are gone, but at least in this case, when it's gone, you might be able to bring it back.
Kyle Rankin is a Senior Systems Administrator in the San Francisco Bay Area and the author of a number of books, including Knoppix Hacks and Ubuntu Hacks for O'Reilly Media. He is currently the president of the North Bay Linux Users' Group.
Taken From: Linux Journal Contents #180, April 2009
http://www.linuxjournal.com/article/10385


 auto-nego