Wednesday, August 4, 2010

Port-Knocking Security (conditional port opening)

Implement Port-Knocking Security with knockd

When dealing with computer security, you should assume that hackers will be trying to get in through any available doors your system may have, no matter how many precautions you might have taken. The method of allowing entrance depending on a password is a classic one and is widely used. In order to “open a door” (meaning, connect to a port on your computer), you first have to specify the correct password. This can work (provided the password is tough enough to crack, and you don't fall prey to many hacking attacks that might reveal your password), but it still presents a problem. The mere fact of knowing a door exists is enough to tempt would-be intruders.
So, an open port can be thought of as a door with (possibly) a lock, where the password works as the key. If you are running some kind of public service (for example, a Web server), it's pretty obvious that you can't go overboard with protection; otherwise, no one will be able to use your service. However, if you want to allow access only to a few people, you can hide the fact that there actually is a door to the system from the rest of the world. You can “knock intruders away”, by not only putting a lock on the door, but also by hiding the lock itself! Port knocking is a simple method for protecting your ports, keeping them closed and invisible to the world until users provide a secret knock, which will then (and only then) open the port so they can enter the password and gain entrance.
Port knocking is appropriate for users who require access to servers that are not publicly available. The server can keep all its ports closed, but open them on demand as soon as users have authenticated themselves by providing a specific knock sequence (a sort of password). After the port is opened, usual security mechanisms (passwords, certificates and so on) apply. This is an extra advantage; the protected services won't require any modification, because the extra security is provided at the firewall level. Finally, port knocking is easy to implement and quite modest as far as resources, so it won't cause any overloads on the server.
In this article, I explain how to implement port knocking in order to add yet another layer to your system security.
Are You Safe?
Would-be hackers cannot attack your system unless they know which port to try. Plenty of port-scanning tools are available. A simple way to check your machine's security level is by running an on-line test, such as GRC's ShieldsUp (Figure 1). The test results in Figure 1 show that attackers wouldn't even know a machine is available to attack, because all the port queries were ignored and went unanswered.

clip_image001[7]

Figure 1. A completely locked-up site, in “stealth” mode, doesn't give any information to attackers, who couldn't even learn that the site actually exists.
Another common tool is nmap, which is a veritable Swiss Army knife of scanning and inspection options. A simple nmap -v your.site.url command will try to find any open ports. Note that by default, nmap checks only the 1–1000 range, which comprises all the “usual” ports, but you could do a more thorough test by adding a -p1-65535 parameter. Listing 1 shows how you can rest assured that your site is closed to the world. So, now that you know you are safe, how do you go about opening a port, but keep it obscured from view?
Listing 1. The standard nmap port-scanning tool provides another confirmation that your site and all ports are completely closed to the world.


$ nmap -v -A your.site.url
Starting Nmap 4.75 ( http://nmap.org ) at 2009-10-03 12:59 UYT
Initiating Ping Scan at 12:59
Scanning 190.64.105.104 [1 port]
Completed Ping Scan at 12:59, 0.00s elapsed (1 total hosts)
Initiating Parallel DNS resolution of 1 host. at 12:59
Completed Parallel DNS resolution of 1 host. at 12:59, 0.01s elapsed
Initiating Connect Scan at 12:59
Scanning r190-64-105-104.dialup.adsl.anteldata.net.uy (190.64.105.104)
[1000 ports]
Completed Connect Scan at 12:59, 2.76s elapsed (1000 total ports)
Initiating Service scan at 12:59
SCRIPT ENGINE: Initiating script scanning.
Host r190-64-105-104.dialup.adsl.anteldata.net.uy (190.64.105.104)
appears to be up ... good.
All 1000 scanned ports on r190-64-105-104.dialup.adsl.anteldata.net.uy
(190.64.105.104) are closed


Read data files from: /usr/share/nmap
Service detection performed. Please report any incorrect results
at http://nmap.org/submit/ .
Nmap done: 1 IP address (1 host up) scanned in 2.94 seconds

Secret Handshakes, Taps and Knocks

The idea behind port knocking is to close all ports and monitor attempts to connect to them. Whenever a very specific sequence of attempts (a knock sequence) is recognized, and only in that case, the system can be configured to perform some specific action, like opening a given port, so the outsider can get in. The knock sequence can be as complex as you like—for example, a simple list (like trying TCP port 7005, then TCP port 7006 and finally, TCP port 7007) to a collection of use-only-once sequences, which once used, will not be allowed again. This is the equivalent of “one-time pads”, a cryptography method that, when used correctly, provides perfect secrecy.

Before setting this up, let me explain why it's a good safety measure. There are 65,535 possible ports, but after discarding the already-used ones (see the list of assigned ports in Resources), suppose you are left with “only” 50,000 available ports. If attackers have to guess a sequence of five different ports, there are roughly 312,000,000,000,000,000,000,000 possible combinations they should try. Obviously, brute-force methods won't help! Of course, you shouldn't assume that blind luck is the only possible attack, and that's why port knocking ought not be the only security measure you use, but just another extra layer for attackers to go through (Figure 2).

clip_image002[6]

Figure 2. Would-be attackers (top) are simply rejected by the firewall, but when a legit user (middle) provides the correct sequence of “knocks”, the firewall (bottom) allows access to a specific port, so the user can work with the server.

On the machine you are protecting, install the knockd dæmon, which will be in charge of monitoring the knock attempts. This package is available for all distributions. For example, in Ubuntu, run sudo apt-get install knockd, and in OpenSUSE, run sudo zypper install knockd or use YaST. Now you need to specify your knocking rules by editing the /etc/knockd.conf file and start the dæmon running. An example configuration is shown in Listing 2. Note: the given iptables commands are appropriate for an OpenSUSE distribution running the standard firewall, with eth0 in the external zone; with other distributions and setups, you will need to determine what command to use.

Listing 2. A simple /etc/knockd.conf file, which requires successive knocks on ports 7005, 7007 and 7006 in order to enable secure shell (SSH) access.


[opencloseSSH]
  sequence      = 7005,7006,7007
  seq_timeout   = 15
  tcpflags      = syn
  start_command = /usr/sbin/iptables -s %IP% -I input_ext 1 -p tcp --dport ssh -j ACCEPT
  cmd_timeout   = 30
  stop_command  = /usr/sbin/iptables -s %IP% -D input_ext -p tcp --dport ssh -j ACCEPT


You probably can surmise that this looks for a sequence of three knocks—7005, 7006 and 7007 (not very safe, but just an example)—and then opens or closes the SSH port. This example allows a maximum timeout for entering the knock sequence (15 seconds) and a login window (30 seconds) during which the port will be opened. Now, let's test it out.


First, you can see that without running knockd, an attempt to log in from the remote machine just fails:

$ ssh your.site.url -o ConnectTimeout=10
ssh: connect to host your.site.url port 22: Connection timed out

Next, let's start the knockd server. Usually, you would run it as root via knockd -d or/etc/init.d/knockd start; however, for the moment, so you can see what happens, let's run it in debug mode with knock -D:

# knockd -D

config: new section: 'opencloseSSH'
config: opencloseSSH: sequence: 7005:tcp,7006:tcp,7007:tcp
config: opencloseSSH: seq_timeout: 15
config: tcp flag: SYN
config: opencloseSSH: start_command:
          /usr/sbin/iptables -s %IP% -I input_ext 1
                             -p tcp --dport ssh -j ACCEPT
config: opencloseSSH: cmd_timeout: 30
config: opencloseSSH: stop_command:
          /usr/sbin/iptables -s %IP% -D input_ext
                             -p tcp --dport ssh -j ACCEPT


ethernet interface detected
Local IP: 192.168.1.10


Now, let's go back to the remote machine. You can see that an ssh attempt still fails, but after three knock commands, you can get in:

$ ssh your.site.url -o ConnectTimeout=10
ssh: connect to host your.site.url port 22: Connection timed out

$ knock your.site.url 7005

$ knock your.site.url 7006
$ knock your.site.url 7007
$ ssh your.site.url -o ConnectTimeout=10

Password:
Last login: Sat Oct  3 14:58:45 2009 from 192.168.1.100

Looking at the console on the server, you can see the knocks coming in:


2009-09-03 15:29:47:
     tcp: 190.64.105.104:33036 -> 192.168.1.10:7005 74 bytes
2009-09-03 15:29:50:
     tcp: 190.64.105.104:53783 -> 192.168.1.10:7006 74 bytes
2009-09-03 15:29:51:
     tcp: 190.64.105.104:40300 -> 192.168.1.10:7007 74 bytes


If the remote sequence of knocks had been wrong, there would have been no visible results and the SSH port would have remained closed, with no one the wiser.

Configuring and Running knockd

The config file /etc/knockd.conf is divided into sections, one for each specific knock sequence, with a special general section, options, for global parameters. Let's go through the general options first:

· You can log events either to a specific file by using LogFile=/path/to/log/file, or to the standard Linux log files by using UseSyslog. Note: it's sometimes suggested that you avoid such logging, because it enables an extra possible goal for attackers—should they get their hands on the log, they would have the port-knocking sequences.


· When knockd runs as a dæmon, you may want to check whether it's still running. The PidFile=/path/to/PID/file option specifies a file into which knockd's PID (process ID) will be stored. An interesting point: should knockd crash, your system will be safer than ever—all ports will be closed (so safer) but totally unaccessible. You might consider implementing a cron task that would check for the knockd PID periodically and restart the dæmon if needed.

· By default, eth0 will be the observed network interface. You can change this with something like Interface=eth1. You must not include the complete path to the device, just its name.

Every sequence you want to recognize needs a name; the example (Listing 2) used just one, named openclosessh. Options and their parameters can be written in upper-, lower- or mixed case:

· Sequence is used to specify the desired series of knocks—for example,7005,7007:udp,7003. Knocks are usually TCP, but you can opt for UDP.

· One_Time_Sequences=/path/to/file allows you to specify a file containing “use once” sequences. After each sequence is used, it will be erased. You just need a text file with a sequence (in the format above) in each line.

· Seq_Timeout=seconds.to.wait.for.the.knock is the maximum time for completing a sequence. If you take too long to knock, you won't be able to get in.


· Start_Command=some.command specifies what command (either a single line or a full script) must be executed after recognizing a knock sequence. If you include the %IP% parameter, it will be replaced at runtime by the knocker's IP. This allows you, for example, to open the firewall port but only for the knocker and not for anybody else. This example uses an iptables command to open the port (see Resources for more on this).


· Cmd_Timeout=seconds.to.wait.after.the.knock lets you execute a second command a certain time after the start command is run. You can use this to close the port; if the knocker didn't log in quickly enough, the port will be closed.

· Stop_Command=some.other.command is the command that will be executed after the second timeout.

· TCPFlags=list.of.flags lets you examine incoming TCP packets and discard those that don't match the flags (FIN, SYN, RST, PSH, ACK or URG; see Resources for more on this). Over an SSH connection, you should useTCPFlags=SYN, so other traffic won't interfere with the knock sequence.

For the purposes of this example (remotely opening and closing port 22), you didn't need more than a single sequence, shown in Listing 2. However, nothing requires having a single sequence, and for that matter, commands do not have to open ports either! Whenever a knock sequence is recognized, the given command will be executed. In the example, it opened a firewall port, but it could be used for any other functions you might think of—triggering a backup, running a certain process, sending e-mail and so on.


The knockd command accepts the following command-line options:

· -c lets you specify a different configuration file, instead of the usual /etc/knockd.conf.
· -d makes knockd run as a dæmon in the background; this is the standard way of functioning.
· -h provides syntax help.
· -i lets you change which interface to listen on; by default, it uses whatever you specify in the configuration file or eth0 if none is specified.
· -l allows looking up DNS names for log entries, but this is considered bad practice, because it forces your machine to lose stealthiness and do DNS traffic, which could be monitored.
· -v produces more verbose status messages.
· -D outputs debugging messages.
· -V shows the current version number.


In order to send the required knocks, you could use any program, but the knock command that comes with the knockd package is the usual choice. An example of its usage is shown above (knock your.site.url 7005) for a TCP knock on port 7005. For a UDP knock, either add the -u parameter, or do knock your.site.url 7005:udp. The -h parameter provides the (simple) syntax description.

If You Are behind a Router
If you aren't directly connected to the Internet, but go through a router instead, you need to make some configuration changes. How you make these changes depends on your specific router and the firewall software you use, but in general terms you should do the following:

1) Forward the knock ports to your machine, so knockd will be able to recognize them.

2) Forward port 22 to your machine. Although in fact, you could forward any other port (say, 22960) to port 22 on your machine, and remote users would have to ssh -p 22960 your.site.url in order to connect to your machine. This could be seen as “security through obscurity”—a defense against script kiddies, at least.

3) Configure your machine's firewall to reject connections to port 22 and to the knock ports:

$ /usr/sbin/iptables -I INPUT 1 -p tcp --dport ssh -j REJECT
$ /usr/sbin/iptables -I INPUT 1 -p tcp --sport 7005:7007 -j REJECT


The command to allow SSH connections would then be:


$ /usr/sbin/iptables -I INPUT 1 -p tcp --dport ssh -j ACCEPT

And, the command for closing it again would be:

$ /usr/sbin/iptables -D INPUT -p tcp --dport ssh -j ACCEPT

Conclusion

Port knocking can't be the only security weapon in your arsenal, but it helps add an extra barrier to your machine and makes it harder for hackers to get a toehold into your system.

Resources

The knockd page is at www.zeroflux.org/projects/knock, and you can find the knockd man page documentation at linux.die.net/man/1/knockd, or simply do man knockd at a console.

For more on port knocking, check www.portknocking.org/view, and in particular, seewww.portknocking.org/view/implementations for several more implementations. Also, you might check the critique at www.linux.com/archive/articles/37888 and the answer at www.portknocking.org/view/about/critique for a point/counterpoint argument on port knocking.

Read en.wikipedia.org/wiki/Transmission_Control_Protocol for TCP flags, especially SYN. At www.faqs.org/docs/iptables/tcpconnections.html, you can find a good diagram showing how flags are used.

Port numbers are assigned by IANA (Internet Assigned Numbers Authority); seewww.iana.org/assignments/port-numbers for a list.

To test your site, get nmap at nmap.org, and also go to GRC's (Gibson's Research Corporation) site at https://www.grc.com, and try the ShieldsUp test.

Check www.netfilter.org if you need to refresh your iptables skills.

Federico Kereki is an Uruguayan Systems Engineer, with more than 20 years' experience teaching at universities, doing development and consulting work, and writing articles and course material. He has been using Linux for many years now, having installed it at several different companies. He is particularly interested in the better security and performance of Linux boxes.

Taken From: http://www.linuxjournal.com/article/10600

Tuesday, August 3, 2010

Windows XP VPN (PPTP)

Windows XP VPN (PPTP)

Setting up the VPN server

To setup the server end of the VPN connection, we need to create a new connection, and then check the firewall/router settings.
Firstly bring up the control panel by clicking on Start -> Control Panel. If the control panel is in Classic View as shown below, then click in Category View to see the simplified panel.
clip_image002
From the Category View click on Network and Internet Connections
clip_image004
Now click on Network Connections from the or pick a control panel icon section
clip_image006
Select the Create a new connection from the menu on the left of the screen
clip_image008
You should now see the New Connection Wizard click next to start.
clip_image010
Select Set up an advanced connection and click next to continue.
clip_image012
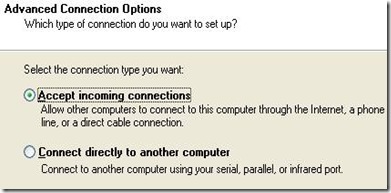
Select Accept incoming connections and click next to continue.
clip_image014
Leave the boxes unticked on this next screen and just click next to continue.
clip_image016
Select Allow virtual private connections and click next to continue.
clip_image018
You now need to pick which users are going to be allowed to vpn in. If you created a user earlier, then ensure that just that user is ticked, else pick which user you want to use - remember they need a secure password. Then click next to continue.
clip_image020
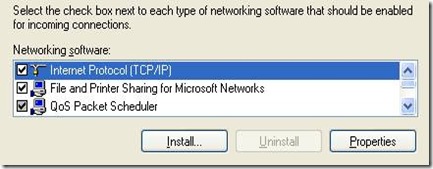
You can just click next to continue on this Networking Software screen, as you should already have everything you need installed, as you must already have either a modem or network card in the pc.
clip_image022
In the Incoming TCP/IP Properties dialog box (see below), place a check mark in the Allow Callers To Access My Local Area Network check box. This will allow VPN callers to connect to other computers on the LAN. If this check box isn’t selected, VPN callers will only be able to connect to resources on the Windows XP VPN server itself. Click OK to return to the Networking Software page and then click Next.
clip_image023
Granting LAN access to callers
Congratulations, you've now completed the second step in creating a VPN connection. Click Finish to close the wizard.
clip_image025
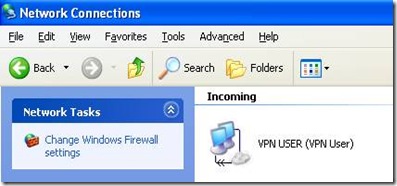
You should now see your new incoming connection in the Network ConnectionsWindow.
clip_image027
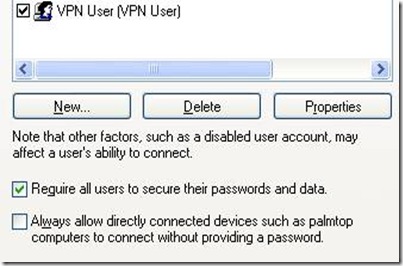
The last step is to ensure that all incoming connections use encryption (otherwise all this was for nothing !), so right click on the Incoming connections icon and select properties, then go to the second tab Users and tick the Require all users to secure their passwords and data checkbox, and then click the OK button to close the dialog
clip_image029

Setting up the VPN client

Now that the Server end of the VPN is set up, you need to create a vpn connection on your laptop to use whenever you are using an insecure wireless network.
Firstly bring up the control panel by clicking on Start -> Control Panel. If the control panel is in Classic View as shown below, then click in Category View to see the simplified panel.
clip_image002[1]
From the Category View click on Network and Internet Connections
clip_image004[1]
Now click on Network Connections from the or pick a control panel icon section
clip_image006[1]
Select the Create a new connection from the menu on the left of the screen
clip_image008[1]
You should now see the New Connection Wizard click next to start.
clip_image010[1]
Select Connect to the workplace at my work and click next to continue.
clip_image031
Select Virtual Private Network as the connection type and click next to continue.
clip_image033
Give the new VPN connection a name and click next to continue.
clip_image035
If you already have a dialup or VPN connection setup on your laptop you will now be asked if you want to always dial one of these existing connections before you make the VPN connection. Because we are going to be using a wireless link to get internet connectivity select Do not dial the initial connection and click next to continue. If you don't already have a dialup or VPN connection setup then this screen will not appear, and you will go straight to the next screen.
clip_image037
Now enter either the hostname your ISP has given you, or the IP address they've given you and click next to continue. If you don't have a static IP address, then it may be easier to use Dynamic DNS such as from dyndns.com to give you a static hostname for your dynamic address.
clip_image039
Now click finish and your new VPN connection will be ready to use.
clip_image041

Note: If you wish to connect to this VPN server from Internet by going through the router, then you need to enable port forwarding and allowPPTP passthrough options on the router.
Note: Since PPTP VPN uses port TCP-1723, you need to do port forwarding on TCP-1723. If you have problem to do port forwarding, then take a look on this port forwarding how to article. In this example, my VPN server IP is 192.168.1.99, so I do port forwarding to this computer’s port TCP-1723 on router.
clip_image042
Here is how I enabled PPTP Passthrough on Linksys router. Just go to your router management page to locate this option.
clip_image043

Testing the VPN Setup

Now the client and server are setup, we just need to make a few final checks before testing the setup.
If you use a modem on your home pc to share your internet connection, then you should be ready to start testing, as setting up the XP VPN Server will automatically update XP's built-in firewall with the rules necessary to allow incoming VPN connections, also you must already have Internet Connection Sharing setup in order to share your internet access.
If you use a router to access the internet and share your connection between computers then you will need to poke a hole in its firewall to the VPN connection through. You will probably need to look at the manual for your router to see how this is done, but you will most likely need to setup port-forwarding on the router to forward TCP connections on port 1723 to your home computer. This should be enough for most home routers.
Instead of going to the nearest internet cafe to test your vpn connection, the easiest way is to test it from home. Use the modem in your laptop to dial your dialup ISP ( most ISPs offer a dialup service with no monthly fees ) and then dial your VPN connection to connect through to your home PC.
clip_image045
Once successfully connected, you should see the new incoming connection shown in the Network Connections control panel of your home pc
clip_image047
If it has connected ok, you should now be able to surf all your regular sites and check your email from your laptop, all through this secure connection.
Once you are happy that it is working over a dialup link, you need to go to your regular wireless internet cafe and test the connection from there. It should obviously be much faster than over a dialup, while keeping all of your web and email traffic safe from prying eyes.

For other windows versions like windows 7 it should be similiar.
Based On:
http://wireless.gumph.org/content/6/4/011-howto-xp-pptp-vpn-user.html
http://www.zdnetasia.com/configure-windows-xp-professional-to-be-a-vpn-server-39050037.htm
http://www.home-network-help.com/pptp-vpn-server.html

Linux Switch (aka Bridge)

In this post Im going to show you how to configure a bridge (switch) in Linux. Here I will present several variations tha I have tested. The base cenário is the following:


# Set the eth1 IP address on the Rigth Laptop

ifconfig eth1 10.0.0.1 netmask 255.0.0.0

# Set the eth1 IP address on the Left Laptop

ifconfig eth1 10.0.0.2 netmask 255.0.0.0


Cenário 1 – No IPs on the Server NICs and Bridge

Server Configuration

# Load the bridge kernel module
modprobe bridge

# Activate eth1 and eth2 interface
ifconfig eth1 up

ifconfig eth2 up

# Create the bridge (virtual interface)
brctl addbr br0

# Add members to th
e bridge

brctl addif br0 eth1
brctl addif br0 eth2


Cenário 2 – No IPs on the Server NICs


Server Configuration

# Load the bridge kernel module
modprobe bridge

# Activate eth1 and eth2 interface
ifconfig eth1 up

ifconfig eth2 up

# Create the bridge (virtual interface)
brctl addbr br0

# Add members to the bridge
brctl addif br0 eth1
brctl addif br0 eth2

# Set the bridge IP address:
ifconfig br0 10.0.0.3 netmask 255.0.0.0

Now both computers are on the same LAN and can ping each other and the bridge interface, but can’t ping with the server NICs. This is like a switch with management ip.


Cenário 3 – IPs on the Server NICs and Bridge


Server Configuration

# Load the bridge kernel module
modprobe bridge

# Activate eth1 and eth2 interface
ifconfig eth1 up

ifconfig eth2 up

# Create the bridge (virtual interface)
brctl addbr br0

# Add members to the bridge
brctl addif br0 eth1
brctl addif br0 eth2

# Set the bridge IP address:
ifconfig br0 10.0.0.3 netmask 255.0.0.0

# Set the bridge IP address:
ifconfig br0 10.0.0.3 netmask 255.0.0.0

# Set the eth1 and eth2 IP address:
ifconfig eth1 10.0.0.4 netmask 255.0.0.0

ifconfig eth2 10.0.0.5 netmask 255.0.0.0

Now both computers are on the same LAN and can ping each other, the bridge interface, and also ping with the server NICs. It's like no switch I have ever seen.

Based On: http://openmaniak.com/openvpn_bridging.php


Monday, January 25, 2010

Extending Net-SNMP (Postfix Example)

This article is a great example that you can make anything to be monitored via SNMP. In this case Postfix, mas this applies to just about anything

Check it out on: http://thunder.jbdesign.net/docs/postfix-zenoss.html

Wednesday, December 23, 2009

Clone or Copy a VirtualBox Virtual Disk

Clone or Copy a VirtualBox Virtual Disk

Published by Nick Heppleston on Wednesday, 17th June 2009 in VirtualBox and Virtualisation. 7 Comments

As a virtual machine environment user, I regularly create ‘base’ images of machines that I can reuse – a base Windows Server 2003 environment, or SQL Server 2005 environment for example. That way, when I need a new machine, I can simply create a copy of the virtual disk and add any additional software I need, saving myself valuable time creating new virtual environments.

With VMWare’s various offerings, copying a virtual disk is easy: copy the disk in Windows Explorer and add it to a newly created VM; VMWare will detect that the disk was a copy and create a new unique identifier (UUID) for the disk before adding it to the VM. Easy and painless. Not so with VirtualBox.

With VirtualBox, copying a virtual disk is a bit of a pain. If you copy the disk in Windows Explorer and try and use it in a new VM, VirtualBox will have a hissy fit and display the error shown below. A bit of a ‘wordy’ way to say that it already knows about this disk, don’t you think?


The publicised way around this is to use the command-line VBoxManage CloneHd tool, however there is another – secret and undocumented – way to clone a disk: the setvdiuuid tool. Lets look at these two methods in detail.


Cloning a Virtual Disk – The ‘Supported’ Method

Cloning a disk is (IMHO) a clunky and Unix-y type way of creating a duplicate disk. We need to invoke the CloneHd command of the VBoxManage tool, supplying the disk to clone and the name of the new ‘cloned’ disk. In its simplest form, you would do something like this at the command-line:

cd C:\Program Files\Sun\VirtualBox

VBoxManage clonehd "DiskToClone.vdi" "ClonedDisk.vdi"


The VBoxManage tool will chug away and clone the disk for you, creating a new UUID in the process:

The cloned disk can now be used on a new VM without incurring the ‘I already know about this disk’ error.


Copying a Disk – The ‘Unsupported’ Method

The unsupported method is to copy the disk like you copy a normal file and then set a diferent uuid
using setvdiuuid.

Setvdiuuid is an undocumented option available in VBoxManage – the setvdiuuid command. As the command help states: ‘This is a development tool and shall only be used to analyse problems. It is completely unsupported and will change in incompatible ways without warning’. Because of this, let me add a little disclaimer: I don’t accept any responsibility if you completely destroy your VM using this procedure. Having said that, it appears to work without issue, so I’m more than happy to use it myself – just make sure that you take a backup of you virtual disk before using it if necessary.

To use the tool, simply create a copy of the virtual disk’s VDI file in Windows Explorer; open the Windows command-line and issue the setvdiuuid command for the newly copied disk:

cd C:\Program Files\Sun\VirtualBox

VBoxManage internalcommands setvdiuuid "CopiedDisk.vdi"

The tool will create a new UUID and assign it to the disk:

The new copied disk can now be used on a new VM without incurring the ‘I already know about this disk’ error.

This was shown for windows but also works on linux, you just need to change cd C:\Program Files\Sun\VirtualBox to the correct location on linux.


Wednesday, December 16, 2009

Installing Magento - Shopping Cart

Magento HOWTO


# Install Apache With It's Documentation #####

$ sudo apt-get install apache2 apache2-doc

# Start Apache (it should already be started) #####
$ sudo /etc/init.d/apache2 start


# Test Apache #####

Type on Mozilla Firefox: http://127.0.0.1/
It souhld read: It works!

Note: The message "It works!" can be found at the /var/www
directorie, which is apaches's root directory, wich is were
we will install Magento.


# Instaling MySQL and PHP necessary Dependencies #####


$ sudo apt-get install mysql-server mysql-client
Type in mySQL's root password in the upcoming textbox.

$ sudo apt-get install libapache2-mod-php5 libapache2-mod-perl2

$ sudo apt-get install php5 php5-cli php5-common php5-curl php5-dev php5-gd php5-imap php5-ldap

$ sudo apt-get install php5-mhash php5-mysql php5-odbc curl libwww-perl imagemagick

$ apt-get install php5-mcrypt

# Creating Magento MySQL Database #####

$ mysql -u root -p

mysql> create database magento;

mysql> exit


# Extract Magento #####

$ cd /home/user/Desktop/magento

$ unzip magento.zip


# Installing Magento in Apache #####

# Copiar o Magento para /var/www (apache root dir)
$ sudo cp -vr magento /var/www


# Give Apache Ownership Over SugarCRM Files (apache-user: www-data) #####

$ sudo chown www-data -vR /var/www/magento*


# Configuring php.ini #####

sudo gedit /etc/php5/apache2/php.ini


;memory_limit = 16M
memory_limit = 64M


# Restart Apache #####

$ sudo /etc/init.d/apache2 restart


# Delete Apache's Test Page #####

$ sudo rm -rf /var/www/index.html


# Configuring Magento #####

Type on Mozilla Firefox:
http://127.0.0.1/magento/install.php
and configure Magento acording to the presented instructions.


Other Shopping Carts Reviews

http://webtecker.com/2008/04/22/8-best-open-source-shopping-cart-solutions/
http://www.siteground.com/shopping_cart_reviews.htm


Monday, November 30, 2009

Building a Secure Squid Web Proxy, Part IV

Add squidGuard's blacklist functionality to your Squid proxy.

In my previous three columns [April, May and July 2009], I described the concept, benefits and architectural considerations of outbound Web proxies (Part I); discussed basic Squid installation, configuration and operation (Part II); and explained Squid Access Control Lists (ACLs), its ability to run as an unprivileged user and provided some pointers on running Squid in a chroot jail (Part III).

Although by no means exhaustively detailed, those articles nonetheless cover the bulk of Squid's built-in security functionality (ACLs, running nonroot and possibly running chrooted). This month, I conclude this series by covering an important Squid add-on: squidGuard.

squidGuard lets you selectively enforce “blacklists” of Internet domains and URLs you don't want end users to be able to reach. Typically, people use squidGuard with third-party blacklists from various free and commercial sites, so that's the usage scenario I describe in this article.

Introduction to squidGuard
Put simply, squidGuard is a domain and URL filter. It filters domains and URLs mostly by comparing them against lists (flat files), but also, optionally, by comparing them against regular expressions.

squidGuard does not filter the actual contents of Web sites. This is the domain of appliance-based commercial Web proxies such as Blue Coat, and even products like that tend to emphasize URL/domain filtering over actual content parsing due to the high-computing (performance) cost involved.

You may wonder, what have URL and domain filtering got to do with security? Isn't that actually a form of censorship and bandwidth-use policing? On the one hand, yes, to some extent, it is.

Early in my former career as a firewall engineer and administrator, I rankled at management's expectation that I maintain lists of the most popular URLs and domains visited. I didn't think it was my business what people used their computers for, but rather it should be the job of their immediate supervisors to know what their own employees were doing.

But the fact is, organizations have the right to manage their bandwidth and other computing resources as they see fit (provided they're honest with their members/employees about privacy expectations), and security professionals are frequently in the best “position” to know what's going on. Firewalls and Web proxies typically comprise the most convenient “choke points” for monitoring or filtering Web traffic.

Furthermore, the bigger domain/URL blacklists frequently include categories for malware, phishing and other Web site categories that do, in fact, have direct security ramifications. For example, the free Shalla's Blacklists include more than 27,600 known sources of spyware!

Even if you don't care about conserving bandwidth or enforcing acceptable-use policies, there's still value in configuring squidGuard to block access to “known dangerous” Web sites. That's precisely what I'm going to show you how to do.

Getting and Installing squidGuard
If you run a recent version of Fedora, SUSE, Debian or Ubuntu Linux, squidGuard is available as a binary package from your OS's usual software mirrors (in the case of Ubuntu, it's in the universe repositories). If you run RHEL or CentOS, however, you need to install either Dag Wieers' RPM of squidGuard version 1.2, Excalibur Partners' RPM of squidGuard version 1.4, or you'll have to compile squidGuard from the latest source code, available at the squidGuard home page (see Resources for the appropriate links).

Speaking of squidGuard versions, the latest stable version of squidGuard at the time of this writing is squidGuard 1.4. But, if your Linux distribution of choice provides only squidGuard 1.2, as is the case with Fedora 10 and Ubuntu 9.04, or as with OpenSUSE 11.1, which has squidGuard 1.3, don't worry. Your distribution almost certainly has back-ported any applicable squidGuard 1.4 security patches, and from a functionality standpoint, the most compelling feature in 1.4 absent in earlier versions is support for MySQL authentication.

Hoping you'll forgive my Ubuntu bias of late, the command to install squidGuard on Ubuntu systems is simply:

bash-$ sudo apt-get squidguard
As noted above, squidGuard is in the universe repository, so you'll either need to uncomment the universe lines in /etc/apt/sources.list, or open Ubuntu's Software Sources applet, and assuming it isn't already checked, check the box next to Community-maintained Open Source software (universe), which will uncomment those lines for you.

Besides using apt-get from a command prompt to install squidGuard, you could instead use the Synaptic package manager. Either of these three approaches automatically results in your system's downloading and installing a deb archive of squidGuard.

If you need a more-current version of squidGuard than what your distribution provides and are willing to take it upon yourself to keep it patched for emerging security bugs, the squidGuard home page has complete instructions.

Getting and Installing Blacklists
Once you've obtained and installed squidGuard, you need a set of blacklists. There's a decent list of links to these at squidguard.org/blacklists.html, and of these, I think you could do far worse than Shalla's Blacklists (see Resources), a free-for-noncommercial-use set that includes more than 1.6 million entries organized into 65 categories. It's also free for commercial use; you just have to register and promise to provide feedback and list updates. Shalla's Blacklists are the set I use for the configuration examples through the rest of this article.

Once you've got a blacklist archive, unpack it. It doesn't necessarily matter where, so long as the entire directory hierarchy is owned by the same user and group under which Squid runs (proxy:proxy on Ubuntu systems). A common default location for blacklists is /var/lib/squidguard/db.

To extract Shalla's Blacklists to that directory, I move the archive file there:

bash-$ cp mv shallalist.tar.gz /var/lib/squidguard/db
Then, I unpack it like this:

bash-$ sudo -s
bash-# cd /var/lib/squidguard/db
bash-# tar --strip 1 -xvzf shallalist.tar.gz
bash-# rm shallalist.tar.tz

In the above tar command, the --strip 2 option strips the leading BL/ from the paths of everything extracted from the shallalist tar archive. Without this option, there would be an additional directory (BL/) under /var/lib/squidguard/db containing the blacklist categories, for example, /var/lib/squidguard/db/BL/realestate rather than /var/lib/squidguard/db/realestate. Note that you definitely want to delete the shallalist.tar.gz file as shown above; otherwise, squidGuard will include it in the database into which the contents of /var/lib/squidguard/db will later be imported.

Note also that at this point you're still in a root shell; you need to stay there for just a few more commands. To set appropriate ownership and permissions for your blacklists, use these commands:

bash-# chown -R proxy:proxy /var/lib/squidguard/db/
bash-# find /var/lib/squidguard/db -type f | xargs chmod 644
bash-# find /var/lib/squidguard/db -type d | xargs chmod 755
bash-# exit

And with that, your blacklists are ready for squidGuard to start blocking. After, that is, you configure squidGuard to do so.

Configuring squidGuard
On Ubuntu and OpenSUSE systems (and probably others), squidGuard's configuration file squidGuard.conf is kept in /etc/squid/, and squidGuard automatically looks there when it starts. As root, use the text editor of your choice to open /etc/squid/squidGuard.conf. If using a command-line editor like vi on Ubuntu systems, don't forget to use sudo, as with practically everything else under /etc/, you need to have superuser privileges to change squidGuard.conf.

squidGuard.conf's basic structure is:

Options (mostly paths)

Time Rules

Rewrite Rules

Source Addresses

Destination Classes

Access Control Lists

In this article, my goal is quite modest: to help you get started with a simple blacklist that applies to all users, regardless of time of day, and without any fancier URL-rewriting than redirecting all blocked transactions to the same page. Accordingly, let's focus on examples of Options, Destination Classes and ACLs. Before you change squidGuard.conf, it's a good idea to make a backup copy, like this:

bash-$ sudo cp /etc/squid/squidGuard.conf
/etc/squid/squidGuard.conf.def

Now you can edit squidGuard.conf. First, at the top, leave what are probably the default values of dbhome and logdir, which specify the paths of squidGuard's databases of blacklists (or whitelists—you also can write ACLs that explicitly allow access to certain sites and domains) and its log files, respectively. These are the defaults in Ubuntu:

dbhome /var/lib/squidguard/db
logdir /var/log/squid

These paths are easy enough to understand, especially considering that you just extracted Shalla's Blacklists to /var/lib/squidguard/db. Whatever you do, do not leave a completely blank line at the very top of the file; doing so prevents squidGuard from starting properly.

Next, you need to create a Destination Class. This being a security column, let's focus on blocking access to sites in the spyware and remotecontrol categories. You certainly don't want your users' systems to become infected with spyware, and you probably don't want users to grant outsiders remote control of their systems either.

Destination Classes that describe these two categories from Shalla's Blacklists look like this:

dest remotecontrol {
domainlist remotecontrol/domains
urllist remotecontrol/urls
}

dest spyware {
domainlist spyware/domains
urllist spyware/urls
}

As you can see, the paths in each domainlist and urllist statement are relative to the top-level database path you specified with the dbhome option. Note also the curly bracket {} placement: left brackets always immediately follow the destination name, on the same line, and right brackets always occupy their own line at the end of the class definition.

Finally, you need an ACL that references these destinations—specifically, one that blocks access to them. The ACL syntax in squidGuard is actually quite flexible, and it's easy to write both “allow all except...” and “block all except...” ACLs. Like most ACL languages, they're parsed left to right, top to bottom. Once a given transaction matches any element in an ACL, it's either blocked or passed as specified, and not matched against subsequent elements or ACLs.

You can have multiple ACL definitions in your squidGuard.conf file, but in this example scenario, it will suffice to edit the default ACL. A simple default ACL that passes all traffic unless destined for sites in the remotecontrol or spyware blacklists would look like this:

acl {
default {
pass !remotecontrol !spyware all
redirect http://www.google.com
}
}

In this example, default is the name of the ACL. Your default squidGuard.conf file probably already has an ACL definition named default, so be sure either to edit that one or delete it before entering the above definition; you can't have two different ACLs both named default.

The pass statement says that things matching remotecontrol (as defined in the prior Destination Class of that name) do not get passed, nor does spyware, but all (a wild card that matches anything that makes it that far in the pass statement) does. In other words, if a given destination matches anything in the remotecontrol or spyware blacklists (either by domain or URL), it won't be passed, but rather will be redirected per the subsequent redirect statement, which points to the Google home page.

Just to make sure you understand how this works, let me point out that if the wild card all occurred before !remotecontrol, as in “pass all !remotecontrol !spyware”, squidGuard would not block anything, because matched transactions aren't compared against any elements that follow the element they matched. When constructing ACLs, remember that order matters!

I freely admit I'm being very lazy in specifying that as my redirect page. More professional system administrators would want to put a customized “You've been redirected here because...” message onto a Web server under their control and list that URL instead. Alternatively, squidGuard comes with a handy CGI script that displays pertinent transaction data back to the user. On Ubuntu systems, the script's full path is /usr/share/doc/squidguard/examples/squidGuard.cgi.gz.

This brings me to my only complaint about squidGuard: if you want to display a custom message to redirected clients, you either need to run Apache on your Squid server and specify an http://localhost/ URL, or specify a URL pointing to some other Web server you control. This is in contrast to Squid itself, which has no problem displaying its own custom messages to clients without requiring a dedicated HTTP dæmon (either local or external).

To review, your complete sample squidGuard.conf file (not counting any commented-out lines from the default file) should look like this:

dbhome /var/lib/squidguard/db
logdir /var/log/squid

dest remotecontrol {
domainlist remotecontrol/domains
urllist remotecontrol/urls
}

dest spyware {
domainlist spyware/domains
urllist spyware/urls
}

acl {
default {
pass !remotecontrol !spyware all
redirect http://www.google.com
}
}

Now that squidGuard is configured and, among other things, knows where to look for its databases, you need to create actual database files for the files and directories under /var/lib/squidGuard/db, using this command:

bash-$ sudo -u proxy squidGuard -C all

This imports all files specified in active Destination Class definitions in squidGuard.conf, specifically in this example, the files remotecontrol/domains, remotecontrol/urls, spyware/domains and spyware/urls, into Berkeley DB-format databases. Obviously, squidGuard can access the blacklists much faster using database files than by parsing flat text files.

Configuring Squid to Use squidGuard
The last thing you need to do is reconfigure Squid to use squidGuard as a redirector and tell it how many redirector processes to keep running. The location of your squidGuard binary is highly distribution-specific; to be sure, you can find it like this:

bash-$ which squidGuard
/usr/bin/squidGuard

As for the number of redirector processes, you want a good balance of system resource usage and squidGuard performance. Starting a lot of redirectors consumes resources but maximizes squidGuard performance, whereas starting only a couple conserves resources by sacrificing squidGuard performance. Ubuntu's default of 5 is a reasonable middle ground.

The squid.conf parameters for both of these settings (redirector location and number of processes) are different depending on with which version of Squid you're using squidGuard. For Squid versions 2.5 and earlier, they're redirect_program and redirect_children. For Squid versions 2.6 and later, they're url_rewrite_program and url_rewrite_program.

For example, on my Ubuntu 9.04 system, which runs Squid version 2.7, I used a text editor (run via sudo) to add the following two lines to /etc/squid/squid.conf:

url_rewrite_program /usr/bin/squidGuard
url_rewrite_children 5

As with any other time you edit /etc/squid/squid.conf, it's probably a good idea to add custom configuration lines before or after their corresponding comment blocks. squid.conf, you may recall, is essentially self-documented—it contains many lines of example settings and descriptions of them, all in the form of comments (lines beginning with #). Keeping your customizations near their corresponding examples/defaults/comments both minimizes the chance you'll define the same parameter in two different places, and, of course, it gives you easy access to information about the things you're changing.

By the way, I'm assuming Squid itself already is installed, configured and working the way you want it to (beyond blacklisting). If you haven't gotten that far before installing squidGuard, please refer to my previous three columns (see Resources).

Before those changes take effect, you need to restart Squid. On most Linux systems, you can use this command (omitting the sudo if you're already in a root shell):

bash-$ /etc/init.d/squid reload

If you get no error messages, and if when you do a ps -axuw |grep squid you see not only a couple Squid processes, but also five squidGuard processes, then congratulations! You've now got a working installation of squidGuard.

But is it actually doing what you want it to do? Given the filters we just put in place, the quickest way to tell is, on some client configured to use your Squid proxy, to point a browser to http://www.gotomypc.com (a site in the remotecontrol blacklist). If everything's working correctly, your browser will not pull up gotomypc, but rather Google. squidGuard is passive-aggressively encouraging you to surf to a safer site!

Conclusion
squidGuard isn't the only Squid add-on of interest to the security-conscious. squidtaild and squidview, for example, are two different programs for monitoring and creating reports from Squid logs (both of them are available in Ubuntu's universe repository). I leave it to you though to take your Squid server to the next level.

This concludes my introductory series on building a secure Web proxy with Squid. I hope you're off to a good, safe start!

Resources

squidGuard home page, featuring squidGuard's latest source code and definitive documentation: squidguard.org.

OpenSUSE's squidGuard page: en.opensuse.org/SquidGuard.

squidGuard 1.2 RPMs for Fedora, CentOS and RHEL from Dag Wieers: dag.wieers.com/rpm/packages/squidguard.

squidGuard 1.4 RPM for CentOS 5, from Excalibur Partners LLC: www.excaliburtech.net/archives/46.

The Debian Wiki's “Rudimentary squidGuard Filtering” page: wiki.debian.org/DebianEdu/HowTo/SquidGuard.

Wessels, Duane: Squid: The Definitive Guide. Sebastopol, CA: O'Reilly Media, 2004 (includes some tips on creating and using a Squid chroot jail).

The Squid home page, where you can obtain the latest source code and binaries for Squid: www.squid-cache.org.

The Ubuntu Server Guide's Squid chapter: https://help.ubuntu.com/8.10/serverguide/C/squid.html.

The Squid User's Guide: www.deckle.co.za/squid-users-guide/Main_Page.

Shalla's Blacklists are available at www.shallalist.de (the most current blacklist archive is always at www.shallalist.de/Downloads/shallalist.tar.gz).

“Building a Secure Squid Web Proxy, Part I” by Mick Bauer, LJ, April 2009: www.linuxjournal.com/article/10407.

“Building a Secure Squid Web Proxy, Part II” by Mick Bauer, LJ, May 2009: www.linuxjournal.com/article/10433.

“Building a Secure Squid Web Proxy, Part III” by Mick Bauer, LJ, July 2009: www.linuxjournal.com/article/10488.

Mick Bauer (darth.elmo@wiremonkeys.org) is Network Security Architect for one of the US's largest banks. He is the author of the O'Reilly book Linux Server Security, 2nd edition (formerly called Building Secure Servers With Linux), an occasional presenter at information security conferences and composer of the “Network Engineering Polka”.


Taken From: Linux Journal Issue #184/August 2009