Sunday, October 11, 2015

Linux/Raspberry - Send Emails (SMTP Setup - Gmail)


SMTP Mail Setup

Many times you want to have the ability to send email from processes on your Raspberry Pi to email addresses out on the network. Adding email to your Raspberry Pi is pretty simple. You can use the following three packages for some simple mail capabilities.

It is assumed that you have networking working already...


Loading the packages

sudo apt-get install ssmtp
sudo apt-get install mailutils
sudo apt-get install mpack

Setting up the defaults for SSMTP

sudo nano /etc/ssmtp/ssmtp.conf

Now edit the fields:

AuthUser=youruserid@gmail.com
AuthPass=userpass
FromLineOverride=YES
mailhub=smtp.gmail.com:587
UseSTARTTLS=YES

Using Email Now

echo "sample text" | mail -s "Subject" username@domain.tld

Sending Attachments

mpack -s "test" /home/pi/test/somefile.ext username@domain.tld

Taken From:

Friday, October 9, 2015

How to Mount CD/DVDs Images - Windows, Mac, and Linux

Disc images have become more useful than ever on modern PCs that often lack CD and DVD drives. Create ISO files and other types of disc images and you can “mount” them, accessing the virtual discs as if they were physical discs inserted into your computer.

You can also use these image files to burn copies of the original discs later, creating duplicate copies. Disc image files contain a complete representation of a disc.


Windows

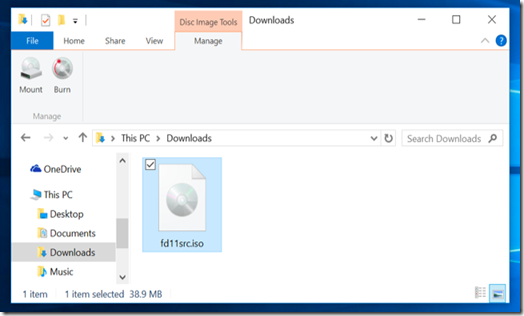
Windows 10 allows you to mount both .ISO and .IMG disc image files without any third-party software. Just double-click a .ISO or .IMG disc image you want to make available. If this doesn’t work, you should be able to click the “Disk Image Tools” tab on the ribbon and click “Mount.” It will appear under Computer as if it were inserted into a physical disc drive.

This feature was added back in Windows 8, so it will also work on Windows 8 and 8.1.

To unmount the disc later, right-click the virtual disc drive and select “Eject.” The disc will be unmounted and the virtual disc drive will disappear from the Computer window until you mount a disc in it again.
clip_image001

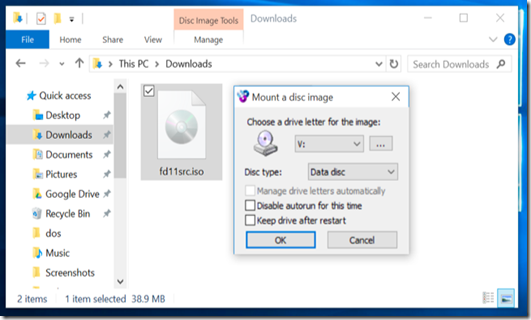
To mount ISO or IMG images on Windows 7 — or to mount images in other formats, such as BIN/CUE, NRG, MDS/MDF, or CCD — we recommend the free, open-source, and simple WinCDEmu utility.

Just right-click an image file after installing it, click “Select drive letter & mount,” and you can mount other types of images Windows doesn’t support.

Some other third-party utilities have additional support for emulating various copy-protection technologies, allowing copy-protected discs to function normally. However, such techniques are being phased out and aren’t even supported by modern versions of Windows.
clip_image002


Mac

On a Mac, double-clicking common disc image formats will mount them. This is why you can simply double-click a downloaded .DMG file to access its contents and install Mac applications, for example.

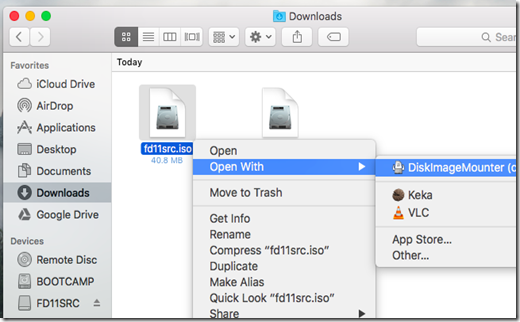
The DiskImageMounter application that handles this can also mount .ISO, .IMG, .CDR, and other types of image files. Just double-click the file to mount it. If this doesn’t work, Option-click or right-click a file, point to “Open With,” and select “DiskImageMounter.

When you’re done, just click the “Eject” button next to the mounted image in the Finder’s sidebar to eject it and unmount it — just like you’d unmount a .DMG image when you’re done with it.
clip_image003

You can also try mounting the disc image file by opening the Disk Utility application. Press Command+Space, type Disk Utility, and press Enter to open it. Click the “File” menu, select “Open Image,” and select the disc image you want to mount.

clip_image004


Linux

Ubuntu’s Unity desktop and GNOME include an “Archive Mounter” application that can mount ISO files and similar image files graphically. To use it, right-click an .ISO file or another type of disc image, point to Open With, and select “Disk Image Mounter.”

You can later unmount the image by clicking the eject icon next to the mounted image in the sidebar.

clip_image005

You can also mount an .ISO file or another disc image with a Linux terminal command. This is particularly useful if you’re just using the command line, or if you’re using a Linux desktop that doesn’t provide a tool to make this easy. (Of course, graphical tools for mounting ISO files and similar images may be available in your Linux distribution’s software repositories.)

To mount an ISO or IMG file on Linux, first open a Terminal window from your Linux desktop’s applications menu. First, type the following command to create the /mnt/image folder. You can create practically any folder you like — you just have to create a directory where you’ll mount the image. The contents of the disc image will be accessible at this location later.

sudo mkdir /mnt/image

Next, mount the image with the following command. Replace “/home/NAME/Downloads/image.iso” with the path to the ISO, IMG, or other type of disc image you want to mount.

sudo mount -o loop /home/NAME/Downloads/image.iso /mnt/image

To unmount the disc image later, just use the umount command:

sudo umount /mnt/image

clip_image006

Some guides recommend you add “-t iso9660” to the command. However, this isn’t actually helpful - it’s best to let the mount command automatically detect the required file system.

If you’re trying to mount a more obscure type of disc image format that the mount command can’t automatically detect and mount in this way, you may need commands or tools designed specifically for working with that type of image file format.

This should “just work” on most modern operating systems, allowing you to mount and use ISO images and other common types of image files in a few clicks. Windows 7 users will have the toughest time, as it isn’t integrated into that older version of Windows, but WinCDEmu is a lightweight and easy way to accomplish this.

Taken From:

Wednesday, September 30, 2015

Cisco - EEM Scripts Examples (TSHOOT)

EEM is a very useful tool to troubleshoot occasional, sporadic CPU spikes that are short-lived and difficult to troubleshoot manually with the command line interface. This is an example of CPU spikes:

Switch#show process cpu history
<snip>
    11111822511   11 111277711111 124111  11 1211111112161116
    143342171209994090111878458239607111981270283361362429475
100
90
80      *               ***
70      *               ***                                *
60      *               ***                            *   *
50      *  *            ***        *                   *   *
40      *  *            ***        *                   *   *
30      * **            ***        *                   *   *
20      ****           **** **   ***         **  *  ** ** **
10 *********************************************************
   0....5....1....1....2....2....3....3....4....4....5....5....6....6....7.
             0    5    0    5    0    5    0    5    0    5    0    5    0
                   CPU% per hour (last 72 hours)
                  * = maximum CPU%   # = average CPU%

This section includes several examples of the use of EEM scripts to monitor CPU utilization. Catalyst 2960 and 3750 switches allow EEM to use non-volatile RAM (NVRAM); Catalyst 4500 switches allow EEM to write to bootflash; and Catalyst 6500 switches allow EEM to use disk0 and sup-bootdisk.

Email Alerts

This script emails an alert when CPU utilization goes above 50 percent. The body of the email is the output of theshow process cpu sorted command.
event manager applet highcpu
  event snmp oid 1.3.6.1.4.1.9.9.109.1.1.1.1.3.1 get-type exact entry-op ge
entry-val 50 poll-interval 0.5
action 1.0 cli command "enable"
  action 2.0 cli command "show proc cpu sorted"
  action 3.0 mail server "192.168.1.1" to "user-to@domain.com" from "user-from@domain.com"
subject "High CPU Alert" body "$_cli_result"

The definitions of italicized variables are:

  • highcpu - name of the event manager applet/script
  • 1.3.6.1.4.1.9.9.109.1.1.1.1.3.1 - Object identifier (OID) for polling the total CPU utilization of the route processor (RP)
  • 50 - CPU utilization that triggers the script
    poll-interval 0.5 - Frequency (every 0.5 seconds) the script monitors the CPU
  • 192.169.1.1 - IP of the mail server

      Append Output to Local File

      This script appends required outputs to a file in the local file system. Replace file system with the appropriate file system on the switch.
      event manager scheduler script thread class default number 1 
      event manager applet High_CPU
      event snmp oid 1.3.6.1.4.1.9.9.109.1.1.1.1.3.1 get-type exact entry-op ge
      entry-val 50 poll-interval 0.5
      action 0.0 syslog msg "High CPU DETECTED. Please wait - logging Information
      to file system:high_cpu.txt"
      action 0.1 cli command "enable"
        action 0.2 cli command "show clock | append file system:high_cpu.txt"
        action 1.2 cli command "term length 0"
        action 1.3 cli command "show process cpu sorted | append file system:high_cpu.txt"
        action 1.4 cli command "show log | append file system:high_cpu.txt"
        action 1.5 cli command "show interfaces | append file system:high_cpu.txt"
        action 1.6 cli command "term length 24"

      Append Output to Local File and Remove Script

      This script appends the output of the show process cpu sorted command to a file in the local file system, then removes itself once completed. Replace file system with the appropriate file system on the switch.
      event manager scheduler script thread class default number 1 
      event manager applet High_CPU
      event snmp oid 1.3.6.1.4.1.9.9.109.1.1.1.1.3.1 get-type exact entry-op gt
      entry-val 50 poll-interval 0.5
      action 0.0 syslog msg "High CPU DETECTED. Please wait - logging Information
      to flash:high_cpu.txt"
        action 0.1 cli command "enable"
        action 0.2 cli command "term exec prompt timestamp"
        action 1.3 cli command "show process cpu sorted | append file system:high_cpu.txt"
        action 1.4 cli command "show process cpu sorted | append file system:high_cpu.txt"
        action 1.4 cli command "show process cpu sorted | append file system:high_cpu.txt"
        action 5.1 syslog msg "Finished logging information to file system:high_cpu.txt..."
        action 5.1 syslog msg "Self-removing applet from configuration..."
        action 5.2 cli command "term no exec prompt timestamp"
        action 9.1 cli command "configure terminal"
        action 9.2 cli command "no event manager applet High_CPU"
        action 9.3 cli command "end"

      Collect Output and Write to Local File

      This script uses a syslog-based trigger in order to run and collect required outputs and write those outputs to the local file system. Replace file system with the appropriate file system on the switch.
      process cpu threshold type total rising 70 interval 15 
      event manager applet DETECT_CPU
      event syslog pattern ".*SYS-1-CPURISINGTHRESHOLD.*"
      action 1 cli command "en"
      action 2 cli command "show clock | append file system:cpuinfo"
      action 3 cli command "show proc cpu sort | append file system:cpuinfo"
      action 4 cli command "show line | append file system:cpuinfo"

      Monitor CPU Utilization on Modular IOS

      The Cisco EEM can also be used to monitor CPU utilization on modular IOS. Because of the differences in how the CPU is monitored on modular IOS, you can use the Simple Network Management Protocol (SNMP) OID (1.3.6.1.4.1.9.9.109.1.1.1.1.3.1) in order to check CPU utilization by the IOS base process.

      This script uses the OID as a trigger and writes required outputs to the local file system. Replace file system with the appropriate file system on the switch.

      event manager scheduler script thread class default number 1
      event manager applet High_CPU
      event snmp oid 1.3.6.1.4.1.9.9.109.1.1.1.1.10.1  get-type exact entry-op ge
      entry-val 50 poll-interval 0.5
        action 0.0 syslog msg "High CPU DETECTED. Please wait - logging Information
      to file system:high_cpu.txt"
        action 0.1 cli command "enable"
        action 0.2 cli command "show clock | append file system:high_cpu.txt"
        action 1.2 cli command "term length 0"
        action 1.3 cli command "show process cpu sorted | append file system:high_cpu.txt"
        action 1.4 cli command "show log | append file system:high_cpu.txt"
        action 1.5 cli command "show interfaces | append file system:high_cpu.txt"
        action 1.6 cli command "term length 24"

      Remove Script

      Enter this command in order to remove an EEM script:
      Switch(config)#no event manager applet applet 
    • Based On: http://www.cisco.com/c/en/us/support/docs/switches/catalyst-6500-series-switches/116141-trouble-eem-scripts-00.html
      Contributed by Cisco Engineers: Shashank Singh and Saurav Lahiri