CONFIGURE WINDOWS 8 & 8.1 TO PROVIDE SECURE WIRELESS ACCESS POINT SERVICES TO WI-FI CLIENTS - TURN WINDOWS 8 INTO AN ACCESS POINT
POSTED IN WINDOWS 8 & WINDOWS 8.1
Windows 8 and Windows 8.1 (including Professional edition) operating systems provide the ability to turn your workstation or laptop into a secure wireless access point, allowing wireless clients (including mobile devices) to connect to the local network or Internet. This feature can save you time, money and frustration when there is need to connect wireless devices to the network or Internet but there is no access point available.
In addition, using the method described below, you can turn your Windows system into a portable 3G router by connecting your workstation to your 3G provider (using your USB HSUPA/GPRS stick).
Windows 7 users can visit our article Configuring Windows 7 To Provide Secure Wireless Access Point Services to Wi-Fi Clients - Turn Windows into an Access Point
To begin, open your Network Connections window by pressing Windows Key + R combination to bring up the Run window, and typencpa.cpl and click OK:
Figure 1. Run Command – Network Connections
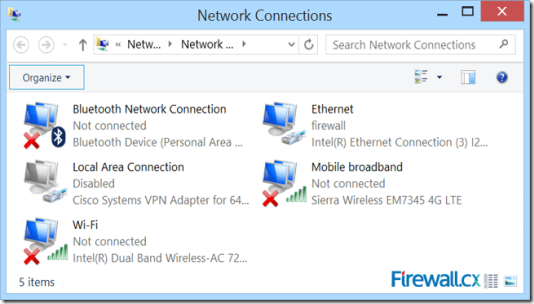
The Network Connection window will appear, displaying all network adapters the system current has installed:
Figure 2. Network Connections
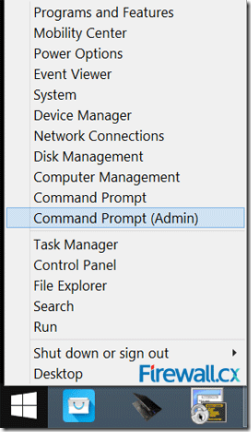
Let’s now create our new wireless virtual adapter that will be used as an access point for our wireless clients. To do this, open anelevated Command prompt (cmd) by right-clicking on the Window 8 start button located on the lower left corner of the desktop and select Command Prompt (Admin). If prompted by the User Account Control protection, simply click on Yes to proceed:
Figure 3. Opening an elevated Command Prompt
Once the command prompt is open, enter the following command to create the wireless network (SSID). The encryption used by default is WPA2-PSK/AES:
C:\windows\system32> netsh wlan set hostednetwork mode=allow ssid=Firewall.cx key=$connect$here
When the command is entered, the system will return the following information:
The hosted network mode has been set to allow.
The SSID of the hosted network has been successfully changed.
The user key passphrase of the hosted network has been successfully changed.
In our example, the Wi-Fi (SSID) is named Firewall.cx and has a password of $connect$here.
The system information above confirms the creation of the wireless network and creates our virtual adapter which will be visible in theNetwork Connection window after the virtual adapter is enabled with the following command:
C:\windows\system32> netsh wlan start hostednetwork
Again, the system will confirm the wireless network has started with the below message:
The hosted network started.
Looking at the Network Connection window we’ll find our new adapter labeled as Local Area Connection 4. Right under the adapter is the SSID name of the wireless network created by the previous command:
Figure 4. Network Connections – Our new adapter appears
At this point, our new wireless network (Firewall.cx) should be visible to all nearby wireless clients.
Next, we need to enable Internet sharing on the network adapter that has Internet access. In our case this is the Ethernet adapter. Users accessing the Internet via their mobile broadband adapter should select their broadband adapter instead.
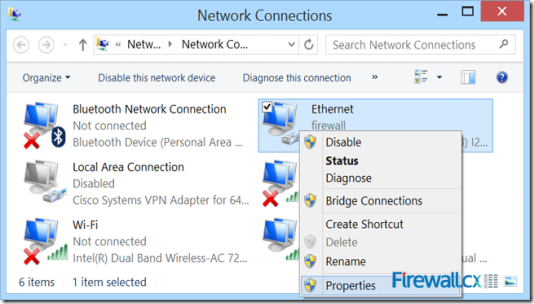
To enable Internet sharing, right-click on the Ethernet network adapter and select properties from the context menu, as shown below:
Figure 5. Network Connections – Ethernet Adapter Properties
Once the Ethernet adapter properties window appears, select the Sharing tab and tick the Allow other network users to connect through this computer’s Internet connection then select the newly created virtual adapter labelled Local Area Connection 4:
Figure 6. Enabling sharing and selecting the newly created virtual adapter
Be sure to untick the second option below (not clearly visible in above screenshot): Allow other network users to control or disable the shared Internet connection, then click on OK.
Notice our Ethernet adapter now has the word Shared in its description field:
Figure 7. Our Ethernet adapter now appears to be shared
At this point, clients that have successfully connected to our wireless SSID Firewall.cx should have Internet access.
Note that in some cases, it might be required to perform a quick restart of the operating system before wireless clients have Internet access. Remember that in case of a system restart, it is necessary to enter all command prompt commands again.
The command below will help verify the wireless clients connected to our Windows 8 access point:
C:\windows\system32> netsh wlan show hostednetwork
Figure 8. Information on our Windows 8 access point
As shown above, we have one wireless client connected to our Windows 8 access point. Windows 8 will support up to 100 wireless clients, even though that number is extremely likely to ever be reached.
This article showed how to turn your Windows 8 & Windows 8.1 operating system into a wireless access point, allowing wireless clients to connect to the Internet or Local LAN.
Taken From: http://www.firewall.cx/microsoft-knowledgebase/windows-8/1087-windows-8-secure-access-point.html


2 comments:
great post , thank u for your blog visit us fiber optic solutions in dubai
Fiber optic network cabling
THANKS FOR SHARING SUCH A GREAT WORK
GOOD CONTENT!!
structured cabling service
Post a Comment