Sunday, December 10, 2017

Raspberry Pi/Linux - Installing Webmin

Today I’m going to show you how to install webmin on you Raspberry Pi or other linux machines. I tested this on a Raspberry Pi.


On The Cli

On the CLI of the machine you want to install Webmin, just do.

sudo apt-get install perl libnet-ssleay-perl openssl libauthen-pam-perl libpam-runtime libio-pty-perl apt-show-versions python

wget https://downloads.sourceforge.net/project/webadmin/webmin/1.870/webmin_1.870_all.deb

sudo dpkg -i webmin_1.870_all.deb

now Webmin should be installed and running.


On a Browser

Let’s access Webmin, just swap the 192.168.10.20 IP with the IP where you installed webmin, and access it on the browser like this:

https://192.168.10.20:10000

and login to webmin:

image

the user and pasword are you machines’s local linux users and passwords.

Now you start managing you linux from a Gui :)

image

My main goal personally was to have a Gui to manage DNS (Bind), which becomes quite easy with webmin.:

image

Tuesday, November 7, 2017

Linux SSH - Automation with Send & Expect Scripts

By Ken Hess

Expect is a natural and intuitive automation scripting language that operates in much the same way humans do when interacting with a system. You type in commands and expect a certain response to your command. When you receive the expected response, you enter another command and so on. Expect works in the same way, except you have to provide the script with commands and expected responses to those commands. Basically, you have to script out the entire two-way “conversation.”


You can think of an Expect script as a dialog script written for two actors: a sender and a receiver. One of the more popular activities to automate is an SSH session between two hosts, in which one host is the sender (local host) and the other is the receiver (remote host). Being able to emulate every keystroke and create a true interactive session between two systems via a script is an exciting proposition.


Expect Setup

Most Linux distributions include Expect as part of the available and installable software packages. In other words, you won’t have to download and install from source code. Use your system’s package manager to download and install Expect and any required dependencies or associated packages. For example:


$ sudo yum install expect
or
$ sudo apt-get install expect


Once you have Expect installed, you can begin writing scripts.


Creating an Interactive SSH Session

As stated previously, you must provide both sides of the conversation in your script because you’re setting up an interactive system. Look at a few essential items before diving right into a script.


To make an Expect script executable as a standalone program, you must do two things: Make the script executable, and supply the path to the script for expect . The path on my system is: /usr/bin/expect ; therefore, enter that path on the first line of your script with a preceding “shebang” (#! ):

#!/usr/bin/expect -f

The -f switch tells Expect that it is reading commands from a file.


The spawn command spawns or launches an external command for you. In this case, ssh to a remote host (aspen ):

spawn ssh aspen

Change the host aspen to your remote host. When you SSH to a remote system, you’re prompted for a password. This password prompt is what you “expect” from the remote system; therefore, you enter that expected response:

expect "password: "

From the local side, you have to enter your password at the password prompt. To send anything to the remote system, it must be included in double quotes and must include a hard return (\r ). Change PASSWORD to your password:

send "PASSWORD\r"

Again, you have to enter the expected response from the remote system, which in this case is a user prompt ($ ).

expect "$ "

Now that you’re logged in to the remote system, you can begin your interactive session on that remote host. The following send command issues the ps -ef |grep apache command:

send "ps -ef |grep apache\r"

Output will appear as STDOUT. After the command has executed, you’re returned to a prompt, so tell the Expect script that bit of information:

expect "$ "

Finally, send the exit command to the remote system to log out. Don’t forget that hard return (\r ):

send "exit\r"

The script in its entirety looks as follows:

#!/usr/bin/expect -f
spawn ssh aspen
expect "password: "
send "PASSWORD\r"
expect "$ "
send "ps -ef |grep apache\r"
expect "$ "
send "exit\r"

Change permissions on the script so that it is executable; for example,

$ chmod 755 script.sh

and try it for yourself.


Expect Caveats

If your script hangs and doesn’t continue, try the command manually yourself and look for the response. If the remote system drops you to a prompt as its final act, then place that in your script (e.g., expect "$ " ). Be sure you have entered the hard return (\r ) inside the closing quotation mark in your send line. You might also find that your system needs two backslashes on the send line for a hard return (\r ).


Sometimes Expect scripts execute too fast, and you won’t see your expected response. If that happens, place a sleep command and a number of seconds for the command preceeding it to wait for a response, or your data might be ignored.
For example, if you connect to a remote system and there’s a delay in creating that connection, your script will continue to execute and fail because it sends commands before the remote system has time to respond.


You have to think about network delays, shell responses and system timing when scripting in Expect. Like any scripting language, Expect has its quirks, but you’ll find that it’s an easy way to automate those repetitious keystrokes and procedures. The time you spend debugging your scripts is well worth the effort.


Autoexpect

Of course, some lazy system administrators take lazy to a higher level and even cheat at writing Expect scripts by invoking a shell “watcher” or recorder script named Autoexpect. Once invoked, Autoexpect watches your every keystroke and records it to a file named, script.exp by default. You’ll almost certainly have to edit and prune this script to achieve your desired results; however, it can save hours of script debugging to have an almost complete script from which to work.


If you simply run a freshly created Autoexpect script, it will likely fail because, if you issued a command that answers your request by displaying information to the screen, the script picks up that answer, too, and copies it into the script file.
For example, if during your Autoexpect session, you type, ls , the result of that command appears in your script.exp file as well. After you’ve created a few Expect scripts by hand, you’ll appreciate the cleanup editing you have to do in an Autoexpect-created script.
To install Autoexpect, issue a command like:

$ sudo apt-get install expect-dev

You’ll likely require many more dependencies for this feature, so prepare yourself for a slight delay while everything installs.


Creating an Interactive SSH Session with Autoexpect

After installing Autoexpect and all of its required packages, you’re ready to create Expect scripts automatically by stepping through the procedures you want to automate. Using the above example, SSH to a remote system and run a

ps -ef |grep apache

command and then log out.
Invoking Autoexpect is easy:

$ Autoexpect

Autoexpect started, file is script.exp
$

Although it looks as if nothing has happened or is happening, every keystroke you type will be recorded into script.exp . Every STDOUT response you receive will also be copied into that same file. Your entire session is recorded – but not just recorded, it is also formatted in Expect script style. To stop recording keystrokes to your script, press Ctrl+D on your keyboard to stop Autoexpect and copy the buffer to your file.


The complete transcription of this simple procedure is very long and includes a lot of commentary from the author, Don Libes:

#!/usr/bin/expect -f
#
# This Expect script was generated by Autoexpect on Thu Oct 11 15:53:18 2012
# Expect and Autoexpect were both written by Don Libes, NIST.
#
# Note that Autoexpect does not guarantee a working script.  It
# necessarily has to guess about certain things.  Two reasons a script
# might fail are:
#
# 1) timing - A surprising number of programs (rn, ksh, zsh, telnet,
# etc.) and devices discard or ignore keystrokes that arrive "too
# quickly" after prompts.  If you find your new script hanging up at
# one spot, try adding a short sleep just before the previous send.
# Setting "force_conservative" to 1 (see below) makes Expect do this
# automatically - pausing briefly before sending each character.  This
# pacifies every program I know of.  The -c flag makes the script do
# this in the first place.  The -C flag allows you to define a
# character to toggle this mode off and on.

set force_conservative 0  ;# set to 1 to force conservative mode even if
                           ;# script wasn’t run conservatively originally
if {$force_conservative} {
         set send_slow {1 .1}
         proc send {ignore arg} {
                 sleep .1
                 exp_send -s -- $arg
         }
}

#
# 2) differing output - Some programs produce different output each time
# they run.  The "date" command is an obvious example.  Another is
# ftp, if it produces throughput statistics at the end of a file
# transfer.  If this causes a problem, delete these patterns or replace
# them with wildcards.  An alternative is to use the -p flag (for
# "prompt") which makes Expect only look for the last line of output
# (i.e., the prompt).  The -P flag allows you to define a character to
# toggle this mode off and on.
#
# Read the man page for more info.
#
# -Don

set timeout -1
spawn $env(SHELL)
match_max 100000
expect -exact "]0;khess@trapper: ~khess@trapper:~\$ "
send -- "ssh aspen\r"
expect -exact "ssh aspen\r
khess@aspen’s password: "
send -- "PASSWORD\r"
expect -exact "\r
Linux aspen 2.6.32-43-server #97-Ubuntu SMP Wed Sep 5 16:56:41 UTC 2012 x86_64 GNU/Linux\r
Ubuntu 10.04.4 LTS\r
\r
Welcome to the Ubuntu Server!\r
  * Documentation: 
http://www.ubuntu.com/server/doc\r
\r
   System information as of Thu Oct 11 15:55:28 CDT 2012\r
\r
   System load:  1.09               Temperature:         40 C\r
   Usage of /:   1.0% of 454.22GB   Processes:           168\r
   Memory usage: 22%                Users logged in:     1\r
   Swap usage:   0%                 IP address for eth0: 192.168.1.250\r
\r
   Graph this data and manage this system at
https://landscape.canonical.com/\r
\r
7 packages can be updated.\r
7 updates are security updates.\r
\r
New release ‘precise’ available.\r
Run ‘do-release-upgrade’ to upgrade to it.\r
\r
*** System restart required ***\r
Last login: Thu Oct 11 15:53:41 2012 from trapper\r\r
]0;khess@aspen: ~khess@aspen:~\$ "
send -- "ps -ef|grep apache\r"
expect -exact "ps -ef|grep apache\r
www-data   555 23171  0 Oct07 ?        00:00:00 /usr/sbin/apache2 -k start\r
www-data   556 23171  0 Oct07 ?        00:00:00 /usr/sbin/apache2 -k start\r
www-data   557 23171  0 Oct07 ?        00:00:00 /usr/sbin/apache2 -k start\r
www-data   558 23171  0 Oct07 ?        00:00:00 /usr/sbin/apache2 -k start\r
www-data   559 23171  0 Oct07 ?        00:00:00 /usr/sbin/apache2 -k start\r
khess    21504 21433  0 15:55 pts/1    00:00:00 grep apache\r
root     23171     1  0 Sep27 ?        00:00:28 /usr/sbin/apache2 -k start\r
]0;khess@aspen: ~khess@aspen:~\$ "
send -- "exit\r"
expect -exact "exit\r
logout\r
Connection to aspen closed.\r\r
]0;khess@trapper: ~khess@trapper:~\$ "
send -- "^D"
expect eof
khess@trapper:~$
You can see that you have a lot of cleanup to do before you distill this transcript down to its essential parts. Autoexpect also changes permissions on the script.exp file so that it is executable.
The parts you needed for this script to execute correctly are shown below in my cleaned up version.
#!/usr/bin/expect -f

set force_conservative 0  ;# set to 1 to force conservative mode even if
                           ;# script wasn’t run conservatively originally
if {$force_conservative} {
         set send_slow {1 .1}
         proc send {ignore arg} {
                 sleep .1
                 exp_send -s -- $arg
         }
}

set timeout -1
spawn $env(SHELL)
match_max 100000
expect -exact "$ "
send -- "ssh aspen\r"
expect -exact "password: "
send -- "PASSWORD\r"
expect -exact "$ "
send -- "ps -ef|grep apache\r"
expect -exact "$ "
send -- "exit\r"
expect -exact "$ "


You can see that the complex prompts, such as

expect -exact "exit\r
logout\r
Connection to aspen closed.\r\r
]0;khess@trapper: ~khess@trapper:~\$ "

have been shortened significantly to:

expect -exact "$ "

The prompt still works because Expect looks for the last few characters in an expect line and not the entire string. You could shorten the line that expects the password prompt from:

expect -exact "password: "
to
expect -exact ": "

A word of caution against shortening your expect lines too much – it makes the script more difficult, not easier, to read and interpret in the future when you try to figure out what’s going on.

You might not realize that ": " is a password prompt. Unless you’re great at including comments in your scripts, you might spend hours debugging this shortened version.


Summary

To be perfectly honest, I only use Autoexpect when building an Expect draft script. To sit down and attempt writing Expect line-by-line just isn’t appealing after being seduced and ruined by the ease of removing unwanted lines from an Autoexpect-created script. Autoexpect makes using Expect fun and more intuitive by letting you perform a procedure one time instead of many. After discovering and using Autoexpect, my Expect scripting creation time and debug time has been cut by at least two-thirds. I suspect you’ll have much the same return on your time as well.


Taken From: http://www.admin-magazine.com/Articles/Automating-with-Expect-Scripts
Monday, September 11, 2017

Raspberry - Remote Desktop via The Cloud (Real VNC)


Login via SSH

On your PC access the SD card with Raspbian installed:

image

create a file named ssh with no content:

image

this will signal the Raspberry Pi to start the SSH server.

Put the SD card on the raspberry and start it.


Start VNC Server

Now on the cli via SSH:

sudo raspi-config


### ADJUST RESOLUTION ###

7 Advanced Options

A5 Resolution

DTM Mode 16 1024x768 60 Hz 4:3


### ENABLE REAL VNC SERVER ###

Interfacing Options

P3 VNC –Yes  (ENTER TO ENABLE)
    
  Now it will install a bunch of packages


Install the Real VNC Client on a PC

Get the Real VNC Server here:

https://www.realvnc.com/en/connect/download/viewer/

image


Access the Raspberry Pi via VNC

Get the Raspberry PI IP from you router or by connecting a HDMI screen to it:

image

authenticate using a local user and password (the default is: pi / raspberry)

image


image


Creating a Cloud Account

image

image

if it does not open a browser, click on this link:

https://www.realvnc.com/en/raspberrypi/#sign-up

now create an account, and login into to the above window.

image

hit next and you are done.

You can have up to 5 devices with this free account.


Logging in to the Cloud

Now logging in the window above with the created account:

image

and it will show all your devices. Now you can just click on a device and with no port forwarding it will access it via the Real VNC Cloud:

image

Thursday, August 3, 2017

IoT / Arduino - USB ESP8266 Programmer (CH340G Chip)


I recently bought this ESP8266 WiFi module (ie ESP-01) for my IOT project. This is a self contained chip and can be programmed to do the respective tasks. To ease out the task of programming, I bought this ESP-01 ESP8266 Programmer CH340G Chip USB WiFi Wireless UART GPIO0 Adapter.

Please read my tutorial series on IOT.

clip_image001

So lets get started !


Installing Drivers - Part 1

1.  This Programmer Adapter is build around CH340 chip which usually needs to install the following drivers on a computer.

  • Unzip the folder.
  • If you are running a 64Bit Windows: – run the SETUP_64.EXE installer.
  • If you are running a 32Bit Windows: – run the SETUP_32.EXE installer.

2. Connect the ESP-01 (as shown) to the programmer and plug it into the USB.

clip_image002

3. Install the Drivers

clip_image003

After restarting the PC, the device will be ready to go.


Setting Arduino Software - Part 2

1. Download the latest arduino Software.

2. We need to Install ESP board in Arduino Software

Open up Arduino, then go to the Preferences (File > Preferences).

Then, towards the bottom of the window, copy this URL into the “Additional Board Manager URLs” text box:

clip_image004

3.  Hit OK. Then navigate to the Board Manager by going to Tools > Boards > Boards Manager. There should be a couple new entries in addition to the standard Arduino boards. Look for esp8266. Click on that entry, then select Install.

clip_image005

4. The board definitions and tools for the ESP8266 include a whole new set of gcc, g++, and other reasonably large, compiled binaries, so it may take a few minutes to download and install (the archived file is ~170MB). Once the installation has completed, an Arduino-blue “INSTALLED” will appear next to the entry

5. Select the Generic ESP 8266 Module Board.

clip_image006

6. Set the Upload Speed and CPU Frequency.

clip_image007

clip_image008

7. Select the device port. (Device should be connected to the PC)

clip_image009

8. To test the ESP8266, open up serial monitor (Ctrl + Shift + M)

clip_image010

9. Set baud rate to : 115200 baud
    and Both NL & CR
    with AutoScroll

10. Type AT command in the serial monitor and click enter. If you see an OK message, you are good to go.

11. You can find the complete set of AT commands here.


Bonus :

Out of them, here are my noted ones.

AT                      // Test if AT system works correctly

AT+GMR           //Print firmware version

AT+CWMOD=3   //Wifi Mode
- 1 = Station mode (client)
- 2 = AP mode (host)
- 3 = AP + Station mode (Yes, ESP8266 has a dual mode!)

AT+CWLAP       // List of all available wifi 

ATE1  / ATE0       // Enable or Disable echo

AT+CWJAP=”my-test-wifi”,”1234test”    // Connect to a wifi

AT+CWQAP         //Disconnect from the wifi


Caution :

  • The ESP8266 chip requires 3.3V power supply voltage. It should not be powered with 5 volts like other arduino boards.
  • The I/O pins of ESP8266 communicate or input/output max 3.3V only. i.e. the pins are NOT 5V tolerant inputs.

Taken From: http://www.arjunsk.com/iot/iot-using-esp8266-programmer-ch340g-chip-adapter/

Tuesday, April 18, 2017

Windows - Streaming to TVs (via DLNA)

Here I’ going to show you how to stream media (in this the example is video but it should be similar to other media)  and share files with a Smart TV.

Smart TVs support a standard protocol called DLNA that allows you to stream video and share files to stream, among other things. Normally TV brands give it another name like AllShare (Samsung).

Windows Media Player and Windows itself support DLNA, wich is very usefull in order to display you media in you TV.


Enable Streaming

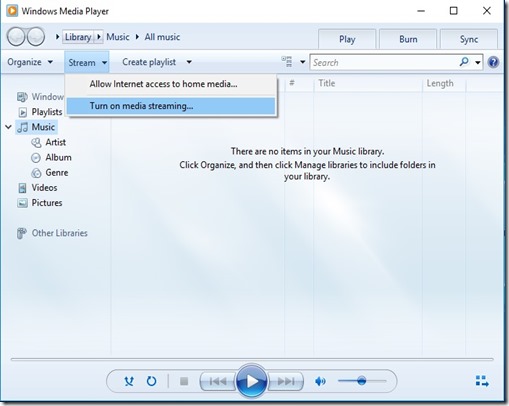
The DLNA streaming on Windows is off by default, so we need to enable it, the easiest is from Windows Media Player, just go to: 

01

Turn on you TV and wait a bit (20s) after click on “Turn on media streaming”:

02

now just click OK (check that you TV is on the list and is allowed), additionally you can change you media library name and disallow devices in your network:

03.00

later on if you want to comeback to this menu to Allow or Disallow a device you can just go to Windows Media Player again:

MEDIA P

An alternative to get to this menu without Windows Media Player is just to go to the Start Windows icone and type “Media streaming options”, and click on the icon with that name:

image


Stream From the PC to the TV

First put your files here:

image

now this video will be available on the Videos section in Windows Media Player, you can select it and cast the video to your TV.

The first time you do this a popup will show on your TV asking if you allow the PC to stream, just select OK, the next time the streaming will automatically.

03.01

when the streaming starts, it will show you the controlls and the progress bar:

03.02

and you should be seeing the video on you TV Smile.

The inconvenience with this is that you have to go to you PC to start the video and maintain the player window open (in the next topic we are going to see how to start videos from the TV).

By default TV you only have the pause control over the video, but you can enable all the controls (Back, Forward, Previous Video, Next Video) with this option:

image


Start Videos From The TV (or another PC)

At this point if you already can stream from the PC to the TV, what you don’t know is that when you enabled streaming in the above section you are also started sharing the files in the Video library (by default only the Video folder) on your PC via DLNA.

Now on the TV you can get the the Videos library’s folders that your PC is sharing.

image

In my TV (Samsung Smart TV) you can find the PC by pressing on the  “Sources” in the TV remote.

As you can see bellow your PC is represented by a media icon, which has you PC name plus the library name you gave when you enabled streaming.

ICONfor other brands it should be similar, but check you TV’s Manual.

When you click the icon you get something like this:

PHOTO_20170425_082017

DLNA categorizes and organizes your media which is normally quite confusing.

The easiest way is to go into the right category in this case Videos, and then select “Folders” that shows you the actual folders that you shared instead of some confusing DLNA organization.

PHOTO_20170425_082039

if you want more folders to show on the TV you can just add them to the library, like this:

05

as you can see on the TV you have de default Video folder and the My Movies folder that we have just added to the Videos library.

image

if you just want to watch the videos in another Windows PC instead of you TV (ex: your Laptop), on that PC you just need to go to “Network”:

image

click on the media device icon, which will open Windows Media Player with the remote library already added to it:

image

and push play


Hope this was helpful !!!!!!! Smile

Saturday, February 11, 2017

Linux/Raspberry - Web SSH Shell (No client needed)

You probably access you linux machines via SSH using a client like Putty.

With Shell In A Box, you get the same SSH access but without any client, you just use a browser that shows you the the SSH connection via HTTPS.

This might be usefull in some scenario, so I’m going to show you how to set up it bellow.

To install just type:

sudo apt-get install shellinabox

and that’s it once it finished installing, Shell In A Box is running, just go to you browser and enter this

https://<Machine_IP>:4200/

and you should get this

image

now just login and that’s it.

If you want to change something (ex: the 4200 port) you just edit this file:

nano /etc/default/shellinabox

FILE: shellinabox
----------------------------

# Should shellinaboxd start automatically
SHELLINABOX_DAEMON_START=1

# TCP port that shellinboxd's webserver listens on
SHELLINABOX_PORT=4200

# Parameters that are managed by the system and usually should not need
# changing:
# SHELLINABOX_DATADIR=/var/lib/shellinabox
# SHELLINABOX_USER=shellinabox
# SHELLINABOX_GROUP=shellinabox

# Any optional arguments (e.g. extra service definitions).  Make sure
# that that argument is quoted.
#
#   Beeps are disabled because of reports of the VLC plugin crashing
#   Firefox on Linux/x86_64.
SHELLINABOX_ARGS="--no-beep"

and do

 sudo service shellinabox restart

to load the new configuration.

Monday, February 6, 2017

Docker - Running Applications on Docker Containers

Docker is a “container” platform, which allows applications to be run in their own sandboxed world. These applications share resources, e.g. things like hard drive space or RAM, but otherwise can’t interfere with programs running on the host system. For corporate servers this means an attacker may not be able to use a compromised web server to get at the database holding customer data.

For the desktop user, it means the bleeding-edge app you’re trying out can’t accidentally delete all your cat’s selfies.


Pros and Cons of Using Docker

There are several good reasons to try out new programs via Docker, including the following:

  • They are safely isolated from your system, without the means to do damage in most cases.
  • Docker containers have a mechanism to keep them up-to-date, meaning it’s easy to make sure you have the latest and greatest versions.
  • You’re not installing anything on your “real” system, so you won’t run into conflicts with your “regular” versions on the application. You could, for example, run LibreOffice on your host system, but run OpenOffice in a container (you know, in case you don’t believe the project is shutting down).
  • Speaking of versions, you can even have multiple (but different) copies of the same version running on your machine at once. Try that with Word 2016!
  • Some Docker apps run their own minimized version of Linux. This means even if the app isn’t normally compatible with Mac or Windows it may still work for you within a Docker container. Try them out before you switch to Linux full time.
  • They’re easy to clean up. Don’t like the way things turned out? Just trash the container and create a new one.

On the other hand, there are some caveats to using applications this way:

  • As they operate in their own little world, they don’t have access to your files unless you give it to them. That means if you want to try the brand new version of LibreOffice via Docker, you may need to do some additional work to make your files accessible.
  • In general, Docker apps ship with everything they need to run, which often includes libraries that could be re-used with other programs. Some even ship with a full operating system behind them. So you may be doubling up on disk space usage.
  • They don’t provide convenient icons and other desktop-centric niceties. While we’ll show you a GUI you can use to download and run these Docker containers, they won’t show up in your main application launcher unless you create an entry by hand.
  • Like many things open source, it’s members of the community who have been creating these Docker applications from their upstream releases. This means your access to the latest version and/or any bugfixes is at the mercy of these peoples’ free time.


Installation and Usage

Getting things up and running involves three preliminary steps:

  1. First, get Docker installed and running on your system (including a graphical interface for it, if you want one).
  2. Next, find and download an image for the application you want to run. While you normally install an application, you get one (and only one) copy of it. Think of an image as a template for the application — you can create as many installs from this template as you like.
  3. Lastly, create one of those copies, called a container, and run it.

Let’s look at each of these in detail.


Installation

Most Linux distribution have Docker available in repositories for easy installation. In Ubuntu, the following command will get you what you need:

sudo apt-get install docker.io

You can confirm the system is running by confirming the “dockerd” daemon is running (you do know how to use ps, grep, and pipes, don’t you?): An A-Z of Linux - 40 Essential Commands You Should Know An A-Z of Linux - 40 Essential Commands You Should Know Linux is the oft-ignored third wheel to Windows and Mac. Yes, over the past decade, the open source operating system has gained a lot of traction, but it’s still a far cry from being considered... Read More

ps ax | grep dockerd

The Docker daemon will start up with your system automatically by default, but you can set that differently if you know how to adjust your systemd settings.

If you’re interested, you can also grab the Simple Docker UI Chrome app. Follow the instructions here to get things set up so you can connect to the Docker daemon on your machine.

clip_image001

Note: If you use Simple Docker UI, make sure you add yourself to the “docker” user group as described here. If you’re not part of this group, you won’t be able to use Docker commands from your normal (non-root) user account, the one with which you’ll be running Chrome and its apps, without using sudo all the time.


Finding and Installing Desktop Applications With Docker

Now that you’ve got a nice UI going, it’s time to find something to install. Your first stop should be the Hub, a repository of applications hosted by the docker project. Another straightforward way to find some interesting applications is to Google for them. In either case look for a “Launch Command” along the lines of the following:

docker run -it -v someoptions \

-e more options \

yet even more options...

Paste this into a terminal and it will download and launch the application for you.

You can also “pull” the application, then launch it yourself. If you’re using the Simple UI app, it can search Docker Hub automatically for your keyword.

clip_image002

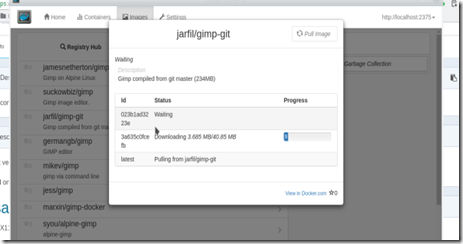
Once you’ve found what you’re looking for, click its listing, then the Pull Image button in the pop-up dialog to download the image of the application.

clip_image003

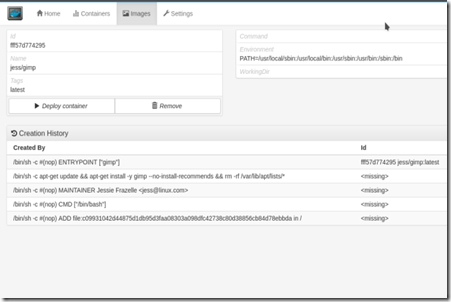
Remember, an image is a “template” of sorts. Next you’ll need to create a container that uses your new image. Switch over to the Images tab. Clicking the Deploy Container button will create a new, runnable copy of your application.

clip_image004


Running Your New Docker Container

From the command line, you can view a list of all your docker containers with the command:

docker ps -a

clip_image005

This lists the containers with some of their stats — note the “NAMES” column to the far right. To restart one of your containers, pick the name of the container you want and issue the following:

docker start [containername]

Using the app, go the “Containers” screen, select the container you want, and click the “Start” button in the upper left of the screen. Your application will start in a new window on your desktop, just like a “normal” application.

clip_image006

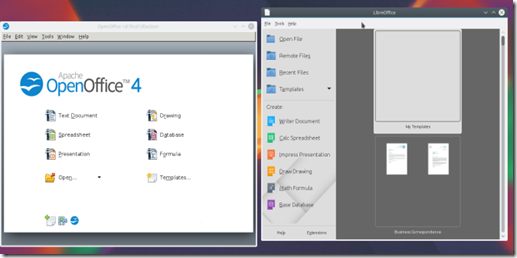
Your application should open in a new window, just as if you had installed it normally. But remember, it exists in isolation from your other applications. This allows you to do some neat things, like run LibreOffice and OpenOffice in parallel (their dependencies usually conflict with one another):

clip_image007


Try Docker-ized Apps for Fun and Profit

Docker provides an easy way to get an app up and running so you can try it out, and an equally easy way to clean it from your system. Once you get through the initial set-up of Docker, a single run command is often all you need to download an image, create a container from it, and launch it on your desktop.


Taken From: http://www.makeuseof.com/tag/safely-test-desktop-applications-secure-container-docker/