Here I’ going to show you how to stream media (in this the example is video but it should be similar to other media) and share files with a Smart TV.
Smart TVs support a standard protocol called DLNA that allows you to stream video and share files to stream, among other things. Normally TV brands give it another name like AllShare (Samsung).
Windows Media Player and Windows itself support DLNA, wich is very usefull in order to display you media in you TV.
Enable Streaming
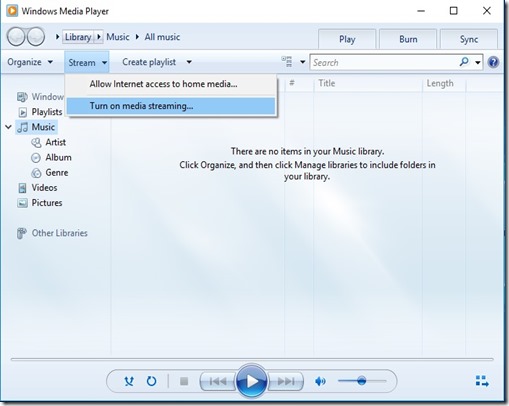
The DLNA streaming on Windows is off by default, so we need to enable it, the easiest is from Windows Media Player, just go to:
Turn on you TV and wait a bit (20s) after click on “Turn on media streaming”:
now just click OK (check that you TV is on the list and is allowed), additionally you can change you media library name and disallow devices in your network:
later on if you want to comeback to this menu to Allow or Disallow a device you can just go to Windows Media Player again:
An alternative to get to this menu without Windows Media Player is just to go to the Start Windows icone and type “Media streaming options”, and click on the icon with that name:
Stream From the PC to the TV
First put your files here:
now this video will be available on the Videos section in Windows Media Player, you can select it and cast the video to your TV.
The first time you do this a popup will show on your TV asking if you allow the PC to stream, just select OK, the next time the streaming will automatically.
when the streaming starts, it will show you the controlls and the progress bar:
and you should be seeing the video on you TV .
The inconvenience with this is that you have to go to you PC to start the video and maintain the player window open (in the next topic we are going to see how to start videos from the TV).
By default TV you only have the pause control over the video, but you can enable all the controls (Back, Forward, Previous Video, Next Video) with this option:
Start Videos From The TV (or another PC)
At this point if you already can stream from the PC to the TV, what you don’t know is that when you enabled streaming in the above section you are also started sharing the files in the Video library (by default only the Video folder) on your PC via DLNA.
Now on the TV you can get the the Videos library’s folders that your PC is sharing.
In my TV (Samsung Smart TV) you can find the PC by pressing on the “Sources” in the TV remote.
As you can see bellow your PC is represented by a media icon, which has you PC name plus the library name you gave when you enabled streaming.
![]() for other brands it should be similar, but check you TV’s Manual.
for other brands it should be similar, but check you TV’s Manual.
When you click the icon you get something like this:
DLNA categorizes and organizes your media which is normally quite confusing.
The easiest way is to go into the right category in this case Videos, and then select “Folders” that shows you the actual folders that you shared instead of some confusing DLNA organization.
if you want more folders to show on the TV you can just add them to the library, like this:
as you can see on the TV you have de default Video folder and the My Movies folder that we have just added to the Videos library.
if you just want to watch the videos in another Windows PC instead of you TV (ex: your Laptop), on that PC you just need to go to “Network”:
click on the media device icon, which will open Windows Media Player with the remote library already added to it:
and push play
Hope this was helpful !!!!!!!


2 comments:
great post , thank u for your blog visit us fiber optic solutions in dubai
Fiber optic network cabling
great post , thank u for your blog visit us fiber optic solutions in dubai
Fiber optic network cabling
Post a Comment