Showing posts with label linux. Show all posts

Tuesday, May 5, 2015

Cisco / Linux - Decapsulating Cisco ERSPAN With Linux

Decapsulation ERSPAN Traffic With Open Source Tools

Posted on May 3, 2015 by Radovan Brezula

Cisco Encapsulated Remote SPAN (ERSPAN) feature allows to monitor traffic on one or more ports and send the monitored traffic to one or more destination ports.  Traffic is encapsulated into GRE tunnel and routed via network to ERSPAN destination. Any device that supports ERSPAN can be used as ERSPAN destination. It might be another Cisco device or Linux with installed software that can decapsulate GRE traffic.

The goal of this article is to show methods and tools for decapsulation of  ERSPAN traffic. For this purpose I have built simple lab that consists of a Cisco CSR 1000v router and two Linux boxes. Core Linux represents a network host and generates network traffic (ICMP) that is going to be monitored. It is connected to the port GigabitEthernet1 of the Cisco router. The router is configured to monitor traffic on the port Gi1 and it sends traffic encapsulated in GRE tunneling protocol to IP address 10.230.10.1. It is the IP address of the ERSPAN destination configured on Linux  Security Union. Security Onion is a unique Linux distro for intrusion detection, network security monitoring, and log management based on Ubuntu however any other Linux distro can be used.

clip_image001

Picture 1 - ERSPAN Lab Topology

Below is an example of ERSPAN configuration on the CSR 1000v router. This is the source ERSPAN type and with configured rspan_id 1. The interface Gi1 is being monitored and the GRE traffic is sent to ERSPAN destination address IP 10.230.10.1.

CSR1000v# show running-config | b monitor
monitor session 1 type erspan-source
description ERSPAN to 10.230.10.1
source interface Gi1
destination
erspan-id 1
mtu 1464
ip address 10.230.10.1
origin ip address 10.230.10.2

Capturing ERSPAN Traffic with Wireshark

We are going to capture and analyze ERSPAN traffic with Wireshark packet sniffer. First configure IP address 10.230.10.1 on interface eth1 of the Linux Security Onion.

janosik@onion:~$ sudo su
root@onion# ip address add 10.230.10.1/24 dev eth1

Now use Wireshark to capture GRE traffic on Security Onion on its interface eth1 and ping the router IP address 192.168.1.2 from the Linux Core host (IP 192.168.1.1). If the source ERSPAN is properly configured on router, packets from the subnet 192.168.1.0/24 should appear in Wireshark output.

A closer look at the picture below reveals that the original packet ICMP packet (MAC header, IPv4 header and ICMP header) is now encapsulated as following.

MAC header + IPv4 header (10.230.10.2, 10.230.10.1) + GRE header (Protocol type ERSPAN) + ERPAN header + (original packet)

clip_image002

Picture 2 - Encapsulated GRE Traffic Captured on Interface Eth1

An original ICMP packet is encapsulated into GRE tunnel and the new outer MAC and IPv4 + GRE + ERSPAN headers are added to original packets. It allows encapsulated traffic to be forwarded through network to ERSPAN destination. However if we want software application such as IPS/IDS to analyze encapsulated packets, the outer L2 and L3 headers must be striped from packet. This can be done with tools such as RCDCAP  which dissects packets from GRE tunnel.


Configuring GRE tunnel on ERSPAN Destination Device

If for some reason we do not want to install special software that dissects packets from GRE tunnel we can configure GRE tunnel on ERSPAN destination (Linux Security Onion) and let IDS to listen on a tunneled interface. Thanks to this configuration the outer MAC and IPv4 headers are stripped and do no appear in Wireshark output.

a) Load gre module to kernel

janosik@onion:~$ sudo su
root@onion# modprobe ip_gre

b) Choose receiving interface and assign IPv4 to it

root@onion# ip addr add 10.230.10.1/24 dev eth1

Set the MTU of the network interface that receives GRE packets larger than 1500 e.g. to 1900.  Otherwise we are going to miss some bytes in larger packets.

root@onion# ip link set dev eth1 mtu 1900

c) Create virtual tunnel interface and associate it with IP previously configured on eth1 interface

root@onion# ip tunnel add mon0 mode gre local 10.230.10.1 ttl 8

d) Add IP address to interface mon0 which is not used for anything

root@onion# ip addr add 1.1.1.1/30 dev mon0

e) Change the state of mon0 device to up

root@onion# ip link set mon0 up

Again, generate some traffic in the subnet 192.168.1.0/24 and configure Wireshark to listen on interface mon0. Notice that the outer MAC and Ipv4 header are now stripped from the ICMP packet.

clip_image003

Picture 3 - Decapsulated Traffic Captured on Interface Eth1

Using RCDCAP for Decapsulating ERSPAN Traffic

RCDCAP is wrapper program that dissects the traffic and creates a virtual interface where the traffic is already decapsulated. I've compiled it from the source and created the Ubuntu package RCDCap-0.7.99-Linux for Ubuntu 15.04. Be aware that additional packages are needed to get it working.

janosik@onion:~$ sudo su
root@onion# apt-get install libboost-regex1.55.0

Use apt-get to install the packages below. If they are not available in a repository  download them from here and install manually with dpkg -i command.

  • libboost-program-options1.48.0_1.48.0-3_amd64.deb
  • libboost-thread1.48.0_1.48.0-3_amd64.deb
  • libboost-system1.48.0_1.48.0-3_amd64.deb

root@onion# dpkg -i libboost-program-options1.48.0_1.48.0-3_amd64.deb libboost-thread1.48.0_1.48.0-3_amd64.deb libboost-system1.48.0_1.48.0-3_amd64.deb

Now we can install RCDCAP with the command.

root@onion# dpkg -i RCDCap-0.7.99-Linux.deb

Once RCDCAP is installed configure interface eth1 to prepare for capturing.

janosik@onion:~$ sudo su
root@onion# ip addr add dev eth1 10.230.10.1/24
root@onion# ip link set dev eth1 mtu 1900
root@onion# ip link set dev eth1 up

Start RCDCAP with the command below and let Wireshark to listen on interface mon1.

root@onion# rcdcap -i eth1 --erspan --tap-persist --tap-device mon1 --expression "host 10.230.10.1"

We can see that RCDCAP have dissected monitored traffic from GRE and only original MAC + IPv4 + ICMP headers and pyaload are presented in Wireshark output.

clip_image004

Picture 4 - Decapsulated Traffic Captured on Interface Mon1

Reference:

Taken From: http://brezular.com/2015/05/03/decapsulation-erspan-traffic-with-open-source-tools/

Monday, November 24, 2014

Change MAC Address on Linux (Ubuntu / Debian)

Temporary MAC Address Change

When you change the MAC address for an interface, you need to have the network interface disabled (down) and than to set the new MAC.

You can do both this things with the command:

$ sudo ifconfig eth0 down hw ether AA:BB:CC:DD:EE:FF && ifconfig eth0 up

This sets down the eth0 interface, changes the mac to AA:BB:CC:DD:EE:FF and turns the interface back down.

Or, do it in the old fashioned way:

$ sudo ifconfig eth0 down
$ sudo ifconfig eth0 hw ether AA:BB:CC:DD:EE:FF
$ sudo ifconfig eth0 up

Read more about the ifconfig command here.


Permanent MAC Address Change

To set the hardware address (MAC), open the /etc/network/interface file in your favourite text editor:

$ sudo vim /etc/network/interfaces

After the network interface configuration, paste this line: hwaddress ether AA:BB:CC:11:22:33.
Note: AA:BB:CC:11:22:33 is just a sample, replace it with the MAC address you want to set for your interface.

Example, with dhcp enabled network interface:

auto eth0
iface eth0 inet dhcp
hwaddress ether AA:BB:CC:11:22:33

Example, with a network interface having a static ip:

auto eth0
iface eth0 inet static
address 192.168.0.100
netmask 255.255.255.0
network 192.168.0.0
broadcast 192.168.0.255
gateway 192.168.0.1
hwaddress ether AA:BB:CC:11:22:33

To apply the MAC change, restart the network interface:

$ sudo /etc/init.d/networking restart

Based On:

Sunday, November 23, 2014

Raspberry Pi (Linux) – TigthVNC Server + File Transfer

How to Configure Your Raspberry Pi for Remote Shell, Desktop, and File Transfer

So you have a Raspberry Pi and you would like to maximize its tiny footprint by turning into a totally stand alone box—no monitor, keyboard, or other input peripherals. Read on as we show you how to set up remote shell, desktop, and file transfer access on your Pi.

Why Do I Want to Do This?

The Pi, even clad in a sturdy case, is a tiny computer. It’s perfect for tucking somewhere out of sight without a gaggle of wires sticking off of it—for many projects you simply don’t need a permanent monitor and peripheral accompaniment.

That doesn’t mean, however, that you won’t need to connect to the box to make changes, update things, transfer files, and so on. A perfect example of this is the cool little rain indicator we built as part of our Build an LED Indicator with a Raspberry Pi (for Email, Weather, or Anything) article. It doesn’t need all that stuff attached right to it, but we still would like the ability to hop onto the device and easily make changes or try out a new experiments with the LED module without having to drag it back into the workshop, and hook it up to a monitor, keyboard, mouse, etc. By configuring it for remote shell, remote desktop, and remote file transfer, we make it super simple to always interact with our Pi unit from the comfort of our desktop computer as if we’ve hooked the unit up to a full work station.

What Do I Need?

If you’re brand new to working with the Raspberry Pi, we strongly suggest checking out The HTG Guide to Getting Started with Raspberry Pi to get a handle on the basics of the device and get up to speed.

For this tutorial you will need the following things:

  • A Raspberry Pi running Raspbian.
  • A desktop or laptop computer.
  • A local Wi-Fi or wired network to connect the Pi and your computer.

First, most of the steps in this tutorial should work with other Linux-based Pi distributions butwe’re going to be using Raspbian. You should have little trouble adapting the tutorial to other distributions.

Second, we’re using a Windows machine as our networked computer to interact with the Raspberry Pi unit as the remote head/interface. When appropriate, we’ll do our best to link to tutorials and suggested reading regarding performing parallel tasks and tools on OS X and Linux.

Setting Up and Connecting to the SSH Server
clip_image002

Remote command line access to your Raspbian installation is about the handiest little tweak you can make to your system, and it’s down right simple to enable.

Open up the terminal in Rasbian, the shortcut is LXTerminal on the desktop, and type in the following command:

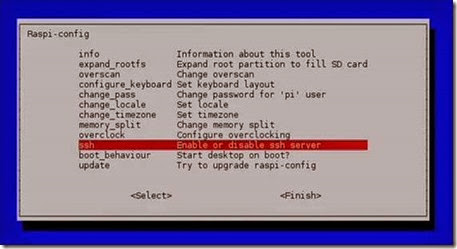
sudo raspi-config

Navigate down to ssh and hit enter. When prompted about the SSH server, select Enable and hit enter again. You will be returned to the Raspi-config panel; navigate down to Finish and hit enter to close out the configuration tool. That’s all you need to do to turn on SSH access to your Pi. The default SSH login and password is pi and raspberry, respectively.

While you’re still sitting at the command line, now is a great time to check the IP of your Raspberry Pi unit on the local network. Type ifconfig at the prompt and then look at the output of the command. If you’re using the Ethernet port you want to look for the init addr in the eth0section; if you’re using Wi-Fi, you want to look for the init addr in the wlan0 section. In addition to checking and noting the IP address, this is also a great time to set up a static IP entry in your router so you don’t have to hunt for the IP in the future.

Now that we have the SSH server enabled, we know the login, and we know the IP address of the machine, it’s time to connect in via SSH and test it out. To do so from Linux and OS X you can simply use the ssh command at the terminal. Windows users, however, will need an SSH client like PuTTY.

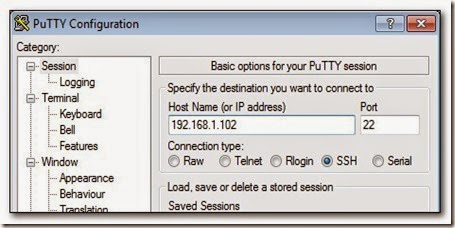
Since we’re using a Windows box to remotely manage our Pi, PuTTY it is. Install a copy of PuTTY or extract the portable version and fire it up. There are a lot of settings you can mess with in PuTTY, but we only need to worry about a single thing to connect to our Pi. On the main Session interface, just type in the IP address of your Pi and select SSH below it:

clip_image003

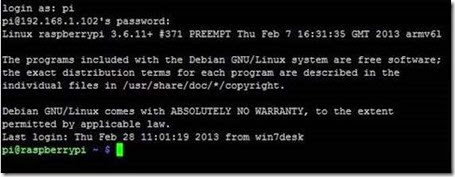
Hit Open at the bottom and PuTTY will launch a terminal window for you, connect to your Pi, and prompt you to log in. Go ahead and log in with pi / raspberry:

clip_image005

Once your SSH connection is functional, you could technically complete the rest of this tutorial remotely from the comfort of your desk—although we’d advise leaving the head and keyboard on your system until you have finish the whole project and have everything running smoothly.

Before we move on, there’s some extra functionality we can squeeze out of SSH. In addition to managing the command line remotely, you can also remotely transfer files using Secure Copy. It’s command line intensive and not particularly convenient for transferring a large number of files sourced from multiple directories, but for a one-off configuration file transfer or other small dump, it’s pretty handy. Check out our guide to copying files over SSH using the SCP command here.

We’re going to be looking closer more user-friendly/GUI-based file transfer techniques later in the tutorial.

Setting Up and Configuring Your Remote Desktop

clip_image006

Remote command line access is awesome, but so is having access to the desktop for GUI-focused activities. Let’s bring the powers of the command line and the powers of the desktop together.

Although we’ve been referring to it as “remote desktop” to this point, the tool we’re actually installing is known as Virtual Network Computing (VNC)—iterations of which many are familiar with such as RealVNC and TightVNC. For this tutorial, we’ll be installing TightVNC on the Pi. In order to access the Pi-based TightVNC session, you will need a remote client such as:

Grab a copy now, and we’ll be trotting it out later in this section. For now, let’s get down to installing the TightVNC server on your Raspberry Pi. Open up the terminal. Enter the following command to get started:

sudo apt-get install tightvncserver

This will download and unpack the installation files; when prompted to continue press Y. After the installation is complete, you’ll be returned to the prompt.  You can start the VNC one of two ways. Simply running the command for the server like so:

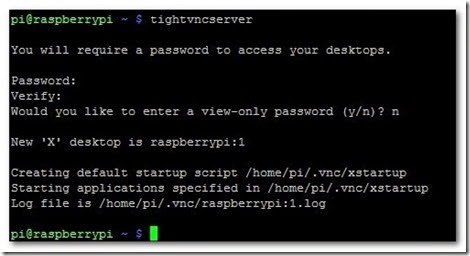
tightvncserver

clip_image007

Will prompt you enter a password to access your VNC desktop—as seen in the screenshot above. The password needs to be 4-8 characters long. Once you confirm the password, you will be prompted to set a view-only password (you can opt out of the step, as we did).


Continue reading to learn how to configure your server and setup file transfer tools.

Alternatively, you can use a much more precise, albeit longer to type out, command that gives you more control over how the remote computer will see the desktop—most importantly, what resolution the desktop will display so you can enjoy a full screen view on the remote computer. To specify the resolution of the VNC desktop, use the following command, swapping out the resolution value (the fourth item in the command) for the resolution of the remote desktop:

vncserver :1 -geometry 1600×900 -depth 16 -pixelformat rgb565:

If at any point you make a mistake in setting up your VNC server instance and/or you want to shut down the VNC server, simply enter the following (changing the number after the colon to the number of the VNC instance you want to kill):

vncserver –kill :1

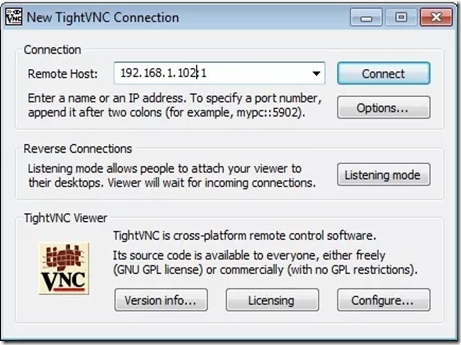
Now that we have the VNC server up and running, let’s connect into it from our remote desktop. Fire up TightVNC viewer on your computer and plug in the IP address of the Raspberry Pi unit followed by :1 like so:

clip_image008

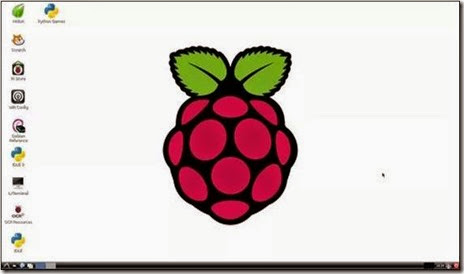
And here’s our reward for successfully configuring our VNC server—a nice full screen view of our remote Raspberry Pi unit:

clip_image010

There’s a known issue with TightVNC and Rasbian that, thanks to a wonky permission change, will cause trouble with the actual monitor-is-attached desktop (while leaving the remote desktop interface provided by the VNC server untouched).  To fix this issue before it even becomes a problem for you, head right to the command line and enter the following command:

sudo chown pi /home/pi/.Xauthority

This command changes the ownership of the .Xauthority file back to the user pi—for the curious, the .Xauthority file is used by the X-windows system in Rasbian and something during the TightVNC server installation and configuration process causes that little permissions hiccup.

With that little minor detour out the way, let’s get back to finishing our remote desktop configuration.

Now that we have full command line and desktop access to the Raspberry Pi, there’s one not-so-trivial tweak we need to make. The Raspi-config tool set the SSH server to automatically start on boot for us, but the VNC server is not yet configured in such a fashion. You can skip this step and manually start the server at the command line via SSH when you need it, but we’re trying to make this as fuss-free as possible for future use. Let’s take a minute now and create a startup file for the VNC server.

In order to automatically start the VNC server, we need to set up an init, or initialization, file that Raspbian will use to cleanly start and shut down the server during the boot and shut down process. Let’s create the init file now. At the command line type in the following command:

sudo nano /etc/init.d/tightvnc

This will create a file in the initialization directory called “tightvnc” and open the nano editor so we can paste in our script. In the nano editor, paste the following code (make sure to change the 1600×900 resolution value to match the screen of your remote computer:

#!/bin/sh
### BEGIN INIT INFO
# Provides: tightvncserver
# Required-Start:
# Required-Stop:
# Default-Start: 2 3 4 5
# Default-Stop: 0 1 6
# Short-Description: start vnc server
# Description:
### END INIT INFO

case “$1″ in
start)
su pi -c ‘vncserver :1 -geometry 1600×900 -depth 16 -pixelformat rgb565:’
echo “VNC Started”
;;
stop)
pkill Xtightvnc
echo “VNC Terminated”
;;
*)
echo “Usage: /etc/init.d/tightvnc {start|stop}”
exit 1
;;
esac

In addition to modifying the screen resolution portion of the script, there is one other thing you can modify. In line 14 you can change the command “su pi -c” to any other user account besides “pi” if you wish to VNC to the specific desktop for that account.

Once you have pasted and modified the code, it’s time to save it. Press CTRL+X to exit and save your work in nano. Once you are back at the command line, we need to make a few quick changes to the permissions of the file:

sudo chmod 755 /etc/init.d/tightvnc

Now the initialization file is executable. We can test it from the prompt:

sudo /etc/init.d/tightvnc start

sudo /etc/init.d/tightvnc stop

The last change we’re going to make is to update the rc.d file (which tracks which initilization scripts are in the /init.d/ folder):

sudo update-rc.d tightvnc defaults

After you enter that command, you’ll get a confirmation that the file was updated. Now it’s time for the real test: does the file load properly after reboot? Enter the following at the command line to reboot and be prepared with your VNC client to test the connection in a moment:

sudo reboot

Once the system has finished rebooting, log in with your VNC client. If your VNC session fails, visit the command prompt and run the tightvnc start command (from the test portion above) again to double check that the file is executable and that the password was saved properly.

At this point, we’re even further along in our mission to totally remote-control our Raspberry Pi unit. With remote command line access via SSH and remote desktop access via VNC under our belts, let’s move on to simplifying the process of transferring files between our Pi and desktop computer.


Setting Up and Configuring File Transfer Tools

clip_image012

Since we already have SSH set up, the easiest way to set up dead simple file transfer between our Pi and remote computers is to piggy back a GUI interface on the SSH connection. Remember how we talked about using SCP over SSH earlier in the tutorial? Running it from the command line gets real tedious, real fast. With a GUI wrapper, we’ll be able to spend more time moving files and playing with our Pi and less time pecking at the keyboard.

While there are a variety of GUI wrappers for the SCP command, we’re going to go with a cross-platform tool that many people already know, have, and love (and may even be unaware that it does SCP transfers): FileZilla. It’s available for Windows, OS X, and Linux—you can grab a copy here.

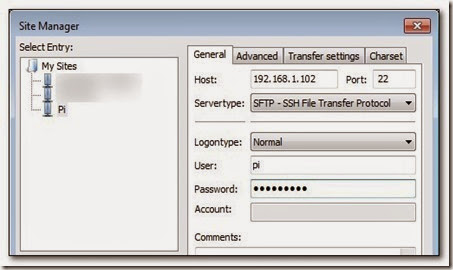
Once you have installed FileZilla, fire it up and go to File –> Site Manager. Create a new site entry, name it, and plug in user name and password for your Pi.

clip_image013

Finally, make sure to set the port to 22 and the Servertype to SFTP – SSH File Transfer Protocol. Click connect at the bottom and you’ll be treated to a view similar to this one:

clip_image014

Your local directories are in the left-hand pane and the remote directories on the Pi are in the right-hand pane. Moving files between the two is as simple as drag and dropping them.

Taking advantage of the existing SSH file transfer is the easiest way to get at the files on the Pi with no additional configuration necessary but if you want to configure your Pi to receive and share files without the remote user requiring any fancy tools (like an SCP capable FTP client such as FileZilla), we highly recommend checking out the Samba configuration portion of our guide:How to Turn a Raspberry Pi into a Low-Power Network Storage Device. Reading over that will familiarize you with setting up a basic Samba share on Pi to create a shared folder easily accessible by just about anyone on your network without any additional tools.

You’ve configured SSH, you’ve configured VNC, and you’ve set up simple SFTP and/or Samba access to your Pi—at this point you can boot down your Raspberry Pi, strip away the monitor, keyboard, and mouse, and tuck it away as a silent and headless machine.

Have an idea for Raspberry Pi project and you’re dying for us to write a tutorial for it? Sound off in the comments or shoot us an email at tips@howtogeek.com and we’ll do our best to help.

Taken From: http://www.howtogeek.com/141157/how-to-configure-your-raspberry-pi-for-remote-shell-desktop-and-file-transfer/all/

Saturday, November 8, 2014

Wake on Lan - Linux

HowTo: Wake Up Computers Using Linux Command [ Wake-on-LAN ( WOL ) ] by NIXCRAFT on APRIL 3, 2012

Wake-on-LAN (WOL) is an Ethernet networking standard that allows a server to be turned on by a network message. You need to send 'magic packets' to wake-on-lan enabled ethernet adapters and motherboards, in order to switch on the called systems. Make sure you connect the NIC (eth0 or eth1) with the motherboard, and enable the WOL function in the BIOS. This is a quick guide to enable WOL under RHEL / Fedora / CentOS / Debian / Ubuntu Linux.

Client Software

You need to use software to send WoL magic packets. You will find various tools for all modern oses, including MS-Windows, Apple OS X, Linux, and many smart phones.
Linux Install etherwake Under Debian / Ubuntu Linux
etherwake command can be used to send a Wake-On-LAN "Magic Packet" under Linux operating systems. Type the following command to install the same under Debian / Ubuntu Linux desktop:

$ sudo apt-get install etherwake

[sudo] password for vivek:
The following NEW packages will be installed:
  etherwake wakeonlan{a}
0 packages upgraded, 2 newly installed, 0 to remove and 11 not upgraded.
Need to get 20.9 kB of archives. After unpacking 98.3 kB will be used.
Do you want to continue? [Y/n/?] y
Get:1
http://mirror.anl.gov/debian/ squeeze/main etherwake amd64 1.09-3 [9,564 B]
Get:2
http://mirror.anl.gov/debian/ squeeze/main wakeonlan all 0.41-10 [11.4 kB]
Fetched 20.9 kB in 2s (10.3 kB/s)
Selecting previously deselected package etherwake.
(Reading database ... 195338 files and directories currently installed.)
Unpacking etherwake (from .../etherwake_1.09-3_amd64.deb) ...
Selecting previously deselected package wakeonlan.
Unpacking wakeonlan (from .../wakeonlan_0.41-10_all.deb) ...
Processing triggers for man-db ...
Setting up etherwake (1.09-3) ...
Setting up wakeonlan (0.41-10) ...

Note: Red Hat Linux and friends user should use net-tools package which is installed by default.

How Do I Send WOL Magic Packets Under Linux?

Type the following command:
# wakeonlan MAC-Address-Here
OR
# etherwake MAC-Address-Here
# etherwake -D MAC-Address-Here

RHEL / Centos / Fedora Linux user, try:
# ether-wake MAC-Address-Here
If your MAC address were xx:yy:zz:11:22:33, you would type:
# wakeonlan xx:yy:zz:11:22:33
OR
# etherwake xx:yy:zz:11:22:33

Where, xx:yy:zz:11:22:33 is remote servers mac address. You can obtained mac address using combination of ping and arp command - 'ping -c 4 server3 && arp -n'.

How Do I Verify That Remote Linux Server Supports Wake-on-LAN (WOL)?

First, reboot the remote server and go to BIOS > Power Management > "Wake On LAN". Turn it on. Next, save and close the bios. After activating Wake On LAN in hardware (BIOS) it is also necessary to activate it using ethtool. The ethtool will configure eth0 to respond to the magic packet:

# ethtool -s eth0 wol g

Where,
1. -s eth0: Your NIC. Feel free to replace eth0 with your actual network interface device name.
2. wol g: Sets Wake-on-LAN options using MagicPacket.

Type the following command to see current status of wol for eth0:
# ethtool eth0
Settings for eth0:
    Supported ports: [ ]
    Supported link modes:
    Supports auto-negotiation: No
    Advertised link modes:  Not reported
    Advertised auto-negotiation: No
    Speed: 100Mb/s
    Duplex: Full
    Port: MII
    PHYAD: 1
    Transceiver: internal
    Auto-negotiation: off
        Supports Wake-on: g
       Wake-on: g

    Link detected: yes


If you are using RHEL / SL / Fedora / CentOS Linux, edit /etc/sysconfig/network-scripts/ifcfg-eth0:

# vi /etc/sysconfig/network-scripts/ifcfg-eth0
Add / modify the following line:
 
ETHTOOL_OPTS="wol g"

OR
ETHTOOL_OPTS="wol g autoneg off speed 100 duplex full "

 
Save and close the file. If you are using Debian / Ubuntu Linux, edit /etc/network/interfaces:

# vi /etc/network/interfaces
Append the following to eth0:

auto eth0
iface eth0 inet static
address 192.168.1.1
netmask 255.255.255.0
gateway 192.168.1.254
        post-up /sbin/ethtool -s eth0 wol g
        post-down /sbin/ethtool -s eth0 wol g
 

post-up and post-down execute a comand or a script when the interface comes up and when it goes down. Here we used it for  ethtool, but you can use it for anything you want.


Recommend readings
- man pages - ethtool, ether-wake / etherwake, arp, wakeonlan
- Wake-on-LAN

Taken From: http://www.cyberciti.biz/tips/linux-send-wake-on-lan-wol-magic-packets.html

Saturday, November 1, 2014

How to Create Bootable USB Drives and SD Cards For Every Operating System

How to Create Bootable USB Drives and SD Cards For Every Operating System

clip_image001

Creating installation media for your operating system of choice used to be simple. Just download an ISO and burn it to CD or DVD. Now we’re using USB drives, and the process is a little different for each operating system.

You can’t just copy files form an ISO disc image directly onto your USB drive. The USB drive’s data partition needs to be made bootable, for one thing. This process will usually wipe your USB drive or SD card.

From a Linux ISO

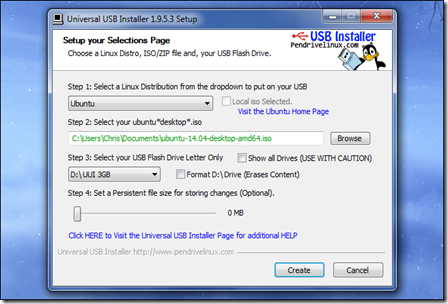
Ubuntu recommends the Universal USB Installer for creating bootable Linux USB drives on Windows. This tool can create bootable disc images for many different Linux distributions.UNetbootin is another popular alternative.

Download the Linux distribution you want to use in .ISO form. Run the tool, select your desired distribution, browse to your downloaded ISO file, and choose the USB drive you want to use. The tool will do the rest.

clip_image002

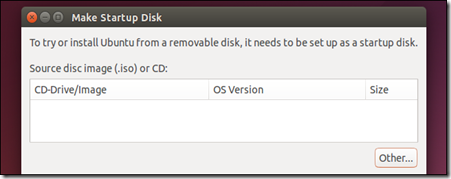
You can use similar tools on Linux. For example, Ubuntu includes a Startup Disk Creator tool for creating bootable Ubuntu USB drives. UNetbootin also runs on Linux, so you can use that too.

clip_image003

From an IMG File

Some operating system projects provide an IMG file instead of an ISO file. An IMG file is a raw disk image that needs to be written directly to a USB drive.

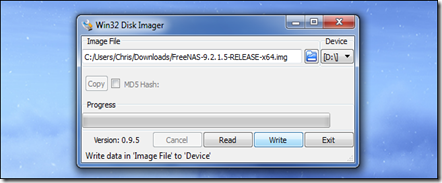
Use Win32 Disk Imager to write an IMG file to a USB drive or SD card. Provide a downloaded IMG file and the tool will write it directly to your drive, erasing its current contents. You can also use this tool to create IMG files from USB drives and SD cards.

clip_image004

Linux users can use the dd command to directly write an IMG file’s contents to a removable media device. Insert the removable media and run the following command on Ubuntu:

sudo dd if=/home/user/file.img of=/dev/sdX bs=1M

Replace /home/user/file.img with the path to the IMG file on your file system and /dev/sdX with the path to your USB or SD card device. Be very careful to specify the correct disk path here — if you specify the path to your system drive instead, you’ll write the contents of the image to your operating system drive and corrupt it

clip_image005

From a Windows 7 ISO

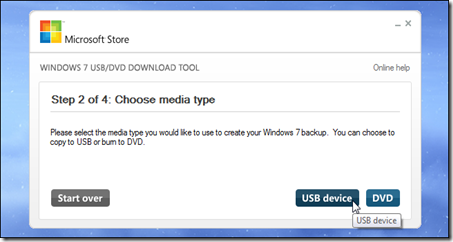
Provide the ISO file and a USB flash drive and the tool will create a bootable drive.

clip_image006

From a Windows 8 or 8.1 Product Key

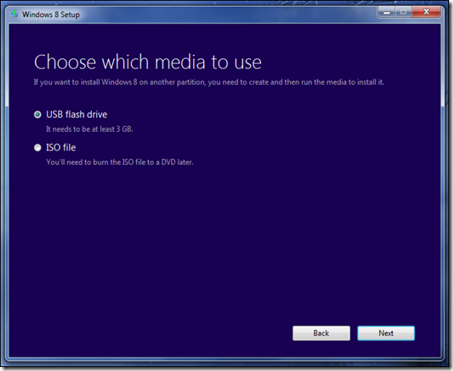
If you have a Windows 8 or Windows 8.1 product key, you can download installation media directly from Microsoft and create a USB drive all at once. Download the appropriate tool from the Upgrade Windows with only a product key page. Run it, provide your product key, and tell the wizard you want to create a bootable USB drive.

Note that Windows 8 and Windows 8.1 have different product keys, so you’ll need to jump through hoops if you want to install Windows 8.1 with a Windows 8 product key. You may just want to install Windows 8 and upgrade to Windows 8.1 from within Windows 8 — that’s Microsoft’s officially supported method.

clip_image007

From a Windows 8 or 8.1 ISO

If you already have a Windows 8 or 8.1 ISO file and you want to create installation media without redownloading anything, you can actually use the Windows 7 USB/DVD download tool for this.

Just provide the Windows 8 or 8.1 ISO file when prompted. The tool will happily create Windows 8 or 8.1 installation media if you provide the appropriate ISO file.

clip_image008

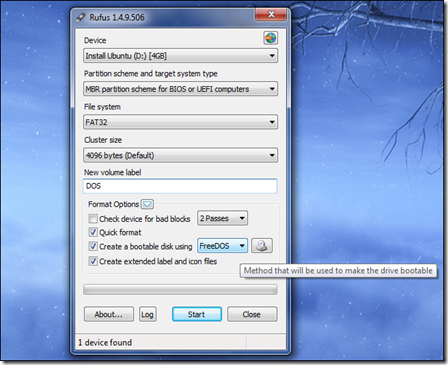
If you need to boot into DOS to use a low-level firmware upgrade, BIOS update, or system tool that still requires DOS for some reason, you can use the Rufus tool to create a bootable DOS USB drive.

Rufus uses FreeDOS, an open-source implementation of DOS that should run whatever DOS program you need to use.

clip_image009

From Mac OS X Installation Files

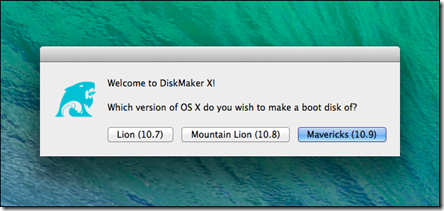
You can create a bootable drive with Mac OS X on it by downloading the latest version of OS X from the Mac App Store. Use Apple’s included “createinstallmedia” tool in a terminal or by run the third-party DiskMaker X tool.

The Mac OS X drive can be used to install OS X on other Macs or upgrade them to the latest version without any long downloads.

clip_image011

From a Windows ISO for Mac

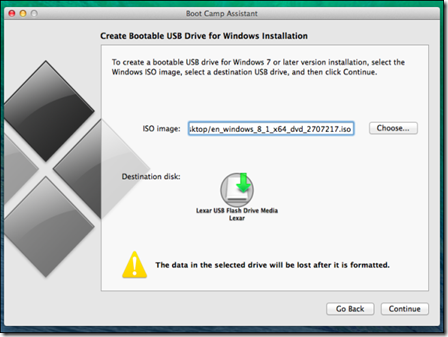
If you plan on installing Windows on a Mac via Boot Camp, don’t bother creating a bootable USB drive in the usual way. Use your Mac’s Boot Camp tool to start setting things up and it will walk you through creating a bootable Windows installation drive with Apple’s drivers and Boot Camp utilities integrated.

You can use this drive to install Windows on multiple Macs, but don’t use it to install Windows on non-Apple PCs.

clip_image012

Some of these tools overlap — for example, Rufus can also be used to create bootable drives from Linux ISOs, IMG files, and even Windows ISO Files. We suggested the most popular, widely recommended tools for each task here.

Image Credit: USBMemoryDirect on Flickr

Taken From: http://www.howtogeek.com/191054/how-to-create-bootable-usb-drives-and-sd-cards-for-every-operating-system/

Monday, September 29, 2014

Boot Linux ISOs From Hard Drive ( GRUB )

How to Boot Linux ISO Images Directly From Your Hard Drive

Linux’s GRUB2 boot loader can boot Linux ISO files directly from your hard drive. Boot Linux live CDs or even install Linux on another hard drive partition without burning it to disc or booting from a USB drive.

We performed this process on Ubuntu 14.04 — Ubuntu and Ubuntu-based Linux distributions have good support for this. Other Linux distributions should work similarly.

Get a Linux ISO File

How to Configure the GRUB2 Boot Loader’s Settings
Ubuntu and most other Linux distributions now use the GRUB2 boot loader. You can change its settings to select a... [Read Article]

This trick requires you have a Linux system installed on your hard drive. Your computer must be using the GRUB2 boot loader, which is a standard boot loader on most Linux systems. Sorry, you can’t boot a Linux ISO file directly from a Windows system using the Windows boot loader.

Download the ISO files you want to use and store them on your Linux partition. GRUB2 should support most Linux systems. if you want to use them in a live environment without installing them to your hard drive, be sure to download the “live CD” versions of each Linux ISO. Many Linux-based bootable utility discs should also work.

Check the Contents of the ISO File

You may need to look inside the ISO file to determine exactly where specific files are. For example, you can do this by opening the ISO file with the Archive Manager/File Roller graphical application that comes with Ubuntu and other GNOME-based desktop environments. In the Nautilus file manager, right-click the ISO file and select Open with Archive Manager.

Locate the kernel file and the initrd image. If you’re using a Ubuntu ISO file, you’ll find these files inside the casper folder — the vmlinuz file is the Linux kernel and the initrd file is the initrd image. You’ll need to know their location inside the ISO file later.

clip_image002

Determine the Hard Drive Partition’s Path

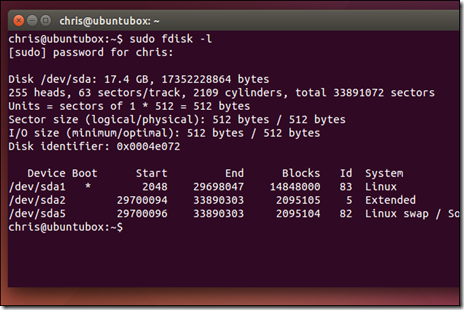
GRUB uses a different “device name” scheme than Linux does. On a Linux system, /dev/sda0 is the first partition on the first hard disk — a means the first hard disk and 0 means its first partition. In GRUB, (hd0,1) is equivalent to /dev/sda0. The 0 means the first hard disk, while the1 means the first partition on it. In other words, in a GRUB device name, the disk numbers start counting at 0 and the partition num6ers start counting at 1 — yes, it’s unnecessarily confusing. For example, (hd3,6) refers to the sixth partition on the fourth hard disk.

You can use the fdisk -l command to view this information. On Ubuntu, open a Terminal and run the following command:

sudo fdisk -l

You’ll see a list of Linux device paths, which you can convert to GRUB device names on your own. For example, below we can see the system partition is /dev/sda1 — so that’s (hd0,1) for GRUB.

clip_image003

Create the GRUB2 Boot Entry

The easiest way to add a custom boot entry is to edit the /etc/grub.d/40_custom script. This file is designed for user-added custom boot entries. After editing the file, the contents of your /etc/defaults/grub file and the /etc/grub.d/ scripts will be combined to create a /boot/grub/grub.cfg file — you shouldn’t edit this file by hand. It’s designed to be automatically generated from settings you specify in other files.

You’ll need to open the /etc/grub.d/40_custom file for editing with root privileges. On Ubuntu, you can do this by opening a Terminal window and running the following command:

sudo gedit /etc/grub.d/40_custom

Feel free to open the file in your favorite text editor. For example, you could replace “gedit” with “nano” in the command to open the file in the Nano text editor.

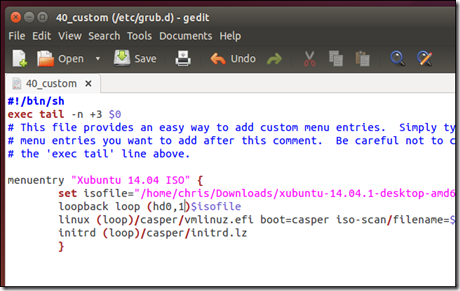
Unless you’ve added other custom boot entries, you should see a mostly empty file. You’ll need to add one or more ISO-booting sections to the file below the commented lines.

clip_image004

Here’s how you can boot an Ubuntu or Ubuntu-based distribution from an ISO file. We tested this with Ubuntu 14.04:

menuentry “Ubuntu 14.04 ISO” {
set isofile=”/home/name/Downloads/ubuntu-14.04.1-desktop-amd64.iso
loopback loop (hd0,1)$isofile
linux (loop)/casper/vmlinuz.efi boot=casper iso-scan/filename=${isofile} quiet splash
initrd (loop)/casper/initrd.lz
}

Customize the boot entry to contain your desiredmenu entry name, the correct path to the ISO file on your computer, and the device name of the hard disk and partition containing the ISO file. If the vmlinuz and initrd files have different names or paths, be sure to specify the correct path to those files, too.

(If you have a separate /home/ partition, omit the /home bit, like so: set isofile=”/name/Downloads/${isoname}”).

Important Note: Different Linux distributions require different boot entries with different boot options. The GRUB Live ISO Multiboot project offers a variety of menu entries for different Linux distributions. You should be able to adapt these example menu entries for the ISO file you want to boot. You can also just perform a web search for the name and release number of the Linux distribution you want to boot along with “boot from ISO in GRUB” to find more information.

clip_image005

If you want to add more ISO boot options, add additional sections to the file.

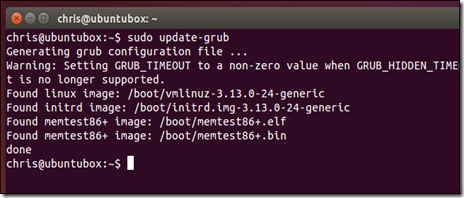
Save the file when you’re done. Return to a Terminal window and run the following command:

sudo update-grub

clip_image006

The next time you boot your computer, you’ll see the ISO boot entry and you can choose it to boot the ISO file. You may have to hold Shift while booting to see the GRUB menu.

If you see an error message or a black screen when you attempt to boot the ISO file, you misconfigured the boot entry somehow. Even if you got the ISO file path and device name right, the paths to the vmlinuz and intird files on the ISO file may not be correct or the Linux system you’re booting may require different options.

Taken From: http://www.howtogeek.com/196933/how-to-boot-linux-iso-images-directly-from-your-hard-drive/

Sunday, June 22, 2014

Raspberry Pi on Your PC (Linux or Windows)

QEMU – Emulating Raspberry Pi the easy way (Linux or Windows!)

15APR/12

This page will shows how to emulate an ARM1176JZF-S system the quick and easy way.


Assumptions

You have:

- QEMU - Linux or Windows. Make sure you have a suitable version (see 'Quick note on QEMU and ARM1176').

- A disk image for your distro of choice

  • Raspian and Debian should work out of the box, however Arch Linux requires a few tweaks to work. These will not be explored in this article, as they can only be done in Linux.

- Ability to read and follow instructions carefully


Preparing the Environment

- Create and enter the work directory.

- Download the linux kernel:

wget http://xecdesign.com/downloads/linux-qemu/kernel-qemu

- Download and extract the disk image .img file to the working directory.

- All of the instructions will be carried out in this directory.


Check that you Have Everything

- Make sure you have kernel-qemu and your disk image files.

- qemu-system-arm -cpu ?

If everything looks right, you should be ready to go.


First Boot

- qemu-system-arm -kernel kernel-qemu -cpu arm1176 -m 256 -M versatilepb -no-reboot -serial stdio -append "root=/dev/sda2 panic=1 rootfstype=ext4 rw init=/bin/bash" -hda 2013-09-25-wheezy-raspbian.img

  • Windows users should use qemu-system-armw.exe instead of qemu-system-arm.
  • Make sure you replace '2013-09-25-wheezy-raspbian.img' with the name of your disc image.
  • Do not try to use more than 256 MB of RAM, the value is hard-coded in and QEMU will not work correctly.
  • You should be presented with a minimal shell. From here, you will need to make some modifications before you can boot properly.

- nano /etc/ld.so.preload

- Put a # in front of the first line so that it looks like this:

#/usr/lib/arm-linux-gnueabihf/libcofi_rpi.so

- Press ctrl-x then y then enter to save and exit.

- (Optional) Use steps 2 to 4 above to create a file /etc/udev/rules.d/90-qemu.rules with the following content:

KERNEL=="sda", SYMLINK+="mmcblk0"
KERNEL=="sda?", SYMLINK+="mmcblk0p%n"
KERNEL=="sda2", SYMLINK+="root"

  • The kernel sees the disk as /dev/sda, while a real pi sees /dev/mmcblk0. This will create symlinks to be more consistent with the real pi.

halt

First (proper) Boot

- qemu-system-arm -kernel kernel-qemu -cpu arm1176 -m 256 -M versatilepb -no-reboot -serial stdio -append "root=/dev/sda2 panic=1 rootfstype=ext4 rw" -hda 2013-09-25-wheezy-raspbian.img

  • This is the same command as before, but without init=/bin/bash.
  • This will take a while, but will be much quicker on subsequent boots.

QEMU running raspbian

That's it, you should see the system starting to boot.


Things to Keep in Mind

  • The disc image will only contain about 200MB of free space (if any at all) for you to play with, so don't expect to be able to install a full system. You can use DD to expand the image and then resize manually, but that is not within the scope of this tutorial.
  • You may see a few steps failing while the image boots. That's normal, since QEMU cannot emulate ALL of the hardware exactly. Double check that all the important steps are fine, but in general, this isn't something to worry about.


Acknowledgements

kinsa for figuring out the ld.so.preload business. Stevie-O for testing. Mjlally for finding a QEMU build that actually works on windows. v13 for a method to fix up ld.so.preload on windows.


For Troubleshooting Check:

http://xecdesign.com/qemu-emulating-raspberry-pi-the-easy-way/

Taken From: http://xecdesign.com/qemu-emulating-raspberry-pi-the-easy-way/

Wednesday, May 14, 2014

Display Linux Applications (X11) on Windows – via Putty (SSH)

X Forwarding with Putty on Windows

Intro to X Forwarding

Unix machines have been able to run software on a remote machine and display the GUI locally for almost two decades. Linux and Mac OS X support X Forwarding with no extra software. Any terminal on Linux should do X Forwarding, Mac users need to run "Applications > Utilities > XTerm". In a command line terminal run "ssh -Y jdoe@compute.example.edu matlab" and you'll be running matlab on "compute.example.edu" but seeing it on your desktop.

Windows users need two pieces of software: an secure shell program (ssh) to establish the remote connection and an X Server to handle the local display.

Prerequisites

Configuring Putty

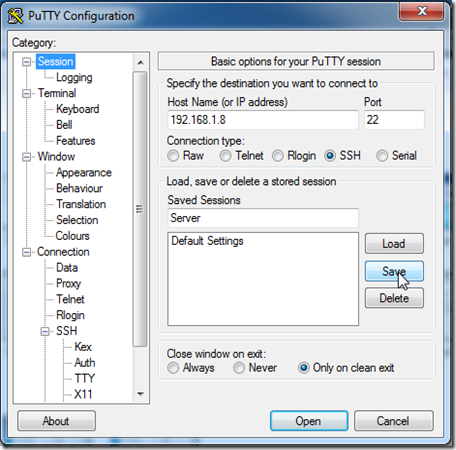
  • 1. Add Unix hostname
  • 2. Switch Protocol to SSH
  • 3. Type name of session in saved sessions
  • 4. Click 'Save'

ScreenShot013

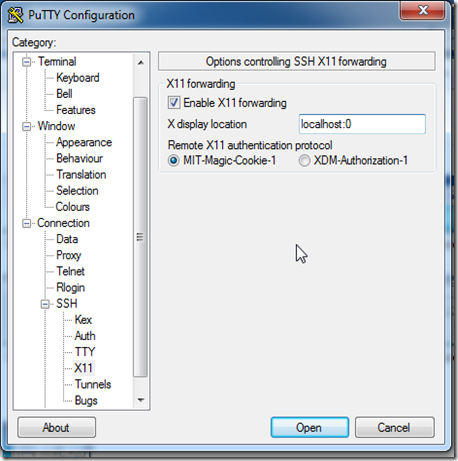
  • 5. Expand the 'SSH' tab from the 'Category' list
  • 6. Choose 'X11' from 'SSH' list
  • 7. Check 'Enable X11 Forwarding'

ScreenShot012

  • 8. Choose 'Session' from 'Category' list
  • 9. Click 'Save'

Starting the X Server on Windows

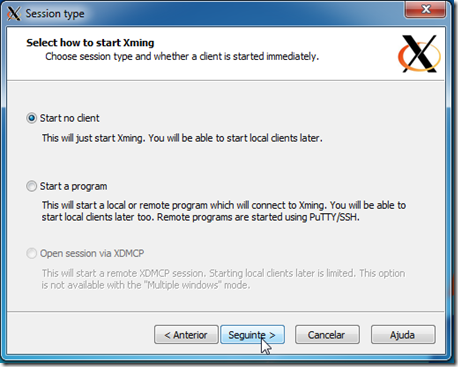
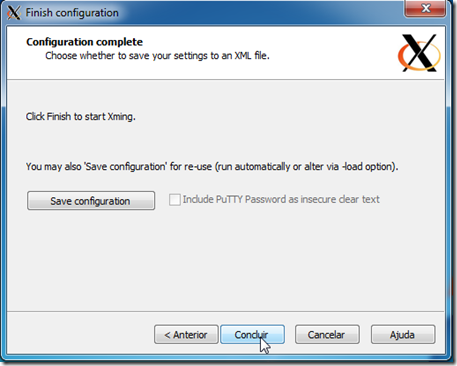
Configuring Xming

Just run "All Programs > Xming Xming" and leave all at it’s defaults as show in the picture bellow. It should work if you've got PuTTY configured.

ScreenShot010ScreenShot006ScreenShot007ScreenShot008ScreenShot009

Connecting

  • 1. Start Xming
  • 2. Start Putty
  • 3. Double click on the saved session you want

ScreenShot014

  • 4. Enter username and password as requested
  • 5. You should now be able to run X applications from the host
    on your local desktop

Based On: http://www.math.umn.edu/systems_guide/putty_xwin32.html

Sunday, April 20, 2014

Mount Windows Network Shares on Linux

Linux mount CIFS Windows Share

clip_image001

Q. How do I mount CIFS (Windows Network Shares) Windows Server / XP / Vista Shared folder under Linux operating systems?

A. Common Internet File System is an application-level network protocol mainly used to provide shared access to files, printers, serial ports, and miscellaneous communications between nodes on a network. You can easily access CIFS (Windows Share) share from Linux and mount them as a regular filesystem.

Mount Linux CIFS share

Mount CIFS (Windows Share) with the default local filesystem permissions:

# mkdir /mnt/cifs
# mount -t cifs //server-name/share-name /mnt/cifs -o username=shareuser,password=sharepassword,domain=nixcraft

# mount -t cifs //192.168.101.100/sales /mnt/cifs -o username=shareuser,password=sharepassword,domain=nixcraft


OR
# mount.cifs //192.168.101.100/sales /mnt/cifs -o username=shareuser,password=sharepassword,domain=nixcraft

Where,

  • username=shareuser : specifies the CIFS user name.
  • password=sharepassword : specifies the CIFS password. If this option is not given then the environment variable PASSWD is used. If the password is not specified directly or indirectly via an argument to mount, mount will prompt for a password, unless the guest option is specified.
  • domain=nixcraft : sets the domain (workgroup) of the user

Taken From: http://www.cyberciti.biz/faq/linux-mount-cifs-windows-share/

Saturday, March 1, 2014

ZenOss Core 4 – Installation

Zenoss Core 4 Installation
clip_image001

[1/24/2014: Post has been updated to reflect configuration with CentOS 6.5 and Zenoss Core 4.2.4
This is a sample installation guide for Zenoss Core 4. The single server installation closely aligns with the official Zenoss Core Installation Guide, but it also differs in some areas, and has a little more "glue".
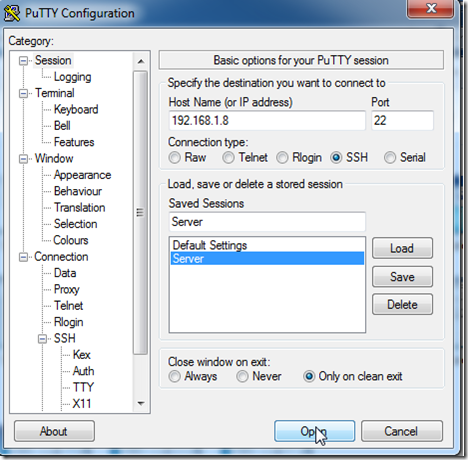
The following components were used for this guide:

· CentOS

· Zenoss Core

· MariaDB

1. Hardware Requirements
You should meet these minimum hardware requirements for a single-server installation of Zenoss 4 Core (up to a 1000 devices):

Deployment Size

Memory

CPU

Storage

1 to 250 devices

4GB

2 cores

1 x 300GB (10K RPM or SSD)

250 to 500 devices

8GB

4 cores

1 x 300GB (10K RPM or SSD)

500 to 1000 devices

16GB

8 cores

1 x 300GB (15K RPM or SSD)

2. Operating System
My solution will be using the CentOS-6.5-x86_64-minimal.iso image. The aim of this image is to install a very basic CentOS 6.5 system, with the minimum number of packages needed to have a functional system. This post won't document the install process for CentOS 6 considering each environment (and associated requirements) is different. The main stages of the OS installation consist of language, storage, hostname, network, timezone, and the root password. 
Note: All commands are run within the context of the root account unless otherwise specified.
Make sure to update the system after the initial boot post install.

# yum -y update

I also install the following packages that are not included by default.

# yum -y install file ntp vim-enhanced man man-pages wget traceroute yum-utils

# hosts file
It's recommended to add a hostname entry (FQDN and short), of the local computer, to the hosts file. You can update the entry manually (via text editor), or run the following set of commands:

# ipv4addr=$(ip -f inet addr show dev eth0 | sed -n 's/^ *inet *\([.0-9]*\).*/\1/p')

# printf "$ipv4addr\t$(hostname -f)\t$(hostname -s)\n" >> /etc/hosts

# unset -v ipv4addr

Verify the entry.

# cat /etc/hosts

127.0.0.1 localhost localhost.localdomain localhost4 localhost4.localdomain4

::1 localhost localhost.localdomain localhost6 localhost6.localdomain6

10.1.206.43 zenoss.corp.example.com zenoss

# SELinux
Zenoss documentation states the requirement that SELinux be disabled. We can accomplish this by changing the SELINUX value to disabled in the /etc/sysconfig/selinux file. Modify the file with your text editor.

# vim /etc/sysconfig/selinux

# This file controls the state of SELinux on the system.

# SELINUX= can take one of these three values:

# enforcing - SELinux security policy is enforced.

# permissive - SELinux prints warnings instead of enforcing.

# disabled - No SELinux policy is loaded.

SELINUX=disabled

# SELINUXTYPE= can take one of these two values:

# targeted - Targeted processes are protected,

# mls - Multi Level Security protection.

SELINUXTYPE=targeted

Reboot the computer for the change to take effect.
After logging in after the reboot, verify SELinux is disabled. Run the following command:

# sestatus

SELinux status: disabled

# Network Time Protocol (NTP)
Time synchronization is an often overlooked, but a very essential, configuration step for new server deployments. In my configuration, I will have my zenoss server sync with an Active Directory domain controller (which holds the PDC emulator FSMO role) on my private network. We will need to modify the ntp.conf file with a text editor and start the NTP daemon process, and also set it for autostart at boot time. Notice I "comment out" the default public pool.ntp.org virtual cluster servers. You may want to leave these enabled if you don't have a particular time source to sync with.

# vim /etc/ntp.conf

...

# Permit all access over the loopback interface. This could

# be tightened as well, but to do so would effect some of

# the administrative functions.

restrict 127.0.0.1

restrict -6 ::1

# Hosts on local network are less restricted.

#restrict 192.168.1.0 mask 255.255.255.0 nomodify notrap

# Use public servers from the pool.ntp.org project.

# Please consider joining the pool (http://www.pool.ntp.org/join.html).

#server 0.centos.pool.ntp.org

#server 1.centos.pool.ntp.org

#server 2.centos.pool.ntp.org

# Use internal NTP Server (AD/DC01)

server 10.1.206.11 iburst

#broadcast 192.168.1.255 autokey # broadcast server

#broadcastclient # broadcast client

#broadcast 224.0.1.1 autokey # multicast server

#multicastclient 224.0.1.1 # multicast client

#manycastserver 239.255.254.254 # manycast server

#manycastclient 239.255.254.254 autokey # manycast client

...

Start the NTP daemon.

# service ntpd start

Starting ntpd: [ OK ]

Set the NTP daemon for autostart at boot time and verify.

# chkconfig ntpd on; chkconfig --list ntpd

ntpd 0:off 1:off 2:on 3:on 4:on 5:on 6:off

We can verify the NTP status by running the following command:

# ntpq -pn

remote refid st t when poll reach delay offset jitter

=================================================

*10.1.206.11 199.180.253.191 3 u 42 64 377 0.429 -69.204 58.561

# Firewall
Zenoss requires the following ports be open on the host firewall:

Port

Protocol

Direction

Description

11211

TCP/UDP

inbound

memcached

8080

TCP

inbound

Web interface

514

UDP

inbound

syslog

162

UDP

inbound

SNMP Traps

25

TCP

inbound

zenmail

Add the rules. It is recommended to add each rule with the iptables command, but I prefer to modify the /etc/sysconfig/iptables file directly with a text editor.

# vim /etc/sysconfig/iptables

# Firewall configuration written by system-config-firewall

# Manual customization of this file is not recommended.

*filter

:INPUT ACCEPT [0:0]

:FORWARD ACCEPT [0:0]

:OUTPUT ACCEPT [0:0]

-A INPUT -m state --state ESTABLISHED,RELATED -j ACCEPT

-A INPUT -p icmp -j ACCEPT

-A INPUT -i lo -j ACCEPT

-A INPUT -m state --state NEW -m tcp -p tcp --dport 22 -j ACCEPT

-A INPUT -m state --state NEW -m tcp -p tcp --dport 11211 -j ACCEPT

-A INPUT -m state --state NEW -m udp -p udp --dport 11211 -j ACCEPT

-A INPUT -m state --state NEW -m tcp -p tcp --dport 8080 -j ACCEPT

-A INPUT -m state --state NEW -m udp -p udp --dport 514 -j ACCEPT

-A INPUT -m state --state NEW -m udp -p udp --dport 162 -j ACCEPT

-A INPUT -m state --state NEW -m tcp -p tcp --dport 25 -j ACCEPT

-A INPUT -j REJECT --reject-with icmp-host-prohibited

-A FORWARD -j REJECT --reject-with icmp-host-prohibited

COMMIT

Restart the firewall service for the changes to take effect.

# service iptables restart

iptables: Flushing firewall rules: [ OK ]

iptables: Setting chains to policy ACCEPT: filter [ OK ]

iptables: Unloading modules: [ OK ]

iptables: Applying firewall rules: [ OK ]

# Oracle Java 6
From a client computer, browse to Oracle's Java Downloads and grab the latest Java Version 6 Linux x64 RPM file.
Transfer the file to the Zenoss server. The command/utility will vary depending on what client OS you're using. I recommend WinSCP or PSCP if using a Windows client. From a Linux or Mac OS X client, we can use the scp command. The following command will copy the file to root's home directory on the destination Zenoss server:

$ scp jre-6u45-linux-x64-rpm.bin root@10.1.206.43:

Back in our terminal for the Zenoss server, we now need to make the binary file executable.

# cd ~

# chmod u+x ./jre-6u45-linux-x64-rpm.bin

Install the Oracle Java Runtime Environment (JRE).

# ./jre-6u45-linux-x64-rpm.bin

Unpacking...

Checksumming...

Extracting...

UnZipSFX 5.50 of 17 February 2002, by Info-ZIP (Zip-Bugs@lists.wku.edu).

inflating: jre-6u45-linux-amd64.rpm

Preparing... ########################################### [100%]

1:jre ########################################### [100%]

Unpacking JAR files...

rt.jar...

jsse.jar...

charsets.jar...

localedata.jar...

plugin.jar...

javaws.jar...

deploy.jar...

Done.

Add the JAVA_HOME variable statement to the end of the system BASH profile file.

# echo 'export JAVA_HOME=/usr/java/default' >> /etc/profile

"Dot" source the system BASH profile file to add the JAVA_HOME variable to the current shell environment.

# . /etc/profile

Verify the variable is set and that Java is installed correctly.

# echo $JAVA_HOME

/usr/java/default

# java -version

java version "1.6.0_45"

Java(TM) SE Runtime Environment (build 1.6.0_45-b06)

Java HotSpot(TM) 64-Bit Server VM (build 20.45-b01, mixed mode)

3. Database
My solution diverges from the official Zenoss documentation. I prefer to deploy MariaDB instead of the standard MySQL server. MariaDB is an enhanced, drop-in replacement for MySQL. Visit theMariaDB website for more information.
Let's first add the MariaDB repo to our local YUM configuration.

# cat >> /etc/yum.repos.d/MariaDB.repo << EOF

> [mariadb]

> name = MariaDB

> baseurl = http://yum.mariadb.org/5.5/centos6-amd64

> gpgkey=https://yum.mariadb.org/RPM-GPG-KEY-MariaDB

> gpgcheck=1

> EOF

Verify.

# cat /etc/yum.repos.d/MariaDB.repo

[mariadb]

name = MariaDB

baseurl = http://yum.mariadb.org/5.5/centos6-amd64

gpgkey=https://yum.mariadb.org/RPM-GPG-KEY-MariaDB

gpgcheck=1

Then also verify the repository is enabled.

# yum repolist

Loaded plugins: fastestmirror

Loading mirror speeds from cached hostfile

* base: mirror.nwresd.org

* extras: mirrordenver.fdcservers.net

* updates: yum.phx.singlehop.com

mariadb | 1.9 kB 00:00

mariadb/primary_db | 15 kB 00:00

repo id repo name status

base CentOS-6 - Base 6,367

extras CentOS-6 - Extras 14

mariadb MariaDB 9

updates CentOS-6 - Updates 373

repolist: 6,763

Let's now install the required packages.

# yum -y install MariaDB-server MariaDB-client

After MariaDB has been installed, modify the MariaDB server.cnf configuration file with some recommended settings from Zenoss.

# vim /etc/my.cnf.d/server.cnf

...

# this is read by the standalone daemon and embedded servers

[server]

# this is only for the mysqld standalone daemon

[mysqld]

max_allowed_packet=16M

innodb_buffer_pool_size=256M

innodb_additional_mem_pool_size=20M

# this is only for embedded server

[embedded]

...

Start the MariaDB server.

# service mysql start

Starting MySQL.. SUCCESS!

Verify MariaDB is set for autostart at boot.

# chkconfig --list mysql

mysql 0:off 1:off 2:on 3:on 4:on 5:on 6:off

4. Zenoss Core
From a client computer, browse to the Zenoss Core site and grab the latest Zenoss Core 4 RPM package for RHEL/CentOS 6 64-bit (v4.2.4 at the date of this post).
Transfer the file to the Zenoss server. The command/utility will vary depending on what client OS you're using. I recommend WinSCP or PSCP if using a Windows client. From a Linux or Mac OS X client, we can use the scp command. The following command will copy the file to root's home directory on the destination Zenoss server:

$ scp zenoss_core-4.2.4-1897.el6.x86_64.rpm root@10.1.206.43:

Back in our terminal for the Zenoss server, install the Zenoss dependencies repositories.

# rpm -Uvh http://deps.zenoss.com/yum/zenossdeps-4.2.x-1.el6.noarch.rpm

Retrieving http://deps.zenoss.com/yum/zenossdeps-4.2.x-1.el6.noarch.rpm

Preparing... ########################################### [100%]

1:zenossdeps ########################################### [100%]

Verify the repositories are enabled.

# yum repolist

Loaded plugins: fastestmirror

Loading mirror speeds from cached hostfile

* base: mirror.nwresd.org

* extras: mirrordenver.fdcservers.net

* updates: yum.phx.singlehop.com

repo id repo name status

base CentOS-6 - Base 6,367

extras CentOS-6 - Extras 14

mariadb MariaDB 9

updates CentOS-6 - Updates 373

zenossdeps-repo Zenoss Dependencies - Base 18

zenossdeps-update-repo Zenoss Dependencies - Updates 0

repolist: 6,781

It's now time to install the Zenoss Core 4 package (and dependency packages).

# cd ~

# yum -y --nogpgcheck localinstall zenoss_core-4.2.4-1897.el6.x86_64.rpm

# memcached, rabbitmq-server, snmpd
Set the services to start automatically at boot, and also interactively start them.

# for svc in memcached rabbitmq-server snmpd; do chkconfig $svc on; service $svc start; done

# Start Zenoss
Run the following command to start Zenoss:

# service zenoss start

At this stage, Zenoss should be ready from a functional perspective. We now need to focus on securing the Zenoss server. 
5. Post-Install
The auto-deploy script offered by Zenoss runs a separate script that secures your Zenoss installation. Since we chose to do a normal install, we will have to manually fetch (and execute) the script. 
Switch to a login shell for the zenoss user.

# su -l zenoss

Verify the zenoss user shell. As a side note, that's an "interesting" UID number for the zenoss user. :-)

$ id

uid=1337(zenoss) gid=500(zenoss) groups=500(zenoss)

Download the secure_zenoss.sh file from GitHub.

$ wget --no-check-certificate https://raw.github.com/osu-sig/zenoss-autodeploy-4.2.3/master/secure_zenoss.sh

Before we run the script, let's get the default passwords for the zenoss user in the global.conf file.

$ egrep 'user|password' $ZENHOME/etc/global.conf | grep -v admin

zodb-user zenoss

zodb-password zenoss

amqpuser zenoss

amqppassword zenoss

zep-user zenoss

zep-password zenoss

Give the secure_zenoss.sh script the execute permission.

$ chmod u+x secure_zenoss.sh

Run the secure_zenoss.sh script. I opted not to change the MySQL (MariaDB) root password at this time. We will be performing that task in the next section.

$ ./secure_zenoss.sh

Restricting permissions on /opt/zenoss/etc/*.conf*

Assigning secure password for global.conf:zodb-password

Assigning secure password for global.conf:amqppassword

Assigning secure password for global.conf:zep-password

Assigning secure password for global.conf:hubpassword

Assigning secure password for hubpassword:admin

MySQL is configured with a blank root password.

Configure a secure MySQL root password? [Yn]: n

Forcing zeneventserver to only listen on 127.0.0.1:8084

Let's verify the passwords have been modified for the zenoss user in the global.conf file.

$ egrep 'user|password' $ZENHOME/etc/global.conf | grep -v admin

zodb-user zenoss

zodb-password 18zmcTgYsA+AjczljwQd

amqpuser zenoss

amqppassword 18zmcTgYsA+AjczljwQd

zep-user zenoss

zep-password 18zmcTgYsA+AjczljwQd

hubpassword 18zmcTgYsA+AjczljwQd

We will also need to modify the password in the zodb_db_main.conf and zodb_db_session.conf files to match the value set for the zodb-password property in the global.conf file. 
First, get the current configuration of these two files.

$ tail -n +1 $ZENHOME/etc/zodb_db_{main,session}.conf

==> /opt/zenoss/etc/zodb_db_main.conf <==

<mysql>

host localhost

port 3306

user zenoss

passwd zenoss

db zodb

</mysql>

==> /opt/zenoss/etc/zodb_db_session.conf <==

<mysql>

host localhost

port 3306

user zenoss

passwd zenoss

db zodb_session

</mysql>

Run the following commands to perform a substitution of the passwd property value for each of the files:

$ zodbpw=$(grep zodb-password $ZENHOME/etc/global.conf | awk '{print $2}')

$ sed -i.orig "5s/zenoss/$zodbpw/" $ZENHOME/etc/zodb_db_{main,session}.conf

$ unset -v zodbpw

Verify the modification was successful.

$ tail -n +1 $ZENHOME/etc/zodb_db_{main,session}.conf

==> /opt/zenoss/etc/zodb_db_main.conf <==

<mysql>

host localhost

port 3306

user zenoss

passwd 18zmcTgYsA+AjczljwQd

db zodb

</mysql>

==> /opt/zenoss/etc/zodb_db_session.conf <==

<mysql>

host localhost

port 3306

user zenoss

passwd 18zmcTgYsA+AjczljwQd

db zodb_session

</mysql>

Exit out of the shell for the zenoss user to return to the root user shell.

$ exit

logout

# MariaDB
The interactive mysql_secure_installation command improves the security of your MariaDB installation. It will allow you to set your MariaDB (MySQL) root password as well as other security related operations.

# mysql_secure_installation

The password for the MariaDB database zenoss user will also need to be set to "sync up" with the previous password modifications. We will use the value set for the passwd property in thezodb_db_* config files.

# mysql -u root -p

Enter password: <mysql_root_password>

Welcome to the MariaDB monitor. Commands end with ; or \g.

Your MariaDB connection id is 234

Server version: 5.5.34-MariaDB MariaDB Server

Copyright (c) 2000, 2013, Oracle, Monty Program Ab and others.

Type 'help;' or '\h' for help. Type '\c' to clear the current input statement.

MariaDB [(none)]> SET PASSWORD FOR 'zenoss'@'localhost' = PASSWORD('18zmcTgYsA+AjczljwQd');

Query OK, 0 rows affected (0.00 sec)

MariaDB [(none)]> \q

Bye

Restart the MariaDB server.

# service mysql restart

Shutting down MySQL. SUCCESS!

Starting MySQL.. SUCCESS!

# RabbitMQ
The following script will ensure the proper Zenoss credentials/permissions are set for the AMQP entities. 
Create the set-rabbitmq-perms.sh script file.

# vim set-rabbitmq-perms.sh

Enter the following information (exclude the line numbers), then save the file:

001 002 003 004 005 006 007 008 009 010 011 012 013 014 015 016 017 018 019 020 021 022 023 024 025

#!/usr/bin/env bash set -e VHOSTS="/zenoss" USER="zenoss" PASS="grep amqppassword \$ZENHOME/etc/global.conf | awk '{print \$2}'" if [ $(id -u) -eq 0 ] then RABBITMQCTL=$(which rabbitmqctl) $RABBITMQCTL stop_app $RABBITMQCTL reset $RABBITMQCTL start_app $RABBITMQCTL add_user "$USER" "$(su -l zenoss -c "$PASS")" for vhost in $VHOSTS; do $RABBITMQCTL add_vhost "$vhost" $RABBITMQCTL set_permissions -p "$vhost" "$USER" '.*' '.*' '.*' done exit 0 else echo "Error: Run this script as the root user." >&2 exit 1 fi

Give the script file the execute permission.

# chmod u+x set-rabbitmq-perms.sh

Run the script.

# ./set-rabbitmq-perms.sh

Stopping node rabbit@zenoss ...

...done.

Resetting node rabbit@zenoss ...

...done.

Starting node rabbit@zenoss ...

...done.

Creating user "zenoss" ...

...done.

Creating vhost "/zenoss" ...

...done.

Setting permissions for user "zenoss" in vhost "/zenoss" ...

...done.

Restart the rabbitmq-server daemon.

# service rabbitmq-server restart

Restarting rabbitmq-server: SUCCESS

rabbitmq-server.

Restart Zenoss.

# service zenoss restart

# Verification
Verify all Zenoss daemons are running.

# su -l zenoss -c 'zenoss status'

Daemon: zeneventserver program running; pid=10564

Daemon: zopectl program running; pid=10662

Daemon: zenrrdcached program running; pid=10667

Daemon: zenhub program running; pid=10730

Daemon: zenjobs program running; pid=10777

Daemon: zeneventd program running; pid=10831

Daemon: zenping program running; pid=10907

Daemon: zensyslog program running; pid=11035

Daemon: zenstatus program running; pid=11026

Daemon: zenactiond program running; pid=11064

Daemon: zentrap program running; pid=11185

Daemon: zenmodeler program running; pid=11196

Daemon: zenperfsnmp program running; pid=11222

Daemon: zencommand program running; pid=11254

Daemon: zenprocess program running; pid=11282

Daemon: zredis program running; pid=11283

Daemon: zenjmx program running; pid=11410

Daemon: zenwin program running; pid=11600

Daemon: zenwinperf program running; pid=11758

Daemon: zeneventlog program running; pid=11910

If the proper permissions have been set for the RabbitMQ zenoss vhost(s), then the following queues should be listed:

# rabbitmqctl -p /zenoss list_queues

Listing queues ...

celery 0

zenoss.queues.zep.migrated.summary 0

zenoss.queues.zep.migrated.archive 0

zenoss.corp.example.com.celeryd.pidbox 0

zenoss.queues.zep.rawevents 0

zenoss.queues.zep.heartbeats 0

zenoss.queues.zep.zenevents 0

zenoss.queues.zep.signal 0

zenoss.queues.zep.modelchange 0

...done.

6. Web Interface Setup Wizard
After the preceding steps have been completed, you are ready to start the Setup Wizard for the initial configuration of customizing Zenoss for your environment. On your client computer, open a web browser and type http://zenoss.corp.example.com:8080 (or http://10.1.206.43:8080) in the address field.

Taken From: http://binarynature.blogspot.pt/2012/11/zenoss-core-4-installation.html