The Beginner’s Guide to iptables, the Linux Firewall
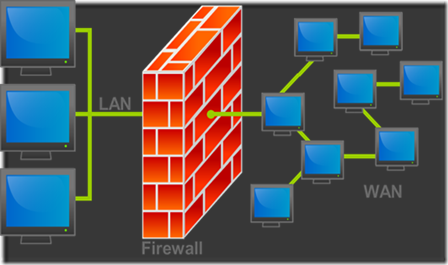
Iptables is an extremely flexible firewall utility built for Linux operating systems. Whether you’re a novice Linux geek or a system administrator, there’s probably some way that iptables can be a great use to you. Read on as we show you how to configure the most versatile Linux firewall.
About iptables
iptables is a command-line firewall utility that uses policy chains to allow or block traffic. When a connection tries to establish itself on your system, iptables looks for a rule in its list to match it to. If it doesn’t find one, it resorts to the default action.
iptables almost always comes pre-installed on any Linux distribution. To update/install it, just retrieve the iptables package:
sudo apt-get install iptables
There are GUI alternatives to iptables like Firestarter, but iptables isn’t really that hard once you have a few commands down. You want to be extremely careful when configuring iptables rules, particularly if you’re SSH’d into a server, because one wrong command can permanently lock you out until it’s manually fixed at the physical machine.
Types of Chains
iptables uses three different chains: input, forward, and output.
Input – This chain is used to control the behavior for incoming connections. For example, if a user attempts to SSH into your PC/server, iptables will attempt to match the IP address and port to a rule in the input chain.
Forward – This chain is used for incoming connections that aren’t actually being delivered locally. Think of a router – data is always being sent to it but rarely actually destined for the router itself; the data is just forwarded to its target. Unless you’re doing some kind of routing, NATing, or something else on your system that requires forwarding, you won’t even use this chain.
There’s one sure-fire way to check whether or not your system uses/needs the forward chain.
iptables -L -v
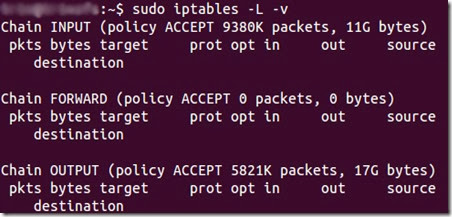
The screenshot above is of a server that’s been running for a few weeks and has no restrictions on incoming or outgoing connections. As you can see, the input chain has processed 11GB of packets and the output chain has processed 17GB. The forward chain, on the other hand, has not needed to process a single packet. This is because the server isn’t doing any kind of forwarding or being used as a pass-through device.
Output – This chain is used for outgoing connections. For example, if you try to ping howtogeek.com, iptables will check its output chain to see what the rules are regarding ping and howtogeek.com before making a decision to allow or deny the connection attempt.
The caveat
Even though pinging an external host seems like something that would only need to traverse the output chain, keep in mind that to return the data, the input chain will be used as well. When using iptables to lock down your system, remember that a lot of protocols will require two-way communication, so both the input and output chains will need to be configured properly. SSH is a common protocol that people forget to allow on both chains.
Policy Chain Default Behavior
Before going in and configuring specific rules, you’ll want to decide what you want the default behavior of the three chains to be. In other words, what do you want iptables to do if the connection doesn’t match any existing rules?
To see what your policy chains are currently configured to do with unmatched traffic, run theiptables -L command.

As you can see, we also used the grep command to give us cleaner output. In that screenshot, our chains are currently figured to accept traffic.
More times than not, you’ll want your system to accept connections by default. Unless you’ve changed the policy chain rules previously, this setting should already be configured. Either way, here’s the command to accept connections by default:
iptables --policy INPUT ACCEPT
iptables --policy OUTPUT ACCEPT
iptables --policy FORWARD ACCEPT
By defaulting to the accept rule, you can then use iptables to deny specific IP addresses or port numbers, while continuing to accept all other connections. We’ll get to those commands in a minute.
If you would rather deny all connections and manually specify which ones you want to allow to connect, you should change the default policy of your chains to drop. Doing this would probably only be useful for servers that contain sensitive information and only ever have the same IP addresses connect to them.
iptables --policy INPUT DROP
iptables --policy OUTPUT DROP
iptables --policy FORWARD DROP
Connection-specific Responses
With your default chain policies configured, you can start adding rules to iptables so it knows what to do when it encounters a connection from or to a particular IP address or port. In this guide, we’re going to go over the three most basic and commonly used “responses”.
Accept – Allow the connection.
Drop – Drop the connection, act like it never happened. This is best if you don’t want the source to realize your system exists.
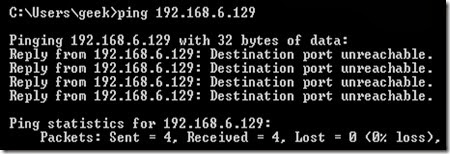
Reject – Don’t allow the connection, but send back an error. This is best if you don’t want a particular source to connect to your system, but you want them to know that your firewall blocked them.
The best way to show the difference between these three rules is to show what it looks like when a PC tries to ping a Linux machine with iptables configured for each one of these settings.
Allowing the connection:
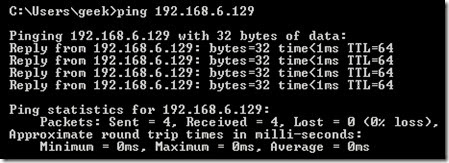
Dropping the connection:

Rejecting the connection:
Allowing or Blocking Specific Connections
With your policy chains configured, you can now configure iptables to allow or block specific addresses, address ranges, and ports. In these examples, we’ll set the connections to DROP, but you can switch them to ACCEPT or REJECT, depending on your needs and how you configured your policy chains.
Note: In these examples, we’re going to use iptables -A to append rules to the existing chain. iptables starts at the top of its list and goes through each rule until it finds one that it matches. If you need to insert a rule above another, you can use iptables -I [chain] [number] to specify the number it should be in the list.
Connections from a single IP address
This example shows how to block all connections from the IP address 10.10.10.10.
iptables -A INPUT -s 10.10.10.10 -j DROP
Connections from a range of IP addresses
This example shows how to block all of the IP addresses in the 10.10.10.0/24 network range. You can use a netmask or standard slash notation to specify the range of IP addresses.
iptables -A INPUT -s 10.10.10.0/24 -j DROP
or
iptables -A INPUT -s 10.10.10.0/255.255.255.0 -j DROP
Connections to a specific port
This example shows how to block SSH connections from 10.10.10.10.
iptables -A INPUT -p tcp --dport ssh -s 10.10.10.10 -j DROP
You can replace “ssh” with any protocol or port number. The -p tcp part of the code tells iptables what kind of connection the protocol uses. If you were blocking a protocol that uses UDP rather than TCP, then -p udp would be necessary instead.
This example shows how to block SSH connections from any IP address.
iptables -A INPUT -p tcp --dport ssh -j DROP
Connection States
As we mentioned earlier, a lot of protocols are going to require two-way communication. For example, if you want to allow SSH connections to your system, the input and output chains are going to need a rule added to them. But, what if you only want SSH coming into your system to be allowed? Won’t adding a rule to the output chain also allow outgoing SSH attempts?
That’s where connection states come in, which give you the capability you’d need to allow two way communication but only allow one way connections to be established. Take a look at this example, where SSH connections FROM 10.10.10.10 are permitted, but SSH connections TO 10.10.10.10 are not. However, the system is permitted to send back information over SSH as long as the session has already been established, which makes SSH communication possible between these two hosts.
iptables -A INPUT -p tcp --dport ssh -s 10.10.10.10 -m state --state NEW,ESTABLISHED -j ACCEPT
iptables -A OUTPUT -p tcp --sport 22 -d 10.10.10.10 -m state --state ESTABLISHED -j ACCEPT
Saving Changes
The changes that you make to your iptables rules will be scrapped the next time that the iptables service gets restarted unless you execute a command to save the changes. This command can differ depending on your distribution:
Ubuntu:
sudo /sbin/iptables-save
Red Hat / CentOS:
/sbin/service iptables save
Or
/etc/init.d/iptables save
Other Commands
List the currently configured iptables rules:
iptables -L
Adding the -v option will give you packet and byte information, and adding -n will list everything numerically. In other words – hostnames, protocols, and networks are listed as numbers.
To clear all the currently configured rules, you can issue the flush command.
iptables -F
Taken From: http://www.howtogeek.com/177621/the-beginners-guide-to-iptables-the-linux-firewall/
