Saturday, September 22, 2012

Customized Windows 7 (RT Se7en Lite and AIK)

How To Create a Customized Windows 7 Installation Disc With Integrated Updates

image

Do you want to save time when installing Windows 7? You can create a customized installation disc and have it perform an installation without asking you questions, integrate updates and drivers, tweak Windows, and remove Windows components.

We’ll be using RT Se7en Lite for this – if you’ve used nLite with Windows XP or vLite with Windows Vista in the past, it works similarly. RT Se7en Lite is a sort of vLite or nLite for Windows 7.

Image Credit: bfishadow on Flickr

What You’ll Need

To do this, you’ll need Windows 7 installed on your computer. You’ll also need to download and install the Windows Automated Installation Kit (WAIK) for Windows 7 from Microsoft – RT Se7en Lite is a more user friendly frontend to WAIK.

WAIK is 1.7 GB, so the download may take a while if you have a slow Internet connection. After downloading it, extract it with a file extraction program such as 7-Zip.

Run the StartCD.exe file, select Windows AIK Setup, and follow the instructions on your screen to install Windows AIK.

You’ll also need a Windows 7 installation source – either a physical disc or ISO file.

Next, download and install RT Se7en Lite from here – it’s free and donation-supported. Download the appropriate version for your version of Windows — x86 if you’re using a 32-bit version of Windows or x64 if you’re using a 64-bit edition.

Using RT Se7en Lite

First, click the Browse button and provide your Windows 7 files – if you have an ISO file on your hard drive, click Select ISO file and navigate to it. If you have a Windows disc, insert the disk, click Select OS path, and navigate to the disc.

If you provide an ISO, you’ll have to specify an extraction path where the ISO’s files will be extracted to – you’ll need several gigabytes of space on your hard disk for this.

The files will be automatically extracted after you provide your ISO.

After selecting the edition of Windows 7 you’re customizing, RT Se7en Lite will load the image. If you have a Windows 7 disc without Service Pack 1 integrated, click the Slipstream Service Pack option in the “Select an image to configure” window and you’ll be able to integrate SP1.

Click over to the Task pane and select the tasks you want to perform after the image is loaded. You can manually check the check boxes or select a preset. Selecting one of the check boxes will activate the corresponding configuration pane at the left side of the window.

The integration pane allows you to integrate Windows updates, drivers, language packs, and even third-party applications into your installation disc. To integrate updates, you’ll have to download their installer files and load them into RT Seven Lite with the Add button.

On the Features Removal or Components tab, you can permanently remove components from your Windows installation disc and control which Windows features are installed by default. For example, you can remove the included games from your Windows installer disc, or force Windows to install the IIS web server by default.

The Tweaks tab allows you to customize the default settings for the Windows Control Panel, Desktop, Explorer, and a variety of other Windows components. You can even add custom registry settings to tweak other settings that aren’t present in the list.

The Unattended section allows you to create an unattended installation disc – you provide answers to installation questions beforehand and Windows will install without asking you these questions during the installation process.

For example, you can enter your product key ahead of time so Windows won’t ask you for it. The other tabs allow you to control other settings – for example, selecting the hard disks that Windows will install on. If you complete enough of these settings, Windows will install automatically without asking you any questions during the installation, allowing you to perform an unattended Windows installation.

The Customization pane allows you to add custom screensavers, wallpapers, themes, documents, and even logon screens to your Windows 7 disc.

On the ISO Bootable pane, you can create a ISO image from your customized installation disc. You can also burn it to a DVD or copy it to a bootable USB drive.

RT Se7en Lite’s developers recommend booting your custom Windows 7 image in a virtual machine and installing it in the virtual machine before you use it on a physical computer, just to make sure everything is working properly.

You can use VirtualBox or VMware Player to do this – both are free.
Wednesday, September 5, 2012

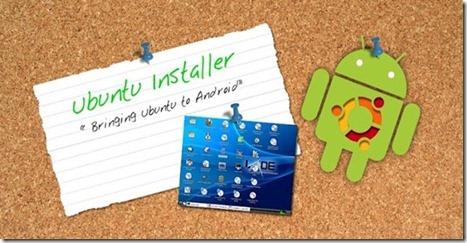
Linux Desktop On Your Android Phone (Ubuntu)

Of all the various flavors of Linux available to those looking for an open-source platform from which to compute, Ubuntu is by far the simplest to install – allowing even the most hapless noob to download and enjoy.

Being that Google’s Android is also open source, developers have enjoyed a great deal of success porting Windows 95, 98, XP, as well as many other Linux iterations onto Android devices, but hitherto, not Ubuntu.

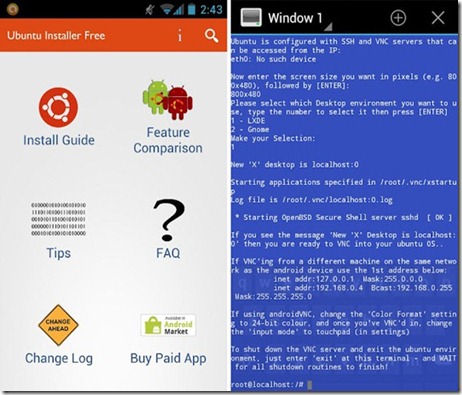
Those of you running a rooted Android may be pleased to learn of Ubuntu Installer, a Market app which - yes, you’ve guessed it - installs Ubuntu. Even for the unseasoned tinkerer, it’s pretty simple to install – providing you check for the compatibility of your device/ ROM in advance.

clip_image001

Here is a list of the key features:

  • Run Ubuntu within Android.
  • Access to both Android & Ubuntu at same time.
  • Highly optimized for ARM devices.
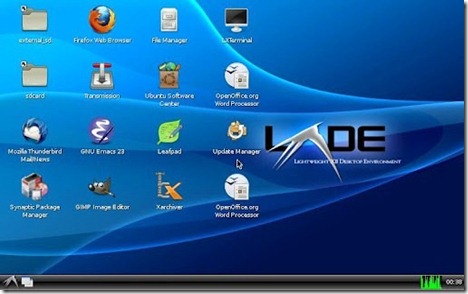
  • LXDE Desktop (very lightweight)
  • Ubuntu update manager, Software centre fully operational.
  • File system access: Ability to access files on your SD card and internal memory from Ubuntu.
  • Set resolution: Ability to set screen size on boot (you no longer have to download a certain image for different screen sizes!)
  • Choose Ubuntu Installation type: ‘large’ and ‘lightweight’

By default, we always recommend performing such installs on spare devices as opposed to your daily runner. We don’t expect anything to go wrong, but if it were to, we wouldn’t want the issue to intervene with your daily digital errands.

clip_image002

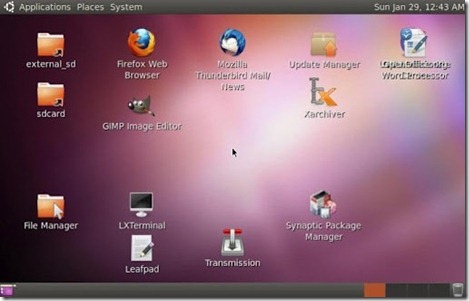
There’s a large version of the installer (1.5 GB downloaded, 3.5 GB installed), which comes with all the bells and whistles such as Firefox, Thunderbird, openoffice.org suite, GIMP Image Editor and so forth, as well as a lightweight version, which contains the basic features required for Ubuntu to function without a hitch.

clip_image003

clip_image004

Before you download, please check the compatibility of your device via the developer’s blog.

Download Ubuntu Installer for Android [Market Link]

Please let us know how you get on with Ubuntu Installer; feel free to share your sentiments via our Facebook and Google + pages linked below!

You can follow us on Twitter, add us to your circle on Google+ or like our Facebook page to keep yourself updated on all the latest from Microsoft, Google, Apple and the web.


MOBILE PC - Ubuntu On Android With External PC Screen, Mouse and Keyboard

Taken From: http://www.redmondpie.com/install-and-run-ubuntu-on-your-android-device-with-ubuntu-installer-download-now/

Thursday, August 23, 2012

Stream Videos and Music Over the Network With VLC

clip_image002

VLC includes a fairly easy-to-use streaming feature that can stream music and videos over a local network or the Internet. You can tune into the stream using VLC or other media players.

Use VLC’s web interface as a remote control to control the stream from elsewhere. Bear in mind that you may not have the bandwidth to stream high-definition videos over the Internet, though.

Broadcasting a Stream

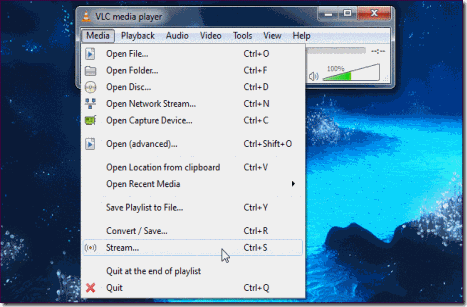
To start broadcasting a network stream, click the Media menu in VLC and select Stream.

clip_image004

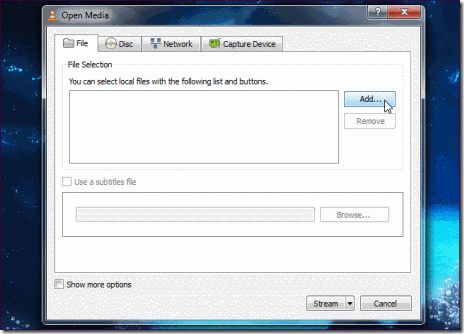
In the Open Media dialog, select the media you want to stream. You can select one or more files on the Files tab, select a CD or DVD on the Disc tab, or even capture video from a specific device on the Capture Device tab. For example, you could stream your desktop by selecting Desktop on the Capture Device tab.

Click the Stream button after selecting your media.

clip_image006

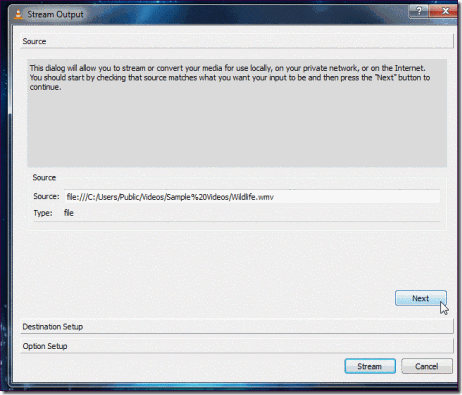
The Stream Output window will appear. The first pane just lists the media source you selected – click Next to continue.

clip_image008

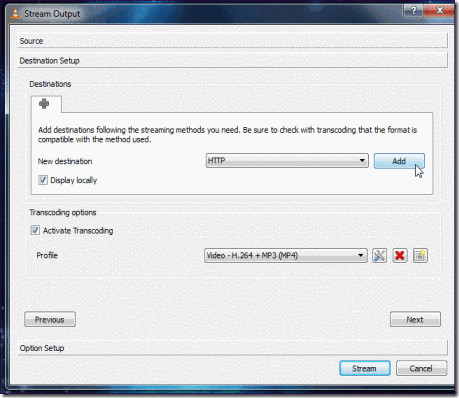
On the Destination Setup pane, you’ll need to choose a destination for your stream. For example, you can select HTTP to listen for connections – other computers can connect to your computer and watch the stream. You can also select UDP to broadcast to a specific IP address or range of IP addresses.

After selecting your destination, click the Add button. You may also want to activate the Display locally check box – if you do, you’ll see and hear the media being streamed on your local computer, so you’ll know it’s playing correctly.

clip_image010

After adding a destination, you’ll be able to customize its settings. With the HTTP destination, you could specify a custom path – but the default one will work fine.

You can also tweak the transcoding settings – by transcoding to a lower quality, VLC can save network bandwidth.

clip_image012

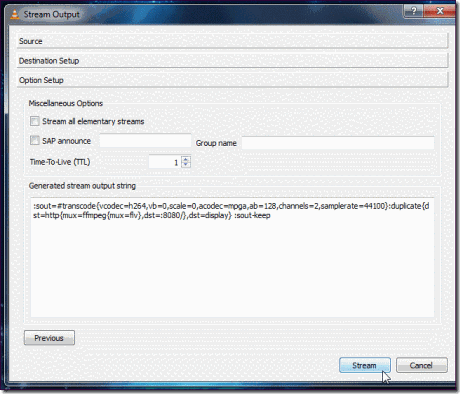
Click Next to continue to the Option Setup pane – you probably don’t need to tweak any of the advanced options here. To start streaming, click the Stream button.

clip_image014

If you selected the Display locally option, the media will start playing locally on your computer.

If you have a firewall enabled, ensure that VLC is an allowed program or no computers will be able to connect. If you’re trying to stream over the Internet, you may also need toforward ports on your router.

Connecting to a Stream

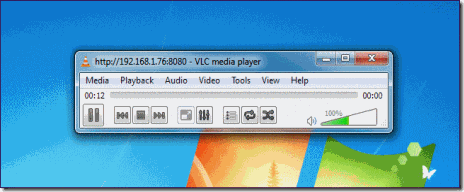
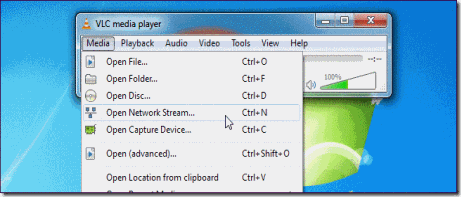
To tune in to a stream, click the Media menu in VLC on another computer and select Open Network Stream.

clip_image016

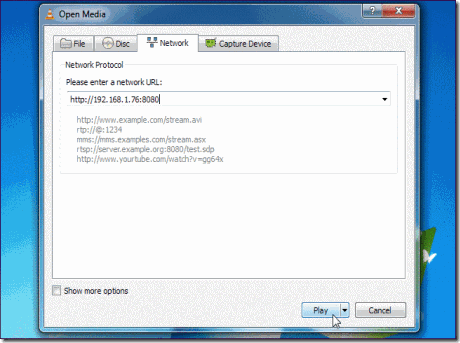
Assuming you used HTTP, enter an address like http://IP.Address:8080. See this postif you need help finding the other system’s IP address.

(If you specified a custom path for your HTTP stream in the Path box, you’ll need to specify the custom path here. For example, if you specified /path as your custom path, you’d enter http://IP.Address:8080/path in the box here.)

clip_image018

After clicking Play, the stream should start playing. To control playback remotely, trysetting up VLC’s web interface. If you encounter an error, make sure VLC isn’t being blocked by a firewall on the streaming system.

clip_image020

Taken From: http://www.howtogeek.com/118075/how-to-stream-videos-and-music-over-the-network-using-vlc/

Tuesday, August 21, 2012

Forward Ports on Your Router From a Desktop (UPnP)

clip_image002

UPnP is a convenient way for programs to forward ports without you having to pull up your router’s web interface and forward ports manually. Unfortunately, some programs that require port forwarding don’t support UPnP – that’s where UPnP PortMapper comes in.

This application takes care of port forwarding for you, right from your desktop. If your IP address changes, you don’t need to log into your router and change your port forwarding rules – you can have the application update them for you.

If you visit a friend’s house and join their network, you don’t have to ask for their router’s password to forward ports – just fire up the application and activate your preset rules.

Installation

UPnP Port Mapper is written in Java, so you’ll need the free Java Runtime Environmentinstalled to run it. After installing Java, you can download UPnP Port Mapper from SourceForge. In addition to Windows, this application also works on Mac OS X and Linux.

UPnP Port Mapper communicates with your router with the UPnP protocol, so you’ll also need a router with UPnP enabled to use this application. If UPnP is disabled on your network’s router, this program can’t do anything.

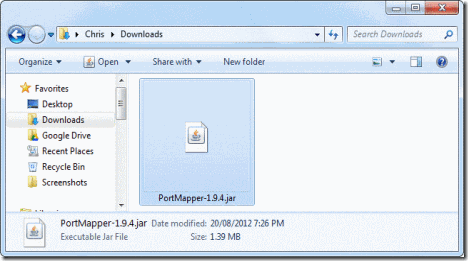
After downloading UPnP Port Mapper, double-click the .jar file to launch it.

clip_image004

Forwarding Ports

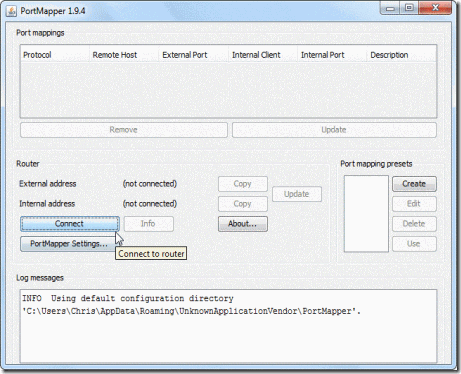
To get started, click the Connect button in UPnP Port Mapper. If you see a Windows Firewall pop-up window, click the Unblock button. You may have to allow Java network access in the Windows firewall pop-up that appears.

If UPnP PortMapper informs you that it can’t find your router, click the Connect button again unblocking the application in the Windows firewall.

clip_image006

If it worked, you’ll see a list of UPnP port mappings in the top pane (this list will be empty by default), as well as your router’s external IP address on the Internet and its IP address on your local network.

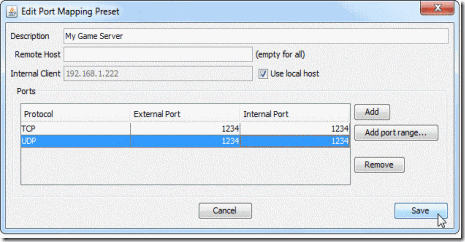
To create a new port forwarding preset, click the Create button.

clip_image008

Enter a description for your port forwarding rule and provide a list of one or more ports to forward. You can specify port ranges or forward a list of ports using a single preset.

You can also specify a specific remote host. If you enter an IP address, only traffic from that IP address will be forwarded to your computer from your router. For example, you can use this feature to only allow connections from a friend’s IP address on the Internet.

The Use local host box is checked by default, making it easy to forward ports without having to double-check your computer’s local IP address. However, you could also use this application to forward ports to multiple different computers on your network.

clip_image010

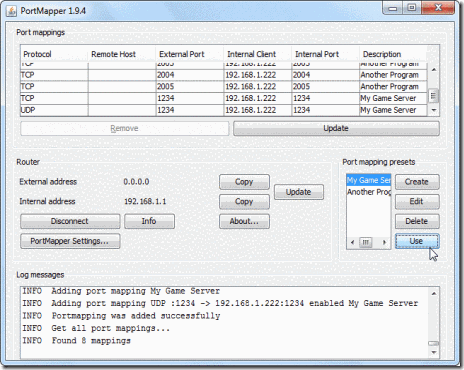
Port forwarding presets you specify will appear  in the Port mapping presets box. Select a preset and click the Use button to activate it.

Clicking this button forwards the ports on your router – they’ll appear in the Port mappings box at the top of the window. You can remove port mappings by selecting them and clicking the Remove button.

clip_image012

The port mappings will be saved on your router until its UPnP data is cleared – depending on your router, this may happen when your router is restarted. If you open UPnP Port Mapper later and click the Connect button, you’ll see your active port mappings.

You will also need to reapply port mapping settings if your computer’s local IP address changes.

With your presets, you can quickly and easily apply these port mapping settings on any network with a router that supports UPnP – this can be convenient if you move around and need to forward ports for gaming, servers, or other purposes.

Taken From: http://www.howtogeek.com/122227/how-to-quickly-forward-ports-on-your-router-from-a-desktop-application/

Thursday, August 16, 2012

Sync Gmail Calendar with Outlook

There are many tutorials out there but they are all too complicated or/and give you paid, complicated tools to do the job.

The tool on this post is free, and will sit on your tray and won’t bother you, while maintaining your calendar synced. I’m gonna show you the easiest way to do it.

Google Calendar Sync

clip_image001

Download page: http://www.google.com/support/cal..wer=89955
(Direct link to download)

Installation

1. Read through the Google Calendar Sync Terms of Service, and click I Agree.
2. Follow through the Installation Options and click Install to finish the set-up process.

3. Once Google Calendar Sync is installed on your computer, the Google Calendar Sync Settings window will appear:

clip_image002

Just enter your email/password and click Save. If you don’t want to sync back to Google Calendar choose “1 way: Google Calendar to Microsoft Outlook”
You are now syncing Google Calendar with Outlook!

This is very helpfull, specialy if you have an android phone, since it automatically syncs with gmail calendar. Now I have my Outlook calendar on my phone.

Based On: http://knokio.com/guide/sync-gmail-contacts-and-google-calendar-with-outlook/#.UC1YSt1lSbN

Wednesday, August 15, 2012

Windows 8 Portable USB Drive (No Extra Tools)

clip_image002

For a long time Linux users have been able to install their OS onto a portable USB drive, but Windows just caught up. Read on to find out how you can install Windows 8 onto a USB drive so you can take it wherever you go.

Note: This was written on the RTM version of Windows 8 Enterprise and you will need to have an RTM build of the Enterprise edition to complete the steps in this article.

Using Windows To Go to Create a Portable Workspace

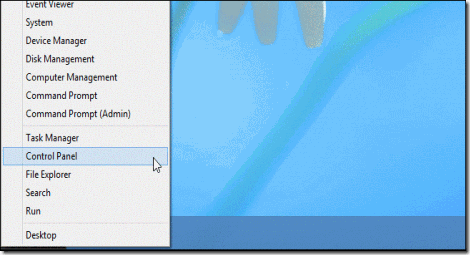
Press the Win + X keyboard combination and select Control Panel from the context menu.

clip_image004

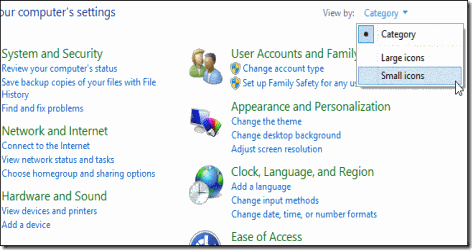
You will need to change your Control Panel view to the Small Icons view.

clip_image006

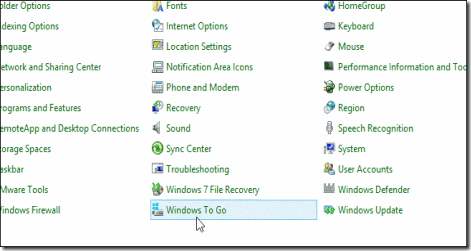
You should now see Windows To Go near the bottom of the Control Panel, click on it.

clip_image008

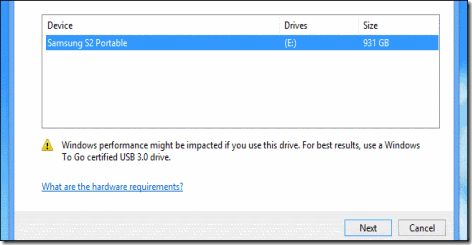
You will now need to select the USB drive you would like to turn into a portable workspace, then click next.

clip_image010

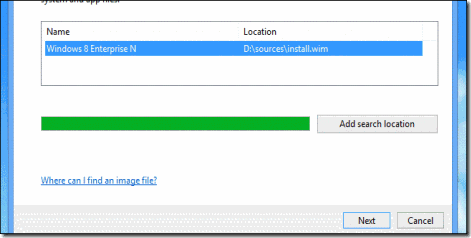
The wizard will automatically scan your CD\DVD and Removable drives for valid Windows installation files, once you have selected a version of Windows click next.

Note: If you store your installation files elsewhere you will need to add it as a search location.

clip_image012

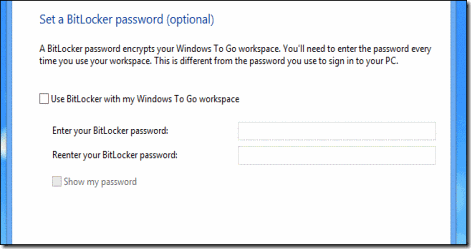
You can optionally set a BitLocker password, but we’ll pass on this option for now.

clip_image014

Once you have reached the end of the wizard, you will be warned that your USB drive will be formatted. You can then click on create to kick of the creation process.

clip_image016

That’s all there is to it, you now have a bootable USB with Windows on it.

clip_image018

Note: Your portable USB will not show up in Explorer, this leaves us with a problem later on when you don’t need to use it as a Portable Workspace anymore.

How To Reformat Your Windows To Go USB Drive

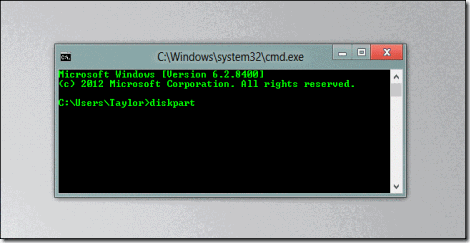
If you’re done using Windows on a drive, you can reformat the drive, but you’ll need to open a command prompt and type diskpart, then press enter.

clip_image020

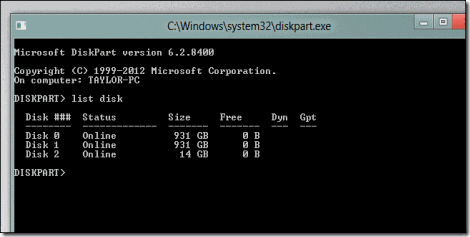
Once you enter Diskpart you will need to find out which drive is the one you need to format, the list disk command will show you all the drive currently connected to your system. Take note of your drive number because we will need it in the next step.

clip_image022

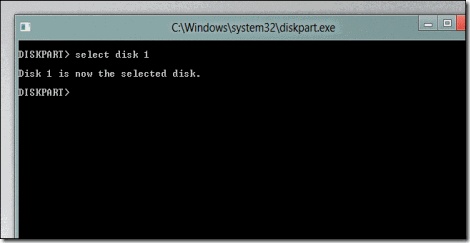
We now need to select the disk, you can simply use the select disk command along with your drive number from the previous step.

clip_image024

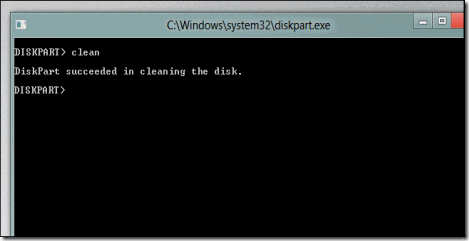
Now that the disk is selected we can go ahead and wipe it.

Note: Clean is a ruthless command that will wipe all the file systems off your drive without any warnings, if you have selected the wrong drive previously this will result is a loss of data so make sure you have the right drive selected.

clip_image026

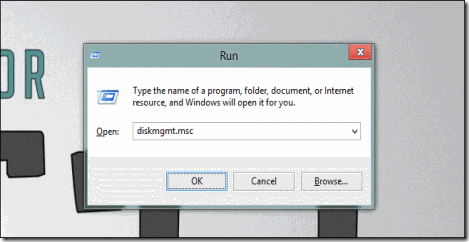
We can now use the Win + R keyboard combination to bring up the run box  and open Disk Management.

clip_image028

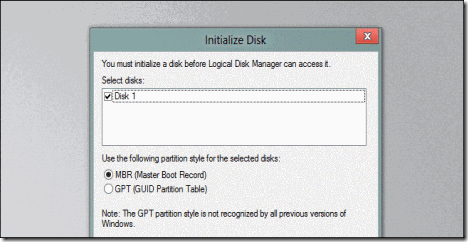
As soon as the Management console opens you will need to initialize the disk.

clip_image030

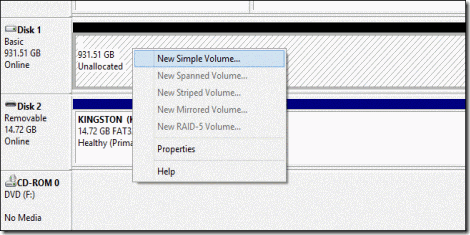
Then you can go ahead and create your drives partition.

clip_image032

That’s all there is to it.

Taken From: http://www.howtogeek.com/121322/how-to-create-a-portable-version-of-windows-8-without-extra-software/