Tuesday, August 21, 2012

Forward Ports on Your Router From a Desktop (UPnP)

clip_image002

UPnP is a convenient way for programs to forward ports without you having to pull up your router’s web interface and forward ports manually. Unfortunately, some programs that require port forwarding don’t support UPnP – that’s where UPnP PortMapper comes in.

This application takes care of port forwarding for you, right from your desktop. If your IP address changes, you don’t need to log into your router and change your port forwarding rules – you can have the application update them for you.

If you visit a friend’s house and join their network, you don’t have to ask for their router’s password to forward ports – just fire up the application and activate your preset rules.

Installation

UPnP Port Mapper is written in Java, so you’ll need the free Java Runtime Environmentinstalled to run it. After installing Java, you can download UPnP Port Mapper from SourceForge. In addition to Windows, this application also works on Mac OS X and Linux.

UPnP Port Mapper communicates with your router with the UPnP protocol, so you’ll also need a router with UPnP enabled to use this application. If UPnP is disabled on your network’s router, this program can’t do anything.

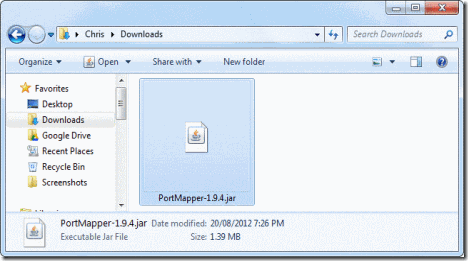
After downloading UPnP Port Mapper, double-click the .jar file to launch it.

clip_image004

Forwarding Ports

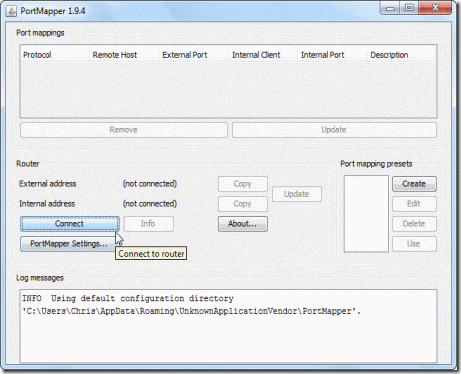
To get started, click the Connect button in UPnP Port Mapper. If you see a Windows Firewall pop-up window, click the Unblock button. You may have to allow Java network access in the Windows firewall pop-up that appears.

If UPnP PortMapper informs you that it can’t find your router, click the Connect button again unblocking the application in the Windows firewall.

clip_image006

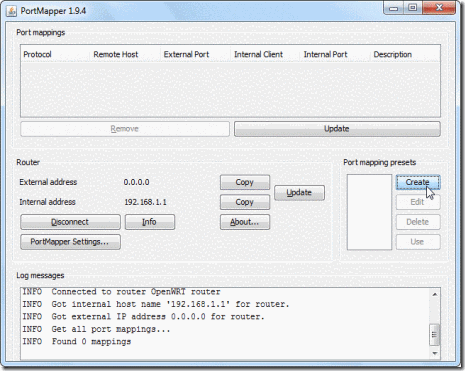
If it worked, you’ll see a list of UPnP port mappings in the top pane (this list will be empty by default), as well as your router’s external IP address on the Internet and its IP address on your local network.

To create a new port forwarding preset, click the Create button.

clip_image008

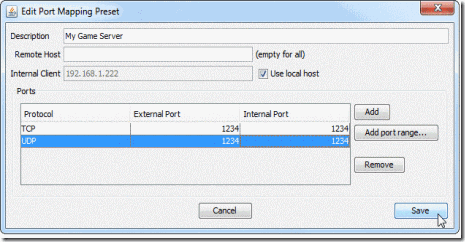
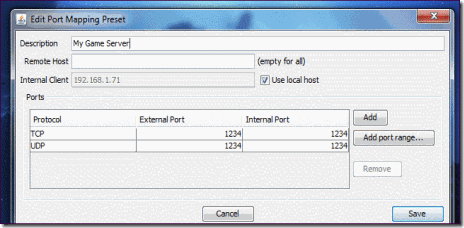
Enter a description for your port forwarding rule and provide a list of one or more ports to forward. You can specify port ranges or forward a list of ports using a single preset.

You can also specify a specific remote host. If you enter an IP address, only traffic from that IP address will be forwarded to your computer from your router. For example, you can use this feature to only allow connections from a friend’s IP address on the Internet.

The Use local host box is checked by default, making it easy to forward ports without having to double-check your computer’s local IP address. However, you could also use this application to forward ports to multiple different computers on your network.

clip_image010

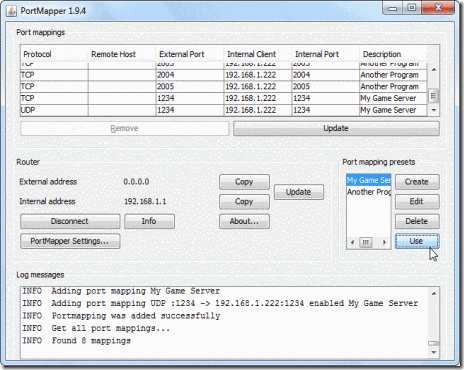
Port forwarding presets you specify will appear  in the Port mapping presets box. Select a preset and click the Use button to activate it.

Clicking this button forwards the ports on your router – they’ll appear in the Port mappings box at the top of the window. You can remove port mappings by selecting them and clicking the Remove button.

clip_image012

The port mappings will be saved on your router until its UPnP data is cleared – depending on your router, this may happen when your router is restarted. If you open UPnP Port Mapper later and click the Connect button, you’ll see your active port mappings.

You will also need to reapply port mapping settings if your computer’s local IP address changes.

With your presets, you can quickly and easily apply these port mapping settings on any network with a router that supports UPnP – this can be convenient if you move around and need to forward ports for gaming, servers, or other purposes.

Taken From: http://www.howtogeek.com/122227/how-to-quickly-forward-ports-on-your-router-from-a-desktop-application/

Thursday, August 16, 2012

Sync Gmail Calendar with Outlook

There are many tutorials out there but they are all too complicated or/and give you paid, complicated tools to do the job.

The tool on this post is free, and will sit on your tray and won’t bother you, while maintaining your calendar synced. I’m gonna show you the easiest way to do it.

Google Calendar Sync

clip_image001

Download page: http://www.google.com/support/cal..wer=89955
(Direct link to download)

Installation

1. Read through the Google Calendar Sync Terms of Service, and click I Agree.

2. Follow through the Installation Options and click Install to finish the set-up process.

3. Once Google Calendar Sync is installed on your computer, the Google Calendar Sync Settings window will appear:

clip_image002

Just enter your email/password and click Save. If you don’t want to sync back to Google Calendar choose “1 way: Google Calendar to Microsoft Outlook”

You are now syncing Google Calendar with Outlook!

This is very helpfull, specialy if you have an android phone, since it automatically syncs with gmail calendar. Now I have my Outlook calendar on my phone.

Based On: http://knokio.com/guide/sync-gmail-contacts-and-google-calendar-with-outlook/#.UC1YSt1lSbN

Wednesday, August 15, 2012

Windows 8 Portable USB Drive (No Extra Tools)

clip_image002

For a long time Linux users have been able to install their OS onto a portable USB drive, but Windows just caught up. Read on to find out how you can install Windows 8 onto a USB drive so you can take it wherever you go.

Note: This was written on the RTM version of Windows 8 Enterprise and you will need to have an RTM build of the Enterprise edition to complete the steps in this article.

Using Windows To Go to Create a Portable Workspace

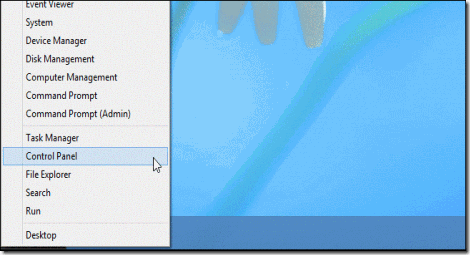
Press the Win + X keyboard combination and select Control Panel from the context menu.

clip_image004

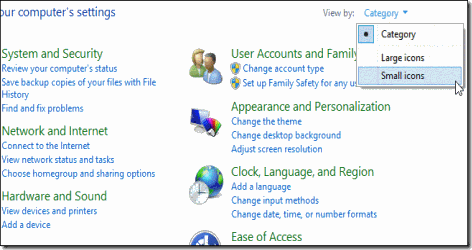
You will need to change your Control Panel view to the Small Icons view.

clip_image006

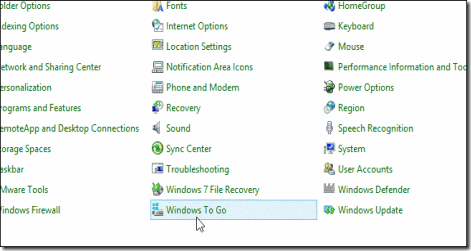
You should now see Windows To Go near the bottom of the Control Panel, click on it.

clip_image008

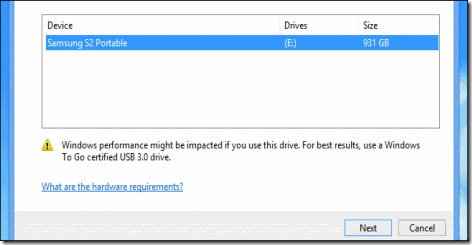
You will now need to select the USB drive you would like to turn into a portable workspace, then click next.

clip_image010

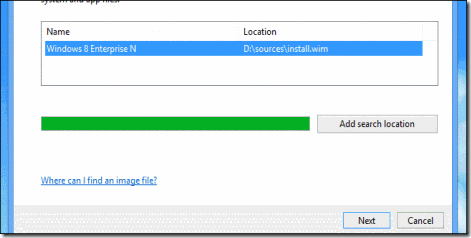
The wizard will automatically scan your CD\DVD and Removable drives for valid Windows installation files, once you have selected a version of Windows click next.

Note: If you store your installation files elsewhere you will need to add it as a search location.

clip_image012

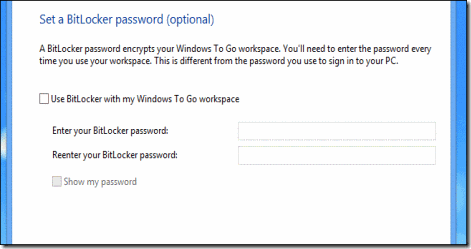
You can optionally set a BitLocker password, but we’ll pass on this option for now.

clip_image014

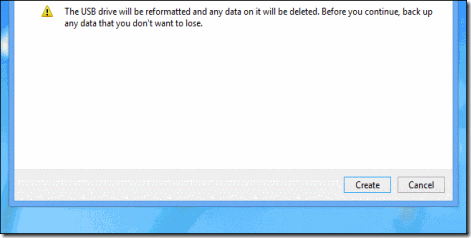
Once you have reached the end of the wizard, you will be warned that your USB drive will be formatted. You can then click on create to kick of the creation process.

clip_image016

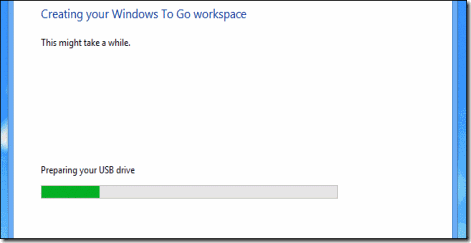
That’s all there is to it, you now have a bootable USB with Windows on it.

clip_image018

Note: Your portable USB will not show up in Explorer, this leaves us with a problem later on when you don’t need to use it as a Portable Workspace anymore.

How To Reformat Your Windows To Go USB Drive

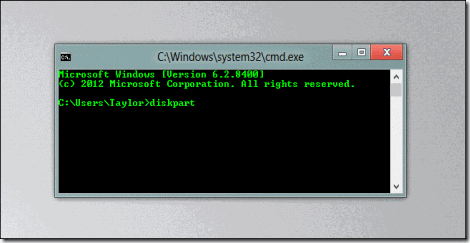
If you’re done using Windows on a drive, you can reformat the drive, but you’ll need to open a command prompt and type diskpart, then press enter.

clip_image020

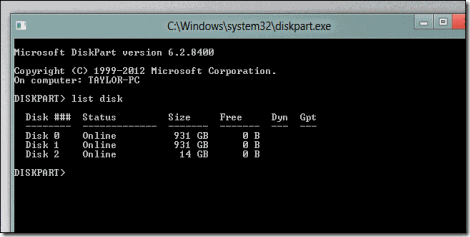
Once you enter Diskpart you will need to find out which drive is the one you need to format, the list disk command will show you all the drive currently connected to your system. Take note of your drive number because we will need it in the next step.

clip_image022

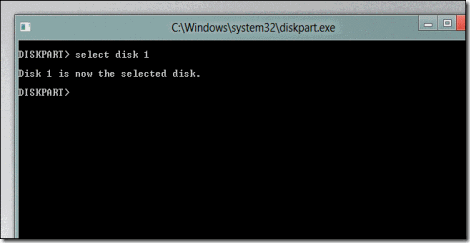
We now need to select the disk, you can simply use the select disk command along with your drive number from the previous step.

clip_image024

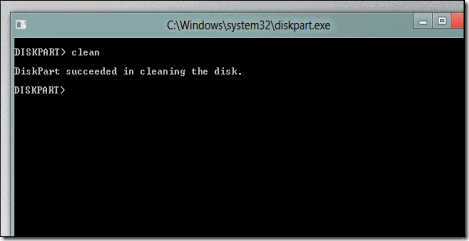
Now that the disk is selected we can go ahead and wipe it.

Note: Clean is a ruthless command that will wipe all the file systems off your drive without any warnings, if you have selected the wrong drive previously this will result is a loss of data so make sure you have the right drive selected.

clip_image026

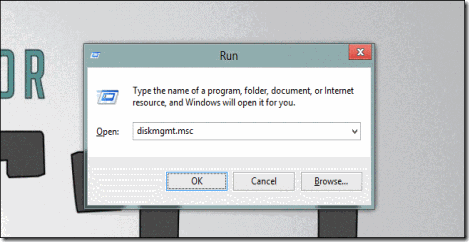
We can now use the Win + R keyboard combination to bring up the run box  and open Disk Management.

clip_image028

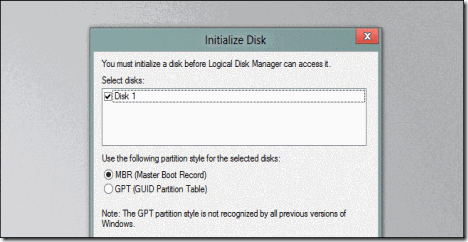
As soon as the Management console opens you will need to initialize the disk.

clip_image030

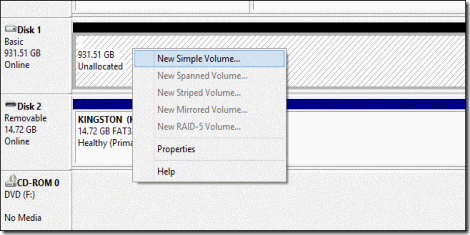
Then you can go ahead and create your drives partition.

clip_image032

That’s all there is to it.

Taken From: http://www.howtogeek.com/121322/how-to-create-a-portable-version-of-windows-8-without-extra-software/

Saturday, July 14, 2012

How to Get Free Cisco Books (Routers and Switches)

Recently I had a problem with a cisco 2960 switch, to solve it I needed to do a password recovery, so I tried the Ctlr + Break/Pause procedure that I had learned on the CCNA classes, and it didn’t work, so I went online serching for more information an found the following a online book (webpage):

“Catalyst 2960 and 2960-S Switch Software Configuration Guide”

This book has all the cisco 2960 possible commands and configurations for a particular IOS version, and you can download it freely in PDF.

In this book I found that for this particular equipment the recovery was done in a diferent way.

So I went on google and tried searching for other equipments:

Google: Cisco xxxx Software Configuration Guide

and found the same type off manual.

These manuals are a great source of information, in these you can see what the equipment can do, and how to do it, this is especially important if it’s done in a different way from the other equipments.

I highly recommend that you get these for every cisco equipment/IOS that you work with.

Wednesday, June 27, 2012

WiFi for Arduino via dd-wrt Router (Serial/TCP/USB)

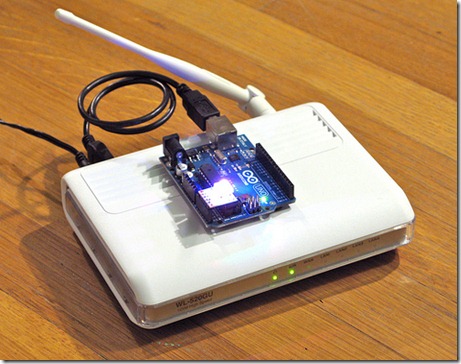
I love Arduino but its lack of wireless bugs me. And it sucks that WiFi Shields for the Arduino cost as much a cell phone. I want something cheap. Turns out, small, cheap WiFi routers like the Asus WL-520gu can run theDD-WRT Linux firmware and act as serial-to-network gateway for Arduinos (or most any other USB device). Here’s how to do it.

(Hey, is this a Wifi-controlled BlinkM? I think it is.)
clip_image001

A quick video showing a router acting as a serial-to-network gateway:

This is not that new of a concept, hacking Linux onto a router for some neat DIY purpose. One of my favorite past hacks is MightyOhm’s WiFi Radio project. And of course, see my own book Hacking Roomba for an example of how to put a Roomba on the Net.

This post is specifically about trying to make a DD-WRT router a transparent gateway for an Arduino.

The steps are:

  1. Install DD-WRT Firmware
  2. Configure Router to be WiFi Client
  3. Do Some Tests
  4. Install USB Serial Drivers
  5. Install Serial-to-Network Proxy

1. Install DD-WRT Firmware

To get it working, you need to install two firmware files. The first is to convert from standard Asus firmware to a standard DD-WRT, then the second adds in additional features.

Follow the steps in the “New Wiki Install Material” section on DD-WRT’s wiki on the Asus WL-520gu. It seems scary at first, but stick with it. (And for more than you ever wanted to know about Asus and TFTP, see Asus_TFTP_Flash.)

Below is an abbreviated and summarized version of the full instructions.

1a. Download firmwards and needed tools

Download the “trx” firmware to your computer. (“trx” files are what Asus routers need when updating via TFTP) It is called: dd-wrt.v24-12548_NEWD_mini_asus.trx.

Also, download the second “bin” firmware to your computer. (“bin” firmware files are what DD-WRT uses. It is called: dd-wrt.v24_usb_generic.bin

1b. Install 1st firmware (“.trx”)

Connect your router to your computer via an Ethernet cable, set your computer to have the IP address 192.168.1.7.

Do the mentioned “30-30-30″ reset to the router, then send the “trx” firmware file with tftp. On Mac OS X (and Linux), do this by opening up a terminal window and typing:
% tftp 192.168.1.1
tftp> mode binary
tftp> put dd-wrt.v24-12548_NEWD_mini_asus.trx
tftp> quit

Then wait for five minutes (seriously). Power cycle the router and its web interface should be available. It will ask you for a admin username and password, be sure to fill this out.

1c. Install 2nd firmware (“.bin”)

This is a pretty standard firmware upgrade process. Just follow the instructions in the DD-WRT page above and you should end up with a router that’s ready to go.

2. Configure Router to be WiFi Client

With the router running a good basic DD-WRT firmware, it now needs to be modified to act like a wireless client, instead of an access point, enable things like SSH server for command-line access, and enable USB.

After each step below, reboot the router.

2a. Enable wireless client mode

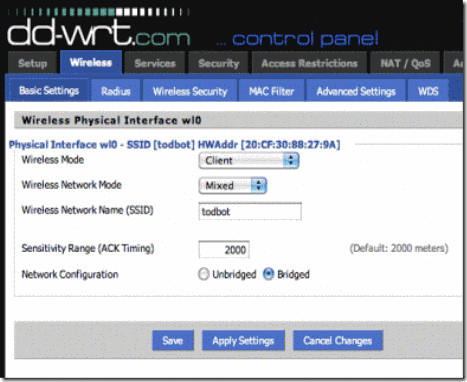
Go to the “Wireless/Basic Settings page, and set the router to be a wireless client on your network. If you have WEP/WPA, you’ll need to go to the Wireless/Wireless Security page to set that up. And if you want your Arduino to have a static IP address instead of a DHCP-obtained one, head over to Setup/Basic Setupand change “Connection Type” to “Static IP”; you’ll be presented with a set of form fields to input the IP address.

Note that at the end of this, your router will have two IP addresses: one being the “management” IP address of 192.168.1.1 you’re currently using to configure the router and only available via a “LAN” Ethernet port, and the other being the DHCP or static-assigned IP address on your network. The router considers this the WAN IP address. (even though this router is not going to be acting like a router in the normal sense)

DD-WRT “Wireless/Basic Settings page
clip_image003

2b. Enable useful management options

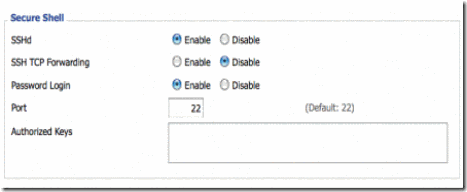
In the Services/Services page, in the “Secure Shell” section, enable SSH so you can log into it and copy files to it.

DD-WRT Services/Services page
clip_image005

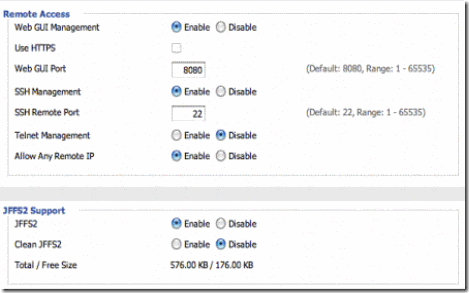
In the Administration/Management page, in the “Remote Access” section, enable Web and SSH access from the WAN port (and the IP address the router gets from your WiFi), and in the “JFFS2 Support” tab enable JFFS2 so you have some flash memory you can write to.

DD-WRT Administration/Management page
clip_image007

Go to the Security/Firewall page, and turn off the firewall. This doesn’t need to be a super secure thing (at least not to start). And it causes lots of problems that are hard to diagnose.

DD-WRT Security/Firewall page
clip_image009

2c. Enable USB

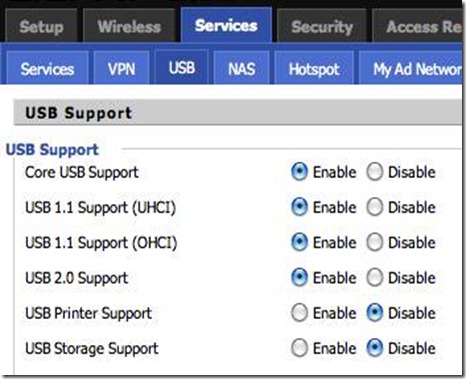
Go to the Services/USB page and enable the USB kernel drivers. The firmware doesn’t come with USB-to-serial drivers needed for Arduino, we’ll do those later.

DD-WRT Services/USB page
clip_image011

3. Do Some Tests

At this point, on reboot your router should join your WiFi network, grab an IP address from your network’s DHCP server, and have two IP addresses. The first, is the “LAN” admin IP address of 192.168.1.1. This only works when you have an Ethernet cable plugged into one of the LAN ports. The other address is the “WAN” address that’s obtained over WIFi from your network.

3a. Find the WAN IP of your Router

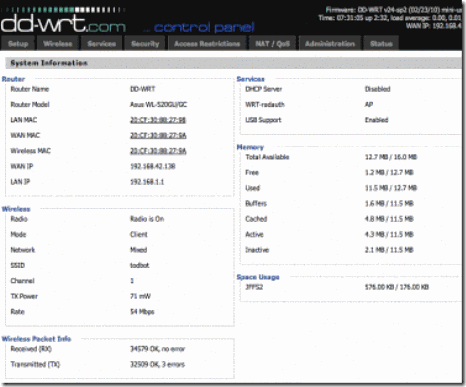
Because of the various settings above, the admin page and ssh server is available on both IPs. If you go to the Status/Sys-Info page (using the admin IP address and an Ethernet cable), you can see what the WAN IP address is, like below. On my network, the Asus got an IP of 192.168.42.138.

DD-WRT Status/Sys-Info page
clip_image013

3b. Test out SSH login

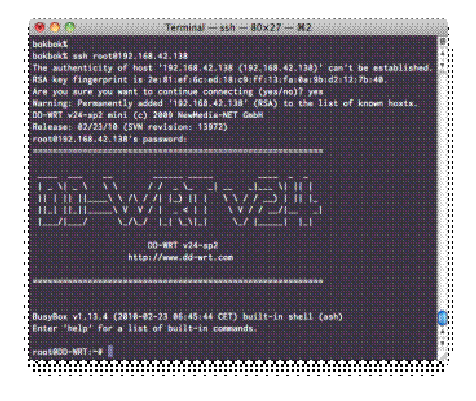
You should also log into the router now. The username is “root”, not the admin username you chose when first setting up the router. The password however is the password you chose during first setup. Open up a terminal window and ssh in.
clip_image015

DD-WRT is a real Linux, but with a reduced command set. Many useful commands are there though, like “ping”, “wget”, “lsmod”, “df”, etc.

4. Install USB Serial Drivers

Now that you have a working system, time to put on the USB serial drivers. There isn’t a very good way of doing this on such a memory-constrained router like the WL-520gu (the routers with more built-in flash can properly use the “ipkg” package management system to get these drivers). But here’s one way:

4a. Find USB Serial Drivers

This USB kernel modules post on the dd-wrt.com forums has a zip file called “fs_and_usb_modules_2_4_37.tar.gz ” containing the three files we need to talk to an Arduino. You can download that driver bundle yourself and pull out the files needed.

Or you can grab them from here:
- fs_and_usb_modules_2_4_37/usb/serial/usbserial.o
- fs_and_usb_modules_2_4_37/usb/serial/ftdi_sio.o
- fs_and_usb_modules_2_4_37/usb/acm.o
The last one is what you use if you’re using an Arduino Uno. The other two are what you’re using for any other kind of Arduino.

4b. Put Drivers in Router’s flash space

The “JFFS2″ feature lets us use part of the flash memory as a disk. We’ll put the drivers there. So ssh into the router, cd over to the jffs partition and pull down the drivers.
% ssh root@192.168.1.1
# cd /jffs
# mkdir kmods
# cd kmods
# wget http://todbot.com/asus_wl520gu/fs_and_usb_modules_
2_4_37/usb/serial/usbserial.o
# wget http://todbot.com/asus_wl520gu/fs_and_usb_modules_
2_4_37/usb/serial/ftdi_sio.o
# wget http://todbot.com/asus_wl520gu/fs_and_usb_modules_
2_4_37/usb/acm.o

4c. Load drivers and set to startup automatically

Back in the DD-WRT web interface, go to the Adminstration/Commands page and copy the below into the Commands window:
insmod /jffs/kmods/usbserial.o
insmod /jffs/kmods/ftdi_sio.o
insmod /jffs/kmods/acm.o

Click “Run Commands” to run the commands immediately. Click “Save Startup” to make these commands run on reboot. You could have also typed those commands on the command-line.

On the ssh command-line, you can type “lsmod” to see if the drivers have loaded.

If you have an Arduino or FTDI cable plugged into the USB port on reboot, you can also type “dmesg” to see if the Arduino is detected. In dmesg you should see:
usb.c: registered new driver serial
usbserial.c: USB Serial support registered for Generic
usbserial.c: USB Serial Driver core v1.4
usbserial.c: USB Serial support registered for FTDI SIO
usbserial.c: USB Serial support registered for FTDI 8U232AM Compatible
usbserial.c: USB Serial support registered for FTDI FT232BM Compatible
usbserial.c: FTDI FT232BM Compatible converter detected
usbserial.c: FTDI FT232BM Compatible converter now attached to ttyUSB0 (or usb/tts/0 for devfs)

5. Install Serial-to-Network Proxy

Now that you have the Arduino showing up as a serial device to the router, you can use any unix tool that can talk to serial devices to control the Arduino. Or you could write your own. While this router probably doesn’t have enough memory for PHP or Perl, you could write a compiled program in C/C++. You’ll need to install the cross-compile tools, which isn’t exactly trivial unfortunately. You can find some tips at the DD-WRT Wiki on Development, this post and this post on the dd-wrt.com forums, and this OpenWrt wiki page on the SDK.

But perhaps one of the most useful is a “serial proxy”. This is a familiar concept in the Arduino world. A serial proxy is a small program that essentially turns a serial port into a TCP port. There is a good small command-line one called “ser2net” that comes with Ubuntu.

I didn’t want to get the full WRT SDK cross-compiling up and running to port ser2net to DD-WRT and thankfully I didn’t have to. Andrew Hazelden has done the hard work and posted the results in a post about how to use serial ports on the Linksys WRT54GS (a very similar router).

You can read his post for more details and more code. I’ve stuck the single file needed for us here:
- ser2net_2.3-1_mipsel.ipk

5a. Download and Install ser2net

SSH into the router again and do the following:
% ssh root@192.168.1.1
# cd /jffs
# wget http://todbot.com/asus_wl520gu/ser2net_2.3-1_mipsel.ipk
# ipkg install ser2net_2.3-1_mipsel.ipk
# rm ser2net_2.3-1_mipsel.ipk
This will install ser2net in /jffs/usr/sbin/ser2net .

5b. Test ser2net

Time to do some tests. Get your Arduino, load up a sketch on it that reads and writes to the serial port (I like bitlash, a command interpreter for Arduino), and plug the Arduino into the router.

Then on the command-line, type:
# ser2net -C "3001:raw:600:/dev/usb/tts/0:57600 NONE 1STOPBIT 8DATABITS -XONXOFF -LOCAL -RTSCTS"

This runs ser2net with the settings of:
- “3001″ is the TCP port you will connect to,
- “/dev/usb/tts/0″ is serial port (will be “/dev/usb/acm/0″ for Arduino Uno),
- “57600″ is the baud rate

On another computer, open up a network terminal program like the command-line “telnet”:
% telnet 192.168.1.1 3001
You should be able to communicate with your Arduino as if you were using the Arduino Serial Monitor.

5c. Put ser2net in startup script

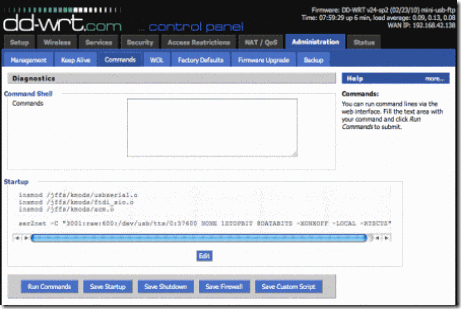
Once you figure out the ser2net config that works for your setup, you can have that run on startup by editing the startup command. Go back into the DD-WRT web gui and go to Administration/Commands. Edit the Startup script and add your ser2net command line to it. When you click “Save Startup” the result will be something like this:

DD-WRT Administration/Commands page
clip_image017

Done!

Now you can unplug your Arduino, load up any sketch to it, and then control it from where ever you can ping that router. You can even have the Arduino pull data out from the Net by having a different kind of serial-to-network proxy that is Arduino-facing, instead of Net-facing.

This should also work for other dd-wrt routers that have a USB port.

Taken From: http://todbot.com/blog/2010/12/16/wifi-for-arduino-with-asus-wl-520gu/comment-page-1/
Howto use a dd-wrt Router's Internal Serial Port (Serial/TCP)

By Andrew Hazelden, January 17, 2010 7:51 pm
clip_image001
This is Andrew's Guide to DD-WRT network serial ports.
A Linksys WRT54G / WRT54GS router makes a great wireless network serial port. In the following guide I will go over the techniques I use to allow TCP or UDP connections. This tutorial covers how to do this with the DD-WRT firmware. The WRT54GS has two serial ports. The first one is connected as a serial console at startup. The second one can be used easily for connecting GPS units, microcontrollers, weather stations or any other serial device.
DD-WRT Homepage
http://www.dd-wrt.com/site/index
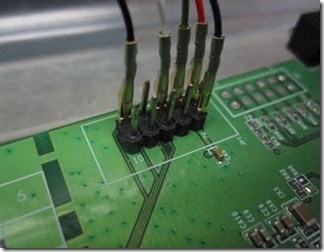
Rod Whitby has an article that explains how to solder the required header pins onto your WRT54GS router.
http://www.rwhitby.net/projects/wrt54gs
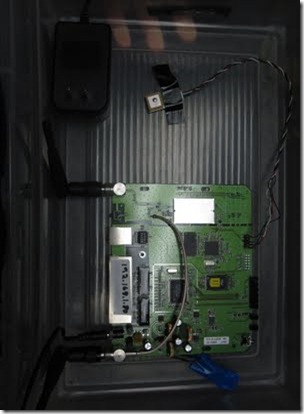
Using the pinout from Ron Whitby's site you can either hook up a 3.3 Volt serial device directly to your WRT54GS router or, with additional work, you could make / get a voltage converter board to allow true rs-232 serial voltage levels to be converted to 3.3 Volt TTL levels. This type of converter board device would use a Maxim-IC MAX3233E chip. A 10 pin IDC connector ribbon cable can run from your voltage converter board to your header pins soldered onto the WRT54GS. The converter board can draw its power off the router terminal pins through the ICD connector.
Note: Crimping standard servo terminal type connectors onto your serial device's cable will make wiring up the serial port connections to the Linksys WRT54GS easy during prototyping. This type of connection is shown in the two pictures below:
clip_image001[1]
clip_image002
Requirements:
3.3 Volt Locosys GPS (NG Hobbies sells the Locosys LS20033 10 Hz model)
Locosys GPS cable with 5 position 0.1" connector (Also at NG Hobbies )
Linksys WRT54G / WRT54GS router
DD-WRT firmware (v24 suggested)
0.1” 10 pin header
clip_image003
2.54mm Pin Header Strip
The header pins are called either:
  • Double Row Male 2x40 Pin Header Strip 2.54mm ( eBay )
  • 0.1" Break Away Header Pins
  • CONN HDR BRKWAY .100 80POS VERT  ( Digi-Key )
The 2x5 pin header was made by snapping off a piece from standard 0.1” (2.54mm) PCB Male Header Pins  (2 row x 40). You can find these at Digi-Key, or on eBay.
SSH Client Software:
Putty or Terminal
Optional:
WinSCP
I have packaged up the utilities you require for this project into a ZIP archive:
http://www.andrewhazelden.com/files/2010/January/dd-wrt_serial_TCP.zip
This archive will allow you to set up a network TCP/IP connection on your DD-WRT router using the /dev/tts/1 serial port. The archive dd-wrt_serial_TCP.zip has the following programs:
libncurses_5.6-1_mipsel.ipk
netcat_0.7.1-1_mipsel.ipk
ser2net_2.3-1_mipsel.ipk
---------------------------------------------------------------------------------------------------------------------------------
Step 1. Solder on a 10 pin header
Follow Ron Whitby’s instructions and solder the 10 pin header onto your linksys router.
http://www.rwhitby.net/projects/wrt54gs
Step 2. Install the dd-wrt v24 firmware on your WRT54G / WRT54GS Linksys router.
Step 3. Check your dd-wrt network settings
Set up your network and wireless settings. I recommend setting the router up with a fixed IP address. I use 192.168.1.80 for the wireless router. You will have to decide if you will use either client bridged or client routed modes for the Linksys router or you might even make it an access point.
Step 4. Enable JFFS2 Support on your router.
You must compete this step if you want the process to work!
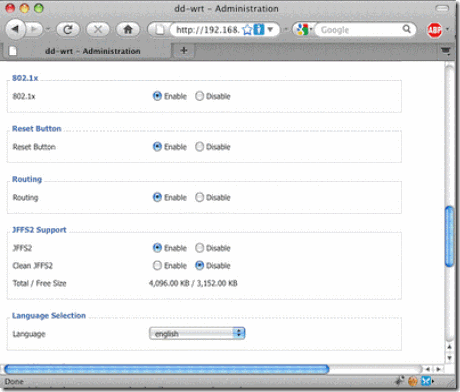
To do this go to the Administration > management section in the dd-wrt user inteface.
Scroll down to the JFFS2 Support section. Enable the JFFS2 and Clean JFFS2 options.
Click Apply.
Now reboot the router.
This will allocate storage in the flash memory where you will save the programs on your router. I find you have to reboot your router once after enabling JFFS2 Support for it to work properly.
clip_image005
Step 5. SSH into the router. ( You could also use telnet.)
On Windows I recommend the PUTTY program as an SSH Client:
http://www.chiark.greenend.org.uk/~sgtatham/putty/
On Mac OS X I recommend using the Terminal application found in your
/Applications/Utilities folder.
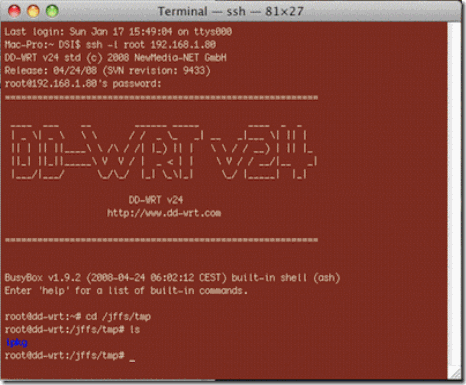
Assuming your router’s IP address is 192.168.1.80 and your dd-wrt username is root, use the following command:
ssh -l root 192.168.1.80
The default password is admin
clip_image007
Last login: Sun Jan 17 15:40:52 on ttys000
Mac-Pro:~ DSI$ ssh -l root 192.168.1.80
DD-WRT v24 std (c) 2008 NewMedia-NET GmbH
Release: 04/24/08 (SVN revision: 9433)
root@192.168.1.80's password:
==========================================================
____  ___    __        ______ _____         ____  _  _
| _ \| _ \   \ \      / /  _ \_   _| __   _|___ \| || |
|| | || ||____\ \ /\ / /| |_) || |   \ \ / / __) | || |_
||_| ||_||_____\ V  V / |  _  | |     \ V / / __/|__   _|
|___/|___/      \_/\_/  |_| \_\|_|     \_/ |_____|  |_|
DD-WRT v24
http://www.dd-wrt.com
==========================================================
BusyBox v1.9.2 (2008-04-24 06:02:12 CEST) built-in shell (ash)
Enter 'help' for a list of built-in commands.
root@dd-wrt:~#
Step 6. Download the files to your dd-wrt.
The technique I use is to download the files using the wget command on the dd-wrt router.
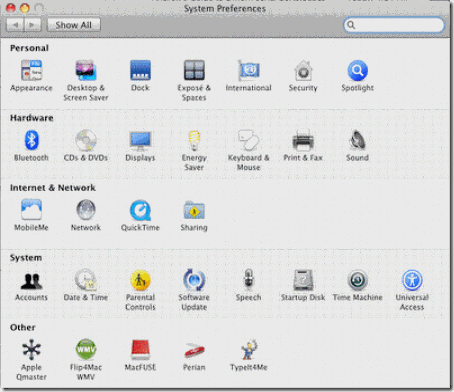
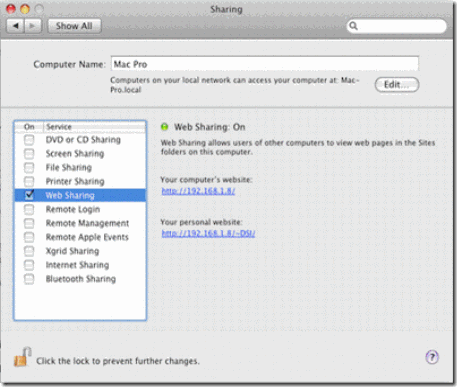
On Mac OS X you can enable web sharing in your System Preferences Control Panel.
clip_image009
Click on the Sharing Option.
In the Sharing section enable Web Sharing.
clip_image011
This enables the Apache based HTTP web server built into your Mac. You can place files either in the computer's sharing folder or in your user account’s sharing folder.
If you type your computer's IP address in your favorite web browser you will see a directory listing. For example, my computer's local IP address is 192.168.1.8 so I would type the following in the address bar:
http://192.168.1.8
clip_image013
The local path to your computer’s web-sharing folder is:
/Library/WebServer/Documents/
Step 7.
Installing TCP serial software using Mac OS X:

The local IP address of my desktop computer is 192.168.1.8 . You should substitute your IP address where you see 192.168.1.8 in the following examples.
Type the following into your ssh session window:
cd /jffs/tmp
If there is no /jffs/tmp directory that would likely indicate the you need to enable JFFS2 support. See Step 4.
To download the software to the dd-wrt:
wget http://192.168.1.8/libncurses_5.6-1_mipsel.ipk
wget http://192.168.1.8/netcat_0.7.1-1_mipsel.ipk
wget http://192.168.1.8/ser2net_2.3-1_mipsel.ipk

To install the software packages using the IPKG installer:
ipkg install libncurses_5.6-1_mipsel.ipk
ipkg install ser2net_2.3-1_mipsel.ipk
ipkg install netcat_0.7.1-1_mipsel.ipk

Installing TCP serial software using Windows:
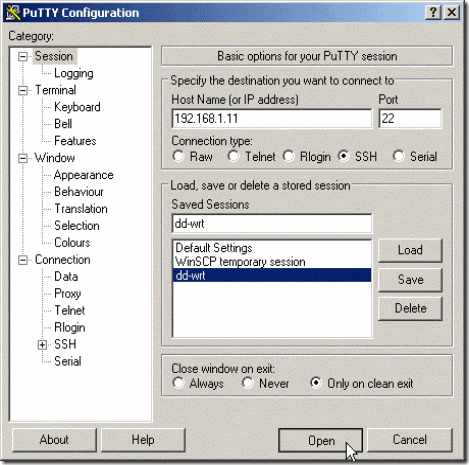
On Windows I recommend the PUTTY program as an SSH Client:
http://www.chiark.greenend.org.uk/~sgtatham/putty/
WinSCP is a great Windows program for copying files onto your dd-wrt router using the SCP protocol:
http://winscp.net/eng/download.php
clip_image015
Using WinSCP login to the router using SCP. The default username is root.
clip_image017
Unzip the dd-wrt TCP serial software on your desktop and copy the .ipk fliles using WinSCP to the router's /jffs/tmp folder.
clip_image019
Connect to the router using PuTTY and SSH.
clip_image021
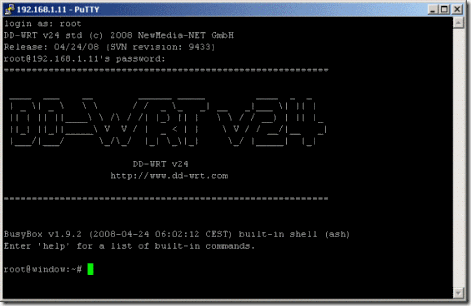
Login to your dd-wrt router with SSH
clip_image023
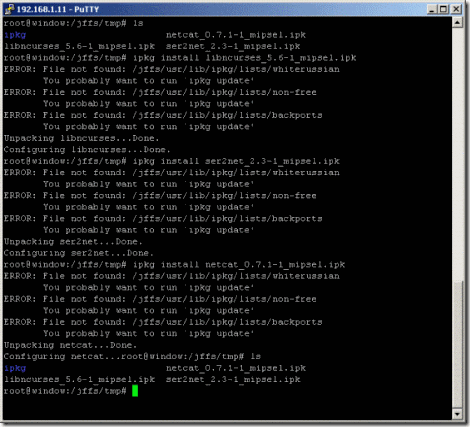
Using SSH install the three .ipk files located at /jffs/tmp you copied via WinSCP.
To install the software packages using the IPKG installer:
ipkg install libncurses_5.6-1_mipsel.ipk
ipkg install ser2net_2.3-1_mipsel.ipk
ipkg install netcat_0.7.1-1_mipsel.ipk

Step 8. Test Ser2net
Connect your serial device to the dd-wrt. This example expects that your serial device is connected to TTS/1. I am using a Lococsys 10 Hz GPS connected at 38,400 baud. I set up the serial device to output data on TCP port 3001 but any other port number could be used. The ser2net program only allows a single TCP connection to the serial port at a time.
In the SSH session window type in:
ser2net -C "3001:raw:600:/dev/tts/1:38400 NONE 1STOPBIT 8DATABITS -XONXOFF -LOCAL -RTSCTS"
If you copy the above text, make sure your web browser didn't convert the quotes into smart quotes as this will give an error in your SSH terminal program.
To check if the program is installed properly and running, type in:
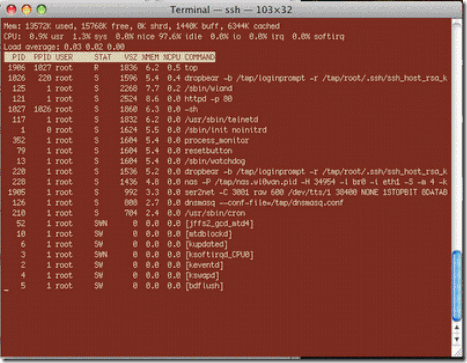
top
This shows the currently running programs on the dd-wrt router. In the right hand column labeled COMMAND you should see ser2net listed part way down. Press Control-C to quit top.
clip_image025
Step 9.  Set up the startup script.
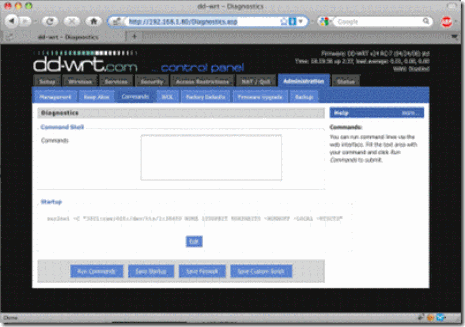
To make the serial software ser2net start at boot time we will make it a startup script. Connect to the Linksys router. In my case, I will connect to http://192.168.1.80/Diagnostics.asp
This will load up the Administration / Commands section in the dd-wrt software.
Paste the following text into the Command Shell section of the web-gui of the dd-wrt router firmware control panel:

ser2net -C "3001:raw:600:/dev/tts/1:38400 NONE 1STOPBIT 8DATABITS -XONXOFF -LOCAL -RTSCTS"
If you copy the above text, make sure your web browser didn't convert the quotes into smart quotes as this will give an error in your SSH terminal program.
Click the Save Startup button.
clip_image027
Reboot the router.
Step 10. Let’s now test if everything is working!
Open a new terminal window.
On Mac OS X and Linux there is a handy Unix tool called Netcat. Netcat is also known as “nc” for short. It allows you to easily test UDP and TCP network connections. If you search on Google there are also pre-compiled versions of Netcat for windows.
Type the following into your terminal window:
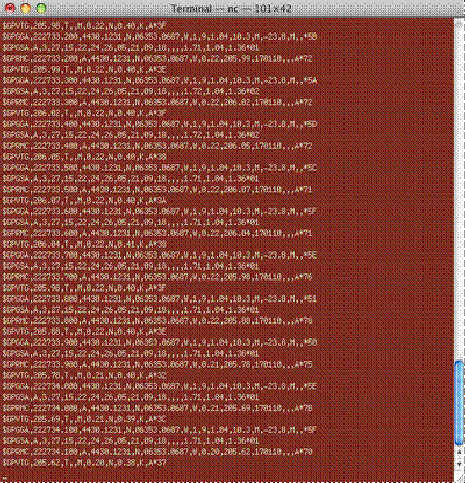
nc 192.168.1.80 3001
This tells Netcat to connect to the Linksys router on port 3001 using the TCP protocol.
If your serial device is properly connected you should see data scrolling by in the terminal window.
clip_image029
Step 11. Conclusions
You can now access the serial port on a dd-wrt either through the Ethernet port on the router or wirelessly using WIFI.
On Mac OS X it is possible to use BSD Sockets to connect and transfer data between desktop software and the remote network serial port.
On Windows you can either use a TCP socket and connect directly or you can use virtual serial port software that will make the network TCP data look like it is coming in on a Windows COM port.
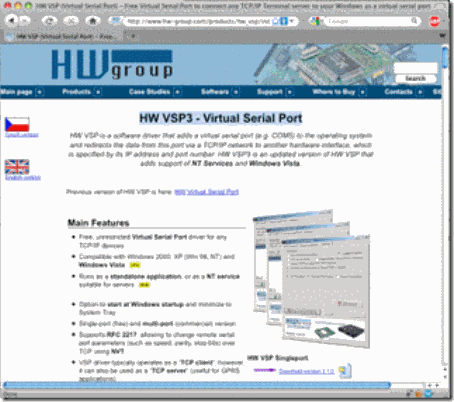
A free program for Windows that maps the TCP serial data to a virtual serial port is:
HW VSP3 - Virtual Serial Port
http://www.hw-group.com/products/hw_vsp/index_en.html
clip_image031
Some people like to use Python scripting for its easy network socket programming.
http://www.python.org/
Another way to access the network TCP serial data is to use the Simple Directmedia Layer "SDL" with the SDL_net cross-platform networking library. This works equally well on Mac / Windows / Linux platforms.
http://www.libsdl.org/
http://www.libsdl.org/projects/SDL_net/
clip_image033
Step 12.
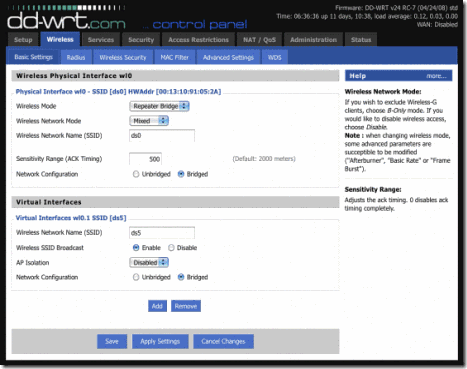
And additional step is that you could setup your serial port enhanced dd-wrt router to be a wireless repeater. Wireless repeater bridge mode allows your dd-wrt router to connect to a wireless access point for internet access and also allows clients to connect directly to your dd-wrt. Another handy thing about this mode is that you can place this router a long way away from your access point and you don't have to run any Ethernet cable to hook it up. With a properly setup grid or patch antenna the dd-wrt wireless repeater router could even be a kilometer or more away. As well you can connect to the dd-wrt with an device like an iPod to check the settings. I have a Terminal app on my iPod so I can even log in to the router with SSH and change settings.
clip_image035
You might find that enabling the dd-wrt repeater bridge mode is just what your project needs.
clip_image037
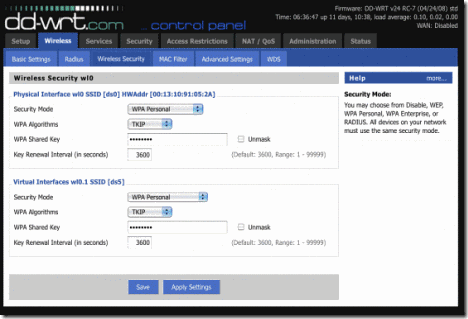
You can define two separate wireless security passwords for your router. One for the physical interface and one for the virtual interface.
You have now completed part 1 of this tutorial on setting up network serial ports using a Linksys router. Part 2 of this tutorial covers setting up a UDP based network serial port on your Linksys WRT54G router using a custom build of busybox and netcat.
Installing Ser2net Without JFFS2 Support
A blog reader named Matt sent me a tip from the DD-WRT forums on how you can install ser2net on routers without JFFS2 support. The technique uses an http server to host a gzipped copy of ser2net.  The file is downloaded using wget, expanded with tar xzf, and then ser2net is run from the command line with the appropriate arguments.
cd /tmp
wget http://[your-webserver-ip/folder-name]/ser2net-2.5-mips.tar.gz
tar xzf ser2net-2.5-mips.tar.gz
cd ser2net-2.5
./ser2net -C "1024:raw:600:/dev/tts/1:38400 NONE 1STOPBIT 8DATABITS -XONXOFF -LOCAL -RTSCTS"

Note: If you make this a startup script on the router the HTTP webserver URL has to be accessible from the router at boot time for this to work. This means you might have to store the file on your local LAN. You can download a copy of the file ser2net-2.4-mips.tar.gz here.
This also applies to the Asus WL-520gu and many other DDWrt routers (except for the pinout part).
Taken From: http://www.andrewhazelden.com/blog/2010/01/how-to-use-the-serial-ports-on-a-linksys-wrt54gs-with-dd-wrt-v24/
Check out Part 2, Wich is the same but via UDP: http://www.andrewhazelden.com/blog/2012/03/setting-up-a-udp-based-network-serial-port-on-a-linksys-wrt54g-router/