Thursday, August 3, 2017

IoT / Arduino - USB ESP8266 Programmer (CH340G Chip)


I recently bought this ESP8266 WiFi module (ie ESP-01) for my IOT project. This is a self contained chip and can be programmed to do the respective tasks. To ease out the task of programming, I bought this ESP-01 ESP8266 Programmer CH340G Chip USB WiFi Wireless UART GPIO0 Adapter.

Please read my tutorial series on IOT.

clip_image001

So lets get started !


Installing Drivers - Part 1

1.  This Programmer Adapter is build around CH340 chip which usually needs to install the following drivers on a computer.

  • Unzip the folder.
  • If you are running a 64Bit Windows: – run the SETUP_64.EXE installer.
  • If you are running a 32Bit Windows: – run the SETUP_32.EXE installer.

2. Connect the ESP-01 (as shown) to the programmer and plug it into the USB.

clip_image002

3. Install the Drivers

clip_image003

After restarting the PC, the device will be ready to go.


Setting Arduino Software - Part 2

1. Download the latest arduino Software.

2. We need to Install ESP board in Arduino Software

Open up Arduino, then go to the Preferences (File > Preferences).

Then, towards the bottom of the window, copy this URL into the “Additional Board Manager URLs” text box:

clip_image004

3.  Hit OK. Then navigate to the Board Manager by going to Tools > Boards > Boards Manager. There should be a couple new entries in addition to the standard Arduino boards. Look for esp8266. Click on that entry, then select Install.

clip_image005

4. The board definitions and tools for the ESP8266 include a whole new set of gcc, g++, and other reasonably large, compiled binaries, so it may take a few minutes to download and install (the archived file is ~170MB). Once the installation has completed, an Arduino-blue “INSTALLED” will appear next to the entry

5. Select the Generic ESP 8266 Module Board.

clip_image006

6. Set the Upload Speed and CPU Frequency.

clip_image007

clip_image008

7. Select the device port. (Device should be connected to the PC)

clip_image009

8. To test the ESP8266, open up serial monitor (Ctrl + Shift + M)

clip_image010

9. Set baud rate to : 115200 baud
    and Both NL & CR
    with AutoScroll

10. Type AT command in the serial monitor and click enter. If you see an OK message, you are good to go.

11. You can find the complete set of AT commands here.


Bonus :

Out of them, here are my noted ones.

AT                      // Test if AT system works correctly

AT+GMR           //Print firmware version

AT+CWMOD=3   //Wifi Mode
- 1 = Station mode (client)
- 2 = AP mode (host)
- 3 = AP + Station mode (Yes, ESP8266 has a dual mode!)

AT+CWLAP       // List of all available wifi 

ATE1  / ATE0       // Enable or Disable echo

AT+CWJAP=”my-test-wifi”,”1234test”    // Connect to a wifi

AT+CWQAP         //Disconnect from the wifi


Caution :

  • The ESP8266 chip requires 3.3V power supply voltage. It should not be powered with 5 volts like other arduino boards.
  • The I/O pins of ESP8266 communicate or input/output max 3.3V only. i.e. the pins are NOT 5V tolerant inputs.

Taken From: http://www.arjunsk.com/iot/iot-using-esp8266-programmer-ch340g-chip-adapter/
Tuesday, April 18, 2017

Windows - Streaming to TVs (via DLNA)

Here I’ going to show you how to stream media (in this the example is video but it should be similar to other media)  and share files with a Smart TV.

Smart TVs support a standard protocol called DLNA that allows you to stream video and share files to stream, among other things. Normally TV brands give it another name like AllShare (Samsung).

Windows Media Player and Windows itself support DLNA, wich is very usefull in order to display you media in you TV.


Enable Streaming

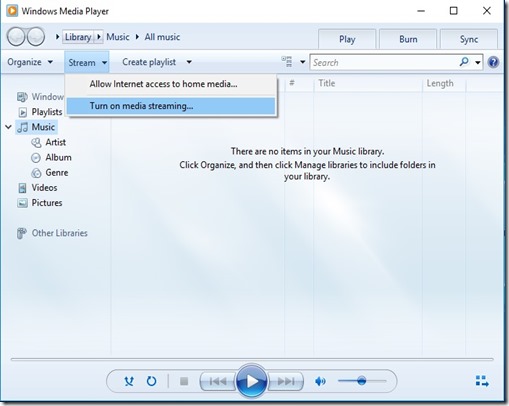
The DLNA streaming on Windows is off by default, so we need to enable it, the easiest is from Windows Media Player, just go to: 

01

Turn on you TV and wait a bit (20s) after click on “Turn on media streaming”:

02

now just click OK (check that you TV is on the list and is allowed), additionally you can change you media library name and disallow devices in your network:

03.00

later on if you want to comeback to this menu to Allow or Disallow a device you can just go to Windows Media Player again:

MEDIA P

An alternative to get to this menu without Windows Media Player is just to go to the Start Windows icone and type “Media streaming options”, and click on the icon with that name:

image


Stream From the PC to the TV

First put your files here:

image

now this video will be available on the Videos section in Windows Media Player, you can select it and cast the video to your TV.

The first time you do this a popup will show on your TV asking if you allow the PC to stream, just select OK, the next time the streaming will automatically.

03.01

when the streaming starts, it will show you the controlls and the progress bar:

03.02

and you should be seeing the video on you TV Smile.

The inconvenience with this is that you have to go to you PC to start the video and maintain the player window open (in the next topic we are going to see how to start videos from the TV).

By default TV you only have the pause control over the video, but you can enable all the controls (Back, Forward, Previous Video, Next Video) with this option:

image


Start Videos From The TV (or another PC)

At this point if you already can stream from the PC to the TV, what you don’t know is that when you enabled streaming in the above section you are also started sharing the files in the Video library (by default only the Video folder) on your PC via DLNA.

Now on the TV you can get the the Videos library’s folders that your PC is sharing.

image

In my TV (Samsung Smart TV) you can find the PC by pressing on the  “Sources” in the TV remote.

As you can see bellow your PC is represented by a media icon, which has you PC name plus the library name you gave when you enabled streaming.

ICONfor other brands it should be similar, but check you TV’s Manual.

When you click the icon you get something like this:

PHOTO_20170425_082017

DLNA categorizes and organizes your media which is normally quite confusing.

The easiest way is to go into the right category in this case Videos, and then select “Folders” that shows you the actual folders that you shared instead of some confusing DLNA organization.

PHOTO_20170425_082039

if you want more folders to show on the TV you can just add them to the library, like this:

05

as you can see on the TV you have de default Video folder and the My Movies folder that we have just added to the Videos library.

image

if you just want to watch the videos in another Windows PC instead of you TV (ex: your Laptop), on that PC you just need to go to “Network”:

image

click on the media device icon, which will open Windows Media Player with the remote library already added to it:

image

and push play


Hope this was helpful !!!!!!! Smile

Saturday, February 11, 2017

Linux/Raspberry - Web SSH Shell (No client needed)

You probably access you linux machines via SSH using a client like Putty.

With Shell In A Box, you get the same SSH access but without any client, you just use a browser that shows you the the SSH connection via HTTPS.

This might be usefull in some scenario, so I’m going to show you how to set up it bellow.

To install just type:

sudo apt-get install shellinabox

and that’s it once it finished installing, Shell In A Box is running, just go to you browser and enter this

https://<Machine_IP>:4200/

and you should get this

image

now just login and that’s it.

If you want to change something (ex: the 4200 port) you just edit this file:

nano /etc/default/shellinabox

FILE: shellinabox
----------------------------

# Should shellinaboxd start automatically
SHELLINABOX_DAEMON_START=1

# TCP port that shellinboxd's webserver listens on
SHELLINABOX_PORT=4200

# Parameters that are managed by the system and usually should not need
# changing:
# SHELLINABOX_DATADIR=/var/lib/shellinabox
# SHELLINABOX_USER=shellinabox
# SHELLINABOX_GROUP=shellinabox

# Any optional arguments (e.g. extra service definitions).  Make sure
# that that argument is quoted.
#
#   Beeps are disabled because of reports of the VLC plugin crashing
#   Firefox on Linux/x86_64.
SHELLINABOX_ARGS="--no-beep"

and do

 sudo service shellinabox restart

to load the new configuration.