If you�ve ever had the desire to RAID your hard drives for increased performance, but didn�t want to shell out the cash for additional hardware, then here is a practical solution for you. You can utilize a software RAID system through the use of dynamic disks if you happen to be the lucky owner of Windows 2000 or XP (Pro/Server).
Microsoft's Definition of Dynamic Disks (�dem fellers is smart)
Dynamic disks provide features that basic disks do not, such as the ability to create volumes that span multiple disks (spanned and striped volumes), and the ability to create fault-tolerant volumes (mirrored and RAID-5 volumes). All volumes on dynamic disks are known as dynamic volumes and can only be accessed by Windows 2000 or XP. You can perform the following tasks only on a dynamic disk:
- Create and delete simple, spanned, striped, mirrored, and RAID-5 volumes.
- Extend a simple or spanned volume.
- Remove a mirror from a mirrored volume or split the volume into two volumes.
- Repair mirrored or RAID-5 volumes.
- Reactivate a missing or offline disk.
- Check disk properties, such as capacity, available free space, and current status.
- View volume and partition properties such as size, drive letter assignment, label, type, and file system.
- Establish drive letter assignments for volumes or partitions, optical storage devices (for example CD-ROM), and removable drives.
- Establish disk sharing and security arrangements for volumes and partitions formatted with NTFS.
RAID 101 - The Condensed Version
RAID = Redundant Array of Independent Disks. The key word here is redundant. RAID was developed for data backup reasons on file servers. The basic idea is to have two or more hard drives in a system and when data is written on one, the same data is duplicated on the other (mirroring), and quicker than you can say �deathstar� you have a reliable backup to your data. It was discovered that if you could care less about your data, and just wanted a screaming machine that you could configure two or more drives to act as one. So one set of data is split and written to multiple disks, and you know the old adage �two heads are better than one,� well in this case it is certainly true. Two drives retrieving or writing a file at the same time (striping) increases the efficiency significantly. Now of course there are several possible configurations for striping and mirroring drives in the same array, but since I�m one of those who could care less about my data, I will focus on striping and increasing performance.
Be aware that if you decide to undertake this delicate procedure that your data is at risk. If you have one drive go down then you�re your RAID configuration is no longer valid. Remember, striping splits your data among the drives, so if you lose a drive to failure you won�t be able to access the half files left behind on the good drive!
Just Like the Boy Scouts, Be Prepared!
Windows itself cannot reside on a striped partition. Does that mean you have to have a third drive just for Windows? No! Three drives? Money doesn�t grow on trees you know. Remember, we are being cheap..err�frugal here. However, if you happen to be independently wealthy, just as two heads are better than one, three must be thrice as good, and four must be force as good, huh?
You can pull this off without a format and reinstall of Windows if you already have Windows on its own partition. My recommendation is to back up your data and start from scratch.
Since I�ve convinced you to wipe your drives now, give some consideration to how you will be partitioning them. Keep in mind that to do software RAID it is not necessary to have matched drives. You could get this done with an 80GB and a 40GB without giving up drive space. This is an advantage over hardware RAID, which requires like drives to retain all drive space. However, even in the software setup, I would suspect performance would take a hit if one drive was significantly slower than the other, or the buffers were different sizes.
Here is how I partitioned using two 80GB Maxtor drives:
- C: =10GB single drive for Windows
- E: = 100GB on two drives (50GB on each drive striped).
- F: =10GB Single drive for backups
- G: = 25GB Single drive for downloads
- Z: = 2GB on two drives (1GB on each drive striped) for the swapfile
Since Windows can�t be on a striped partition, and I would like to get the maximum benefit from striping, this is the volume on which I keep all program files and data such as My Documents, My Pictures, My Music, etc, etc, etc�. You may be asking yourself �how in the name of Pete do you move all that Windows stuff to a drive that doesn�t contain Windows?� Well, I could tell you, but then I�d have to kill you. Seriously, if you desire this information, feel free tocontact me.
For you visual types, here you go:
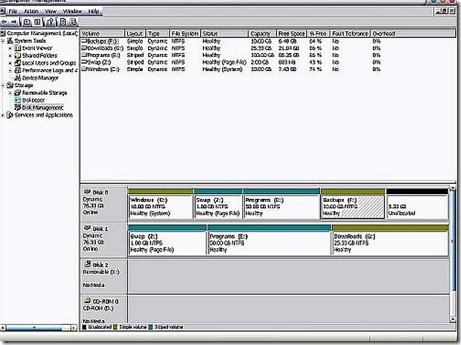
If you�re wondering what the 5.33 GB of unallocated space is for, that�s reserved for the day I figure out how to install Linux on a Windows dynamic disk� :p
One more thing, whether you use two, three, or four disks; the biggest performance gain is when each drive is on its own channel. In order to accomplish this with more than two drives, the addition of a PCI controller card is required. There we go spending money on hardware again, but the good news is an IDE controller is much less money than a quality RAID controller.
Throwing Caution to the Wind
Now we get down to the nuts and bolts. Turn off your computer and physically place each hard drive on its own channel. If for some reason you can�t get this done with your system don�t despair. You will still be able to do this, but the results just won�t be as good.
Next we need to do a clean install of Windows. What we are trying to accomplish with this step is to remove all partitions and create just one small one for Windows. The size is up to you, keep in mind that without a swapfile, My Documents, or program files; WinXP pro will take less than 2GB after the installation of SP1. You do need extra room to grow for things like system restore, the registry, and the many other things Windows manages to bloat it self with. Also, you will want free space to allow for later drive defragmentation. My recommendation is 5 to 10GB. After Windows is installed get all your updates done and your hardware installed.
Now that you have a nice fresh install of Windows and everything is working and up to date, right click on My Computer and click on �Manage�, this will bring up the Computer Management console. Just like everything else in Windows there are many ways to get to this, this is the one I prefer. Click on Disk Management and it will bring up a screen similar to the earlier image.
Convert all hard drives to dynamic by right clicking in the disk info box to the left of the partition graph and clicking on convert to Dynamic Disk. Select all drives that will be used for striping, follow the directions, read the warnings, and finish. Note in these images my drives are already converted and partitioned so options are grayed out or missing for me that won�t be for you.
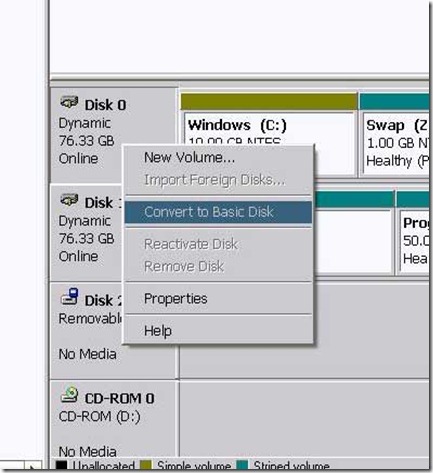
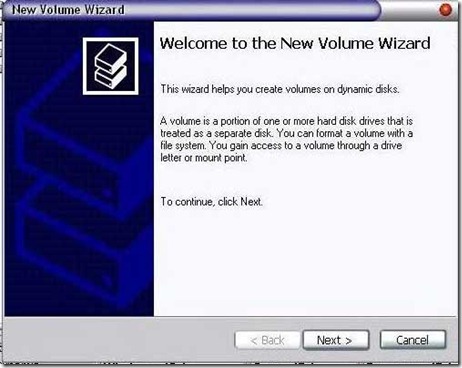
Now that you have dynamic disks, you can create your volumes (partitions) on them. Simply right click anywhere in the unallocated space of the drive where you want the partition be and select �new volume�. Now there will be a wizard to guide you through the process.
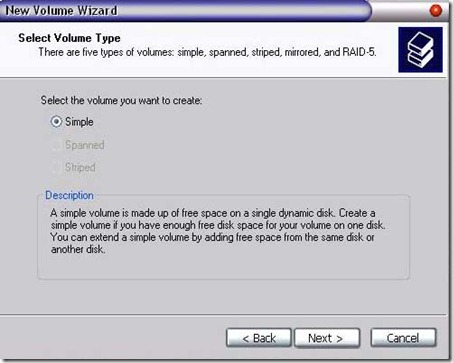
You will have a choice of simple, spanned, striped, and mirrored. The wizard provides descriptions of each selection. Be careful of the difference between striped and spanned, spanned will not give a performance increase. We will be using simple or striped. Depending on how you planned out your partitions make the appropriate choice and continue.
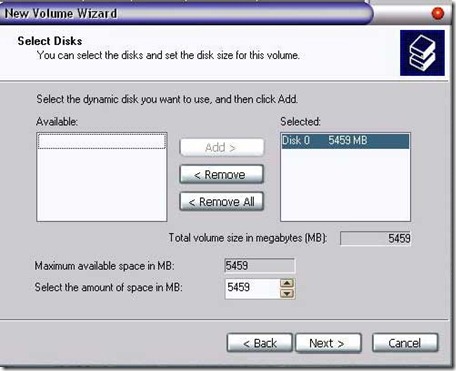
Next, for a simple volume, make sure the appropriate drive is selected and for striped volumes make sure all drives are selected. Dial in the size of the partition, for striped volumes this number will be the amount of space taken on one drive and the total size of the partition will be this number times the number of drives involved. For example if you were using two drives and you selected 10MB, the total partition size would be 20MB, 10 on each drive.
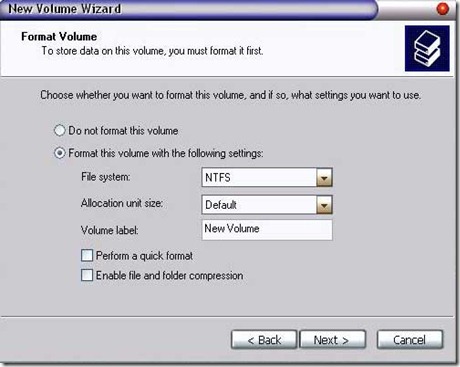
Continue and select a drive letter. Click next and select your file system, allocation unit size, and the name you want on this drive. I went with NTFS and default allocations.
Clicking next will give you an overview of what you selected, if it looks ok click finish. Continue in this manner until you have your drives partitioned the way you want them.
Now you are ready to move Your Documents and the pagefile off of the windows partition and on to the new ones you created. Install your software and you�re done. Bear in mind that most installs default to C:\Program Files, so remember to change the path when installing.
System as Tested
| Processor: | AMD Athlon 2200+ |
| Motherboard: | MSI KT7 Ultra 2 KT133A |
| Graphics Card: | ATI Radeon 9800 AGP |
| Memory: | 768MB PC-133 SD-RAM |
| Hard Drive: | 2x Maxtor 80GB 7200RPM 2MB Cache |
| Software: | Windows XP Pro SP1 |
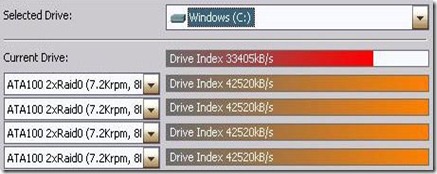
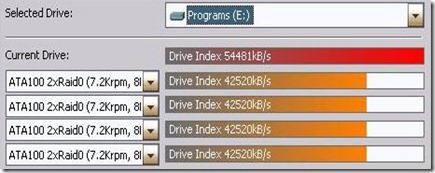
SiSoft Sandra is utilized for hard disk performance testing. As you can see my system is not state of the art, yet my results were significant during testing.
Default Drive Performance
Software RAID Performance
Conclusion
This seems to be a good way to squeeze some extra performance from one of the slowest parts of your PC. I have noticed a significant improvement in load time, especially for games. The performance improves greatly with three and four drives, but I�m sure that is getting close to or exceeding the limits of the current PCI bus. Have fun and enjoy your new found performance boost.
Pros:
- Inexpensive
- Good performance increase
- Easy to configure
- No need for matched drives
- Can do spanning and mirroring also
Cons:
- Dynamic disks are only recognized by Windows 2000 or later
- Small increase in CPU loading
Taken From: http://www.techimo.com/articles/index.pl?photo=149


