Monday, February 27, 2012

Cisco Etherchannel / Port-Channel (LACP / PAgP)

Etherchannel/Port-channel

On different Cisco switches it is possible to create logical connections that

are made-up off different fysical interface. It is needed that these interface

do have the same speed.

Most Cisco switches support max 64 etherchannels. These interfaces do not have to be contiguous.

or even on the same module. Each channel must be made up of min 2, max 8 interfaces.

The best is to use 2 ,4 or 8 interfaces. This will give the perfect load-balancing.

The load-balancing can be bases on layer 2/3 or 4 information.

It is not possible to have different load-balancing methods for different Etherchannels

on one switch. If the load-balancing method is change, it is applicable for all.

The load-balancing method can be:

- src-mac

- dst-mac

- src-dst-mac

- src-ip

- dst-ip

- src-dst-ip

- src-port

- dst-port

- src-dst-port

By using <port-channel load-balance {option}> it is possible to change to method.

If a single header is used to load-balance the low-order bits is used to dictate to

witch interface the frame is send. If two headers are used a XOR function is used on

the low-order bits.

It is possible to change what path with-in the etherchannel a frame takes by used the following command:

<test etherchannel load-balance interface port-channel [#] ip [src] [dst]>

to assign a physical interface towards a port-channel use the following command:

channel-group [#] mode on

There are two type of dynamic protocols to negotiate an etherchannels: PAgP and LACP 8021.AD

PAgP is Cisco proprietary

When these protocols start to communicate there is an exchange of information before the port-channel can be formed. The following items must match before a port-channel can form:

- same speed/duplex

- Access VLAN (if not trunked)

- Same trunking type, allowed VLAN and native VLAN (if trunked)

- Each port must have the same STP cost per VLAN with-in the portchannel

- No SPAN ports

channel-group [#] mode on (disables PAgP en LACP)

channel-group [#] mode off (disables PAgP en LACP and prevent the ports to form a port-channel)

channel-group [#] mode auto (use PAgP in a passive mode, it will wait until a PAgP packet will be send)

channel-group [#] mode passive (use LACP in a passive mode, it will wait until a PAgP packet will be send)

channel-group [#] mode desirable (use PAgP in an active mode, it will start to send PAgP packets)

channel-group [#] mode active (use LACP in an active mode, it will start to send LACP packets)

3750(config)#interface range gigabitethernet 1/0/2 – 4

3750(config-if-range)#channel-group 1 mode on

3750(config-if-range)#switchport

3750(config-if-range)#switchport trunk encapsulation dot1q

3750(config-if-range)#switchport mode trunk

First type the channel-group command. After that all interface commands will be automatically duplicated on all the interfaces group in the channel-group.

With LACP it is possible to create a port-channel on a stack (3560/3750 switches).

This is based on IOS version 12.2(25)SEE

Show command’s

· show interfaces port-channel [channel-group-number]

· show etherchannel [channel-group-number] summary

Verify command’s

  • test etherchannel load-balance interface port-channel [#] ip [src] [dst

Taken From: http://www.edgenetworks.nl/etherchannel.html

Monday, February 20, 2012

Soft RAID - Windows

If you�ve ever had the desire to RAID your hard drives for increased performance, but didn�t want to shell out the cash for additional hardware, then here is a practical solution for you. You can utilize a software RAID system through the use of dynamic disks if you happen to be the lucky owner of Windows 2000 or XP (Pro/Server).

Microsoft's Definition of Dynamic Disks (�dem fellers is smart)

Dynamic disks provide features that basic disks do not, such as the ability to create volumes that span multiple disks (spanned and striped volumes), and the ability to create fault-tolerant volumes (mirrored and RAID-5 volumes). All volumes on dynamic disks are known as dynamic volumes and can only be accessed by Windows 2000 or XP. You can perform the following tasks only on a dynamic disk:

  • Create and delete simple, spanned, striped, mirrored, and RAID-5 volumes.
  • Extend a simple or spanned volume.
  • Remove a mirror from a mirrored volume or split the volume into two volumes.
  • Repair mirrored or RAID-5 volumes.
  • Reactivate a missing or offline disk.
  • Check disk properties, such as capacity, available free space, and current status.
  • View volume and partition properties such as size, drive letter assignment, label, type, and file system.
  • Establish drive letter assignments for volumes or partitions, optical storage devices (for example CD-ROM), and removable drives.
  • Establish disk sharing and security arrangements for volumes and partitions formatted with NTFS.

RAID 101 - The Condensed Version

RAID = Redundant Array of Independent Disks. The key word here is redundant. RAID was developed for data backup reasons on file servers. The basic idea is to have two or more hard drives in a system and when data is written on one, the same data is duplicated on the other (mirroring), and quicker than you can say �deathstar� you have a reliable backup to your data. It was discovered that if you could care less about your data, and just wanted a screaming machine that you could configure two or more drives to act as one. So one set of data is split and written to multiple disks, and you know the old adage �two heads are better than one,� well in this case it is certainly true. Two drives retrieving or writing a file at the same time (striping) increases the efficiency significantly. Now of course there are several possible configurations for striping and mirroring drives in the same array, but since I�m one of those who could care less about my data, I will focus on striping and increasing performance.

Be aware that if you decide to undertake this delicate procedure that your data is at risk. If you have one drive go down then you�re your RAID configuration is no longer valid. Remember, striping splits your data among the drives, so if you lose a drive to failure you won�t be able to access the half files left behind on the good drive!

Just Like the Boy Scouts, Be Prepared!

Windows itself cannot reside on a striped partition. Does that mean you have to have a third drive just for Windows? No! Three drives? Money doesn�t grow on trees you know. Remember, we are being cheap..err�frugal here. However, if you happen to be independently wealthy, just as two heads are better than one, three must be thrice as good, and four must be force as good, huh?

You can pull this off without a format and reinstall of Windows if you already have Windows on its own partition. My recommendation is to back up your data and start from scratch.

Since I�ve convinced you to wipe your drives now, give some consideration to how you will be partitioning them. Keep in mind that to do software RAID it is not necessary to have matched drives. You could get this done with an 80GB and a 40GB without giving up drive space. This is an advantage over hardware RAID, which requires like drives to retain all drive space. However, even in the software setup, I would suspect performance would take a hit if one drive was significantly slower than the other, or the buffers were different sizes.

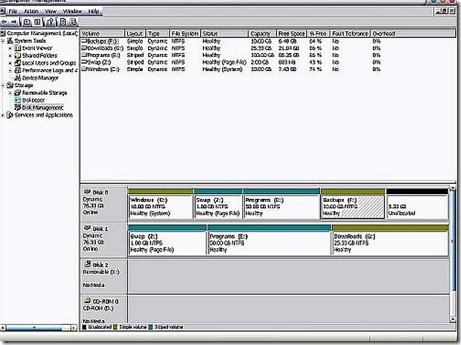
Here is how I partitioned using two 80GB Maxtor drives:

  • C: =10GB single drive for Windows
  • E: = 100GB on two drives (50GB on each drive striped).
  • F: =10GB Single drive for backups
  • G: = 25GB Single drive for downloads
  • Z: = 2GB on two drives (1GB on each drive striped) for the swapfile

Since Windows can�t be on a striped partition, and I would like to get the maximum benefit from striping, this is the volume on which I keep all program files and data such as My Documents, My Pictures, My Music, etc, etc, etc�. You may be asking yourself �how in the name of Pete do you move all that Windows stuff to a drive that doesn�t contain Windows?� Well, I could tell you, but then I�d have to kill you. Seriously, if you desire this information, feel free tocontact me.
For you visual types, here you go:
clip_image001

If you�re wondering what the 5.33 GB of unallocated space is for, that�s reserved for the day I figure out how to install Linux on a Windows dynamic disk� :p

One more thing, whether you use two, three, or four disks; the biggest performance gain is when each drive is on its own channel. In order to accomplish this with more than two drives, the addition of a PCI controller card is required. There we go spending money on hardware again, but the good news is an IDE controller is much less money than a quality RAID controller.

Throwing Caution to the Wind

Now we get down to the nuts and bolts. Turn off your computer and physically place each hard drive on its own channel. If for some reason you can�t get this done with your system don�t despair. You will still be able to do this, but the results just won�t be as good.

Next we need to do a clean install of Windows. What we are trying to accomplish with this step is to remove all partitions and create just one small one for Windows. The size is up to you, keep in mind that without a swapfile, My Documents, or program files; WinXP pro will take less than 2GB after the installation of SP1. You do need extra room to grow for things like system restore, the registry, and the many other things Windows manages to bloat it self with. Also, you will want free space to allow for later drive defragmentation. My recommendation is 5 to 10GB. After Windows is installed get all your updates done and your hardware installed.

Now that you have a nice fresh install of Windows and everything is working and up to date, right click on My Computer and click on �Manage�, this will bring up the Computer Management console. Just like everything else in Windows there are many ways to get to this, this is the one I prefer. Click on Disk Management and it will bring up a screen similar to the earlier image.

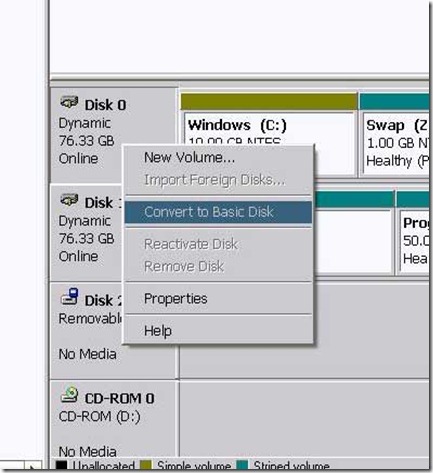
Convert all hard drives to dynamic by right clicking in the disk info box to the left of the partition graph and clicking on convert to Dynamic Disk. Select all drives that will be used for striping, follow the directions, read the warnings, and finish. Note in these images my drives are already converted and partitioned so options are grayed out or missing for me that won�t be for you.
clip_image002

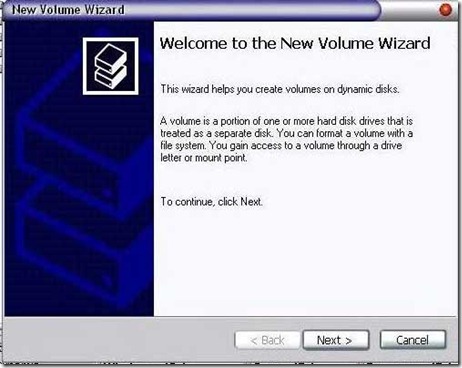
Now that you have dynamic disks, you can create your volumes (partitions) on them. Simply right click anywhere in the unallocated space of the drive where you want the partition be and select �new volume�. Now there will be a wizard to guide you through the process.
clip_image003

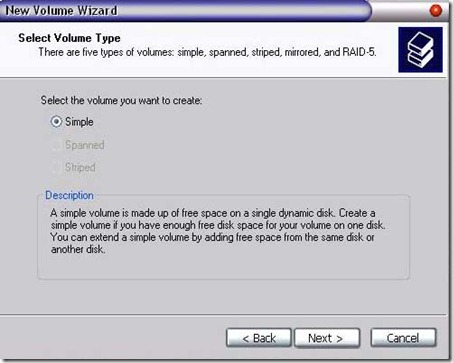
You will have a choice of simple, spanned, striped, and mirrored. The wizard provides descriptions of each selection. Be careful of the difference between striped and spanned, spanned will not give a performance increase. We will be using simple or striped. Depending on how you planned out your partitions make the appropriate choice and continue.
clip_image004

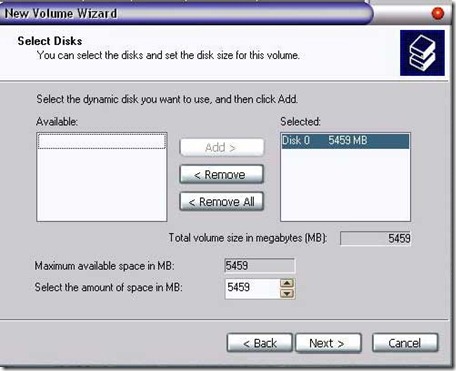
Next, for a simple volume, make sure the appropriate drive is selected and for striped volumes make sure all drives are selected. Dial in the size of the partition, for striped volumes this number will be the amount of space taken on one drive and the total size of the partition will be this number times the number of drives involved. For example if you were using two drives and you selected 10MB, the total partition size would be 20MB, 10 on each drive.
clip_image005

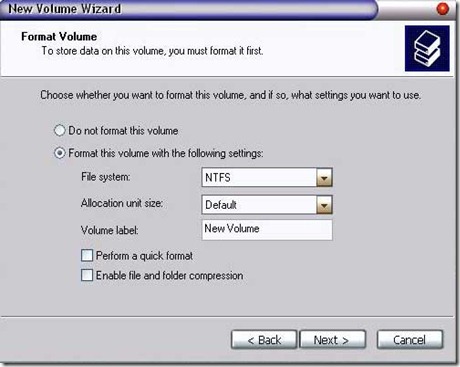
Continue and select a drive letter. Click next and select your file system, allocation unit size, and the name you want on this drive. I went with NTFS and default allocations.
clip_image006

Clicking next will give you an overview of what you selected, if it looks ok click finish. Continue in this manner until you have your drives partitioned the way you want them.

Now you are ready to move Your Documents and the pagefile off of the windows partition and on to the new ones you created. Install your software and you�re done. Bear in mind that most installs default to C:\Program Files, so remember to change the path when installing.

System as Tested

Processor:

AMD Athlon 2200+

Motherboard:

MSI KT7 Ultra 2 KT133A

Graphics Card:

ATI Radeon 9800 AGP

Memory:

768MB PC-133 SD-RAM

Hard Drive:

2x Maxtor 80GB 7200RPM 2MB Cache

Software:

Windows XP Pro SP1

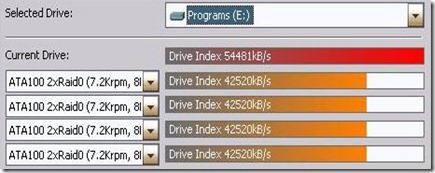
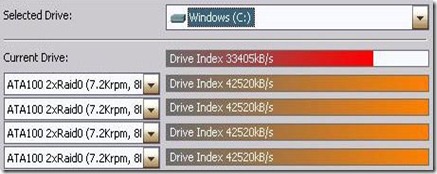
SiSoft Sandra is utilized for hard disk performance testing. As you can see my system is not state of the art, yet my results were significant during testing.

Default Drive Performance
clip_image007

Software RAID Performance

clip_image008

Conclusion

This seems to be a good way to squeeze some extra performance from one of the slowest parts of your PC. I have noticed a significant improvement in load time, especially for games. The performance improves greatly with three and four drives, but I�m sure that is getting close to or exceeding the limits of the current PCI bus. Have fun and enjoy your new found performance boost.

Pros:

  • Inexpensive
  • Good performance increase
  • Easy to configure
  • No need for matched drives
  • Can do spanning and mirroring also

Cons:

  • Dynamic disks are only recognized by Windows 2000 or later
  • Small increase in CPU loading

Taken From: http://www.techimo.com/articles/index.pl?photo=149

GNS3 - PIX Firewall Emulation

PIX Firewall Emulation

GNS3 is also capable of emulating PIX firewalls. Once again, you’ll need to provide your own PIX image. If you want to run more than a restricted license, you’ll also need to have a valid serial number and activation keys.

Configuring Qemuwrapper and Cisco PIX image

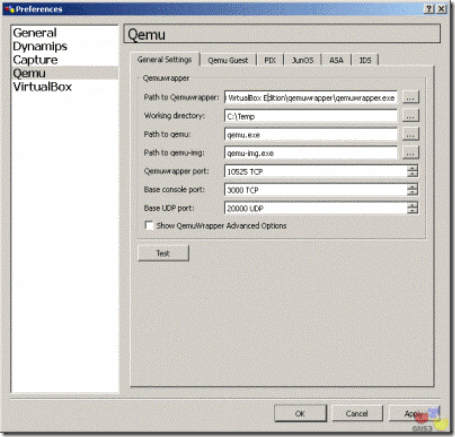
First, go to Preferences on the Edit menu in GNS3. Click on Qemu in the left pane. The default path to the Qemuwrapper should be fine. You may want to specify a different working directory. Note that Qemuwrapper is shipped with a compiled version of Pemu, therefore you do not need Qemu to emulate PIX.

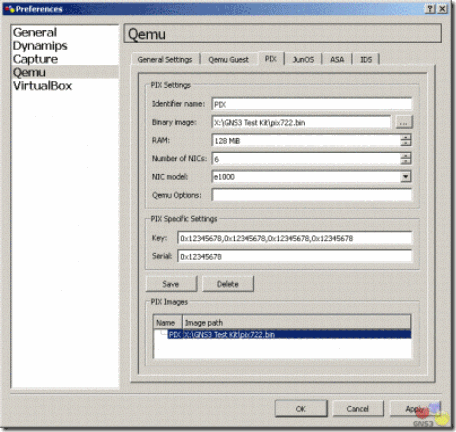
On PIX tab, use the button next to Binary image to specify the location of your PIX operating system image. You may also change other settings like RAM or the number of interfaces. Once you are finished with the settings, click on Save.

clip_image002clip_image004

You may use the default Key and Serial number, if necessary. This will provide a restricted license with limited features. You will need a valid serial number and activation keys to access additional features. The graphic below on the left is a restricted image. Failover, VPN-DES, and VPN-3DES-AES are disabled. You are also limited to 6 physical interfaces and 25 VLANs. The graphic below on the right is unrestricted. With an unrestricted license, these features are enabled along with support for additional interfaces and VLANs.

clip_image006

If you have a serial number and valid activation keys, you may move from a restricted license to an unrestricted license. Type in the activation keys separated by commas with no spaces. Use all lower case. Be sure your serial number is converted to hexadecimal. It is usually in decimal in a show version command. Use a calculator to convert from decimal to hexadecimal if necessary.

Using Cisco PIX

Click OK to return to the GNS3 main interface. Drag a PIX firewall icon from the Nodes Types pane into the workspace. Right-click FW1 and choose Start, then right-click on FW1 again and choose Console.

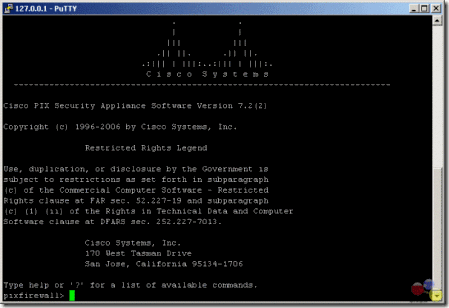
Once you console into your PIX firewall, issue a show version command. If the activation keys do not show up properly, then issue the following command from privileged mode (enable mode):

pixfirewall# activation-key 0x12345678 0x12345678 0x12345678 0x12345678

clip_image008

The command is issued on one line with spaces between the activation keys. Save the configuration using either the write command orcopy run start. Stop the device and restart it. Congratulations! Your PIX firewall is up and running.

Interfaces on the PIX are Ethernet interfaces. To connect to other devices, you’ll need to use either Ethernet or FastEthernet interfaces. You may not connect to a serial interface.

You may connect to other PIX firewalls, routers, and switches. You may not connect to a cloud. Consequently, to connect to a real network or to a Virtual PC, you’ll need to connect from the PIX to a switch, and then from the switch to your Cloud.

CPU usage with PIX

Just as with routers, CPU usage is an issue when emulating PIX firewalls on your computer. You will note that your CPU usage is most likely 100%. There are no idle-pc values available for PIX firewalls at this time. Instead, you may use third-party software to control your CPU usage. There are a variety of products on the market. The one that I use for Windows is called BES and is a free download.

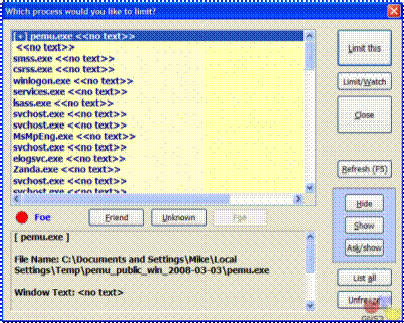
Complete documentation is available on the Web site along with the program download. Once you start your PIX firewall, start BES. Click the Target button. Choose the pemu.exe process and click the Limit this button. A confirmation screen will appear.

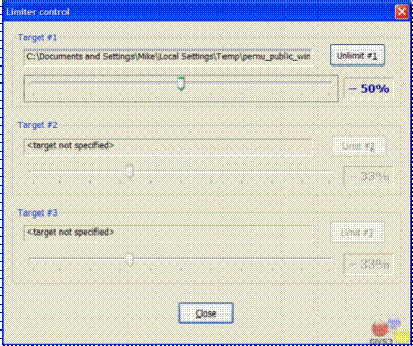
Click the Control button to control how much CPU limiting will be used. I’ve set mine to reduce CPU usage by 50%. If you are running multiple firewalls, you will want to limit each one. This program may also limit other processes running on your Windows computer.

clip_image010clip_image012

For Linux, use cpulimit. You may learn more about cpulimit at the following Web site: http://cpulimit.sf.net. On ubuntu you can use Synaptic Package Manager or Ubuntu Software Centre to download and install cpulimit.

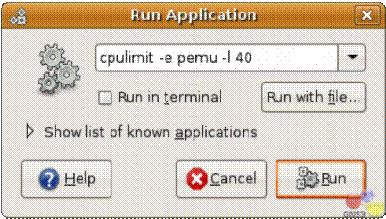
To run cpulimit, press F2 while holding the ALT key down (ALT+F2) in Ubuntu to open a Run Application box. Type the following in the box:

cpulimit –e pemu –l 40

clip_image014

This will limit the application pemu to 40% CPU usage.

Still in your Ubuntu, choose System Monitor under Administration on the System menu. Click the Resources tab. You should see that pemu process is running at 40% of your CPU usage.

Taken From: http://www.gns3.net/gns3-pix-firewall-emulation/

Tuesday, February 14, 2012

Cisco TSHOOT – Top 10 Show Commands

Cisco Router Tips
Top 10 'show' Commands by Tom Lancaster
clip_image002

One of the most important abilities a network administrator can have is the know-how to get information out of his network devices so he can find out what's going on with the network. In most networks, the staple of information gathering has been the "show" commands. Here are my top ten commands to know and love:

  1. show version: Start simple; this command gives uptime, info about your software and hardware and a few other details.
  2. show ip interface brief: This command is great for showing up/down status of your IP interfaces, as well as what the IP address is of each interface. It's mostly useful for displaying critical info about a lot of interfaces on one easy to read page.
  3. show interface: This is the more popular version of the command that shows detailed output of each interface. You'll usually want to specify a single interface or you'll have to hit 'page down' a lot. This command is useful because it shows traffic counters and also detailed info about duplex and other link-specific goodies.
  4. show ip interface: This often overlooked command is great for all the configuration options that are set. These include the switching mode, ACLs, header compression, ICMP redirection, accounting, NAT, policy routing, security level, etc. Basically, this command tells you how the interface is behaving.
  5. show ip route: This indispensable command shows your routing table, which is usually the primary purpose of the box. Get to know the options on this command.
  6. show arp: Can't ping a neighbor? Make sure you're getting an arp entry.
  7. show running-config: This is an easy one. It tells you how the box is configured right now. Also, "show startup-config" will tell you how the router will be configured after the next reboot.
  8. show port: Similar to the show interface command on routers, this command gives you the status of ports on a switch.
  9. show vlan: With the trend toward having lots of VLANs, check this command to make sure your ports are in the VLANs you think they are. Its output is very well designed.
  10. show tech-support: This command is great for collecting a lot of info. It basically runs a whole bunch of other show commands, and spits out dozens of pages of detailed output, designed to be sent to technical support. But, it's also useful for other purposes.

Taken From: http://www.thenetworkadministrator.com/ciscoroutertips.htm

Sunday, February 12, 2012

Iperf Commands for Network Troubleshooting

Iperf is a very useful utility for network troubleshooting.  In this post I’ll share my list of Iperf commands that I have found useful.

What is Iperf?

Iperf is a network performance utility that can generate both TCP and UDP traffic for testing bandwidth, latency, and packet loss.  Iperf is very powerful and can easily generate enough traffic to saturate a 1Gb, or 10Gb connection.  Iperf is included with most Linux distributions but you can compile Iperf for windows if needed.

In order to use Iperf you’ll need to setup an Iperf server, Iperf clients can then connect to the server in order to run tests.  By default Iperf is uni-directional and sends data from the client to the server.

In my examples I’m using 192.168.1.1 as the address of my Iperf server.

Running iperf -s will setup a basic Iperf server, you can also run Iperf in daemon mode by running iperf -D.

Basic TCP Unicast Test

The simplest test you can do with Iperf is a basic TCP test.  By default the server will use a  TCP window size of 85.3KB.  The client will connect to the server on port 5001 using a TCP window size of 16KB.  The -t option instructs the client to run the test for 30 seconds instead of the default of 10 seconds.

[Server] – iperf -s -i 1

[Client] – iperf -c 192.168.1.1 -t 30

Parallel TCP connections

Parallel connections can be useful if you need to saturate the bandwidth of a link.  The bandwidth of a single TCP session can be greatly affected by the size of the receive window and the latency of the link.

To enable parallel connections add the -P flag to the Iperf client parameters followed by the number of connections you want.  Make sure to use a capital P, lowercase p will specify a different port number to connect on.

[Server] – iperf -s -i 1

[Client] – iperf -c 192.168.1.1 -t 30 -P 10

UDP Mode

Testing with UDP packets requires the -u flag on both the client and server.  The cool thing about UDP mode is that you don’t have to use a server.  Instead you can use the interface counters on your switches.  You can also specify the destination address to be a multicast group, the default TTL for multicast is 1 (be careful).  To set a different TTL use the -T option on the client.

If you want to test for jitter and packet loss then you should use UDP mode.

[Server] – iperf -s -i 1

[Client] – iperf -c 192.168.1.1 -t 30 -u

In UDP mode iperf defaults to 1Mb/s, you can tell it to use more bandwidth by using the -b flag followed by the number of bits/sec to send.  For example, iperf -c 192.168.1.1 -u -b 100000000 would send at a rate of 100Mb/s.

Bidirectional testing

If you want to test throughput both to and from the server at the same time you can use the -d option to run a bidirectional test.  This will send data to the server, and receive data from the server simultaneously.

[Server] – iperf -s -i 1

[Client] – iperf -c 192.168.1.1 -t 30 -d

Bandwidth limiting

If you need to test for packet loss or other problems at a specific rate of bandwidth you can use the -b flag to specify the maximum throughput in bits/second.

[Server] – iperf -s -i 1

[Client] – iperf -c 192.168.1.1 -t 30 -b 100000

Transfer 1GB of data then stop

Instead of running the test for a specific period of you can instruct Iperf to stop running after trasfering a certain amound of data.  The example below will send 1GB (1024³) of data to the server and then stop

[Server] – iperf -s -i 1

[Client] – iperf -c 192.168.1.1 -n 1073741824

Stop the iPerf server

To kill the iperf server just press CTRL+C in your terminal and it will interrupt the process.

If you are running iPerf in daemon mode you’ll need to find the process ID first

ps -ef | grep iperf
root     16186     1  0 22:00 ?        00:00:00 iperf -s -D

Then kill it

kill 16186

Useful References

Energy Sciences Network Host Tuning Guide

Using Iperf – Guide by Jon Dugan

Taken From: http://samkear.com/networking/troubleshooting/iperf-commands-network-troubleshooting

Friday, January 27, 2012

Getting Started with Arduino

Introduction


This article is a bit different from my usual column in two ways. First, it's starting with a hardware and software combo—something I've not done before. Second, the projects are linked to each other and come recommended to me by Perth LUG member, Simon Newton.
Given the mostly hardware-based information for the project, here are some carefully selected bits of information from the Web site:

Arduino is an open-source electronics prototyping platform based on flexible, easy-to-use hardware and software. It's intended for artists, designers, hobbyists and anyone interested in creating interactive objects or environments.

Arduino can sense the environment by receiving input from a variety of sensors and can affect its surroundings by controlling lights, motors and other actuators. The microcontroller on the board is programmed using the Arduino programming language and the Arduino development environment. Arduino projects can be standalone or they can communicate with software running on a computer.

The open-source Arduino environment makes it easy to write code and upload it to the I/O board. It runs on Windows, Mac OS X and Linux. The environment is written in Java and based on Processing, avr-gcc and other open source-software.

clip_image003Arduino: this hardware/software combo allows you to program chips and test them on the fly—a real advantage of open hardware.clip_image004One of the wacky creations possible with Arduino, this spider-like robot is made by Curtin University student, Phillip Lawrence.

Installation
For those who are happy with a binary, the Web site makes things very easy with 32- and 64-bit binary tarballs at the download page, and if you're lucky, the Arduino IDE may even be in your repository. If you're going with the binary tarball, just download the latest from the Web site, extract it, and open a terminal in the folder. To run the program, enter the command:

$ ./arduino

If you're running from source instead, instructions are available on the Web site with a link from the Downloads page, although I don't have the space here to cover its somewhat unusual installer method. Nevertheless, it does recommend a series of packages that should help troubleshoot mishaps with both the source and binary tarballs. The Web site says you need the following: Sun Java SDK, avr-gcc, avr-g++, avr-libc, make, ant and git.

If you have a local repository version installed, chances are the program can be started with this command:

$ arduino

Under my Kubuntu installation, the Arduino IDE was available in the KDE menu under Applications→Electronics→Arduino IDE.
However, I must stop you here before actually running the program, and I apologize if I led you astray in the last few paragraphs (don't worry if you've already started it, you can close and re-open it with no worries). Obviously, before you can do anything with an Arduino board and the software, you first have to plug in your Arduino device. This will help in the configuration of your hardware, especially if you're using a USB connection.
Once that's out of the way, you now can start the program with any of the methods above.

Usage
With the program running and the device plugged in, let's set it up. Inside the main window, click on the Tools menu and navigate your way to the Board menu. From there, choose your Arduino device (I had the Arduino Uno). Now you have to choose your serial port, which is under Tools→Serial Port. If you had a USB device and the program found it, a USB option should appear here (in my case, /dev/ttyUSB0).
With all of that boring stuff out of the way, I'm sure you're keen to sink your teeth into this hardware/software combo. The IDE makes things simple with a series of examples in an easy-access menu. Look under File→Examples, and check out the impressive list of examples from which to choose. I recommend starting with Blink under the 1.Basics menu.

With Blink, you can start with the most basic of basics and come to grasp the syntax with well laid out code with documentation for each line. To try out this code, click Upload, which is the sixth button along in the blue menu, with the right-facing arrow. If all goes well, you should see your device start blinking from an LED, perhaps with a board reset in the process.

If your board has an enabled reset facility like the Uno I was using, you should be able to make code changes by uploading them, watching the board next to you reset and start again with the new program. In fact, I recommend you try it now. Change one of the lines, perhaps one of the lines dealing with the delay time, and then upload it again. Now this may seem lame, but to a hardware "n00b" like myself, changing around the program and updating the running hardware in a visible way was quite a buzz!

If you want to check out your code before uploading it, the start and stop buttons are for verifying the code, with the stop button obviously allowing you to cancel any compiling partway through. Although I'm running out of space for the software side, I recommend checking out more of the examples in the code, where genuinely real-world uses are available. Some highlights include ChatServer, "a simple server that distributes any incoming messages to all connected clients"; a reader for barometric pressure sensors; and a program for demonstrating and controlling sprite animations.

However, I've been neglecting one of Arduino's real bonuses, and that is the ability to use a board to program any number of chips, remove them from the main Arduino board, and use them to run external devices. The nature of open hardware really makes this a robotic enthusiast's wet dream, with examples like my close mate Phil's robotic spider showing some of the cool things you can achieve with this suite.
Nevertheless, I do have one specific use of Arduino in mind to tie this column together, and that is Simon Newton's Arduino RGB Mixer: a six channel color mixer that interfaces with OLA. Check out the following link for instructions on how to make this simple device that shows off both of these projects at the same time:
http://www.opendmx.net/index.php/Arduino_RGB_Mixer.

clip_image005
Simon Newton's RGB Mixer is a great way to use both Arduino and OLA together.Read more at: http://arduino.cc/en

Getting Started – The Basics
This example contains the bare minimum of code you need for an Arduino sketch to compile: the setup() method and the loop()method.

Hardware Required
Arduino Board

Circuit
Only your Arduino Board is needed for this example.
clip_image002
image developed using Fritzing. For more circuit examples, see the Fritzing project page

Code
The setup() function is called when a sketch starts. Use it to initialize variables, pin modes, start using libraries, etc. The setup function will only run once, after each powerup or reset of the Arduino board.
After creating a setup() function, the loop() function does precisely what its name suggests, and loops consecutively, allowing your program to change and respond as it runs. Code in the loop() section of your sketch is used to actively control the Arduino board.
The code below won't actually do anything, but it's structure is useful for copying and pasting to get you started on any sketch of your own. It also shows you how to make comments in your code.
Any line that starts with two slashes (//) will not be read by the compiler, so you can write anything you want after it. Commenting your code like this can be particularly helpful in explaining, both to yourself and others, how your program functions step by step.

void setup() {
// put your setup code here, to run once:
}


void loop() {
// put your main code here, to run repeatedly:
}


Getting Started – Hello World (Blink)
This example shows the simplest thing you can do with an Arduino to see physical output: it blinks an LED.

Hardware Required
· Arduino Board
· LED

Circuit
To build the circuit, attach a 220-ohm resistor to pin 13. Then attach the long leg of an LED (the positive leg, called the anode) to the resistor. Attach the short leg (the negative leg, called the cathode) to ground. Then plug your Arduino board into your computer, start the Arduino program, and enter the code below.
Most Arduino boards already have an LED attached to pin 13 on the board itself. If you run this example with no hardware attached, you should see that LED blink.
click the image to enlarge
clip_image002
image developed using Fritzing. For more circuit examples, see the Fritzing project page
Schematic
click the image to enlarge
clip_image004
Code
In the program below, the first thing you do is to initialize pin 13 as an output pin with the line
pinMode(13, OUTPUT);

In the main loop, you turn the LED on with the line:
digitalWrite(13, HIGH);

This supplies 5 volts to pin 13. That creates a voltage difference across the pins of the LED, and lights it up. Then you turn it off with the line:
digitalWrite(13, LOW);

That takes pin 13 back to 0 volts, and turns the LED off. In between the on and the off, you want enough time for a person to see the change, so the delay() commands tell the Arduino to do nothing for 1000 milliseconds, or one second. When you use the delay() command, nothing else happens for that amount of time. Once you've understood the basic examples, check out the BlinkWithoutDelay example to learn how to create a delay while doing other things.
Once you've understood this example, check out the DigitalReadSerial example to learn how read a switch connected to the Arduino.

/*
  Blink
  Turns on an LED on for one second, then off for one second, repeatedly.
  This example code is in the public domain.
*/


void setup() {                
// initialize the digital pin as an output.
// Pin 13 has an LED connected on most Arduino boards:
pinMode(13, OUTPUT);     
}


void loop() {
digitalWrite(13, HIGH);   // set the LED on
delay(1000);              // wait for a second
digitalWrite(13, LOW);    // set the LED off
delay(1000);              // wait for a second
}

See Also
  • DigitalReadSerial: Read a switch, print the state out to the Arduino Serial Monitor.
  • AnalogReadSerial: Read a potentiometer, print it's state out to the Arduino Serial Monitor.
  • Fade: Demonstrates the use of analog output to fade an LED.

Based On

Plop – Boot USB Disks on Old Hardware and VMware

Using Plop Boot Manager for USB Boot

For PLOP USB Disks Booting on VMWARE check this post: http://myhowtosandprojects.blogspot.com/2011/12/boot-from-usb-disk-in-vmware.html

clip_image002

Portability is a huge advantage that Linux enjoys over most other desktop operating systems as most major distros work very well when installed to a flash drive. However, there are still machines in service that just won't play ball when it comes to USB booting. Fortunately, I found a nice little utility that can work around this problem.


Carrying data around on a flash drive is handy, but with Linux, it's possible to carry around an entire work environment. Unfortunately, however, there are some older systems that won't boot from USB. For example, I have a Sempron 3000+ system with 2GB of RAM that won't boot from USB, even though it's a usable system for some things. If the BIOS doesn't support booting from a flash drive, there's not much that GRUB can do as it doesn't contain any drivers and relies on the BIOS to find bootable media.


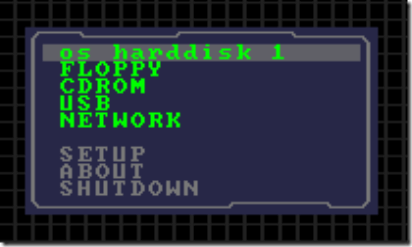
Plop Boot Manager aims to overcome these limitations. Like most boot managers, it presents a selection menu to choose the boot partition when the machine first starts up. As it contains its own USB drivers, you can use it to convince older hardware to boot from a device such as a flash drive. It's a quite a flexible piece of software. For example, you can set it up to be loaded by GRUB or the Windows boot loader menu or even something more exotic such as loading Plop from from a floppy disk drive in order to initiate a network boot. In this example, I'll just be documenting one single use case in which I used it to enable an older machine to boot from a USB drive.

clip_image004
Standard disclaimer: If you're carrying out a job like this, a single mistake or one bug in the software can easily wipe the contents of the entire disk. Back up valuable data.

clip_image006
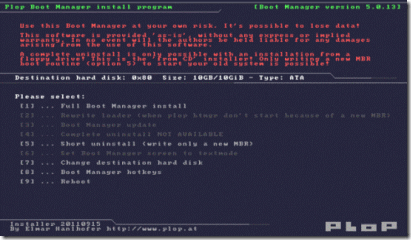
In this case, I installed it to the MBR (Master Boot Record) as this is the simplest option. A word of warning here: when installed to the MBR, it will overwrite an existing GRUB installation if it too was placed in the MBR. As Plop isn't a Linux loader, this means that Linux will no longer work. In other words, you will have to reinstall GRUB onto the Linux boot partition itself, if you don't already have it working like that. There might be a slight problem here as USB keyboards wont work until the operating system itself has booted. This means that you can't actually select anything from the Grub menu if you are using a USB keyboard, which should’t be a huge problem for most uses. Obviously, Plop Boot Manager can select between operating systems. An existing Windows installation should continue to work without modification.

clip_image008

Within the archive, there are a few directories with the files needed for different types of installation. In this case I took the ISO installer image (all 480k of it) and burnt it to a CDR. As I said, if this isn't an option with the machine that you're working with, you can install from within an operating system that is already running on the computer. As with all of the system, the installer uses a flashy mixture of text mode and graphics. It's a simple system and it installs very quickly.


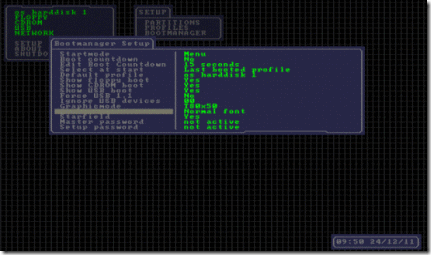
Rebooting, you're presented with the installer itself with options for booting from different types of media. As hoped, this allowed me to boot Xubuntu from the USB flash drive. One limitation of the program is that it can't handle booting from USB DVD/CDROM drives which is a shame. It's an interactive boot manager and you can reconfigure it on the fly to change things like appearance and default boot options.


Plop Boot Manager is a versatile piece of software. Risking the ire of Linux graybeards by saying it, I've often wished that more Linux distros made use of something a bit friendlier than the perennial GRUB. If you work with a lot of older hardware and would like to boot from a memory stick, the the ISO version of the boot loader on a CDR might be worth adding to your bag of tricks.


I've only scratched the surface of what Plop can do. Hit the docs for a full feature list.

______________________

UK based freelance writer Michael Reed writes about technology, retro computing, geek culture and gender politics.

Taken From: http://www.linuxjournal.com/content/using-plop-boot-manager-usb-boot