Full Speed Ahead with Handbrake
Jun 30, 2010 By Anthony Dean
See how Handbrake, a powerful and easy-to-use video conversion program, can help you enjoy your favorite TV shows or films while at your computer, whether you're at home or away from home.
As an animation and comic-book fan, I like to watch various TV shows and movies featuring my favorite characters, ranging from the Simpsons and Superman to Looney Tunesand the X-Men films. Like most such fans, I've also bought the various DVD releases of these shows. However, since I'm not always at home, I also like watching TV programs and movies on my laptop or Palm Pre smartphone. It's great to be able to watch films while on vacation and other trips, or cartoons while commuting on the bus to work. Instead of repurchasing digital download versions of these programs, however, I find it's much cheaper (and easier, when factoring in the lack of Linux-friendliness of some on-line digital video stores) to convert my DVDs into more versatile, computer-ready video files. Doing this gives me such advantages as being able to store my video collection in an easily accessible format (without having to swap DVDs from my bookshelves), being able to convert the files for playback on various devices (such as my Pre or my old iPod), and keeping a backup of my DVD collection. Although various video conversion programs are available for Linux, the most user-friendly one I've found is Handbrake.
Handbrake, a cross-platform program (with versions available for Windows and OS X along with Linux), comes in both a command-line version and a GUI version for Linux. An open-source program, Handbrake offers the ability to convert from unencrypted DVD video sources (including VIDEO_TS folders, .VOB and .TS files, and .ISO images) and most multimedia files that FFmpeg can handle, including AVI (.avi) and MPEG (.mpg) files. Output formats include the Matroska (.mkv) and MP4 (.mp4) video containers; H.264, MPEG-4 and Theora video codecs; and AAC, MP3 and Vorbis audio codecs (along with AC3 passthrough).
Installation of Handbrake itself is straightforward. If Handbrake isn't offered in your system's package manager, the Handbrake Web site's downloads section offers you the choice of installing either a command-line version or a GUI version, for either 32-bit or 64-bit systems. For the purpose of this article, I cover the GUI version, which keeps with Handbrake's emphasis on user-friendliness. If the .deb or .rpm files offered (geared toward Ubuntu and Fedora users, respectively) aren't sufficient, another option is to download the source code and compile Handbrake.
Note that Handbrake does not unencrypt encrypted DVDs on its own, which includes most commercial DVDs available. Before installing Handbrake, make sure the libdvdcss library is installed first. The legality of converting DVD video for one's personal use may vary by locality, so check with the proper authorities before proceeding.
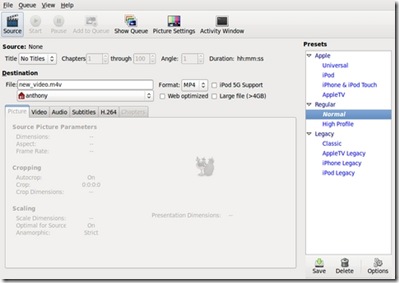
To cover the basics of Handbrake, let's use it to convert to a more laptop-friendly format DVD of the hit 2000 superhero film X-Men about Marvel Comics' classic mutant-powered superhero team. After inserting the DVD into the computer (and launching Handbrake), select the Source button (Figure 1).
Figure 1. Handbrake's Default Interface, before Loading a DVD
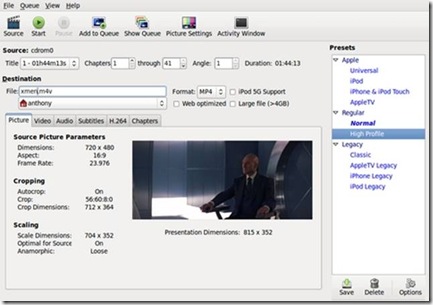
If the DVD's directory isn't selected automatically, navigate to it; afterward, select OK, and Handbrake will read the DVD's tracks. The movie's available tracks will be displayed in the drop-down Title menu, next to the Chapters beginning and ending boxes and an Angle box. The movie itself generally will be the track with the longest time listed. Select the movie's track, then under the File destination box, type what you want to name the movie. If you don't want to convert all the chapters from the original source (say, if you just want the opening title sequence or a particular scene), type in the Chapters boxes the desired range of chapters. The Angle box can be ignored by most users (including for our purposes here), given its infrequent use on DVDs.
Figure 2. Handbrake after Loading a DVD
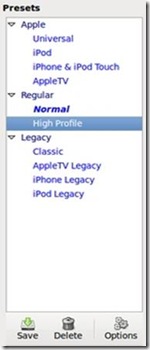
The next step is to decide whether you want to use Handbrake's presets or your own customized settings. One of Handbrake's strengths is its various presets, which allow you to choose a convenient high-quality setting for various conversion purposes. Previous versions of Handbrake offered myriad presets, but as shown in Figure 3, version 0.9.4 (the most-recent version, at the time of this writing) has simplified the offerings for convenience and now include Normal (the default) and High Profile (high-quality) presets; presets for the iPod, the iPhone/iPod Touch and the Apple TV; and several now deprecated legacy settings, aimed at users of previous versions of Handbrake.
For my purposes (keeping the file to play on a laptop), I usually select High Profile, a high-quality setting, though I've also found the iPhone/iPod Touch preset helpful for making files specifically for watching on my Pre, which uses the same video settings as the iPod Touch and iPhone.
Figure 3. Handbrake's Presets
If you're fine with the presets settings as is, the next step is to select Start, and Handbrake will begin converting the video. However, if you want to convert multiple DVD tracks (say, the extras on a movie DVD or all the episodes from a TV show DVD), select Add to Queue first to add the current track, then select another track as previously described, and click Add to Queue. Repeat until you've chosen all the desired tracks from the DVD, then select Start.
If you're looking for finer control over the conversion settings, you need to do more than just the above, of course. As shown in Figure 1, Handbrake offers several different tabbed panes to adjust various settings. The panes include Picture (the default displayed in Figures 1 and 2), Video, Audio, Subtitles, H.264 and Chapters. Let's look at what each pane offers.
This is the default pane shown when Handbrake is launched. When the desired video or DVD to convert from is loaded into Handbrake, a preview scene from the video is displayed, along with information on the video's dimensions, including cropping and scaling. Click on the Picture Settings button in the top bar to adjust the final video's cropping and scaling settings manually, as well as the detelecine settings (which are mostly used when converting TV programs from DVD).
I generally leave the dimensions settings alone, along with keeping decombing turned on when converting TV programs (and off when converting movies, although turning it off isn't necessary).
The Picture Settings window also can play a brief preview of what the final converted film will look like, based on the current settings.
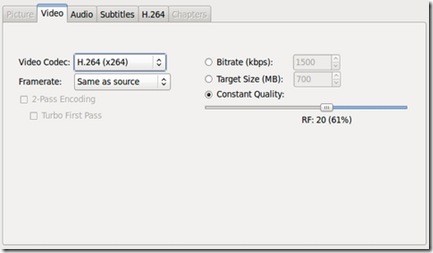
From the Video pane, two drop-down menus offer settings for the video codec and framerate. Video codec choices include H.264, MPEG-4 and Theora. There's also an option to turn on two-pass encoding (a setting that scans the video source twice to ensure a higher-quality result), as well as radio buttons offering a choice of converting based on either the bitrate, a specific targeted file size or a constant quality rate.
Figure 4. Video Pane
I generally keep H.264 selected (Handbrake's default setting) and leave the constant quality setting as is, unless I need a specific bitrate or file size. If so, I also turn on two-pass encoding and select Turbo First Pass, a setting that speeds up the rate of the first pass. If adjusting the bitrate manually, I usually choose a figure between 1,000–1,500kbps (though I lean toward the conservative side).
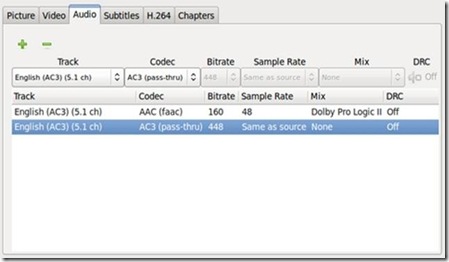
In the Audio pane, depending on the video source or the preset chosen, one or several audio tracks may be displayed. The number of tracks may be added to or subtracted from using the + or - buttons shown. This is useful if you want to include, for instance, the director's commentary track from a movie or alternate languages (a potentially popular feature for, say, Japanese anime fans).
Figure 5. Audio Pane
To adjust the tracks even further, drop-down menus are displayed: Track, Codec, Bitrate, Sample Rate, Mix and a button for DRC (Dynamic Range Compression). Track provides the option of choosing which audio track(s) to encode, including foreign-language tracks or director's commentary. Codec allows you to choose to which audio codec to encode (depending on which video container is chosen): AAC, MP3, Ogg Vorbis or AC3 (the default audio on a DVD). Bitrate and Sample Rates allow you to set to which bitrate and sampling rates, respectively, to encode. Mix allows you to select output mixes: mono, stereo, Dolby Surround, Dolby Pro Logic II and 6-channel discrete. Finally, DRC allows (if activated) you to adjust the limits of compressing the dynamic range of the audio output. This setting would be used for audio with very loud or very quiet portions by altering the resulting audio to increase the sound on very soft portions and reducing the sound on very loud portions.
For the purposes of encoding my X-Men movie, I'd choose at least one track (in English, the only language I fluently speak or read), encoded to AAC with a bitrate of 160kbps, with a mix of either stereo (my very basic audio setup at home consists of just a pair of speakers) or one of the surround sound settings. I leave DRC and Sample Rate alone. If I opt for a second track (say, to include a separate track for surround sound if I ever upgrade my home audio setup), I'd choose AC3, which would encode the audio as is from the video source. I also might decide to include a third audio track for the director's commentary (so I can hear Bryan Singer expand upon some of the film's plot points). Keep in mind that adding extra audio tracks, depending on the settings, may make the resulting file larger.
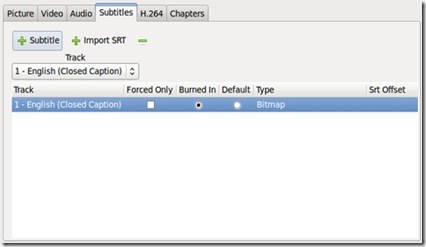
The Subtitles pane allows you to include subtitles and closed captions in the output file, either from the original video source or from an external file. Although I very infrequently use closed captioning (not having hearing difficulties and very rarely watching non-English-language material), this option would be highly useful for someone converting a subtitled video source.
Figure 6. Subtitles Pane
The options in this pane include selecting one or more tracks (via the + Subtitle, + Import SRT and - buttons), then choosing a language for each track. Forced Only should be checked if you want the subtitles displayed only when the video demands it (say, when a scene has someone speaking a foreign language that must be translated and displayed on-screen for plot purposes). For this option, choose Foreign Audio Search from the track drop-down menu. Burned In usually will be chosen automatically if it's a subtitle track, placing the subtitles on the movie with no way of turning them off. Closed captioning, meanwhile, doesn't use this feature, and it can be turned on or off in the resulting file's video player. There's also the option of choosing which track is the default (via the Default radio button). If you've chosen + Import SRT, then a different set of options will be presented, allowing you to choose which external file to use to import subtitles.
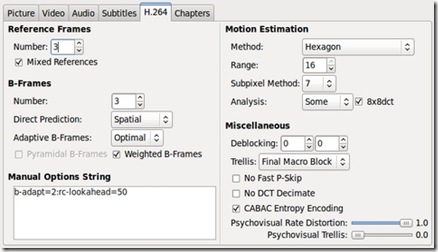
The H.264 pane allows Handbrake users to tweak various advanced x264 settings to their specifications. For the average user (such as myself), this pane can be left alone. Those interested in the settings here can consult the Handbrake Web site's user guide page, although as the page notes, it (at the time of this writing) hasn't been updated yet for 0.9.4.
Figure 7. H.264 Pane
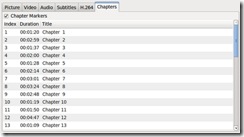
The Chapters pane gives you the option of including chapter markers at the same places the chapter breaks exist on the original DVD. To activate this, select the Chapter Markers box. The length of each chapter is displayed, as well as generic titles reading “Chapter 1”, “Chapter 2” and so forth. If you want to create specifically named chapter titles (such as “That cool scene where Magneto makes the guns hover” or “Statue of Liberty slugfest”), click on the chapter title of choice and type a new name.
Figure 8. Chapters Pane
For my usage, I keep the Chapter Markers box checked, although I usually don't bother renaming the chapters.
After performing all the previous customizing steps, you might want to save these settings for future reuse. To do this, click the Save button shown in Figure 3 at the bottom of the Presets pane, and give the desired settings a custom name in the box that appears. The new preset then will appear in the Presets pane, ready to use for future video conversions.
Length of DVD Video Conversion
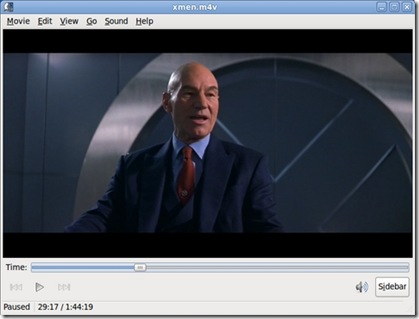
After finishing all of the above, to begin conversion, click Start. For my computer, an HP laptop with 4GB of RAM and a 2.1GHz Intel Core 2 Duo T6500 processor, running Ubuntu 9.10 (64-bit), it took two hours and 43 minutes to convert the X-Men movie (which runs an hour and 44 minutes) using the High Profile preset. The end result of all this, of course, is that I now have a high-quality movie file that I can view (or use) as I wish.
Figure 9. Finished Video File Playing in Totem
As you can see, Handbrake is a great program for those wishing to convert their video media, particularly their DVDs, to a more versatile digital format. Thanks to Handbrake, I've converted much of my DVD collection for easy access and viewing on my laptop, allowing me to enjoy watching Hugh Jackman (or Bugs Bunny) in action while away from my TV set or away from my apartment entirely.
Handbrake: handbrake.fr
Handbrake Downloads: handbrake.fr/downloads.php
Handbrake's User Guide to x264 Options: trac.handbrake.fr/wiki/x264Options
Anthony Dean works as a file clerk for the city of Milwaukee, Wisconsin. He's been using Linux as a primary operating system since 2005. Anthony can be reached atadean33@gmail.com
Taken From: http://www.linuxjournal.com/article/10716
No comments:
Post a Comment