Wednesday, August 25, 2010

Installing and Managing VMware ESXi 4.0 (VSphere)

1.      Make sure your Hardware is Compatible

Before starting the process of downloading VMware ESXi, you must make sure that your hardware is compatible with VMware ESXi version 4. This is especially true because ESX and ESXi version 4 require a server with a 64 bit CPU. In other words, ESXi 4 would not run on a server with a 32 bit CPU.

To verify that your hardware is compatible, checkout VMware’s Hardware Compatibility List. If you do have a 64 bit CPU but your hardware is not on the list, I encourage you to still try out ESXi 4 to see if it works on your hardware.

If you only have a 32 bit CPU, VMware is still offering ESXi 3.5 Free Edition that is compatible with 32 bit CPUs.

2.      Register with VMware and Activate your account

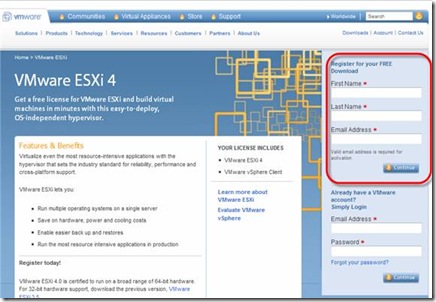
Once you know that your hardware is compatible, you are ready to obtain ESXi 4. However, to obtain it, you need to register to download it. To do this, go to the ESXi Free Download website. Enter your name and email address to activate your account.

clip_image001
Figure 1: Registering to download the free VMware ESXi 4

You will receive an email where you will click to activate your registration. That will take you to the download site for ESXi 4.

3.      Download ESXi Free

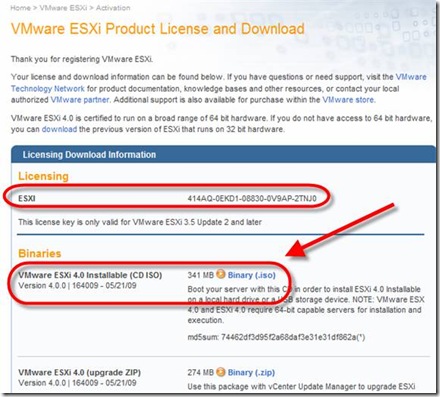
Next, you will see that ISO and ZIP versions available for download. You will also see your activation code. Make sure you keep that code handy for later.

clip_image002
Figure 2: Downloading the VMware ESXi ISO Image

Click on the ISO image and download the 341MB file. You do not want the ZIP file as that is for upgrading, not a fresh install.

4.      Burn a CD

Once downloaded, that image needs to be burned to a physical CD (unless you are going to run ESXi inside VMware Workstation). In other words, if you are going to run ESXi on a physical server (everyone is except in rare cases), then you need to put it on a CD and boot that server off of the CD.

To do this, you will need to burn the CD using CD Burning / CD Authoring software and a CD recordable drive.

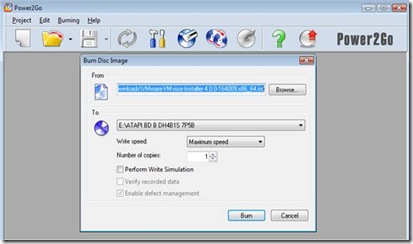
In my case, I had a CD authoring software installed (called Power2Go) that came with my CD/DVD drive so when I double-clicked on the download, the burning software started.

clip_image003
Figure 3: Burning ESXi to a CD

You should note that you only need to insert a CD recordable disk, not a DVD as this image is only 340MB. Also, because of this, the burning will only take a few minutes.

For more information on ISO Burning, see this article – How to Write ISO Files to CD.

5.      Obtain IP address and register hostname in DNS

While the image is burning and you have a few minutes to spare, I recommend that you figure out what static IP address you will use for the new ESXi host. Also, you want to figure out what DNS name you will use and create an alias for the ESX hostname in your DNS server. Of course, that DNS host name will map up with the static IP address you carved out for the new ESXi host.

6.      Boot ESXi and Install

At this point, you can take your burned VMware ESXi 4 CD, insert it into the server and start the installation process. Like any CD that you are trying to boot, you may need to check the boot order in your BIOS or press a key (like ESC) to manually boot from the ESXi CD in the CDROM drive.

The ESXi installation process is quick and easy. It is likely that you will take all the defaults, with the only deterrent being that you should enter all the necessary network information such as:

· Static IP address and hostname you defined in step 5

· DNS servers and DNS suffix

· Default gateway

For some basic step by step on the installation process with screenshots, please see my article- New VMware ESXi Server – Configuration Checklist.

7.      Initial ESXi Server Configure

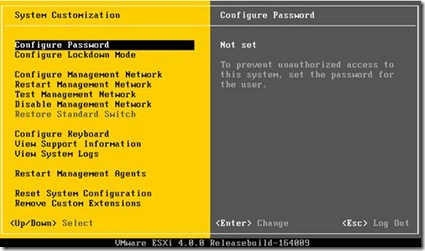
To initially set up the new server, again, I am going to refer you to another of my articles that covers this step by step. Please see New VMware ESXi Server – Configuration Checklist. This will guide you through doing things like setting the root password, locking down the server, and more.

clip_image004
Figure 4: Configuring your new server at the console

8.      Install your vSphere Client

To manage the new server, you need to install the vSphere client. The vSphere client is used whether you purchase the vSphere Enterprise Plus Suite for thousands of dollars or if you are using the Free ESXi only.

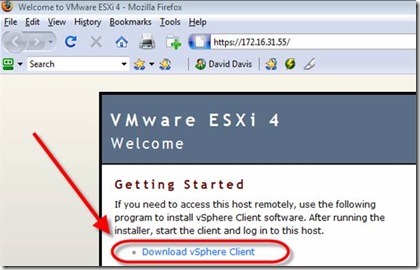
To download and install the vSphere client, just open your web browser and enter that static IP address or hostname of the new ESXi server in the address bar. This will take you to the webpage for that server where you can download the client.

clip_image005
Figure 5: Downloading the vSphere client

9.      Enter your Free ESXi Activation Code

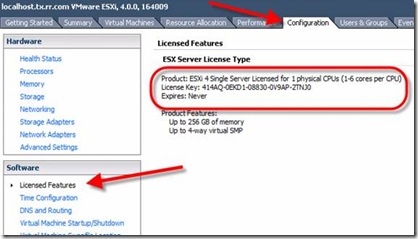
Once your vSphere client is installed, you can connect to the hostname of your new ESXi host. When you do connect, you will get the message that your 60 day trial has started. “Hey wait!”, you say, “this was supposed to be a Free ESXi host, not a 60 day trial”. Well, to make it “free” you need to use the activation code that you see up in Figure 2.

In the vSphere client, go to the Configuration tab, then to Licensed Features and add your License Key, like this:

clip_image006
Figure 6: Entering your License Key

At that point, you can use this ESXi host forever at no cost!

10.  Install or Import a VM

Finally, you need some virtual machines. You can import VMs from the Virtual Appliance Marketplace by going to File > Browse Virtual Appliance Marketplace or by creating your own VM by going to File > New > Virtual Machine.

You can even convert physical machines into virtual machines using a P2V conversion application.

At this point we are all done Downloading, Installing, and getting started with the free VMware ESXi 4 server! Do not forget to document changes for your junior IT staff and educate them how to use the new virtual infrastructure. Once you spend some time using and evaluating VMware ESXi, you may want to consider a full 60 day eval of the complete vSphere suite.


Taken From: http://www.techhead.co.uk/installing-vmware-esxi-4-0-on-a-usb-memory-stick-the-official-way

To test you can download Virtual Appliances from:

http://www.turnkeylinux.org/

http://www.vmware.com/appliances/


To Convert/Create/Install Virtual Appliances you can use:

http://www.vmware.com/products/converter/

Automate and simplify physical to virtual machine conversions as well as conversions between virtual machine formats with VMware vCenter Converter. Use the intuitive wizard-driven interface of VMware vCenter Converter to convert your physical machines to virtual machines.

  • Convert Microsoft Windows and Linux* based physical machines and third party image formats to VMware virtual machines
  • Complete multiple conversions simultaneously with a centralized management console
  • Easy to use wizards to minimize the number of steps to conversion

Installing VMware ESXi 4.0 (USB Memory Stick)

Note: Instaling VMware ESXi on a hardrive is the same as installing on a USB Memory Stick, when selecting a disk just select the hardrive instead off the USB Memory Stick
Since writing my original post last year on installing VMware ESXi 3.5 onto a USB memory stick things have changed and with the release of vSphere VMware  have now provided an official method of doing this which is much easier than any of the previous ‘unofficial’ methods.  As such I felt compelled to write an updated post giving easy to follow steps to assist in instructing how to create such a bootable VMware ESXi 4.0 USB memory stick.
It’s almost so easy that I don’t need to provide any screen shots showing how to do it but what the hey – here they are anyway. clip_image001
1. The first thing you’ll need is a spare USB memory stick.  For this I am using a generic 2GB Dane-Elec (never heard of them before but they were cheap from my local Staples store) memory stick. I usually go for a 2GB memory stick as I know it will have ample space for the installation.
clip_image003
2. The next step is to download ESXi from VMware here and burn if off onto CD.
3. Now insert the USB memory stick into a USB port which is able to be booted (eg: internal USB port) – though at this stage make sure that your server can boot from the CD/DVD drive.
clip_image005
4. Insert the CD containing the ESXi install into the servers CD/DVD drive and boot or restart the server.
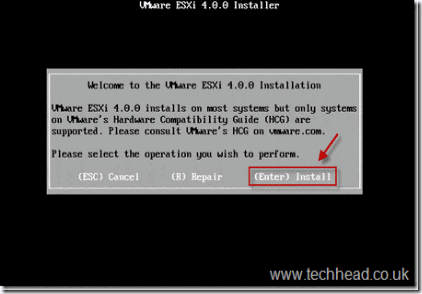
5. Upon booting off of the VMware ESXi installation CD you will be presented with the screen below – press the ‘Enter’ key.  Also, notice the option to ‘Repair’ an ESXi installation from this screen by pressing the ‘R’ button.  This is useful when you have a corrupt ESXi installation and you wish to reinstate a fresh install – this option is non-destructive to the /vmfs/volume on your ESXi host which may contain your VMs, etc though you will lose your host’s configuration settings.
clip_image007
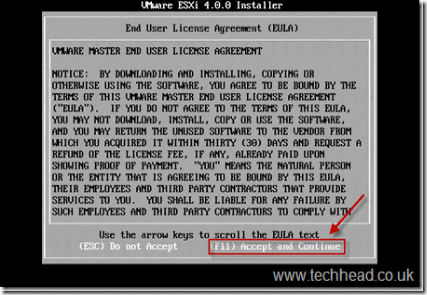
6. Sign your life away to VMware by pressing the ‘F11’ key.
clip_image009
7. At this stage you will see a list of all your storage devices connected to your VMware ESXi host – select your USB memory stick and press ‘Enter’.
clip_image011
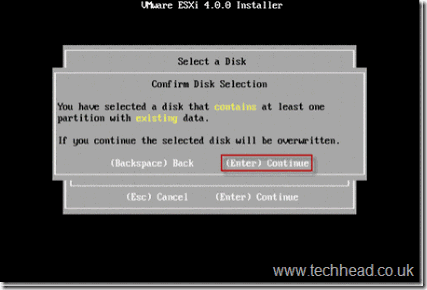
8. If your USB memory stick already has data on it you will be asked if you definitely want to continue with writing ESXi down to it.  This is to avoid any accidental mishaps.  Press ‘Enter’.
clip_image013
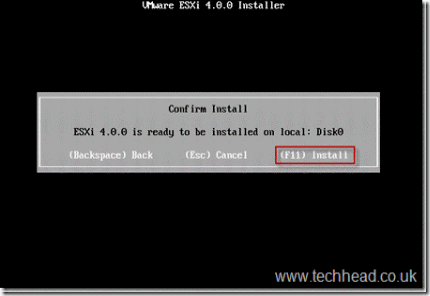
9. Next press ‘F11’ to confirm the installation of ESXi onto the USB flash drive.
clip_image015
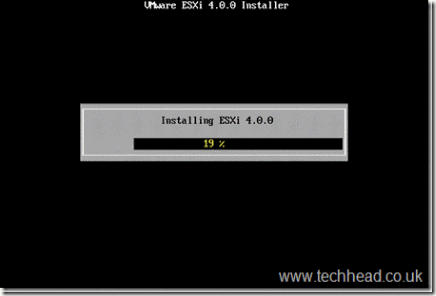
10. Sit back and wait whilst ESXi is written down to your USB flash drive – at this point you should see it flashing away (assuming it has an LED activity light). This install process generally only takes a couple of minutes.
clip_image017
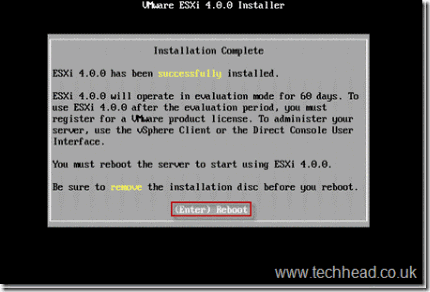
11. Once the installation has completed you will receive the screen below.  At this point remove the ESXi installation CD from the servers CD/DVD drive and press ‘Enter’ to reboot the server.
clip_image019
IMPORTANT: Upon the server rebooting ensure that its boot priority order is set so that the USB port(s) are booted from first.
Your server should now be booting successfully off of the USB memory stick to VMware ESXi  4 – all you need to do now is configure it! clip_image001[1]
clip_image021
Although being pretty straight forward I hope you found this of use.


Adding an HardDrive (if the usb space isn't enough for you):

If you want you can always add an harddisk to VMWare EXSi, with VSphere (setup instructions here).

Warning: You can only add a hole disk to VMware ESXi, if you were thinking off squeezing it on a partition forget it, it will erase everything and use the hole disk.

Once you have VSphere up and running, just do the following:


Next...

Next... And that's it... you have all the space in the world...

To Convert/Create/Install Virtual Appliances you can use:
http://www.vmware.com/products/converter/
Automate and simplify physical to virtual machine conversions as well as conversions between virtual machine formats with VMware vCenter Converter. Use the intuitive wizard-driven interface of VMware vCenter Converter to convert your physical machines to virtual machines.
  • Convert Microsoft Windows and Linux* based physical machines and third party image formats to VMware virtual machines
  • Complete multiple conversions simultaneously with a centralized management console
  • Easy to use wizards to minimize the number of steps to conversion  


To Manage with VSphere (client) check out:
http://www.virtualizationadmin.com/articles-tutorials/vmware-esx-articles/installation-and-deployment/10-steps-install-use-free-vmware-esxi-4.html
or
http://myhowtosandprojects.blogspot.com/2010/08/installing-and-managing-vmware-esxi-40.html


Wednesday, August 4, 2010

Video Conversion With Handbrake

Full Speed Ahead with Handbrake

Jun 30, 2010  By Anthony Dean

· Audio/Video

See how Handbrake, a powerful and easy-to-use video conversion program, can help you enjoy your favorite TV shows or films while at your computer, whether you're at home or away from home.

As an animation and comic-book fan, I like to watch various TV shows and movies featuring my favorite characters, ranging from the Simpsons and Superman to Looney Tunesand the X-Men films. Like most such fans, I've also bought the various DVD releases of these shows. However, since I'm not always at home, I also like watching TV programs and movies on my laptop or Palm Pre smartphone. It's great to be able to watch films while on vacation and other trips, or cartoons while commuting on the bus to work. Instead of repurchasing digital download versions of these programs, however, I find it's much cheaper (and easier, when factoring in the lack of Linux-friendliness of some on-line digital video stores) to convert my DVDs into more versatile, computer-ready video files. Doing this gives me such advantages as being able to store my video collection in an easily accessible format (without having to swap DVDs from my bookshelves), being able to convert the files for playback on various devices (such as my Pre or my old iPod), and keeping a backup of my DVD collection. Although various video conversion programs are available for Linux, the most user-friendly one I've found is Handbrake.

Handbrake, a cross-platform program (with versions available for Windows and OS X along with Linux), comes in both a command-line version and a GUI version for Linux. An open-source program, Handbrake offers the ability to convert from unencrypted DVD video sources (including VIDEO_TS folders, .VOB and .TS files, and .ISO images) and most multimedia files that FFmpeg can handle, including AVI (.avi) and MPEG (.mpg) files. Output formats include the Matroska (.mkv) and MP4 (.mp4) video containers; H.264, MPEG-4 and Theora video codecs; and AAC, MP3 and Vorbis audio codecs (along with AC3 passthrough).

Installation

Installation of Handbrake itself is straightforward. If Handbrake isn't offered in your system's package manager, the Handbrake Web site's downloads section offers you the choice of installing either a command-line version or a GUI version, for either 32-bit or 64-bit systems. For the purpose of this article, I cover the GUI version, which keeps with Handbrake's emphasis on user-friendliness. If the .deb or .rpm files offered (geared toward Ubuntu and Fedora users, respectively) aren't sufficient, another option is to download the source code and compile Handbrake.

Note that Handbrake does not unencrypt encrypted DVDs on its own, which includes most commercial DVDs available. Before installing Handbrake, make sure the libdvdcss library is installed first. The legality of converting DVD video for one's personal use may vary by locality, so check with the proper authorities before proceeding.

From DVD to Laptop

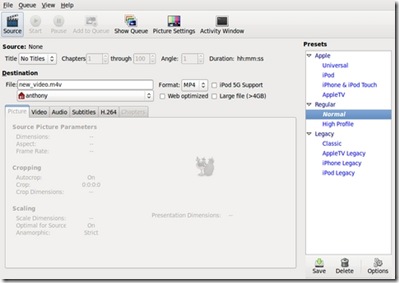
To cover the basics of Handbrake, let's use it to convert to a more laptop-friendly format DVD of the hit 2000 superhero film X-Men about Marvel Comics' classic mutant-powered superhero team. After inserting the DVD into the computer (and launching Handbrake), select the Source button (Figure 1).

clip_image003

Figure 1. Handbrake's Default Interface, before Loading a DVD

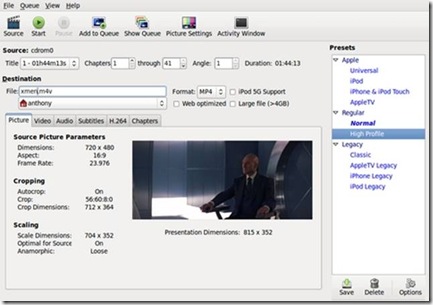
If the DVD's directory isn't selected automatically, navigate to it; afterward, select OK, and Handbrake will read the DVD's tracks. The movie's available tracks will be displayed in the drop-down Title menu, next to the Chapters beginning and ending boxes and an Angle box. The movie itself generally will be the track with the longest time listed. Select the movie's track, then under the File destination box, type what you want to name the movie. If you don't want to convert all the chapters from the original source (say, if you just want the opening title sequence or a particular scene), type in the Chapters boxes the desired range of chapters. The Angle box can be ignored by most users (including for our purposes here), given its infrequent use on DVDs.

clip_image005

Figure 2. Handbrake after Loading a DVD

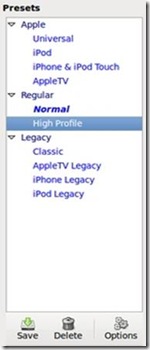
The next step is to decide whether you want to use Handbrake's presets or your own customized settings. One of Handbrake's strengths is its various presets, which allow you to choose a convenient high-quality setting for various conversion purposes. Previous versions of Handbrake offered myriad presets, but as shown in Figure 3, version 0.9.4 (the most-recent version, at the time of this writing) has simplified the offerings for convenience and now include Normal (the default) and High Profile (high-quality) presets; presets for the iPod, the iPhone/iPod Touch and the Apple TV; and several now deprecated legacy settings, aimed at users of previous versions of Handbrake.

For my purposes (keeping the file to play on a laptop), I usually select High Profile, a high-quality setting, though I've also found the iPhone/iPod Touch preset helpful for making files specifically for watching on my Pre, which uses the same video settings as the iPod Touch and iPhone.

clip_image007

Figure 3. Handbrake's Presets

If you're fine with the presets settings as is, the next step is to select Start, and Handbrake will begin converting the video. However, if you want to convert multiple DVD tracks (say, the extras on a movie DVD or all the episodes from a TV show DVD), select Add to Queue first to add the current track, then select another track as previously described, and click Add to Queue. Repeat until you've chosen all the desired tracks from the DVD, then select Start.

If you're looking for finer control over the conversion settings, you need to do more than just the above, of course. As shown in Figure 1, Handbrake offers several different tabbed panes to adjust various settings. The panes include Picture (the default displayed in Figures 1 and 2), Video, Audio, Subtitles, H.264 and Chapters. Let's look at what each pane offers.

Picture

This is the default pane shown when Handbrake is launched. When the desired video or DVD to convert from is loaded into Handbrake, a preview scene from the video is displayed, along with information on the video's dimensions, including cropping and scaling. Click on the Picture Settings button in the top bar to adjust the final video's cropping and scaling settings manually, as well as the detelecine settings (which are mostly used when converting TV programs from DVD).

I generally leave the dimensions settings alone, along with keeping decombing turned on when converting TV programs (and off when converting movies, although turning it off isn't necessary).

The Picture Settings window also can play a brief preview of what the final converted film will look like, based on the current settings.

Video

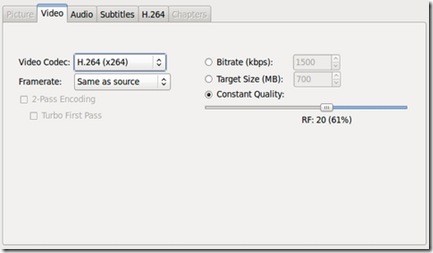
From the Video pane, two drop-down menus offer settings for the video codec and framerate. Video codec choices include H.264, MPEG-4 and Theora. There's also an option to turn on two-pass encoding (a setting that scans the video source twice to ensure a higher-quality result), as well as radio buttons offering a choice of converting based on either the bitrate, a specific targeted file size or a constant quality rate.

clip_image008

Figure 4. Video Pane

I generally keep H.264 selected (Handbrake's default setting) and leave the constant quality setting as is, unless I need a specific bitrate or file size. If so, I also turn on two-pass encoding and select Turbo First Pass, a setting that speeds up the rate of the first pass. If adjusting the bitrate manually, I usually choose a figure between 1,000–1,500kbps (though I lean toward the conservative side).

Audio

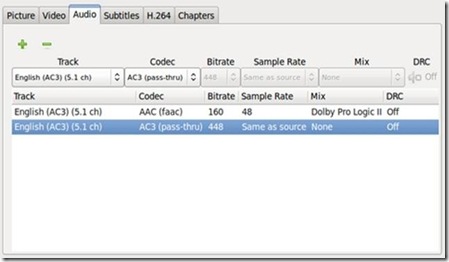
In the Audio pane, depending on the video source or the preset chosen, one or several audio tracks may be displayed. The number of tracks may be added to or subtracted from using the + or - buttons shown. This is useful if you want to include, for instance, the director's commentary track from a movie or alternate languages (a potentially popular feature for, say, Japanese anime fans).

clip_image010

Figure 5. Audio Pane

To adjust the tracks even further, drop-down menus are displayed: Track, Codec, Bitrate, Sample Rate, Mix and a button for DRC (Dynamic Range Compression). Track provides the option of choosing which audio track(s) to encode, including foreign-language tracks or director's commentary. Codec allows you to choose to which audio codec to encode (depending on which video container is chosen): AAC, MP3, Ogg Vorbis or AC3 (the default audio on a DVD). Bitrate and Sample Rates allow you to set to which bitrate and sampling rates, respectively, to encode. Mix allows you to select output mixes: mono, stereo, Dolby Surround, Dolby Pro Logic II and 6-channel discrete. Finally, DRC allows (if activated) you to adjust the limits of compressing the dynamic range of the audio output. This setting would be used for audio with very loud or very quiet portions by altering the resulting audio to increase the sound on very soft portions and reducing the sound on very loud portions.

For the purposes of encoding my X-Men movie, I'd choose at least one track (in English, the only language I fluently speak or read), encoded to AAC with a bitrate of 160kbps, with a mix of either stereo (my very basic audio setup at home consists of just a pair of speakers) or one of the surround sound settings. I leave DRC and Sample Rate alone. If I opt for a second track (say, to include a separate track for surround sound if I ever upgrade my home audio setup), I'd choose AC3, which would encode the audio as is from the video source. I also might decide to include a third audio track for the director's commentary (so I can hear Bryan Singer expand upon some of the film's plot points). Keep in mind that adding extra audio tracks, depending on the settings, may make the resulting file larger.

Subtitles

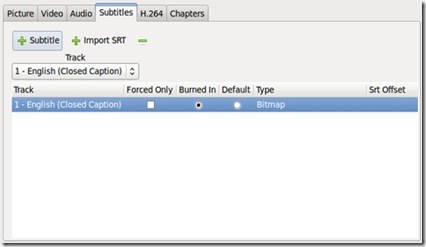
The Subtitles pane allows you to include subtitles and closed captions in the output file, either from the original video source or from an external file. Although I very infrequently use closed captioning (not having hearing difficulties and very rarely watching non-English-language material), this option would be highly useful for someone converting a subtitled video source.

clip_image011

Figure 6. Subtitles Pane

The options in this pane include selecting one or more tracks (via the + Subtitle, + Import SRT and - buttons), then choosing a language for each track. Forced Only should be checked if you want the subtitles displayed only when the video demands it (say, when a scene has someone speaking a foreign language that must be translated and displayed on-screen for plot purposes). For this option, choose Foreign Audio Search from the track drop-down menu. Burned In usually will be chosen automatically if it's a subtitle track, placing the subtitles on the movie with no way of turning them off. Closed captioning, meanwhile, doesn't use this feature, and it can be turned on or off in the resulting file's video player. There's also the option of choosing which track is the default (via the Default radio button). If you've chosen + Import SRT, then a different set of options will be presented, allowing you to choose which external file to use to import subtitles.

H.264

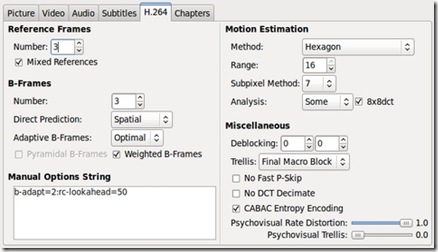
The H.264 pane allows Handbrake users to tweak various advanced x264 settings to their specifications. For the average user (such as myself), this pane can be left alone. Those interested in the settings here can consult the Handbrake Web site's user guide page, although as the page notes, it (at the time of this writing) hasn't been updated yet for 0.9.4.

clip_image012

Figure 7. H.264 Pane

Chapters

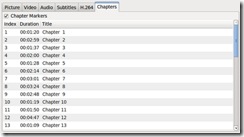
The Chapters pane gives you the option of including chapter markers at the same places the chapter breaks exist on the original DVD. To activate this, select the Chapter Markers box. The length of each chapter is displayed, as well as generic titles reading “Chapter 1”, “Chapter 2” and so forth. If you want to create specifically named chapter titles (such as “That cool scene where Magneto makes the guns hover” or “Statue of Liberty slugfest”), click on the chapter title of choice and type a new name.

clip_image013

Figure 8. Chapters Pane

For my usage, I keep the Chapter Markers box checked, although I usually don't bother renaming the chapters.

Customized Presets

After performing all the previous customizing steps, you might want to save these settings for future reuse. To do this, click the Save button shown in Figure 3 at the bottom of the Presets pane, and give the desired settings a custom name in the box that appears. The new preset then will appear in the Presets pane, ready to use for future video conversions.

Length of DVD Video Conversion

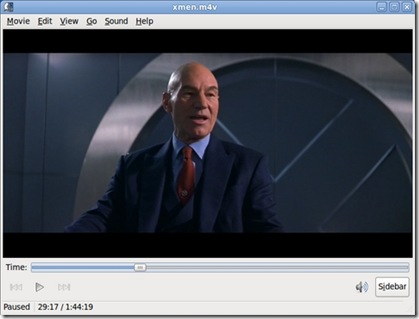
After finishing all of the above, to begin conversion, click Start. For my computer, an HP laptop with 4GB of RAM and a 2.1GHz Intel Core 2 Duo T6500 processor, running Ubuntu 9.10 (64-bit), it took two hours and 43 minutes to convert the X-Men movie (which runs an hour and 44 minutes) using the High Profile preset. The end result of all this, of course, is that I now have a high-quality movie file that I can view (or use) as I wish.

clip_image014

Figure 9. Finished Video File Playing in Totem

Conclusion

As you can see, Handbrake is a great program for those wishing to convert their video media, particularly their DVDs, to a more versatile digital format. Thanks to Handbrake, I've converted much of my DVD collection for easy access and viewing on my laptop, allowing me to enjoy watching Hugh Jackman (or Bugs Bunny) in action while away from my TV set or away from my apartment entirely.

Resources

Handbrake: handbrake.fr

Handbrake Downloads: handbrake.fr/downloads.php

Handbrake's User Guide to x264 Options: trac.handbrake.fr/wiki/x264Options

Anthony Dean works as a file clerk for the city of Milwaukee, Wisconsin. He's been using Linux as a primary operating system since 2005. Anthony can be reached atadean33@gmail.com

Taken From: http://www.linuxjournal.com/article/10716

Comparing MythTV and XBMC

Audio/Video

MythTV and XBMC can turn your Linux system into a video playback device with all the options you've ever dreamed of.

The Linux desktop is a place to work and a place to play. People fortunate enough to have time to play have many distractions to amuse them. Audio fun abounds with programs like Amarok and Rhythmbox. Video enthusiasts will find a plethora of options, from standalone video players (like MPlayer, Xine and VLC) to comprehensive multimedia environments (like Freevo and Moovida). Being a video enthusiast, I find myself drawn to two of the most popular open-source entertainment tools: MythTV and XBMC.

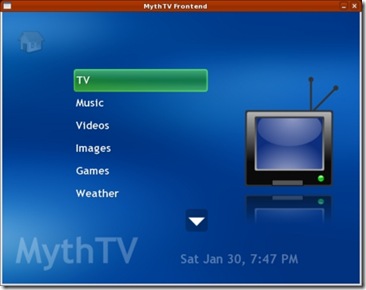
MythTV (www.mythtv.org) is a full-featured digital video recorder built for the Linux desktop yet perfectly suited to running as a home-theater system. It includes support for live TV and recordings, video file and DVD playback, photo galleries, music collections, weather forecasts, movie rentals via Netflix and even home video surveillance.

clip_image001

Figure 1. MythTV can be run as a distributed system, with front and back ends on different computers.

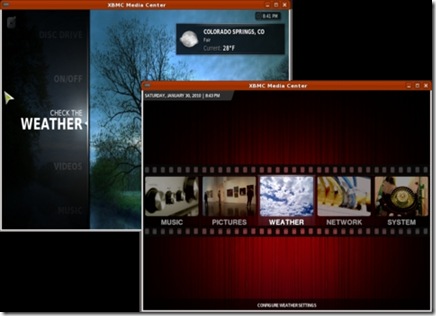
XBMC (xbmc.org) is a media player that also supports DVD and video file playback, music collections, photo galleries and weather forecasts. Unlike MythTV, XBMC was not originally developed for the Linux desktop. Instead, it was built to run on modified Xbox hardware, and later it was modified to be a general-purpose media tool and ported to the Linux desktop. Because of this, some of XBMC's features are geared toward the use of Xbox features, such as running games and dashboards. Even so, XBMC has evolved into an excellent desktop Linux media player in its own right.

clip_image003

Figure 2. XBMC is a media player on steroids.

MythTV and XBMC are similar tools but have different designs and target audiences. This article doesn't attempt to compare them side by side, apples to apples. Instead, the intention is to examine each from a user perspective and discover what features have meaning to different types of users. Because these applications are so feature-rich, the primary focus here is limited to video services—playing movies and watching TV. Although both systems have been designed to work well when displayed on a TV, this article is written from the point of view of using the applications on a desktop.

Installation and Requirements

MythTV is a well established project and, as such, is easily installed on most major Linux distributions using desktop package management tools. Ready-made packages are available for Fedora/Red Hat/CentOS, Ubuntu, Debian, OpenSUSE, Mandriva and Arch Linux. There also are live CD distributions, such as MythBuntu, MythDora and LinHES (formerly KnoppMyth), which allow you to run MythTV without installing it. Building from source is possible, but it can be complex, and there are many prerequisites. Using prepackaged versions is the preferred installation mechanism.

MythTV can be used without TV capture cards. The MythVideo plugin can be used to view and manage video files that have been ripped from DVDs or other sources. However, MythTV requires a supported TV capture card to allow watching live TV. It currently does not provide direct support for external TV sources, such as Hulu or Veoh.

MythTV back ends start automatically when installed from distribution packages. To start front ends, use the mythfrontend command. You can run other command-line tools, such as mythfilldatabase, although these often run automatically once MythTV is configured.

XBMC is built specifically for the Ubuntu distribution, and packages are available from the Ubuntu repositories. Other Linux distributions must build from source. Fortunately, doing so isn't hard, at least for Fedora. As with MythTV, you need to install many prerequisite packages. The XBMC Wiki provides copy-and-paste commands for installing them. Some distributions may require setting some environment variables, but building the package is the same for all listed distributions:

./bootstrap


./configure


make


make install


To install to a program-specific directory, specify a prefix. A prefix allows installation to a directory that can be removed easily later:


./configure --prefix=/opt/xbmc


To start the program, run bin/xbmc from the installation directory, such as /opt/xbmc/bin/xbmc.


Design Overview


MythTV is designed as a personal video recorder (PVR) application. It is a network-based system with back ends used to acquire and serve TV and other media to front ends that handle display and playback. It supports a wide variety of hardware for both analog and video capture (Figure 3). The core recording and playback system is extended with plugins that provide additional features. The MythVideo plugin handles management and playback of video files, such as DVD rips. MythTV is best known for its wide support of TV tuner hardware and ability to play and record both analog and digital TV.


clip_image005


Figure 3. MythTV back ends support both analog and digital (HDTV) video capture cards.


MythTV's core focuses on watching and recording TV as well as providing extensive program guide and scheduling support. Some plugins extend this feature, such as the Archive plugin, which allows saving recorded programs to DVDs or other files.


Because of XBMC's Xbox roots, it focuses on being a multifunction media player, capable of many types of media playback from local or remote sources. This focus also allows the development team to emphasize the user experience. XBMC is best known for its well designed and sophisticated user interface and skins (Figure 4).


clip_image006


Figure 4. XBMC skins are plentiful and impressive.


XBMC's core focuses on video playback, but it also is extensible through the use of Python plugins. Currently, plugins are available that add support for TV and movie guides, instant messaging and front ends to other hardware like a TiVo. And, XBMC forms the basis of at least one commercial venture, Boxee.


Video Management


Browsing and playback of video files, such as ripped DVDs, in MythTV is handled by the MythVideo plugin. MythVideo manages video files under a single configurable folder. Folders under the top-level folder can be mountpoints for multiple hard drives. Each folder can have its own icon (folder.png) that is displayed while browsing the collection (Figure 5). Videos can be streamed from the back end or played by the front end from an NFS mount. Over an 802.11g wireless connection, streamed files play with fewer pauses/skips.


clip_image007


Figure 5. The MythVideo gallery view shows folder icons and is the easiest way to browse a large video collection.


Using mountpoints under the top-level directory offers multiple options on how to manage your hard drives. RAID configurations can be used to create one large storage space. Alternatively, multiple drives can be used for different genres.


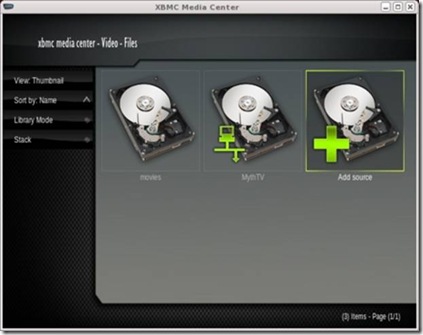
Unlike MythVideo, XBMC is based entirely on the concept of sources. A source can be a local hard drive or NFS mountpoint or a remote server providing streamed data (Figure 6). XBMC supports multiple streaming formats and actually can be used to connect to a MythTV back end to watch TV and stream video.


clip_image009


Figure 6. The movies source is an NFS drive, but the MythTV source is a network connection.


To add videos to a MythVideo collection, copy files to the appropriate folder. MythVideo can play AVI, MPEG and even DVD ISO files (including menus). To reduce disk usage, 7GB DVDs often are ripped to AVI files, which can be as small 2GB without loss of quality. However, ripping like this typically loses the DVD menu options and possibly the subtitles. If you have the disk space, a DVD ISO copy is faster to create, and you won't lose any DVD features.


Videos can be added to local or network sources for XBMC. However, XBMC cannot stream MythTV movies. Instead, the MythTV movie folders must be mounted via NFS on the XBMC system, and the local mountpoint added as a video source to XBMC. Like MythTV, XBMC can play a large number of video file formats.


Organization and Browsing


MythTV provides three methods for video collection browsing. The first is Browse mode, and it allows you to browse the entire collection front to back. The page up and down keys make jumping through the list easy enough, although this method doesn't remember your last location. The second method is List mode, and it uses a tree listing to display entries. This listing benefits from a well structured hierarchy under the top-level video directory. Gallery mode is the last mode, and it uses icons for folders and movie posters for individual entries. This is visually appealing and also benefits from a well structured hierarchy for the video collection, although the number of entries in each folder displayed over the icons is rather distracting (Figure 7).


clip_image010


Figure 7. MythTV can browse sequentially or through a hierarchy.


You can give custom icons to folders in MythTV by creating a JPEG or PNG image in each directory. The size doesn't matter, although making them large enough to be displayed in high quality on the front end with the highest resolution may offer the best overall results. MythTV scales the image as appropriate.


XBMC approaches video organization a little differently. First, it provides two browsing modes: file and library. File browsing starts by showing the available configured sources. Choosing one of those then presents a listing of options relevant to that source. For example, if one source is a set of videos on a local hard drive and another is a remote MythTV back end, the former lists the movies in a typical tree hierarchy and the latter shows features available from the server, such as live TV or recordings.


In file mode, the listings are similar in structure to a directory listing. The typical “..” parent directory lets you back up through the hierarchy. Library mode allows you to browse only recordings. It won't show sources. Instead, it shows you the list of scanned recordings. Moving up through the hierarchy typically involves selecting an up-arrow icon (Figure 8).


clip_image011


Figure 8. XBMC's Library mode displays scanned recordings, but File mode can access any remote source.


Like MythTV, folders under XBMC can have custom icons. Place a folder.jpg file in each directory that requires a custom icon, and it will be displayed in either mode. If you share the directories between MythTV and XBMC, using JPEG will mean only one icon is needed. However, JPEG images don't support transparency, which means converting a PNG folder icon with transparency from MythTV to a JPEG for XBMC will lose the transparent effect (Figure 9).


clip_image012


Figure 9. Transparent PNG folder icons are supported by MythTV, while XBMC uses JPEG format icons.


In either mode, the listings can have multiple views. Library mode offers List, Full List and Thumbnail views. File mode adds Wide Icons and DVD Thumbs.


Both applications allow browsing by genre. Genre information is set automatically when metadata is retrieved for a video. Both systems can stack files. Stacking associates multipart movie files as a single movie.


Metadata Editing


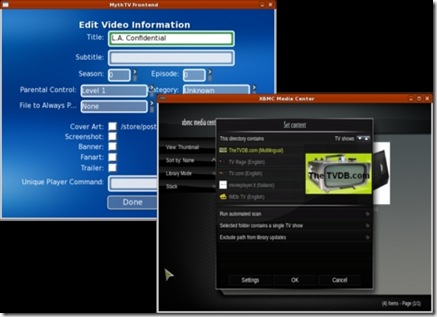
Information about videos is known as metadata. The metadata includes movie title, runtime, cast, synopsis and a variety of items similar to what is found on IMDB.com or TheMovieDatabase.org. Both applications can retrieve metadata automatically when new files are added to folders, and both allow you to edit this metadata while browsing the collection (Figure 10). XBMC offers multiple configurable sources for metadata on a per-folder basis. MythTV's metadata sources are dependent on configurable scripts, but only one script can be configured, and it applies to all files.


clip_image013


Figure 10. MythTV (left) can edit individual movies. XBMC (right) works only on folders of movies.


XBMC sets metadata via the context menu. Right-click on any folder to get the menu, and then select Set Content. Choose a source for the metadata, and then run an automated scan. XBMC will let you add a movie that is not found manually, but once you've done this, there is no easy way to remove the entry if it's wrong. In MythVideo, pressing I over a movie in any browse mode will bring up a context menu. From there, you can edit the metadata data, reset it, play the movie or just view more details about the movie.


Video Playback


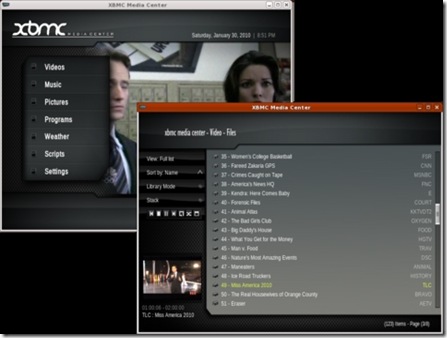
Once you're past the setup and management, you finally can play your videos. And, this is where the two systems shine. Both offer high-quality playback of files in AVI, MPEG4 and even ISO formats. ISO offers the best viewing, because all of the DVD features are available, including menus and subtitles. Of course, both programs also will play a DVD directly from a local DVD drive. MythVideo plays videos with no embellishments—the full window is the video. XBMC actually can wrap its menus around a playing video and will play a video in a small window while the user browses other features (Figure 12). XBMC also offers the usual media controls on-screen. MythTV uses an on-screen menu, but media controls are supported by keyboard keys without the aid of on-screen controls (Figure 11).


clip_image014


Figure 11. MythTV's on-screen display handles most functions except media control while playing.


clip_image015


Figure 12. XBMC can wrap menus around playing video (left) or place it in a small window (right).


TV Guide, Playback and Recordings


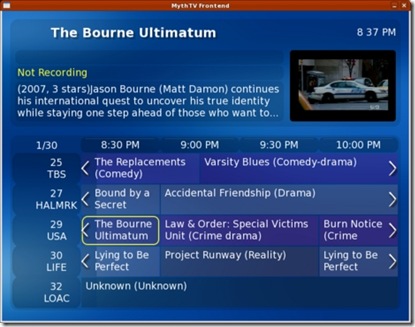
From the user perspective, TV playback under both systems is very similar to video playback. XBMC places TV as another source under its Video feature. MythTV separates videos from TV, although TV recordings still are under the TV function. The main difference between MythTV and XBMC is the way the guide is displayed. MythTV has a built-in guide that is updated by a back-end server (Figure 13). The guide is accessed from the OSD menu while watching live TV or when scheduling a recording.


MythTV can record live TV from any configured hardware. The more TV tuners installed on the back ends, the more sources for recordings. When one tuner is busy recording, another can be used to watch live TV. You can schedule recordings using any of the numerous guide search mechanisms, and you can start recordings while watching a show. You also can view recordings even while it is still recording, as long as some recorded data is available. Recordings are given priorities so that if they conflict and not enough video sources are available, the higher priority gets access to the device.


clip_image016


Figure 13. The MythTV guide is color-coded by genre.


There is only one way to watch recordings, and MythTV uses a tree structure for finding the recordings. Migrating recordings from MythTV's TV feature to MythVideo requires archiving them first via MythArchive. This is not particularly user-friendly, so keep your expectations low for hanging onto recordings.


XBMC uses a MythTV back end to show live TV. It also uses MythTV's guide information. However, it shows the guide information using the same view types as videos in File mode. XBMC, however, cannot record data. It can play only live TV or view existing video files. It cannot create new video files from live TV.


Appearance and Intangibles


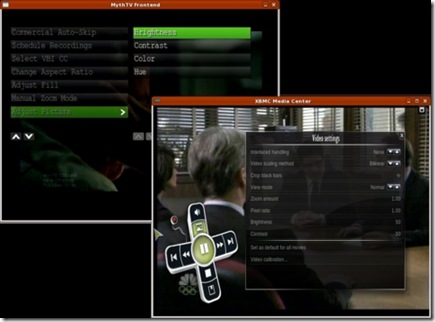
Both systems support the VDPAU extensions for NVIDIA, which provides high-quality playback. Because both support OpenGL, they also provide video controls, such as brightness, contrast and color controls (Figure 14). The actual features available under MythTV depend on various configuration options for both video and TV features. XBMC always has the same options available from any video playback, be it video files or live TV. These controls were available for an NVIDIA-based display. Other video hardware may present different options.


clip_image017


Figure 14. Video controls are available in both programs.


MythTV uses upfront configuration of window sizes and doesn't allow scaling the display while you watch. This isn't a problem once you're set up to display on a real TV, but if you watch on a desktop while you work, it's more of an issue. XBMC can display full screen, as does MythTV, but it also allows playing in a window that can be scaled while video is playing.


Neither system will stream Internet video, so you can't get to Hulu or Veoh from them. There are hacks for doing this, but they mostly just launch the Hulu player as an external application.


Both systems are fairly stable. XBMC crashed a few times during my research, and I experienced a few lockups, although the latter may have been due to some interaction with the MythTV back end. MythTV crashes are very seldom. During my research, it crashed once while experimenting with the use of subtitles while playing a DVD ISO file.


Summary


The XBMC experience with its polished skins is very entertaining. But, without a TV source, you still need a MythTV back end to watch TV. If you watch TV while you work, using XBMC as a TV front end to a MythTV back end is ideal, because you can scale the XBMC window interactively. MythTV may be your only choice if you need to watch, schedule and record multiple sources at once.


Both tools do an admirable job with video file collections. MythTV provides more flexibility in setting metadata on a per-movie basis, while XBMC has attractive browsing options and supports more metadata sources. But, don't expect to play Blu-ray disks any time soon with either tool. For one thing, they produce huge files (50GB typically), if you can rip them at all.


This is far from a comprehensive review of MythTV and XBMC. Both offer far more features and capabilities than can be given justice in a single article, especially if your goal is to hook them up to a real TV and use them as home-theater systems. If you enjoy using your Linux system for media playback, you owe it to yourself to investigate both of these excellent applications.


Michael J. Hammel is a Principal Software Engineer for Colorado Engineering, Inc. (CEI), in Colorado Springs, Colorado, with more than 20 years of software development and management experience. He has written more than 100 articles for numerous on-line and print magazines and is the author of three books on The GIMP, the premier open-source graphics editing package.

Linux VPNs with OpenVPN - Part IV

Jun 30, 2010  By Mick Bauer
In Security
Use dangerous local-area networks without fear with OpenVPN.
For the past few months, I've been describing how to build a Virtual Private Network (VPN) server using OpenVPN, a free, multiplatform, TLS/SSL-based VPN dæmon. My example usage scenario involves the common “road warrior” setup where remote users connect back to a VPN server on their “home network” by establishing an encrypted VPN tunnel over the Internet.
Last month, in Part III, I finished a line-by-line walk-through of an example OpenVPN server configuration file (server.ovpn) shown here for your reference (Listing 1).
Listing 1. Server's server.ovpn File
port 1194
proto udp
dev tun

ca 2.0/keys/ca.crt
cert 2.0/keys/server.crt
key 2.0/keys/server.key  # Keep this file secret
dh 2.0/keys/dh1024.pem
tls-auth 2.0/keys/ta.key 0

server 10.31.33.0 255.255.255.0
ifconfig-pool-persist ipp.txt
push "redirect-gateway def1 bypass-dhcp"

keepalive 10 120
cipher BF-CBC        # Blowfish (default)
comp-lzo
max-clients 2

user nobody
group nogroup
persist-key
persist-tun

status openvpn-status.log
verb 3
mute 20


I then talked about running OpenVPN as a server process (the same executable can be run either as a dæmon/listener or as a client process), either running in the foreground, with all log messages printed to the console:

bash-$ sudo openvpn --config ./server.ovpn

or in the background, with all log messages being written to /var/log/daemon.log:

bash-$ sudo openvpn --daemon --config ./server.ovpn

While in the early stages of getting OpenVPN working on both server and clients, you'll definitely want to run the server dæmon in the foreground, because you'll probably have to stop and restart it through configuration tweaks anyhow. Once everything's working, you can put an init-script into your server's /etc/init.d directory that starts OpenVPN in dæmon mode automatically at startup time.

OpenVPN Client Configuration

This brings us to client configuration. Listing 2 shows a sample client configuration file, client.ovpn. Let's dissect it!

Listing 2. Client's client.ovpn File

client
proto udp
dev tun


remote 1.2.3.4 1194

nobind

ca ca.crt
cert minion.crt
key minion.key


ns-cert-type server
tls-auth ta.key 1


cipher BF-CBC
comp-lzo


user nobody
group nogroup
persist-key
persist-tun


mute-replay-warnings

verb 3
mute 20


First is the client directive. Like server, which we covered last time, client is actually a helper directive that, when read by the openvpn command, expands to two other directives: pull, which instructs OpenVPN to accept options pushed to it by the OpenVPN server it connects to, and tls-client, which enables TLS (SSL) encryption and tells OpenVPN to assume the role of client any time it initiates a TLS transaction.

Next comes proto udp, which tells OpenVPN to use UDP packets to build its VPN tunnel. This setting needs to be the same as what's specified on the server to which you wish to connect.

Next comes dev tun, which tells OpenVPN to encapsulate IP packets via a /dev/tun interface, rather than Ethernet frames via a /dev/tap device. I'm sticking to IP encapsulation in my examples, and besides, this setting has to be the same as on the server to which you wish to connect.

And, to which server do you wish to connect? The one specified in the remotedirective, which has two parameters, IP address (or hostname) and port. In Listing 2, these are set to 1.2.3.4 1194, specifically UDP port 1194. (If earlier I had set proto totcp-client, OpenVPN would assume you mean TCP port 1194 here.)

The IP address of my example server is 1.2.3.4, which may strike you as improbable, but this address is, at least, Internet-routable. If you're going to connect to your OpenVPN server from across the Internet, you'll need to target an Internet-routable IP address. In my home setup, this is actually the address of my DSL router, which I've configured to redirect UDP 1194 connections to the same port on my OpenVPN server, whose real IP address is a non-Internet-routable 192.168.0.0 address.

After remote comes nobind, which tells OpenVPN to allow the local IP stack (your Linux kernel's TCP/IP modules) to assign a local port from which to send and receive OpenVPN packets dynamically, rather than have the OpenVPN dæmon “bind” to (listen on) a specific port like a server process would. This setting, therefore, is suitable only for VPN client systems.

Certificate/Key-Related Directives

Next, there are five directives related to helper files that OpenVPN will need to read in order to build a tunnel. ca specifies a file containing at least one Certificate Authority certificate, specifically, the certificate of whatever CA will have signed the OpenVPN's server certificate. If you try to connect to a server whose server certificate was not signed by a CA key/certificate specified here, your OpenVPN client process will terminate the connection.

cert specifies a file containing a client certificate for your OpenVPN client process to present to the OpenVPN server. This certificate needs to have been signed by a CA whose certificate resides in the server's ca file, or the server will reject connections from you.

In many if not most cases, the simplest way to handle these certificates is to use the same CA to create and sign both server and client certificates. In fact, if you remember Part II in this series (LJ, March 2010), I already created a client certificate and key, right after I created the server credentials.

Because this process is both important and simple, let's take a minute to review it. I'm skipping the process of setting up and creating the Certificate Authority itself, as that applies only to server setup (you should do that only once, on the server). So, assuming you've got a working CA set up on your OpenVPN server as described in Part II of this article, follow these steps to use OpenVPN's pkitool script to create a new client certificate:

1) su to root:

bash-$ su

2) Change your working directory to /etc/openvpn/2.0:

bash-# cd /etc/openvpn/2.0

3) Declare some PKI-related environment variables stored in the file vars:

bash-# source ./vars

4) Create the new certificate:

bash-# ./pkitool --pass minion

In step 4, the string minion is the name (the “common name”, in x.509 parlance) of the host or user whose certificate you're creating. After issuing this command, you'll be prompted twice to type the certificate's passphrase.

The output of this command takes the form of three files: ./keys/minion.csr, ./keys/minion.crt and ./keys/minion.key. Only the last two are important for the purposes of this article: the new client certificate and client key, respectively.

Of the helper files related to crypto that were created when you set up the OpenVPN server, your client certificate and key are the only two unique to the client; ca.crt and ta.key are used on the server and on all clients that connect to it. Note also that although the client certificate (minion.crt) contains no private data, the client key minion.key and the TLS authentication key ta.key both should be kept secret through local file permissions and by handling them carefully.

For example, you should never e-mail any client key or TA key in clear text (note that using an https:// URL for Webmail access doesn't count as message encryption). You should use S/MIME or PGP e-mail encryption if you need to mail keys to users.

If you use a USB drive or other physical media to distribute keys, you should either deliver it in person or use a trusted courier to deliver it, and users should be instructed either to destroy or erase the media after installing their keys, or keep the media under lock and key. Although having a passphrase-protected client key shouldmake it hard for an attacker to use an intercepted key file, it's no guarantee! Under no circumstances should you issue blank-passphrase client certificates for any VPN scenario.

Speaking of the client key's passphrase, you also should take care in how you transmit that passphrase to the key's user. Because it isn't good policy for any system administrator to know users' passphrases in any context, users may afterward want to change the key's passphrase. The simplest way for users to do so is via the openssl command, like so:

bash-$ openssl rsa -in minion.key -out minion.key -aes192

The user does not need to be root to do this, provided the proper file permissions are set on minion.key (users should have read/write access on their own keys). After entering this command, users will be prompted for the key file's old passphrase and then twice for the new passphrase.

Once users have copied the files ca.crt, client.crt, client.key and ta.key over to their client system's /etc/openvpn/ directory, they should make sure they have the correct file permissions set. The two .crt files should be world-readable, but only owner-writable (that is, -rw-r--r--). The two .key files, however, should be only owner-readable/writable (that is, -rw-------).

All four files should be owned by root, assuming your users have root on their own Linux systems. (Setting up OpenVPN for nonroot users and the security challenges of doing so are beyond this article's scope.)

Now that you're clear on how to generate and manage client certificate/key pairs, let's continue working our way down Listing 2. The ca, cert and key directives specify the paths of your CA key file, client certificate file and client key file, respectively. In Listing 2 the values for these parameters are all just filenames, without their full paths specified. This implies that those three files are in the same directory as the client configuration file itself.

So, unlike on the server, where I left all the certificates and keys in /etc/openvpn/2.0/keys and, therefore, specified a CA certificate path of 2.0/keys/ca.crt, on the client system, you can get by with simply ca.crt if the file ca.crt, like the configuration file client.ovpn, is kept in the directory /etc/openvpn/.

The ns-cert-type server directive says what type of certificate your client should accept. Because in this example I'm dealing with multiple clients connecting back to a server, in Listing 2, it's set to server. This will prevent some other client from impersonating the server in a man-in-the-middle attack; the server's certificate, while signed by the same CA as its clients, has attributes that identify it as a server certificate, not another client certificate.

The last directive in the certificate/key-file portion of Listing 2 is tls-auth ta.key 1, which tells OpenVPN to use the file ta.key to add an extra layer of authentication on your VPN tunnel by requiring all packets in the TLS handshake phase at the beginning of each tunnel session to be signed with the specified TLS Authentication key. After the name of the TLS Authentication key (ta.key), specify a number telling in which “direction” to use this file: “0” for the server and “1” for clients.

Other Client Settings

Nearly all of the rest of the directives in Listing 2 are ones I already covered in Parts II and III of this series when dissecting Listing 1, the server configuration file. The client-side settings for those directives are even the same as specified on the server.

In the case of user nobody and group nogroup, which tell the openvpn command to run with unprivileged user and group identities after initialization, make sure the user account nobody and the group nogroup exist on your client system. Because both typically exist on most Linux systems, they probably do already. If not, you either can create them or change the directives to point to some other, existing dæmon account or group name. In no event should you change either to any user or group name used for actual human-use login accounts!

The only other directive worth mentioning here is mute-replay-warnings, which I didn't include in the server.ovpn file. Declaring this directive (without any argument) tells OpenVPN not to log events associated with its anti-packet-replay mechanism, which tends to trigger false alarms if you connect to a wireless network. It won't turn off the actual anti-replay protection; it just suppresses associated local log entries.

Initiating a Tunnel

You've created a client configuration file and put it into your client system's /etc/openvpn directory. You've copied over your CA certificate file, client certificate and key files, and your TA key file. It's time to connect to the server.

Assuming your client system is running Linux (specifically Ubuntu), and assuming that, as in Listing 2, your client configuration file is called client.ovpn, follow these steps the first time you connect to your server:

1) Change your working directory to /etc/openvpn:

bash-$ cd /etc/openvpn

2) Run OpenVPN like this:

bash-$ sudo openvpn --config ./client.ovpn

3) When prompted, enter your client key's passphrase.

Enter Private Key Password: Your passphrase here

Note that in step 2 you started OpenVPN without the --daemon directive, leaving it running in the foreground. If everything works without a hitch, the next time you start OpenVPN, you can use sudo openvpn --daemon --config ./client.ovpn, in which case OpenVPN will run silently after asking you for your client key passphrase. On my Ubuntu client system, OpenVPN logs to the file /var/log/syslog when running in dæmon mode.

Troubleshooting

Hopefully, at this point you've got a working VPN tunnel back to your server. If you don't though, two different mistakes have caused the majority of my own problems using OpenVPN.

First, your tunnel will fail if you fail to copy all necessary files into /etc/openvpn: client configuration file, CA certificate, client certificate, client key and TLS Authentication key. These files also must have appropriate permissions set, and you must run the openvpn command with the appropriate level of privilege (that is, root privilege).

Second, firewall rules on both server and clients must be either disabled (left open) or reconfigured to allow OpenVPN traffic to pass. Telling you how to write such rules easily could occupy half or more of an entire article, especially if I were to cover the art of forcing certain types of traffic to use the tunnel. Suffice it to say, for now, check your iptables rules before you even bother running OpenVPN in server or client mode.

Cross-Platform Notes

In writing this article, I tested both an Ubuntu client and a Windows XP client. Getting the Windows XP client to connect properly was no more difficult than on Ubuntu. It was a simple matter of placing the correct files in the correct directory and tweaking my Windows firewall configuration a little.

On Windows clients, the user and group directives have no effect, as OpenVPN's self-demotion feature is not supported in Windows. Other than that, however, I found the Windows version of OpenVPN to work in a very similar manner as the Linux version.

Conclusion

And that, dear readers, is how you configure OpenVPN to allow yourself to connect back to your home network from an untrusted remote site. This process is, in practice, much easier than my taking four months to describe it implies. Hopefully, my line-by-line dissections of the two configuration files have given you a strong enough understanding of how OpenVPN works for you to explore other usage scenarios.

I may devote one more column to this topic, because Virtual Private Networks are such a powerful tool, and these four installments have covered only a small subset of its potential. Regardless, I hope you've found this series useful and that you have success in your own Virtual Private Linux endeavors. Until next time, be safe!

Resources

Official OpenVPN Home Page: www.openvpn.net

Ubuntu Community OpenVPN Page:https://help.ubuntu.com/community/OpenVPN

Mick Bauer (darth.elmo@wiremonkeys.org) is Network Security Architect for one of the US's largest banks. He is the author of the O'Reilly book Linux Server Security, 2nd edition (formerly called Building Secure Servers With Linux), an occasional presenter at information security conferences and composer of the “Network Engineering Polka”.

Taken From: http://www.linuxjournal.com/article/10744

Linux VPNs with OpenVPN - Part III

Apr 01, 2010  By Mick Bauer
In Security
Secure remote networking, the OpenVPN way.
In my previous two columns, I began a series on building Linux-based Virtual Private Network (VPN) solutions using OpenVPN. When I left off last time, I had gotten as far through the OpenVPN server configuration process as creating a simple Public Key Infrastructure (PKI), using it to generate server and client certificates, and creating a few other “support” files involved in building OpenVPN tunnels. In so doing, I worked my way down just the first third or so of the example OpenVPN server configuration, but those PKI/crypto-related configuration parameters represent the most complicated part of OpenVPN configuration tasks.
This month, I describe the rest of that server configuration file and show a corresponding OpenVPN client configuration file (which I'll dissect next month). I also show how to start both server and client processes, although debugging, firewall considerations and other finer points also will need to wait until my next column.
Have no fear—I think you'll find this installment to be plenty action-packed in its own right. Let's get to it!
OpenVPN Server Configuration, Continued
Normally at this point in a multipart series, I'd review at least some details from the prior month's column, but that won't work this time. Last month's article covered a lot of ground, and this month's needs to cover still more. Suffice it to say that I began dissecting an example OpenVPN server configuration file, /etc/openvpn/server.ovpn (Listing 1).
I got as far as generating the files referenced in the ca, cert, key, dh and tls-authlines, using a combination of OpenVPN “easy-rsa” helper scripts (located in /usr/share/doc/openvpn/examples/easy-rsa/2.0) and the commands openvpn and openssl. I'm going to continue describing Listing 1's parameters, assuming that the aforementioned certificate, key and other helper files are in place.
Listing 1. Server's server.ovpn File

port 1194
proto udp
dev tun


ca 2.0/keys/ca.crt
cert 2.0/keys/server.crt
key 2.0/keys/server.key  # This file should be kept secret
dh 2.0/keys/dh1024.pem
tls-auth 2.0/keys/ta.key 0


server 10.31.33.0 255.255.255.0
ifconfig-pool-persist ipp.txt
push "redirect-gateway def1 bypass-dhcp"


keepalive 10 120

cipher BF-CBC        # Blowfish (default)
comp-lzo
max-clients 2


user nobody
group nogroup
persist-key
persist-tun


status openvpn-status.log
verb 3
mute 20


So, having set up the basic port/protocol/device settings and cryptography-related settings, let's move on to settings that will determine what happens once a client successfully establishes an authenticated, encrypted tunnel. The first such setting isserver.

server actually is a helper directive. It expands to an entire block of other parameters. Rather than slogging through all those additional parameters, let's just say that the server directive takes two parameters: a network address and a netmask. For each tunnel established by clients on the port we specified earlier, the OpenVPN server process will carve a little 30-bit subnet from the specified IP space, assign itself the first host IP address in that subrange as its local tunnel endpoint and assign the other host IP in the 30-bit subnet to the connecting client as its remote tunnel endpoint.

In the example, I've specified the network address 10.31.33.0 with a netmask of 255.255.255.0, which translates to the range of IP addresses from 10.31.33.1 to 10.31.33.254. When the first tunnel is established, the server will use 10.31.33.1 as its local tunnel endpoint address and assign 10.31.33.2 to the client to use as the remote tunnel endpoint address. (10.31.33.0 is that subnet's network address, and 10.31.33.3 is its broadcast address.)

For the next client to connect, the server will use 10.31.33.5 as its tunnel endpoint and will assign 10.31.33.6 as the client's tunnel endpoint (with 10.31.33.4 and 10.31.33.7 as network and broadcast addresses, respectively). Get it?

This isn't the most efficient use of an IP range. The server needs a different local IP address for each tunnel it builds, and for each tunnel, the server essentially wastes two others (for network and broadcast addresses). Preceding the server directive with the line topology subnet will cause the server to use the first IP in its server [network address] [netmask] range for its local tunnel IP for all tunnels and for client tunnel-endpoint IPs to be allocated from the entire remainder of possible IPs in that range, as though all remote tunnel endpoints were IP addresses on the same LAN.

This isn't the default behavior, because it's new to OpenVPN 2.1. The “subnet” topology isn't supported by earlier versions or by Windows clients using version 8.1 or lower of the TAP-Win32 driver. Note that if undeclared (as in Listing 1), thetopology parameter has a default value of net30, which results in server's specified IP range being split up into 30-bit subnets as described above.

Continuing on in Listing 1, next comes ifconfig-pool-persist, which specifies a file in which to store associations between tunnel clients' Common Names (usually their hostnames, as specified in their respective client certificates) and the IP addresses the server assigns to their tunnels. Although this doesn't guarantee a given client will receive the same tunnel IP every time it connects, it does allow clients to use the --persist-tun option in their client configurations, which keeps tunnel sessions open across disruptions in service (OpenVPN server dæmon restarts, network problems and so forth).

Next comes the statement push "redirect-gateway def1 bypass-dhcp". The pushdirective causes the subsequent double-quotation-mark-enclosed string to be run on the client as though it was part of the client's local configuration file. In this case, the server will push the redirect-gateway parameter to all clients, with the effect that each time a client connects, the client's local default gateway, DNS servers and other network parameters normally provided by DHCP will be overridden by the server's settings for those things.

This effectively enforces a VPN policy of “local-subnet-only split tunneling”. For those of you new to VPNs, a split tunnel configuration is one in which clients can use their VPN tunnels to connect to some things and their local (non-tunneled) Internet connection to connect to other things.

As I've said in previous columns though, forcing clients to use the remote network's infrastructure (DNS servers, Internet uplink and so forth) makes it much harder for attackers connected to a client's local network, which might be an untrusted environment like a coffee-shop wireless hotspot, to perform various kinds of eavesdropping, session-hijacking and man-in-the-middle attacks.

Even with this setting, a client still will be able to connect to some things on the local network. It just won't be able to use it as a route for anything but connecting back to your OpenVPN server. Again, it's good policy to configure clients to leverage as much of your trusted network's infrastructure as possible.

After the push "redirect-gateway..." directive comes keepalive 10 120. Likeserver, keepalive is a helper directive that expands to a list of other parameters. Again for the sake of brevity, let me summarize the effect of the example line: every ten seconds, the server will check to see that each client is still connected, and if no reply is received from a given client over any 120-second period, it will assume that client is unreachable at its last known IP address.

For example, if the server sends a query to a particular tunnel client at 9:00:00 and gets a reply, but another at 9:00:10 to which there's no reply, and also receives no reply to any of 11 more queries sent out at 9:00:20, 9:00:30 and so on until 9:02:00, then at 9:02:00 (after 120 seconds of no replies), the server will conclude the client system is unreachable.

At this point, the server will attempt to re-resolve the remote client's name, on the assumption that its IP address may have changed (due to DHCP lease renewal, for example) and, thus, re-establish the tunnel session.

The aforementioned infrastructure settings, such as DNS servers, by the way, will be read by the server's openvpn process from /etc/resolv.conf, the server's running routing table and so forth—no OpenVPN configuration parameters are necessary for those settings unless you want them to be different from the server's. (For now, let's assume you don't!)

I just spent a fair amount of ink on only a handful of settings. But I think this is warranted given that server and keepalive are helper directives that expand to many more settings and given that we're now done with the network configuration portion of our server configuration.

The next parameter is a simple one: cipher BF-CBC, which specifies that each tunnel's data payload will be encrypted with the Blowfish cipher, using 128-bit keys, in Cipher Block Chaining mode (CBC mode makes it harder for an attacker to brute-force-decrypt isolated parts of a given session). BF-CBC is the default setting for cipher, so technically, I don't need to specify this, but it's an important setting. You can use the command openvpn --show-ciphers to see a list of all supported cipher values and their default key sizes.

comp-lzo is even simpler. It tells OpenVPN to compress all session data using the LZO compression algorithm, unless a given portion of data appears to be compressed already (for example, if a JPEG image or a ZIP file is being transferred), in which case OpenVPN won't compress until it detects a return to noncompressed session content. This adaptive behavior helps minimize the data padding that results from trying to compress already-compressed data. Because LZO is a fast algorithm, this is a good setting. Its cost in CPU overhead is generally more than compensated for by the amount of network bandwidth (and, thus, other CPU cycles) it conserves.

The next setting, max-clients 2, specifies that a maximum of two tunnels may be active at one time. If you have only one or two users, there's no good reason to allow more than one or two concurrent tunnels. In my own testing, however, I've found that setting this all the way down to 1 can cause problems even if you have only one user, probably due to how OpenVPN handles tunnel persistence (see keepaliveabove).

The next four settings are interrelated. user and group specify the names of an unprivileged user account and group (nobody and nogroup, respectively), for the OpenVPN server dæmon to demote itself to after opening necessary tun/tap devices, reading its configuration file, certificates and keys, and other root-only startup actions.

For this to work properly, you also need to set persist-key and persist-tun.persist-key causes OpenVPN to keep key file contents cached in memory across dæmon interruptions (like those caused by tunnels being broken and re-established).persist-tun causes OpenVPN to keep any tun/tap devices that were opened on startup, open across the same kinds of dæmon restarts.

With user and group set to unprivileged user and group, if you were to skip declaringpersist-key or persist-tun, the OpenVPN dæmon would lack the necessary privileges to re-read protected key files or re-open the tun or tap device.

You could, of course, skip the user and group settings. Those settings, however, lessen the impact of some unforeseen buffer-overflow vulnerability. It can make the difference from an attacker gaining an unprivileged shell and gaining a root shell. Unfortunately, you can't assume that just because OpenVPN has had a good track record so far with respect to lacking many significant security vulnerabilities, that it never will have any!

The last three settings in Listing 1 concern logging. status specifies a file to which OpenVPN will write dæmon status updates periodically, regardless of actual activity. Unlike most log files, each time this file is updated, OpenVPN will overwrite the previous message. This is what the file /etc/openvpn/openvpn-status.log on my OpenVPN server says right now:

OpenVPN CLIENT LIST
Updated,Fri Jan  1 21:55:11 2010
Common Name,Real Address,Bytes Received,Bytes Sent,Connected Since
minion2,192.168.20.1:36491,125761,103329,Fri Jan  1 17:56:21 2010
ROUTING TABLE
Virtual Address,Common Name,Real Address,Last Ref
10.31.33.6,minion2,192.168.20.1:36491,Fri Jan  1 20:54:03 2010
GLOBAL STATS
Max bcast/mcast queue length,0
END


As you can see, there's only one client currently connected (minion2), with one corresponding route table entry.

Moving on back in Listing 1, verb 3 sets the overall logging-verbosity level to 3 out of a possible range of 0 (no logging except major errors) and 11 (the most verbose debugging output possible). The default value is 1, but 3 is much more useful for getting things set up and working properly, without presenting any particular danger of log files growing too huge too quickly.

This is especially true with mute 20 set, which tells OpenVPN never to log the same message (in a given event category) more than 20 times in a row.

On my Ubuntu system, OpenVPN writes all its messages to /var/log/daemon if theopenvpn command is executed with the --daemon flag, which causes it to run as a background (dæmon) process. If you run openvpn without --daemon, it runs in the foreground and logs all messages to the console or terminal window you started it in (tying up that console in the process, but this is a very handy way to run OpenVPN during initial setup and testing).

Running OpenVPN as a Server Dæmon

Now that I've covered a sample server configuration file in depth, let's fire up our OpenVPN dæmon in server mode! This, as you'll see, is the easy part.

OpenVPN uses a single command, openvpn, for everything. Precisely what any given OpenVPN instance does depends on how you start it. As you've already seen, some startup parameters, like --show-ciphers, cause the openvpn command to give certain information and then exit. Other parameters tell it to remain active, listening for incoming client connections (--mode server) or attempting to establish and maintain a tunnel to some server, as a client (--mode client).

If you execute openvpn with the --config parameter followed by the name of a configuration file, OpenVPN will start itself configured with all parameters in that file. For example, you could create a configuration file containing just the parameter show-ciphers (parameters must start with a -- if specified in a command line, but the -- is omitted for all parameters within configuration files).

More commonly, as with Listing 1, we use configuration files for server-mode and client-mode startup. I mentioned that the server helper directive expands into a list of other parameters; the first of these is mode server.

Thus, to start OpenVPN as a persistent server dæmon running the configuration file /etc/openvpn/server.ovpn, shown in Listing 1, use this command:

sudo openvpn --config ./server.ovpn

Note the relative path for the file server.ovpn. If that file resides in /etc/openvpn, you'd need to run the above command from within that directory. Note also the use of sudo. On non-Ubuntu systems, you might instead su to root before running this command. Regardless, OpenVPN must be run as root in order to read its server key file, to open the tun device and so forth, even though as configured in Listing 1 it subsequently will demote itself to user nobody and group ID nogroup.

Did you notice I omitted the --daemon flag on that command line? Again, you can use that flag to tell OpenVPN to run in the background (like a quiet, well-behaved dæmon) and log its messages to /var/log/daemon.log, but you first may want to make sure everything's working properly.

Configuring the Client

At this point, I had hoped I'd be able to give you a detailed walk-through of client configuration, but I'm out of space for now, so that will need to wait until next time. But, I won't leave you completely hanging. Listing 2 shows a sample client configuration file, client.ovpn, that corresponds to Listing 1's server.ovpn file.

Listing 2. Client's iwazaru.ovpn File

client
dev tun
proto udp


remote 1.2.3.4 1194

resolv-retry infinite
nobind


user nobody
group nogroup
persist-key
persist-tun


mute-replay-warnings

ca ca.crt
cert minion.crt
key minion.key


ns-cert-type server
tls-auth ta.key 1


cipher BF-CBC
comp-lzo


verb 3
mute 20


Much of this should be familiar. Other parts you can figure out via the openvpn(8) man page. In the meantime, feel free to experiment. To run OpenVPN in client mode on a client computer, use this command:

sudo openvpn --config ./iwazaru.ovpn --daemon openvpn-client

One parting tip for you experimenters: you'll need to disable or reconfigure any local iptables (firewall) rules you've got running on either your server or client systems. I'll discuss iptables considerations in the next column in this series, and I'll continue where we left off this time. Until then, be safe!

Resources

Official OpenVPN Home Page: www.openvpn.net

Ubuntu Community OpenVPN Page:https://help.ubuntu.com/community/OpenVPN

Mick Bauer (darth.elmo@wiremonkeys.org) is Network Security Architect for one of the US's largest banks. He is the author of the O'Reilly book Linux Server Security, 2nd edition (formerly called Building Secure Servers With Linux), an occasional presenter at information security conferences and composer of the “Network Engineering Polka”.

Taken From: http://www.linuxjournal.com/article/10707