Sunday, March 27, 2011

Netcat Basics

I think if you were going to master only one of these two-letter commands for hacking purposes besides vi, nc is the best candidate. If you are unfamiliar with nc (or netcat), it is an incredibly versatile tool that allows you to open or listen for TCP and UDP connections. It's the original network Swiss Army knife, and it's a valuable tool to have in your arsenal whether you're a sysadmin or a hacker. In the case of both hacking and troubleshooting, it's useful because you can use it like telnet to connect to a remote server and port and start an interactive session:

$ nc mail.example.org 25

220 mail.example.net ESMTP Postfix

. . .

QUIT

Netcat as a Simple Chat Service

You also could open one nc session on a port in listen mode and start a second nc session on a remote host to connect to that port and send text back and forth like a basic chat program. On the listening host, run:

$ nc -l 31337

On the remote host, type:

$ nc hostname 31337

You also can substitute the IPs for hostnames in both examples. Once the connection is made, anything typed on one end is displayed on the other, and you can press Ctrl-D in either session to close the connection.

Netcat for File Transfers

A number of sysadmins have long used this functionality as a quick-and-dirty file-transfer protocol. Start the first nc session in listen mode, and redirect its output to a file:

$ nc -l 31337 > output_file

On the remote machine from which you want to send the file, you would type:

$ nc hostname 31337 < input_file

Once the file has finished transferring, the connection will close automatically.

Netcat as a Port Scanner

Another incredibly useful function of nc is as a port scanner when something more sophisticated isn't around. Just use the -z option to have nc test only whether a port is open instead of connecting to it, add -v for verbose output, and provide a port range as arguments. So to scan a host for open ports between 20 and 25 (good for testing for open FTP, telnet, SSH and SMTP services), you would type:

$ nc -zv host.example.org 20-25

nc: connect to host.example.org port 20 (tcp) failed:

↪Connection refused

Connection to host.example.org 21 port [tcp/ftp] succeeded!

Connection to host.example.org 22 port [tcp/ssh] succeeded!

nc: connect to host.example.org port 23 (tcp) failed:

↪Connection refused

nc: connect to host.example.org port 24 (tcp) failed:

↪Connection refused

Connection to host.example.org 25 port [tcp/smtp] succeeded!

Taken From: http://www.linuxjournal.com/article/10883

Internet Command Line Applications

If you're wondering when the command line will die, the answer is simple: when we all decide to give up and use Windows.

The Linux graphical desktop has improved vastly since its inception some 18 years ago. Gone are the days in which system configuration necessitated use of the command line. The Ubuntu generation has come to age in a world where using the command line is optional. Although many people still choose to hone their console skills, just as many do not.

The command line, however, is far from irrelevant. Whether you are trying to get the most out of an older system or wanting to access your applications from anywhere over SSH, the console still remains one of the most powerful tools in the Linux user's toolbox. From traditional system utilities to Web and multimedia applications, there are many CLI (command-line interface) versions of our desktop staples. Here's a small selection of my favorites that are still in popular use today.

Internet

A wide selection of Web applications run on the Linux shell. Dedicated downloading and torrenting applications are a natural choice for running at the command line. With the addition of a tool such as screen or dtach, long downloads can be run remotely on an always-on machine. Likewise, text-based browsers can be used for executing downloads that are too deeply buried behind redirects for curl or wget. Console browsers also are invaluable as tools for testing Web site accessibility or avoiding noxious advertising—especially on machines with limited resources.

rTorrent (libtorrent.rakshasa.no)

A popular text-based BitTorrent client, rTorrent boasts an impressive feature set. It supports partial downloading of multifile torrents and session saving, and it can be used with screen or dtach. rTorrent also has a built-in XMLRPC interface with a number of third-party Web-based front ends available. This combined with rTorrent's ability to watch a specified directory for the appearance of torrent files—and when found, execute them—allows users to create a powerful remote torrenting tool with ease.

Wget (www.gnu.org/software/wget)

Of course, a torrenting server with a Web-based front end is over-engineering the solution just a little if you need to download only an ISO or two without interruption. Wget is a simple utility for downloading files over HTTP, HTTPS and FTP. It is included in most Linux distributions. Wget can be used to download individual files or mirror entire Web sites. It supports downloading through proxies, resuming partial downloads and various forms of authentication.

Curl (curl.haxx.se)

Another simple downloader, Curl is both a tool and a library for transferring data over a range of protocols. Curl, of course, supports HTTP, HTTPS and FTP, but it differs from Wget in also supporting LDAP, POP3 and DICT, among others. Curl also supports downloading through proxies, resuming partial downloads and various forms of authentication.

w3m (w3m.sourceforge.net)

A pager like less or more for HTML files, w3m supports rendering both local HTML files and remote URLs. It supports operating through a proxy, cookies and SSL. As it is designed to act as a file pager or viewer, w3m must be invoked either with a remote URL or a local file as an argument.

ELinks (elinks.or.cz)

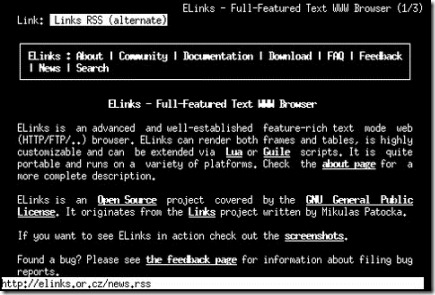
If you are looking for something with a little more functionality, ELinks is an extremely feature-rich text-mode browser. It's capable of displaying tables and frames, and as of version 0.10, ELinks can render CSS and supports up to 256 colors. ELinks makes for a powerful downloading tool. It's able to download multiple files at once and perform background file transfers while you are browsing.

clip_image001

Figure 1. ELinks, a Text-Mode Browser

Instant Messaging/Chat

Running a client in a screen session still is extremely popular among IRC users. Running IRC on a remote server accessed via SSH provides access to IRC from restricted networks and allows for messages to be left with your client for you to read on your return. Chat logs are kept in one place, instead of being spread across every computer you use. And, instant messaging can benefit from being run at the console for all of the same reasons.

Irssi (www.irssi.org)

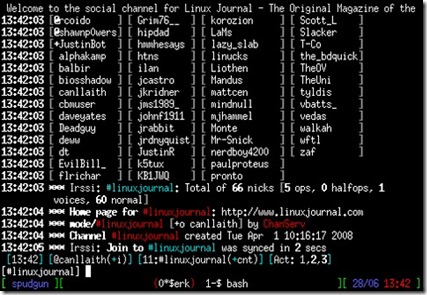
Irssi is a very popular IRC client for the console. Features include logging, custom formatting and themes, configurable key bindings and many, many others. Irssi provides a powerful Perl scripting interface, with many contributed scripts available from Irssi.org. Irssi uses a windowing interface that allows for dozens of server connections, channels and messaging windows to be open and accessible at once.

clip_image002

Figure 2. IRSSI IRC Client

Finch (pidgin.im)

If you've used Pidgin, you'll find Finch hauntingly familiar. Finch is a CLI instant-messaging program that is part of the Pidgin codebase and uses the libpurple instant-messaging libraries. Finch's user interface is modeled as closely to Pidgin as ncurses will allow. They both will save their configuration to the same directory (~/.libpurple), and if Pidgin already is configured on your machine, Finch will pick up its settings automatically. Finch supports chatting on all of the protocols included with libpurple: AIM, MSN, Yahoo! and Jabber, just to name a few.

naim (naim.n.ml.org)

Supporting AIM, ICQ, Lily and IRC, naim is an elegantly designed alternative to Finch if you don't need all of libpurple's protocols. naim uses a very simple command-driven interface. All text entered with a preceding / is considered a command, and all other text is sent as a message to the current active window. naim supports simultaneous connections to multiple networks and IRC servers, with each “window” displayed in a slide-out list that can be called up with the Tab key.

Taken From: http://www.linuxjournal.com/article/10854

Install SNMP on Windows 7

To install SNMP on Windows 7, open Control Panel and then click on Programs and Features. Then, click on "Turn Windows features on or off" link in the left pane. If UAC prompted, then click on Yes. Then, in the Windows Features window, scroll down and select "Simple Network Management Protocol (SNMP)" check box and click on OK. Then, wait for some time to install SNMP.
After installing SNMP, click on Start Orb and then type Services.msc in the Search box and hit Enter. Then, scroll down in the right pane and right click on SNMP Services and select Properties. Then, click on Traps tab. Now, in the Community Name box, type the community name to which your computer will send trap messages and then click on "Add to list" button. Then, click on Apply and then OK.
 
Taken From: http://www.itechtalk.com/thread7216.html

Saturday, March 19, 2011

Android Development Environment (SDK and Eclipse)

This page describes how to install the Android SDK and set up your development environment for the first time.
If you encounter any problems during installation, see the Troubleshooting section at the bottom of this page.
Updating?
If you already have an Android SDK, use the Android SDK and AVD Manager tool to install updated tools and new Android platforms into your existing environment. For information about how to do that, see Adding SDK Components

Step 1. Preparing Your Development Computer

Before getting started with the Android SDK, take a moment to confirm that your development computer meets the System Requirements. In particular, you might need to install the JDK, if you don't have it already.
If you will be developing in Eclipse with the Android Development Tools (ADT) Plugin—the recommended path if you are new to Android—make sure that you have a suitable version of Eclipse installed on your computer as described in the System Requirements document. If you need to install Eclipse, you can download it from this location:
http://www.eclipse.org/downloads/
The "Eclipse Classic" version is recommended. Otherwise, a Java or RCP version of Eclipse is recommended.

Step 2. Downloading the SDK Starter Package

The SDK starter package is not a full development environment—it includes only the core SDK Tools, which you can use to download the rest of the SDK components (such as the latest Android platform).
If you haven't already, get the latest version of the SDK starter package from the SDK download page.
If you downloaded a .zip or .tgz package (instead of the SDK installer), unpack it to a safe location on your machine. By default, the SDK files are unpacked into a directory named android-sdk-<machine-platform>.
If you downloaded the Windows installer (.exe file), run it now and it will check whether the proper Java SE Development Kit (JDK) is installed (installing it, if necessary), then install the SDK Tools into a default location (which you can modify).
Make a note of the name and location of the SDK directory on your system—you will need to refer to the SDK directory later, when setting up the ADT plugin and when using the SDK tools from command line.

Step 3. Installing the ADT Plugin for Eclipse

Android offers a custom plugin for the Eclipse IDE, called Android Development Tools (ADT), that is designed to give you a powerful, integrated environment in which to build Android applications. It extends the capabilites of Eclipse to let you quickly set up new Android projects, create an application UI, debug your applications using the Android SDK tools, and even export signed (or unsigned) APKs in order to distribute your application. In general, developing in Eclipse with ADT is a highly recommended approach and is the fastest way to get started with Android.
If you'd like to use ADT for developing Android applications, install it now.
Downloading the ADT Plugin
Use the Update Manager feature of your Eclipse installation to install the latest revision of ADT on your development computer.
Assuming that you have a compatible version of the Eclipse IDE installed, as described in Preparing for Installation, above, follow these steps to download the ADT plugin and install it in your Eclipse environment.
  1. Start Eclipse, then select Help > Install New Software....
  2. Click Add, in the top-right corner.
  3. In the Add Repository dialog that appears, enter "ADT Plugin" for the Name and the following URL for the Location:
    https://dl-ssl.google.com/android/eclipse/
    Note: If you have trouble acquiring the plugin, try using "http" in the Location URL, instead of "https" (https is preferred for security reasons).
  4. Click OK.
  5. In the Available Software dialog, select the checkbox next to Developer Tools and click Next.
  6. In the next window, you'll see a list of the tools to be downloaded. Click Next.
  7. Read and accept the license agreements, then click Finish.
  8. When the installation completes, restart Eclipse.
Configuring the ADT Plugin 
Once you've successfully downloaded ADT as described above, the next step is to modify your ADT preferences in Eclipse to point to the Android SDK directory:
  1. Select Window > Preferences... to open the Preferences panel (Mac OS X: Eclipse > Preferences).
  2. Select Android from the left panel.
  3. For the SDK Location in the main panel, click Browse... and locate your downloaded SDK directory.
  4. Click Apply, then OK.
Done! If you haven't encountered any problems, then the installation is complete. If you're installing the Android SDK for the first time, return to Installing the SDK to complete your setup.

If you prefer to work in a different IDE, you do not need to install Eclipse or ADT, instead, you can directly use the SDK tools to build and debug your application. The Overview section of the developer guide outlines the major steps that you need to complete when developing in Eclipse or other IDEs.

Step 4. Adding Platforms and Other Components

The last step in setting up your SDK is using the Android SDK and AVD Manager (a tool included in the SDK starter package) to download essential SDK components into your development environment.

The SDK uses a modular structure that separates the major parts of the SDK—Android platform versions, add-ons, tools, samples, and documentation—into a set of separately installable components. The SDK starter package, which you've already downloaded, includes only a single component: the latest version of the SDK Tools. To develop an Android application, you also need to download at least one Android platform and the SDK Platform-tools (tools that the latest platform depend upon). However, downloading additional components is highly recommended.

If you used the Windows installer, when you complete the installation wizard, it will launch the Android SDK and AVD Manager with a default set of platforms and other components selected for you to install. Simply click Install to accept the recommended set of components and install them. You can then skip to Step 5, but we recommend you first read the section about the Available Components to better understand the components available from the Android SDK and AVD Manager.

You can launch the Android SDK and AVD Manager in one of the following ways:
  • From within Eclipse, select Window > Android SDK and AVD Manager.
  • On Windows, double-click the SDK Manager.exe file at the root of the Android SDK directory.
  • On Mac or Linux, open a terminal and navigate to the tools/ directory in the Android SDK, then execute:

    android
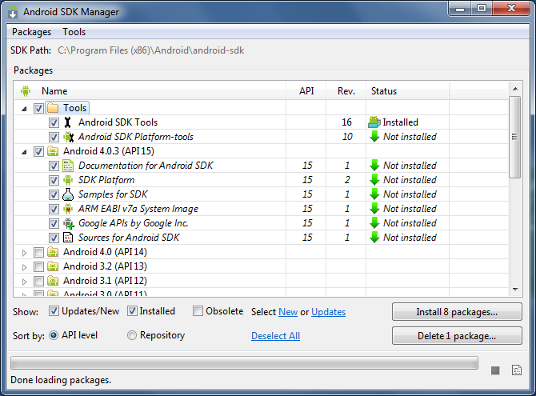
To download components, use the graphical UI of the Android SDK and AVD Manager, shown in Figure 1, to browse the SDK repository and select new or updated components. The Android SDK and AVD Manager will install the selected components in your SDK environment. For information about which components you should download, see the following section about Recommended Components.


Figure 1. The Android SDK and AVD Manager's Available Packages panel, which shows the SDK components that are available for you to download into your environment.

Available Components
By default, there are two repositories of components for your SDK: Android Repository and Third party Add-ons.

The Android Repository offers these types of components:
  • SDK Tools (pre-installed in the Android SDK starter package) — Contains tools for debugging and testing your application and other utility tools. You can access these in the <sdk>/tools/ directory of your SDK and read more about them in the Tools section of the developer guide.
  • SDK Platform-tools — Contains tools that are required to develop and debug your application, but which are developed alongside the Android platform in order to support the latest features. These tools are typically updated only when a new platform becomes available. You can access these in the <sdk>/platform-tools/ directory. Read more about them in the Tools section of the developer guide.
  • Android platforms — An SDK platform is available for every production Android platform deployable to Android-powered devices. Each platform component includes a fully compliant Android library and system image, sample code, emulator skins, and any version specific tools. For detailed information about each platform, see the overview documents available under the section "Downloadable SDK Components," at left.
  • USB Driver for Windows (Windows only) — Contains driver files that you can install on your Windows computer, so that you can run and debug your applications on an actual device. You do not need the USB driver unless you plan to debug your application on an actual Android-powered device. If you develop on Mac OS X or Linux, you do not need a special driver to debug your application on an Android-powered device. (See Developing on a Device for more information about developing on a real device.)
  • Samples — Contains the sample code and apps available for each Android development platform. If you are just getting started with Android development, make sure to download the samples to your SDK.
  • Documentation — Contains a local copy of the latest multiversion documentation for the Android framework API.
The Third party Add-ons provide components that allow you to create a development environment using a specific Android external library (such as the Google Maps library) or a customized (but fully compliant) Android system image. You can add additional Add-on repositories, by clicking Add Add-on Site.
Recommended Components
The SDK repository contains a range of components that you can download. Use the table below to determine which components you need, based on whether you want to set up a basic, recommended, or full development environment:


image


image


image


Once you've installed at least the basic configuration of SDK components, you're ready to start developing Android apps. The next section describes the contents of the Android SDK to familiarize you with the components you've just installed.

For more information about using the Android SDK and AVD Manager, see the Adding SDK Components document.

Step 5. Exploring the SDK (Optional)

Once you've installed the SDK and downloaded the platforms, documentation, and add-ons that you need, we suggest that you open the SDK directory and take a look at what's inside.

The table below describes the full SDK directory contents, with components installed.

add-ons/
Contains add-ons to the Android SDK development environment, which let you develop against external libraries that are available on some devices.


docs/
A full set of documentation in HTML format, including the Developer's Guide, API Reference, and other information. To read the documentation, load the file offline.html in a web browser.


platform-tools/
Contains development tools that may be updated with each platform release (from the Android SDK Platform-tools component). Tools in here include adb, dexdump, and others others that you don't typically use directly. These tools are separate from the generic development tools in the tools/ directory, because these tools may be updated in order to support new features in the latest Android platform, whereas the other tools have no dependencies on the platform version.


platforms/
Contains a set of Android platform versions that you can develop applications against, each in a separate directory.


<platform>/
Platform version directory, for example "android-1.6". All platform version directories contain a similar set of files and subdirectory structure.


data/
Storage area for default fonts and resource definitions.


images/
Storage area for default disk images, including the Android system image, the default userdata image, the default ramdisk image, and more. The images are used in emulator sessions.


skins/
A set of emulator skins available for the platform version. Each skin is designed for a specific screen resolution.


templates/
Storage area for file templates used by the SDK development tools.


tools/
This directory is used only by SDK Tools r7 and below for development tools that are specific to this platform version—it's not used by SDK Tools r8 and above.


android.jar
The Android library used when compiling applications against this platform version.


samples/
Sample code and apps that are specific to platform version.


tools/
Contains the set of development and profiling tools that are platform-independent, such as the emulator, the AVD and SDK Manager, ddms, hierarchyviewer and more. The tools in this directory may be updated at any time (from the Android SDK Tools component), independent of platform releases, whereas the tools in platform-tools/ may be updated based on the latest platform release.


SDK Readme.txt
A file that explains how to perform the initial setup of your SDK, including how to launch the Android SDK and AVD Manager tool on all platforms


SDK Manager.exe
Windows SDK only. A shortcut that launches the Android SDK and AVD Manager tool, which you use to add components to your SDK.


Optionally, you might want to add the location of the SDK's tools/ and platform-tools to your PATH environment variable, to provide easy access to the tools.


How to update your PATH

Next Steps

Once you have completed installation, you are ready to begin developing applications. Here are a few ways you can get started:

Set up the Hello World application
  • If you have just installed the SDK for the first time, go to the Hello World tutorial. The tutorial takes you step-by-step through the process of setting up your first Android project, including setting up an Android Virtual Device (AVD) on which to run the application.
Following the Hello World tutorial is an essential first step in getting started with Android development.

Learn about Android
  • Take a look at the Dev Guide and the types of information it provides
  • Read an introduction to Android as a platform in What is Android?
  • Learn about the Android framework and how applications run on it in Application Fundamentals
  • Take a look at the Android framework API specification in the Reference tab
Explore the development tools
Follow the Notepad tutorial
  • The Notepad Tutorial shows you how to build a full Android application and provides helpful commentary on the Android system and API. The Notepad tutorial helps you bring together the important design and architectural concepts in a moderately complex application.
Following the Notepad tutorial is an excellent second step in getting started with Android development.

Explore some code
  • The Android SDK includes sample code and applications for each platform version. You can browse the samples in the Resources tab or download them into your SDK using the Android SDK and AVD Manager. Once you've downloaded the samples, you'll find them in <sdk>/samples/<platform>/.

Visit the Android developer groups
  • Take a look at the Community pages to see a list of Android developers groups. In particular, you might want to look at the Android Developers group to get a sense for what the Android developer community is like.

Troubleshooting

Ubuntu Linux Notes
  • If you need help installing and configuring Java on your development machine, you might find these resources helpful:

  • Here are the steps to install Java and Eclipse, prior to installing the Android SDK and ADT Plugin.
    1. If you are running a 64-bit distribution on your development machine, you need to install the ia32-libs package using apt-get::

      apt-get install ia32-libs

    2. Next, install Java:
      apt-get install sun-java6-jdk

    3. The Ubuntu package manager does not currently offer an Eclipse 3.3 version for download, so we recommend that you download Eclipse from eclipse.org (http://www.eclipse.org/ downloads/). A Java or RCP version of Eclipse is recommended.
    4. Follow the steps given in previous sections to install the SDK and the ADT plugin.
Other Linux Notes
  • If JDK is already installed on your development computer, please take a moment to make sure that it meets the version requirements listed in the System Requirements. In particular, note that some Linux distributions may include JDK 1.4 or Gnu Compiler for Java, both of which are not supported for Android development.
Based On: http://developer.android.com/sdk/installing.html

Wednesday, August 25, 2010

Installing and Managing VMware ESXi 4.0 (VSphere)

1.      Make sure your Hardware is Compatible

Before starting the process of downloading VMware ESXi, you must make sure that your hardware is compatible with VMware ESXi version 4. This is especially true because ESX and ESXi version 4 require a server with a 64 bit CPU. In other words, ESXi 4 would not run on a server with a 32 bit CPU.

To verify that your hardware is compatible, checkout VMware’s Hardware Compatibility List. If you do have a 64 bit CPU but your hardware is not on the list, I encourage you to still try out ESXi 4 to see if it works on your hardware.

If you only have a 32 bit CPU, VMware is still offering ESXi 3.5 Free Edition that is compatible with 32 bit CPUs.

2.      Register with VMware and Activate your account

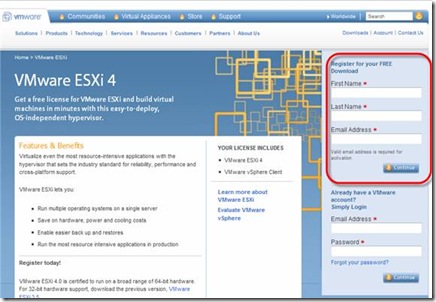
Once you know that your hardware is compatible, you are ready to obtain ESXi 4. However, to obtain it, you need to register to download it. To do this, go to the ESXi Free Download website. Enter your name and email address to activate your account.

clip_image001
Figure 1: Registering to download the free VMware ESXi 4

You will receive an email where you will click to activate your registration. That will take you to the download site for ESXi 4.

3.      Download ESXi Free

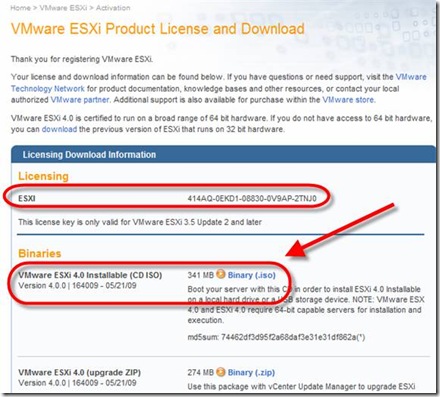
Next, you will see that ISO and ZIP versions available for download. You will also see your activation code. Make sure you keep that code handy for later.

clip_image002
Figure 2: Downloading the VMware ESXi ISO Image

Click on the ISO image and download the 341MB file. You do not want the ZIP file as that is for upgrading, not a fresh install.

4.      Burn a CD

Once downloaded, that image needs to be burned to a physical CD (unless you are going to run ESXi inside VMware Workstation). In other words, if you are going to run ESXi on a physical server (everyone is except in rare cases), then you need to put it on a CD and boot that server off of the CD.

To do this, you will need to burn the CD using CD Burning / CD Authoring software and a CD recordable drive.

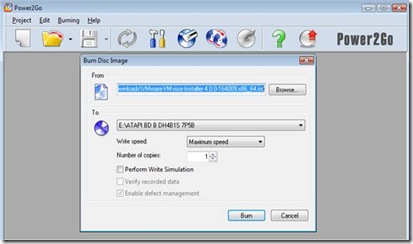
In my case, I had a CD authoring software installed (called Power2Go) that came with my CD/DVD drive so when I double-clicked on the download, the burning software started.

clip_image003
Figure 3: Burning ESXi to a CD

You should note that you only need to insert a CD recordable disk, not a DVD as this image is only 340MB. Also, because of this, the burning will only take a few minutes.

For more information on ISO Burning, see this article – How to Write ISO Files to CD.

5.      Obtain IP address and register hostname in DNS

While the image is burning and you have a few minutes to spare, I recommend that you figure out what static IP address you will use for the new ESXi host. Also, you want to figure out what DNS name you will use and create an alias for the ESX hostname in your DNS server. Of course, that DNS host name will map up with the static IP address you carved out for the new ESXi host.

6.      Boot ESXi and Install

At this point, you can take your burned VMware ESXi 4 CD, insert it into the server and start the installation process. Like any CD that you are trying to boot, you may need to check the boot order in your BIOS or press a key (like ESC) to manually boot from the ESXi CD in the CDROM drive.

The ESXi installation process is quick and easy. It is likely that you will take all the defaults, with the only deterrent being that you should enter all the necessary network information such as:

· Static IP address and hostname you defined in step 5

· DNS servers and DNS suffix

· Default gateway

For some basic step by step on the installation process with screenshots, please see my article- New VMware ESXi Server – Configuration Checklist.

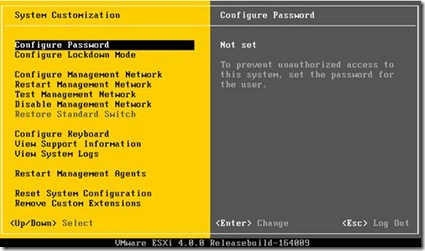
7.      Initial ESXi Server Configure

To initially set up the new server, again, I am going to refer you to another of my articles that covers this step by step. Please see New VMware ESXi Server – Configuration Checklist. This will guide you through doing things like setting the root password, locking down the server, and more.

clip_image004
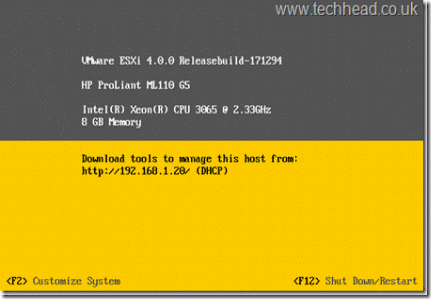
Figure 4: Configuring your new server at the console

8.      Install your vSphere Client

To manage the new server, you need to install the vSphere client. The vSphere client is used whether you purchase the vSphere Enterprise Plus Suite for thousands of dollars or if you are using the Free ESXi only.

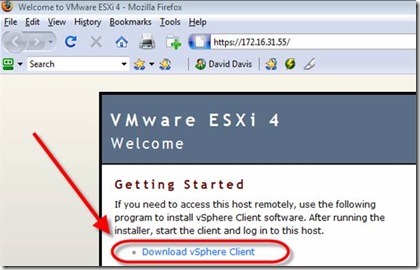
To download and install the vSphere client, just open your web browser and enter that static IP address or hostname of the new ESXi server in the address bar. This will take you to the webpage for that server where you can download the client.

clip_image005
Figure 5: Downloading the vSphere client

9.      Enter your Free ESXi Activation Code

Once your vSphere client is installed, you can connect to the hostname of your new ESXi host. When you do connect, you will get the message that your 60 day trial has started. “Hey wait!”, you say, “this was supposed to be a Free ESXi host, not a 60 day trial”. Well, to make it “free” you need to use the activation code that you see up in Figure 2.

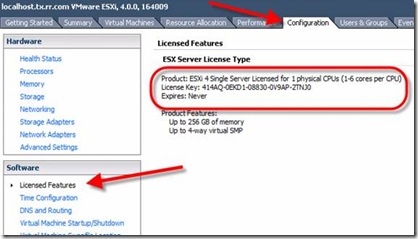
In the vSphere client, go to the Configuration tab, then to Licensed Features and add your License Key, like this:

clip_image006
Figure 6: Entering your License Key

At that point, you can use this ESXi host forever at no cost!

10.  Install or Import a VM

Finally, you need some virtual machines. You can import VMs from the Virtual Appliance Marketplace by going to File > Browse Virtual Appliance Marketplace or by creating your own VM by going to File > New > Virtual Machine.

You can even convert physical machines into virtual machines using a P2V conversion application.

At this point we are all done Downloading, Installing, and getting started with the free VMware ESXi 4 server! Do not forget to document changes for your junior IT staff and educate them how to use the new virtual infrastructure. Once you spend some time using and evaluating VMware ESXi, you may want to consider a full 60 day eval of the complete vSphere suite.


Taken From: http://www.techhead.co.uk/installing-vmware-esxi-4-0-on-a-usb-memory-stick-the-official-way

To test you can download Virtual Appliances from:

http://www.turnkeylinux.org/

http://www.vmware.com/appliances/


To Convert/Create/Install Virtual Appliances you can use:

http://www.vmware.com/products/converter/

Automate and simplify physical to virtual machine conversions as well as conversions between virtual machine formats with VMware vCenter Converter. Use the intuitive wizard-driven interface of VMware vCenter Converter to convert your physical machines to virtual machines.

  • Convert Microsoft Windows and Linux* based physical machines and third party image formats to VMware virtual machines
  • Complete multiple conversions simultaneously with a centralized management console
  • Easy to use wizards to minimize the number of steps to conversion

Installing VMware ESXi 4.0 (USB Memory Stick)

Note: Instaling VMware ESXi on a hardrive is the same as installing on a USB Memory Stick, when selecting a disk just select the hardrive instead off the USB Memory Stick
Since writing my original post last year on installing VMware ESXi 3.5 onto a USB memory stick things have changed and with the release of vSphere VMware  have now provided an official method of doing this which is much easier than any of the previous ‘unofficial’ methods.  As such I felt compelled to write an updated post giving easy to follow steps to assist in instructing how to create such a bootable VMware ESXi 4.0 USB memory stick.
It’s almost so easy that I don’t need to provide any screen shots showing how to do it but what the hey – here they are anyway. clip_image001
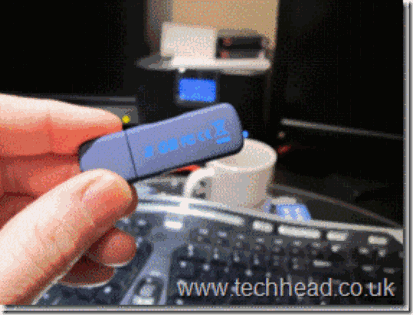
1. The first thing you’ll need is a spare USB memory stick.  For this I am using a generic 2GB Dane-Elec (never heard of them before but they were cheap from my local Staples store) memory stick. I usually go for a 2GB memory stick as I know it will have ample space for the installation.
clip_image003
2. The next step is to download ESXi from VMware here and burn if off onto CD.
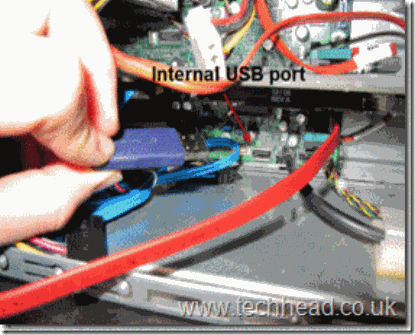
3. Now insert the USB memory stick into a USB port which is able to be booted (eg: internal USB port) – though at this stage make sure that your server can boot from the CD/DVD drive.
clip_image005
4. Insert the CD containing the ESXi install into the servers CD/DVD drive and boot or restart the server.
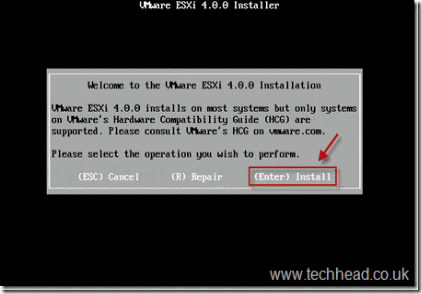
5. Upon booting off of the VMware ESXi installation CD you will be presented with the screen below – press the ‘Enter’ key.  Also, notice the option to ‘Repair’ an ESXi installation from this screen by pressing the ‘R’ button.  This is useful when you have a corrupt ESXi installation and you wish to reinstate a fresh install – this option is non-destructive to the /vmfs/volume on your ESXi host which may contain your VMs, etc though you will lose your host’s configuration settings.
clip_image007
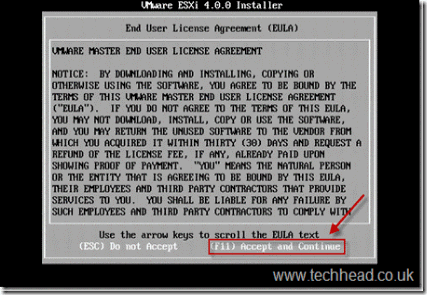
6. Sign your life away to VMware by pressing the ‘F11’ key.
clip_image009
7. At this stage you will see a list of all your storage devices connected to your VMware ESXi host – select your USB memory stick and press ‘Enter’.
clip_image011
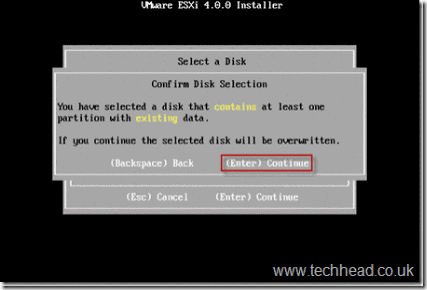
8. If your USB memory stick already has data on it you will be asked if you definitely want to continue with writing ESXi down to it.  This is to avoid any accidental mishaps.  Press ‘Enter’.
clip_image013
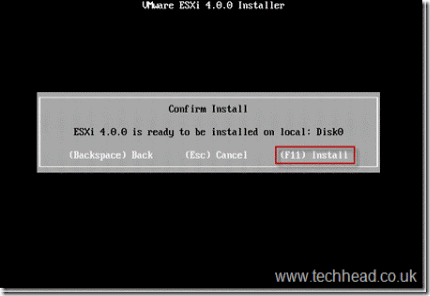
9. Next press ‘F11’ to confirm the installation of ESXi onto the USB flash drive.
clip_image015
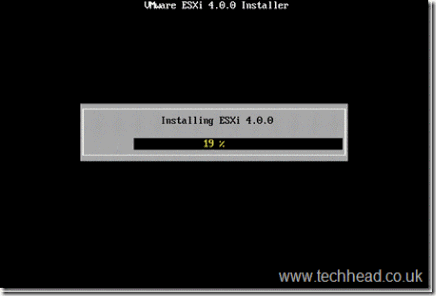
10. Sit back and wait whilst ESXi is written down to your USB flash drive – at this point you should see it flashing away (assuming it has an LED activity light). This install process generally only takes a couple of minutes.
clip_image017
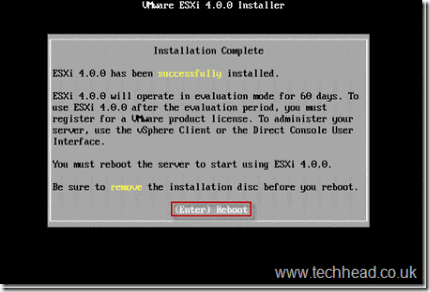
11. Once the installation has completed you will receive the screen below.  At this point remove the ESXi installation CD from the servers CD/DVD drive and press ‘Enter’ to reboot the server.
clip_image019
IMPORTANT: Upon the server rebooting ensure that its boot priority order is set so that the USB port(s) are booted from first.
Your server should now be booting successfully off of the USB memory stick to VMware ESXi  4 – all you need to do now is configure it! clip_image001[1]
clip_image021
Although being pretty straight forward I hope you found this of use.


Adding an HardDrive (if the usb space isn't enough for you):

If you want you can always add an harddisk to VMWare EXSi, with VSphere (setup instructions here).

Warning: You can only add a hole disk to VMware ESXi, if you were thinking off squeezing it on a partition forget it, it will erase everything and use the hole disk.

Once you have VSphere up and running, just do the following:


Next...

Next... And that's it... you have all the space in the world...

To Convert/Create/Install Virtual Appliances you can use:
http://www.vmware.com/products/converter/
Automate and simplify physical to virtual machine conversions as well as conversions between virtual machine formats with VMware vCenter Converter. Use the intuitive wizard-driven interface of VMware vCenter Converter to convert your physical machines to virtual machines.
  • Convert Microsoft Windows and Linux* based physical machines and third party image formats to VMware virtual machines
  • Complete multiple conversions simultaneously with a centralized management console
  • Easy to use wizards to minimize the number of steps to conversion  


To Manage with VSphere (client) check out:
http://www.virtualizationadmin.com/articles-tutorials/vmware-esx-articles/installation-and-deployment/10-steps-install-use-free-vmware-esxi-4.html
or
http://myhowtosandprojects.blogspot.com/2010/08/installing-and-managing-vmware-esxi-40.html


Wednesday, August 4, 2010

Video Conversion With Handbrake

Full Speed Ahead with Handbrake

Jun 30, 2010  By Anthony Dean

· Audio/Video

See how Handbrake, a powerful and easy-to-use video conversion program, can help you enjoy your favorite TV shows or films while at your computer, whether you're at home or away from home.

As an animation and comic-book fan, I like to watch various TV shows and movies featuring my favorite characters, ranging from the Simpsons and Superman to Looney Tunesand the X-Men films. Like most such fans, I've also bought the various DVD releases of these shows. However, since I'm not always at home, I also like watching TV programs and movies on my laptop or Palm Pre smartphone. It's great to be able to watch films while on vacation and other trips, or cartoons while commuting on the bus to work. Instead of repurchasing digital download versions of these programs, however, I find it's much cheaper (and easier, when factoring in the lack of Linux-friendliness of some on-line digital video stores) to convert my DVDs into more versatile, computer-ready video files. Doing this gives me such advantages as being able to store my video collection in an easily accessible format (without having to swap DVDs from my bookshelves), being able to convert the files for playback on various devices (such as my Pre or my old iPod), and keeping a backup of my DVD collection. Although various video conversion programs are available for Linux, the most user-friendly one I've found is Handbrake.

Handbrake, a cross-platform program (with versions available for Windows and OS X along with Linux), comes in both a command-line version and a GUI version for Linux. An open-source program, Handbrake offers the ability to convert from unencrypted DVD video sources (including VIDEO_TS folders, .VOB and .TS files, and .ISO images) and most multimedia files that FFmpeg can handle, including AVI (.avi) and MPEG (.mpg) files. Output formats include the Matroska (.mkv) and MP4 (.mp4) video containers; H.264, MPEG-4 and Theora video codecs; and AAC, MP3 and Vorbis audio codecs (along with AC3 passthrough).

Installation

Installation of Handbrake itself is straightforward. If Handbrake isn't offered in your system's package manager, the Handbrake Web site's downloads section offers you the choice of installing either a command-line version or a GUI version, for either 32-bit or 64-bit systems. For the purpose of this article, I cover the GUI version, which keeps with Handbrake's emphasis on user-friendliness. If the .deb or .rpm files offered (geared toward Ubuntu and Fedora users, respectively) aren't sufficient, another option is to download the source code and compile Handbrake.

Note that Handbrake does not unencrypt encrypted DVDs on its own, which includes most commercial DVDs available. Before installing Handbrake, make sure the libdvdcss library is installed first. The legality of converting DVD video for one's personal use may vary by locality, so check with the proper authorities before proceeding.

From DVD to Laptop

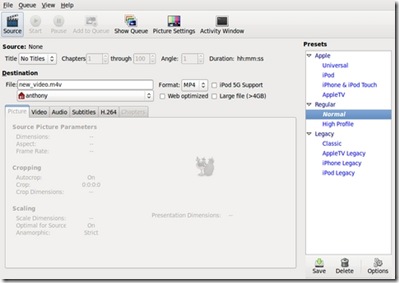
To cover the basics of Handbrake, let's use it to convert to a more laptop-friendly format DVD of the hit 2000 superhero film X-Men about Marvel Comics' classic mutant-powered superhero team. After inserting the DVD into the computer (and launching Handbrake), select the Source button (Figure 1).
clip_image003

Figure 1. Handbrake's Default Interface, before Loading a DVD

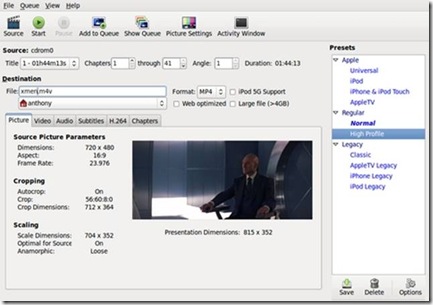
If the DVD's directory isn't selected automatically, navigate to it; afterward, select OK, and Handbrake will read the DVD's tracks. The movie's available tracks will be displayed in the drop-down Title menu, next to the Chapters beginning and ending boxes and an Angle box. The movie itself generally will be the track with the longest time listed. Select the movie's track, then under the File destination box, type what you want to name the movie. If you don't want to convert all the chapters from the original source (say, if you just want the opening title sequence or a particular scene), type in the Chapters boxes the desired range of chapters. The Angle box can be ignored by most users (including for our purposes here), given its infrequent use on DVDs.
clip_image005

Figure 2. Handbrake after Loading a DVD

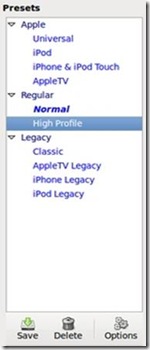
The next step is to decide whether you want to use Handbrake's presets or your own customized settings. One of Handbrake's strengths is its various presets, which allow you to choose a convenient high-quality setting for various conversion purposes. Previous versions of Handbrake offered myriad presets, but as shown in Figure 3, version 0.9.4 (the most-recent version, at the time of this writing) has simplified the offerings for convenience and now include Normal (the default) and High Profile (high-quality) presets; presets for the iPod, the iPhone/iPod Touch and the Apple TV; and several now deprecated legacy settings, aimed at users of previous versions of Handbrake.

For my purposes (keeping the file to play on a laptop), I usually select High Profile, a high-quality setting, though I've also found the iPhone/iPod Touch preset helpful for making files specifically for watching on my Pre, which uses the same video settings as the iPod Touch and iPhone.
clip_image007

Figure 3. Handbrake's Presets

If you're fine with the presets settings as is, the next step is to select Start, and Handbrake will begin converting the video. However, if you want to convert multiple DVD tracks (say, the extras on a movie DVD or all the episodes from a TV show DVD), select Add to Queue first to add the current track, then select another track as previously described, and click Add to Queue. Repeat until you've chosen all the desired tracks from the DVD, then select Start.

If you're looking for finer control over the conversion settings, you need to do more than just the above, of course. As shown in Figure 1, Handbrake offers several different tabbed panes to adjust various settings. The panes include Picture (the default displayed in Figures 1 and 2), Video, Audio, Subtitles, H.264 and Chapters. Let's look at what each pane offers.

Picture

This is the default pane shown when Handbrake is launched. When the desired video or DVD to convert from is loaded into Handbrake, a preview scene from the video is displayed, along with information on the video's dimensions, including cropping and scaling. Click on the Picture Settings button in the top bar to adjust the final video's cropping and scaling settings manually, as well as the detelecine settings (which are mostly used when converting TV programs from DVD).

I generally leave the dimensions settings alone, along with keeping decombing turned on when converting TV programs (and off when converting movies, although turning it off isn't necessary).

The Picture Settings window also can play a brief preview of what the final converted film will look like, based on the current settings.

Video

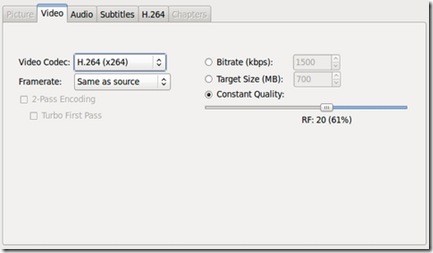
From the Video pane, two drop-down menus offer settings for the video codec and framerate. Video codec choices include H.264, MPEG-4 and Theora. There's also an option to turn on two-pass encoding (a setting that scans the video source twice to ensure a higher-quality result), as well as radio buttons offering a choice of converting based on either the bitrate, a specific targeted file size or a constant quality rate.
clip_image008

Figure 4. Video Pane

I generally keep H.264 selected (Handbrake's default setting) and leave the constant quality setting as is, unless I need a specific bitrate or file size. If so, I also turn on two-pass encoding and select Turbo First Pass, a setting that speeds up the rate of the first pass. If adjusting the bitrate manually, I usually choose a figure between 1,000–1,500kbps (though I lean toward the conservative side).

Audio

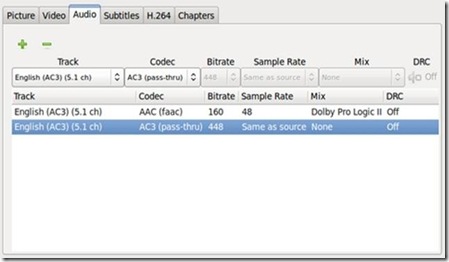
In the Audio pane, depending on the video source or the preset chosen, one or several audio tracks may be displayed. The number of tracks may be added to or subtracted from using the + or - buttons shown. This is useful if you want to include, for instance, the director's commentary track from a movie or alternate languages (a potentially popular feature for, say, Japanese anime fans).
clip_image010

Figure 5. Audio Pane

To adjust the tracks even further, drop-down menus are displayed: Track, Codec, Bitrate, Sample Rate, Mix and a button for DRC (Dynamic Range Compression). Track provides the option of choosing which audio track(s) to encode, including foreign-language tracks or director's commentary. Codec allows you to choose to which audio codec to encode (depending on which video container is chosen): AAC, MP3, Ogg Vorbis or AC3 (the default audio on a DVD). Bitrate and Sample Rates allow you to set to which bitrate and sampling rates, respectively, to encode. Mix allows you to select output mixes: mono, stereo, Dolby Surround, Dolby Pro Logic II and 6-channel discrete. Finally, DRC allows (if activated) you to adjust the limits of compressing the dynamic range of the audio output. This setting would be used for audio with very loud or very quiet portions by altering the resulting audio to increase the sound on very soft portions and reducing the sound on very loud portions.

For the purposes of encoding my X-Men movie, I'd choose at least one track (in English, the only language I fluently speak or read), encoded to AAC with a bitrate of 160kbps, with a mix of either stereo (my very basic audio setup at home consists of just a pair of speakers) or one of the surround sound settings. I leave DRC and Sample Rate alone. If I opt for a second track (say, to include a separate track for surround sound if I ever upgrade my home audio setup), I'd choose AC3, which would encode the audio as is from the video source. I also might decide to include a third audio track for the director's commentary (so I can hear Bryan Singer expand upon some of the film's plot points). Keep in mind that adding extra audio tracks, depending on the settings, may make the resulting file larger.

Subtitles

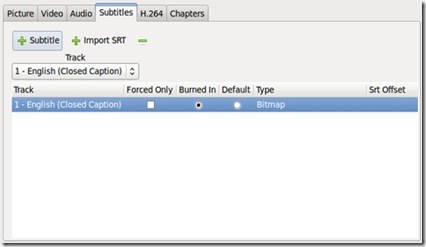
The Subtitles pane allows you to include subtitles and closed captions in the output file, either from the original video source or from an external file. Although I very infrequently use closed captioning (not having hearing difficulties and very rarely watching non-English-language material), this option would be highly useful for someone converting a subtitled video source.
clip_image011

Figure 6. Subtitles Pane

The options in this pane include selecting one or more tracks (via the + Subtitle, + Import SRT and - buttons), then choosing a language for each track. Forced Only should be checked if you want the subtitles displayed only when the video demands it (say, when a scene has someone speaking a foreign language that must be translated and displayed on-screen for plot purposes). For this option, choose Foreign Audio Search from the track drop-down menu. Burned In usually will be chosen automatically if it's a subtitle track, placing the subtitles on the movie with no way of turning them off. Closed captioning, meanwhile, doesn't use this feature, and it can be turned on or off in the resulting file's video player. There's also the option of choosing which track is the default (via the Default radio button). If you've chosen + Import SRT, then a different set of options will be presented, allowing you to choose which external file to use to import subtitles.

H.264

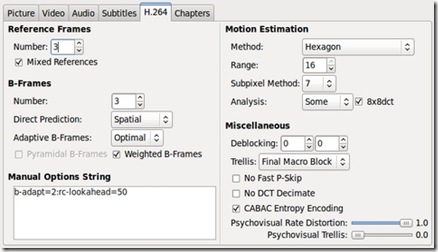
The H.264 pane allows Handbrake users to tweak various advanced x264 settings to their specifications. For the average user (such as myself), this pane can be left alone. Those interested in the settings here can consult the Handbrake Web site's user guide page, although as the page notes, it (at the time of this writing) hasn't been updated yet for 0.9.4.
clip_image012

Figure 7. H.264 Pane

Chapters

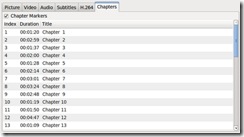
The Chapters pane gives you the option of including chapter markers at the same places the chapter breaks exist on the original DVD. To activate this, select the Chapter Markers box. The length of each chapter is displayed, as well as generic titles reading “Chapter 1”, “Chapter 2” and so forth. If you want to create specifically named chapter titles (such as “That cool scene where Magneto makes the guns hover” or “Statue of Liberty slugfest”), click on the chapter title of choice and type a new name.
clip_image013

Figure 8. Chapters Pane

For my usage, I keep the Chapter Markers box checked, although I usually don't bother renaming the chapters.

Customized Presets

After performing all the previous customizing steps, you might want to save these settings for future reuse. To do this, click the Save button shown in Figure 3 at the bottom of the Presets pane, and give the desired settings a custom name in the box that appears. The new preset then will appear in the Presets pane, ready to use for future video conversions.

Length of DVD Video Conversion

After finishing all of the above, to begin conversion, click Start. For my computer, an HP laptop with 4GB of RAM and a 2.1GHz Intel Core 2 Duo T6500 processor, running Ubuntu 9.10 (64-bit), it took two hours and 43 minutes to convert the X-Men movie (which runs an hour and 44 minutes) using the High Profile preset. The end result of all this, of course, is that I now have a high-quality movie file that I can view (or use) as I wish.
clip_image014

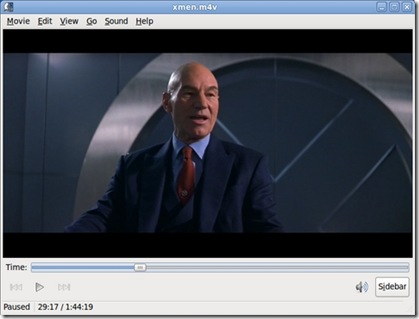
Figure 9. Finished Video File Playing in Totem

Conclusion

As you can see, Handbrake is a great program for those wishing to convert their video media, particularly their DVDs, to a more versatile digital format. Thanks to Handbrake, I've converted much of my DVD collection for easy access and viewing on my laptop, allowing me to enjoy watching Hugh Jackman (or Bugs Bunny) in action while away from my TV set or away from my apartment entirely.

Resources

Handbrake: handbrake.fr

Handbrake Downloads: handbrake.fr/downloads.php

Handbrake's User Guide to x264 Options: trac.handbrake.fr/wiki/x264Options

Anthony Dean works as a file clerk for the city of Milwaukee, Wisconsin. He's been using Linux as a primary operating system since 2005. Anthony can be reached atadean33@gmail.com

Taken From: http://www.linuxjournal.com/article/10716