Windows XP VPN (PPTP)
Setting up the VPN server
To setup the server end of the VPN connection, we need to create a new connection, and then check the firewall/router settings.Firstly bring up the control panel by clicking on Start -> Control Panel. If the control panel is in Classic View as shown below, then click in Category View to see the simplified panel.

From the Category View click on Network and Internet Connections

Now click on Network Connections from the or pick a control panel icon section

Select the Create a new connection from the menu on the left of the screen

You should now see the New Connection Wizard click next to start.

Select Set up an advanced connection and click next to continue.

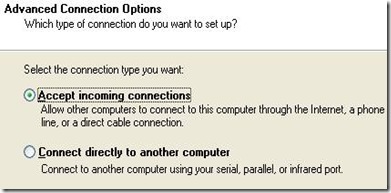
Select Accept incoming connections and click next to continue.

Leave the boxes unticked on this next screen and just click next to continue.

Select Allow virtual private connections and click next to continue.

You now need to pick which users are going to be allowed to vpn in. If you created a user earlier, then ensure that just that user is ticked, else pick which user you want to use - remember they need a secure password. Then click next to continue.

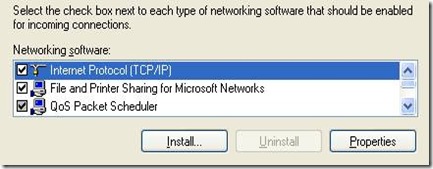
You can just click next to continue on this Networking Software screen, as you should already have everything you need installed, as you must already have either a modem or network card in the pc.

In the Incoming TCP/IP Properties dialog box (see below), place a check mark in the Allow Callers To Access My Local Area Network check box. This will allow VPN callers to connect to other computers on the LAN. If this check box isn’t selected, VPN callers will only be able to connect to resources on the Windows XP VPN server itself. Click OK to return to the Networking Software page and then click Next.

Granting LAN access to callers
Congratulations, you've now completed the second step in creating a VPN connection. Click Finish to close the wizard.

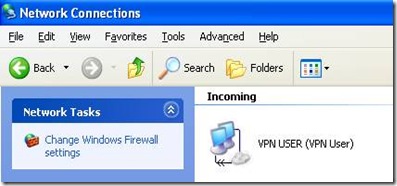
You should now see your new incoming connection in the Network ConnectionsWindow.

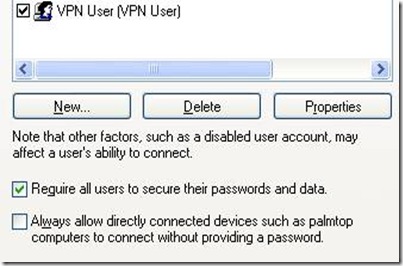
The last step is to ensure that all incoming connections use encryption (otherwise all this was for nothing !), so right click on the Incoming connections icon and select properties, then go to the second tab Users and tick the Require all users to secure their passwords and data checkbox, and then click the OK button to close the dialog

Setting up the VPN client
Now that the Server end of the VPN is set up, you need to create a vpn connection on your laptop to use whenever you are using an insecure wireless network.Firstly bring up the control panel by clicking on Start -> Control Panel. If the control panel is in Classic View as shown below, then click in Category View to see the simplified panel.
![clip_image002[1] clip_image002[1]](http://lh5.ggpht.com/_JBXPQbNd9P0/TFhiZMeMLAI/AAAAAAAAAaY/lNKGSHxAqbA/clip_image002%5B1%5D_thumb%5B1%5D.jpg?imgmax=800)
From the Category View click on Network and Internet Connections
![clip_image004[1] clip_image004[1]](http://lh5.ggpht.com/_JBXPQbNd9P0/TFhiZ9L1D7I/AAAAAAAAAag/gsEzappiNA4/clip_image004%5B1%5D_thumb%5B1%5D.jpg?imgmax=800)
Now click on Network Connections from the or pick a control panel icon section
![clip_image006[1] clip_image006[1]](http://lh3.ggpht.com/_JBXPQbNd9P0/TFhia-yr9jI/AAAAAAAAAaw/KutB6BXYEic/clip_image006%5B1%5D_thumb%5B2%5D.jpg?imgmax=800)
Select the Create a new connection from the menu on the left of the screen
![clip_image008[1] clip_image008[1]](http://lh4.ggpht.com/_JBXPQbNd9P0/TFhibxwgLvI/AAAAAAAAAa4/RhE3QiggoRE/clip_image008%5B1%5D_thumb%5B4%5D.jpg?imgmax=800)
You should now see the New Connection Wizard click next to start.
![clip_image010[1] clip_image010[1]](http://lh5.ggpht.com/_JBXPQbNd9P0/TFhidHCkKYI/AAAAAAAAAbE/5zIzGc9Sm1c/clip_image010%5B1%5D_thumb%5B1%5D.jpg?imgmax=800)
Select Connect to the workplace at my work and click next to continue.

Select Virtual Private Network as the connection type and click next to continue.

Give the new VPN connection a name and click next to continue.

If you already have a dialup or VPN connection setup on your laptop you will now be asked if you want to always dial one of these existing connections before you make the VPN connection. Because we are going to be using a wireless link to get internet connectivity select Do not dial the initial connection and click next to continue. If you don't already have a dialup or VPN connection setup then this screen will not appear, and you will go straight to the next screen.

Now enter either the hostname your ISP has given you, or the IP address they've given you and click next to continue. If you don't have a static IP address, then it may be easier to use Dynamic DNS such as from dyndns.com to give you a static hostname for your dynamic address.

Now click finish and your new VPN connection will be ready to use.

Note: If you wish to connect to this VPN server from Internet by going through the router, then you need to enable port forwarding and allowPPTP passthrough options on the router.
Note: Since PPTP VPN uses port TCP-1723, you need to do port forwarding on TCP-1723. If you have problem to do port forwarding, then take a look on this port forwarding how to article. In this example, my VPN server IP is 192.168.1.99, so I do port forwarding to this computer’s port TCP-1723 on router.

Here is how I enabled PPTP Passthrough on Linksys router. Just go to your router management page to locate this option.

Testing the VPN Setup
Now the client and server are setup, we just need to make a few final checks before testing the setup.If you use a modem on your home pc to share your internet connection, then you should be ready to start testing, as setting up the XP VPN Server will automatically update XP's built-in firewall with the rules necessary to allow incoming VPN connections, also you must already have Internet Connection Sharing setup in order to share your internet access.
If you use a router to access the internet and share your connection between computers then you will need to poke a hole in its firewall to the VPN connection through. You will probably need to look at the manual for your router to see how this is done, but you will most likely need to setup port-forwarding on the router to forward TCP connections on port 1723 to your home computer. This should be enough for most home routers.
Instead of going to the nearest internet cafe to test your vpn connection, the easiest way is to test it from home. Use the modem in your laptop to dial your dialup ISP ( most ISPs offer a dialup service with no monthly fees ) and then dial your VPN connection to connect through to your home PC.

Once successfully connected, you should see the new incoming connection shown in the Network Connections control panel of your home pc

If it has connected ok, you should now be able to surf all your regular sites and check your email from your laptop, all through this secure connection.
Once you are happy that it is working over a dialup link, you need to go to your regular wireless internet cafe and test the connection from there. It should obviously be much faster than over a dialup, while keeping all of your web and email traffic safe from prying eyes.
For other windows versions like windows 7 it should be similiar.
Based On:
http://wireless.gumph.org/content/6/4/011-howto-xp-pptp-vpn-user.htmlhttp://www.zdnetasia.com/configure-windows-xp-professional-to-be-a-vpn-server-39050037.htm
http://www.home-network-help.com/pptp-vpn-server.html
1 comment:
Write more, thats all I have to say. Literally, it seems as though you relied on the video to make your point. You
obviously know what youre talking about, why throw away your intelligence on just posting videos to your blog when you
could be giving us something informative to read? My blog ...
dedicated vpn
Post a Comment